Table of Contents
Advertisement
Quick Links
EN
Dear Customer,
Gigaset Communications GmbH is the legal successor to
Siemens Home and Office Communication Devices GmbH &
Co. KG (SHC), which in turn continued the Gigaset business
of Siemens AG. Any statements made by Siemens AG or
SHC that are found in the user guides should therefore be
understood as statements of Gigaset Communications
GmbH.
We hope you enjoy your Gigaset.
DE
Sehr geehrte Kundin, sehr geehrter Kunde,
die Gigaset Communications GmbH ist Rechtsnachfolgerin
der Siemens Home and Office Communication Devices
GmbH & Co. KG (SHC), die ihrerseits das Gigaset-Geschäft
der Siemens AG fortführte. Etwaige Erklärungen der
Siemens AG oder der SHC in den Bedienungsanleitungen
sind daher als Erklärungen der Gigaset Communications
GmbH zu verstehen.
Wir wünschen Ihnen viel Freude mit Ihrem Gigaset.
FR
Chère Cliente, Cher Client,
la société Gigaset Communications GmbH succède en droit
à Siemens Home and Office Communication Devices GmbH
& Co. KG (SHC) qui poursuivait elle-même les activités Giga-
set de Siemens AG. Donc les éventuelles explications de Sie-
mens AG ou de SHC figurant dans les modes d'emploi
doivent être comprises comme des explications de Gigaset
Communications GmbH.
Nous vous souhaitons beaucoup d'agrément avec votre
Gigaset.
IT
Gentile cliente,
la Gigaset Communications GmbH è successore della Sie-
mens Home and Office Communication Devices GmbH &
Co. KG (SHC) che a sua volta ha proseguito l'attività della
Siemens AG. Eventuali dichiarazioni della Siemens AG o
della SHC nei manuali d'istruzione, vanno pertanto intese
come dichiarazioni della Gigaset Communications GmbH.
Le auguriamo tanta soddisfazione con il vostro Gigaset.
NL
Geachte klant,
Gigaset Communications GmbH is de rechtsopvolger van
Siemens Home and Office Communication Devices GmbH &
Co. KG (SHC), de onderneming die de Gigaset-activiteiten
van Siemens AG heeft overgenomen. Eventuele uitspraken
of mededelingen van Siemens AG of SHC in de gebruiksaan-
wijzingen dienen daarom als mededelingen van Gigaset
Communications GmbH te worden gezien.
Wij wensen u veel plezier met uw Gigaset
ES
Estimado cliente,
la Gigaset Communications GmbH es derechohabiente de la
Siemens Home and Office Communication Devices GmbH &
Co. KG (SHC) que por su parte continuó el negocio Gigaset
de la Siemens AG. Las posibles declaraciones de la
Siemens AG o de la SHC en las instrucciones de uso se
deben entender por lo tanto como declaraciones de la Giga-
set Communications GmbH.
Le deseamos que disfrute con su Gigaset.
PT
SCaros clientes,
Gigaset Communications GmbH é a sucessora legal da Sie-
mens Home and Office Communication Devices GmbH &
Co. KG (SHC), que, por sua vez, deu continuidade ao sector
de negócios Gigaset, da Siemens AG. Quaisquer declara-
ções por parte da Siemens AG ou da SHC encontradas nos
manuais de utilização deverão, portanto, ser consideradas
como declarações da Gigaset Communications GmbH.
Desejamos que tenham bons momentos com o seu Gigaset.
Issued by
Gigaset Communications GmbH
Schlavenhorst 66, D-46395 Bocholt
Gigaset Communications GmbH is a trademark
licensee of Siemens AG
DA
FI
SV
NO
EL
HR
.
SL
Kære Kunde,
Gigaset Communications GmbH er retlig efterfølger til Sie-
mens Home and Office Communication Devices GmbH &
Co. KG (SHC), som fra deres side videreførte Siemens AGs
Gigaset-forretninger. Siemens AGs eller SHCs eventuelle
forklaringer i betjeningsvejledningerne skal derfor forstås
som Gigaset Communications GmbHs forklaringer.
Vi håber, du får meget glæde af din Gigaset.
Arvoisa asiakkaamme,
Gigaset Communications GmbH on Siemens Home and
Office Communication Devices GmbH & Co. KG (SHC)-yri-
tyksen oikeudenomistaja, joka jatkoi puolestaan Siemens
AG:n Gigaset-liiketoimintaa. Käyttöoppaissa mahdollisesti
esiintyvät Siemens AG:n tai SHC:n selosteet on tämän
vuoksi ymmärrettävä Gigaset Communications GmbH:n
selosteina.
Toivotamme Teille paljon iloa Gigaset-laitteestanne.
Kära kund,
Gigaset Communications GmbH övertar rättigheterna från
Siemens Home and Office Communication Devices GmbH &
Co. KG (SHC), som bedrev Gigaset-verksamheten efter Sie-
mens AG. Alla förklaringar från Siemens AG eller SHC i
användarhandboken gäller därför som förklaringar från
Gigaset Communications GmbH.
Vi önskar dig mycket nöje med din Gigaset.
Kjære kunde,
Gigaset Communications GmbH er rettslig etterfølger etter
Siemens Home and Office Communication Devices GmbH &
Co. KG (SHC), som i sin tur videreførte Gigaset-geskjeften i
Siemens AG. Eventuelle meddelelser fra Siemens AG eller
SHC i bruksanvisningene er derfor å forstå som meddelelser
fra Gigaset Communications GmbH.
Vi håper du får stor glede av din Gigaset-enhet.
Αγαπητή πελάτισσα, αγαπητέ πελάτη,
η Gigaset Communications GmbH είναι η νομική διάδοχος της
Siemens Home and Office Communication Devices GmbH &
Co. KG (SHC), η οποία έχει αναλάβει την εμπορική
δραστηριότητα Gigaset της Siemens AG. Οι δηλώσεις της
Siemens AG ή της SHC στις οδηγίες χρήσης αποτελούν
επομένως δηλώσεις της Gigaset Communications GmbH.
Σας ευχόμαστε καλή διασκέδαση με τη συσκευή σας Gigaset.
Poštovani korisnici,
Gigaset Communications GmbH pravni je sljednik tvrtke
Siemens Home and Office Communication Devices GmbH &
Co. KG (SHC), koji je nastavio Gigaset poslovanje tvrtke
Siemens AG. Zato sve izjave tvrtke Siemens AG ili SHC koje
se nalaze u uputama za upotrebu treba tumačiti kao izjave
tvrtke Gigaset Communications GmbH.
Nadamo se da sa zadovoljstvom koristite svoj Gigaset
uređaj.
Spoštovani kupec!
Podjetje Gigaset Communications GmbH je pravni naslednik
podjetja Siemens Home and Office Communication Devices
GmbH & Co. KG (SHC), ki nadaljuje dejavnost znamke
Gigaset podjetja Siemens AG. Vse izjave podjetja Siemens
AG ali SHC v priročnikih za uporabnike torej veljajo kot izjave
podjetja Gigaset Communications GmbH.
Želimo vam veliko užitkov ob uporabi naprave Gigaset.
© Gigaset Communications GmbH 2008
All rights reserved.
Subject to availability. Rights of modifications
reserved.
www.gigaset.com
Advertisement
Table of Contents

Related Manuals for Gigaset Gigaset S44


Summary of Contents for Gigaset Gigaset S44
- Page 1 Nadamo se da sa zadovoljstvom koristite svoj Gigaset de la Siemens AG. Las posibles declaraciones de la uređaj. Siemens AG o de la SHC en las instrucciones de uso se deben entender por lo tanto como declaraciones de la Giga- Spoštovani kupec! set Communications GmbH.
- Page 2 Devices GmbH & Co. KG (SHC), kroz koju je nastavljeno poslovanje kompanije Gigaset kao dela Siemens AG. Stoga sve izjave od strane Siemens AG ili SHC koje se mogu naći u korisničkim uputstvima treba tumačiti kao izjave kompanije Gigaset Communications GmbH.
- Page 3 Siemens Aktiengesellschaft, issued by Siemens Communications Haidenauplatz 1 D-81667 Munich Gigaset S44 © Siemens AG 2005 All rights reserved. Subject to availability. Rights of modification reserved. ➔ SX353isdn / SX303isdn Siemens Aktiengesellschaft ➔ SX255isdn / SX205isdn www.siemens.com/gigaset ➔ CX253isdn / CX203isdn...
-
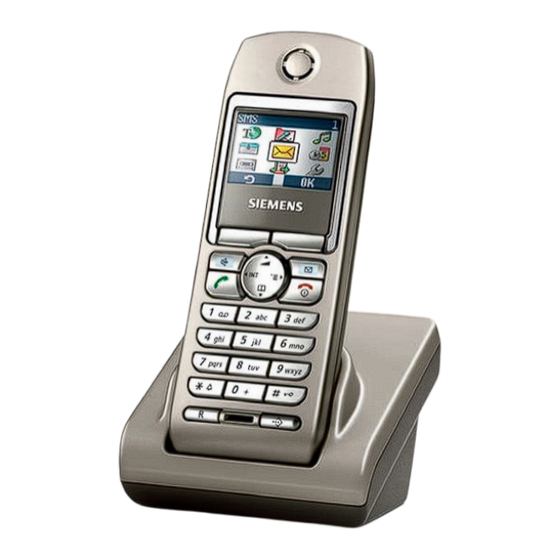
Page 4: The Handset At A Glance
The handset at a glance The handset at a glance 1 Display in idle status 2 Battery charge level = e V U (flat to full) flashing: battery almost flat e V U flashing: battery charging 3 Display keys (page 11) 4 Message key Access to caller and message lists;... -
Page 5: Table Of Contents
Contents Contents The handset at a glance ..... . 1 Safety precautions ......6 Setting up the handset for use . - Page 6 Contents SMS (text messages) ..... . . 48 Requirements for sending and receiving text messages ..... . 48 Managing SMS service centres .
- Page 7 Contents Individual handset settings ....92 Shortcuts for functions and numbers ........92 Changing the display language .
- Page 8 Contents Direct answering machine operation ..121 Selecting an answering machine ........122 Activating/deactivating an answering machine .
-
Page 9: Safety Precautions
Safety precautions Safety precautions Read the safety precautions and the user guide before use. ◆ Explain their contents to your children, and the potential hazards ◆ associated with using the telephone. Fit only the recommended rechargeable batteries (page 136) and ensure they are of the same type! Do not use other types of batteries or non-recharge- able batteries, as they could damage health and cause personal injury. -
Page 10: Setting Up The Handset For Use
Please remove the protective film! Inserting the batteries Use only the rechargeable batteries recommended by Siemens on page 136, i.e. on no account may a conventional (non-rechargeable) bat- tery or other battery type be used, otherwise serious damage to health and property cannot be ruled out, e.g. -
Page 11: Attaching The Belt Clip
Setting up the handset for use Initial charging and discharging of batteries If the handset is activated, the battery charging process is indicated on the handset by the flashing battery icon e. During handset operation, the battery icon indicates the charge level of the batteries (page 1). - Page 12 Setting up the handset for use Range and reception strength Range: Up to 300 m in the open ◆ Up to 50 m in buildings ◆ Reception strength: The display shows the quality of the radio contact between the base station and the handset: Good to poor: Ð...
-
Page 13: Handset Operation - Menu System
Setting up the handset for use Handset operation – Menu system Control key In the description below, the direction on the control key (up, down, right, left) which you have to press in the different operating situations is marked in black, e. g. v for "press right on the control key". -
Page 14: Display Keys
Setting up the handset for use Display keys The function of the display keys changes depending on the particular operating situa- tion. Example: §§§§§SMS§§§§§§ 1. Current display key functions are shown in the bottom line of the display. 2. Display keys The most important display symbols are: Left display key, as long as it has not been assigned a function (page 92). -
Page 15: Correcting Incorrect Entries
Notes on the user guide Correcting incorrect entries You can correct incorrect characters in the text by navigating to the incorrect entry using the control key. You can then: press to delete the character to the left of the cursor, ◆... - Page 16 Notes on the user guide Example: menu input In the user guides, the steps you need to perform are shown in abbreviated form. This is illustrated below using the example of "Setting the colour scheme for the display". ¢ ¢ Ð...
- Page 17 Notes on the user guide Example: multiple line input There are many situations in which you can change the settings of a display or enter data in several lines. Multiple line input is shown in abbreviated form in this user guide. This is illustrated below using the example of "Saving an appointment".
-
Page 18: Setting Up The Base Station - Getting Started Wizard
Setting up the base station – Getting started wizard Setting up the base station – Getting started wizard A few settings are necessary before using your telephone. The Getting started wizard (page 16) is designed to help you with this. It can be opened at any time using your handset. - Page 19 Setting up the base station – Getting started wizard Example of how to assign an MSN: You have requested four MSNs, two for business use (MSN1, MSN2) and two for private purposes (MSN3, MSN4). Four handsets are connected to a base station. Two handsets (Int.11 and 12) and the answering machine AM 91 are intended for business use, and two handsets (Int.13 and 14) and the answering machine AM 92 are intended for pri- vate use.
- Page 20 Setting up the base station – Getting started wizard Making basic settings Setting the date and time Depending on the network provider, the date and time are transferred automatically from the telephone network during the first outgoing call. The display shows: Enter time? Press the display key to set the date and time.
- Page 21 Setting up the base station – Getting started wizard Entering your phone numbers (MSNs) manually and entering names for MSNs The display shows: Find own numbers (MSN)? Press the display key to confirm the prompt. [RRRRRRRRRRRRRRRRRRRRRRRRRRR] Press the display key to confirm the prompt. [RRRRRRRRRRRRRRRRRRRRRRRRRRR] Enter name.
- Page 22 Setting up the base station – Getting started wizard Setting the receive MSN The display shows: Set incoming MSN? The receive MSN is used to answer incoming calls. The MSNs allocated to your ISDN con- nection can be allocated to various terminals according to your preferences. You can assign a terminal multiple receive MSNs.
- Page 23 Setting up the base station – Getting started wizard Operation on a PABX Only carry out the following steps if you want to connect your telephone to a private PABX (not directly to the NTBA). Depending on the PABX, it may be necessary for you to enter an access code (outside line code) for external calls during installation;...
-
Page 24: Registering/Deregistering Handsets
Registering/deregistering handsets Registering/deregistering handsets The handset can be registered on up to four base stations. If all internal numbers for wireless terminals are already assigned on your telephone, before registering make sure that you deregister another handset that is no longer required (page 21). - Page 25 Registering/deregistering handsets Changing the base station The following settings are possible if your handset is registered on more than one base station: Set to one specific base station e. g. the base station at home or the base station at ◆...
-
Page 26: Making Calls
Making calls Making calls Making an external call External calls are calls using the public telephone network. either ... Enter the number and press the Talk key. or ... Press and hold the talk key c and then enter the number. -
Page 27: Answering A Call
Making calls Calling all handsets ("group call") Start the internal call. Press the star key. All handsets are called. Ending a call Press the End call key. Answering a call The handset indicates an incoming call in three ways: by ringing, by a display on the screen and by flashing of the handsfree key d. -
Page 28: Handsfree Mode
Making calls Withholding number identification In some cases, you may not want the other party to be able to identify your phone number. You can selectively withhold identification of your number for the next call or permanently. With the permanent setting, the other subscriber will not be able to see your number when you make an outgoing call. -
Page 29: Picking Up A Call During Ring Delay (Call Pickup)
Making calls Adjusting the volume while in handsfree mode During a call: ¢ Volume Decrease or increase the volume. Press the display key to save the setting. [RRRRRRRRRRRRRRRRRRRRRRRRRRR] Save Picking up a call during ring delay (Call Pickup) You can pick up a call despite a ring delay (page 110) being set. Requirements: The subscriber who picks up the call must have at least Incoming only authorisa- ◆... -
Page 30: Reserving A Line
Making calls Reserving a line Your ISDN connection provides 2 telephone lines that can be used simultaneously (B channels). Requirement: You want to make external calls, but both telephone lines for your con- nection are busy (in use by other internal subscribers). Press the display key . -
Page 31: Callback When Busy (Ccbs) / When The Call Is Not Answered (Ccnr)
Making calls Callback when busy (CCBS) / when the call is not answered (CCNR) Requirement: The exchange supports this feature. Callback when busy – CCBS (Completion of calls to busy subscriber) The subscriber you are calling is currently making a call. Automatic callback saves you making repeated attempts to dial the number. -
Page 32: Identify Caller
Making calls Identify caller Identify caller is used to identify annoying or threatening callers. Requirement: You have requested the Identify caller function from your network pro- vider. Activate this function during the call or immediately after the caller has hung up. You must not end the call yourself. -
Page 33: Functions During A Call
Functions during a call Functions during a call Muting the handset You can mute your handset during a call, e. g. if you wish to talk confidentially to another person in the room. The person on the line cannot hear your conversation dur- ing this time. -
Page 34: Internal Enquiry Call
Functions during a call To make a call to the second external subscriber: Enter the second subscriber's telephone number. You can also make a call via the directory or other lists (page 37). If the second external subscriber you have dialled is busy: Press the display key to return to the first subscriber. - Page 35 Functions during a call To make a call to the internal subscriber: either ... Enter the number of the internal subscriber you want. or ... Press the display key. [RRRRRRRRRRRRRRRRRRRRRRRRRRR] LIST Select internal number, e. g. INT11: Int.11 INT11: Int.11 and confirm.
-
Page 36: Conference Call
Functions during a call To end an enquiry call/toggling: either ... To end the call that is currently active: Open menu. Select and confirm. You return to the waiting sub- scriber. or ... Press the end call key. The active connection is ended. You will automati- cally be called back by the person on hold. -
Page 37: Diverting An Incoming Call - Cd (Call Deflection)
Functions during a call Diverting an incoming call – CD (Call Deflection) CD enables an incoming call to be diverted to any phone number while it is ringing, without having to answer the call. You can pre-set a diversion destination (page 109), dial a phone number from the direc- tory or enter a new number. -
Page 38: Dealing With A Waiting External Call - Cw (Call Waiting)
Functions during a call Dealing with a waiting external call – CW (Call Waiting) Requirement: CW (Call Waiting) set up, see page 111. You hear the call waiting tone (short beep) if you receive an external call while conduct- ing another call (internal or external). The caller's number or name will appear in the dis- play if Calling Line Identification is enabled. -
Page 39: Putting A Call On Hold (Call Hold)
Functions during a call Putting a call on hold (Call Hold) To put an external subscriber on hold: During an external call: Press the display key. The external subscriber is put on hold. The waiting external subscriber hears the waiting melody (page 112) if the connection is on hold internally (page 111). -
Page 40: Using The Directory And Other Lists
Using the directory and other lists Using the directory and other lists The options are: Directory, ◆ Call-by-Call list, ◆ E-mail directory, ◆ Last number redial list, ◆ SMS list, ◆ Caller list, ◆ Answering machine list. ◆ You can store a maximum of 200 entries in the directory, call-by-call list and e-mail directory (the actual number depends on the size of the individual entries). - Page 41 Using the directory and other lists Storing a number in the call-by-call list ¢ New Entry To change the multiple line entry: Enter number. Number: Enter name. Name: Save the changes. Selecting entries in the directory and call-by-call list Open the directory or call-by-call list. You have the following options: Use s to scroll through the entries until the required name is selected.
- Page 42 Using the directory and other lists Using other functions ¢ ¢ (select entry) (open menu) The following functions can be selected with q: Edit or add to a stored number. Then dial or call up Display Number further functions by pressing ©. Edit selected entry.
- Page 43 Using the directory and other lists Sending the directory/call-by-call list to another handset Requirements: The sending and receiving handsets must both be registered to the same base sta- ◆ tion. The other handset can send and receive directory entries. ◆ ¢...
- Page 44 Using the directory and other lists Storing anniversaries in the directory You can store an anniversary for every number in the directory, and specify a time when you will receive a reminder call on the anniversary. ¢ (select entry; page 38) Press display keys one after the other.
-
Page 45: Voice Dialling
Using the directory and other lists Voice dialling You can dial numbers from the directory by speaking the name. In order for your tele- phone to be able to "recognise" you, you must record a voice pattern for each name, i.e. loudly say the name into the handset and store it. -
Page 46: E-Mail Directory
Using the directory and other lists Deleting voice patterns ¢ ´ (select entry with Open the menu. Select and press . The voice pattern will be played Delete Pattern in handsfree mode. Hold down (idle status). The directory entry is retained. E-mail directory You can store e-mail addresses in the e-mail directory (for SMS to e-mail). -
Page 47: Last Number Redial List
Using the directory and other lists Last number redial list The last number redial list contains the last ten numbers dialled from the handset (max. 32 digits). If any of the numbers are in the directory, then the corresponding names will be displayed. Manual last number redial Press the key briefly. -
Page 48: Opening Lists With The Message Key
Using the directory and other lists Opening lists with the message key Providing a new entry is present in the relevant list, you can open the following lists using the message key f: 1. Incoming SMS message list Textmessage (SMS) (page 57) 2. - Page 49 Using the directory and other lists The following is displayed for each entry: the number of calls for this caller, ◆ the phone number of the caller or his name (if it exists as a directory entry) or ◆ unknown if the phone number was not transferred, the receive MSN, ◆...
- Page 50 Using the directory and other lists Displaying an entry Open the list of missed or answered calls (page 46). Then: Select entry and open the submenu. Select and confirm. Display entry Changing the caller's phone number Open the list of missed or answered calls (page 46). Then: Select entry and open the submenu.
-
Page 51: Sms (Text Messages)
SMS (text messages) SMS (text messages) You can send and receive SMS text messages (Short Message Service) with your hand- set. You can send a text message to any fixed network or mobile phone network number. Your text message can be received as a text message by any device with SMS functionality (mobile phone, PC, another telephone). -
Page 52: Managing Sms Service Centres
SMS (text messages) Managing SMS service centres SMS messages are exchanged through SMS service centres. To send and receive a text message, you require the phone number for your service provider's SMS centre. You have to store this phone number in your telephone. You may enter up to ten SMS centres in your telephone. -
Page 53: Activating/Deactivating Sms Send Centre
SMS (text messages) Activating/deactivating SMS send centre To send a text message you must activate the phone number for the required SMS cen- tre as the send centre. By doing this you determine the SMS centre used to send the text message. -
Page 54: Memory
SMS (text messages) Memory The number of text messages that can be stored in the base station depends on the size of the messages (about 11 text messages of up to 160 characters each). The memory is used for both the incoming and outgoing message lists. If the memory is full, the mes- sage Text list full! Please delete entries is displayed. - Page 55 SMS (text messages) Writing text messages A single text message can be up to 160 characters long. If your text is longer, it will automatically be sent as a linked message. Up to four messages with 153 characters each can be linked. This means you can enter up to 612 characters. Bear in mind that linked messages incur correspondingly higher charges.
- Page 56 SMS (text messages) Saving text messages Requirement: You have written a text message (page 52) and the input field is open. à Press the display key to open the submenu. Select and confirm. You can then send the text mes- Save Entry sage (page 53).
- Page 57 SMS (text messages) Opening the outgoing message list The outgoing message list shows you: Text messages which you saved before you sent them (page 53). ◆ Text messages you could not send, e. g. because you were interrupted by an incom- ◆...
- Page 58 SMS (text messages) Deleting the entire outgoing message list This function deletes all the messages in the outgoing message list. Requirement: You have opened the outgoing message list (page 54). ¢ Delete list Press the display key to confirm the prompt. [RRRRRRRRRRRRRRRRRRRRRRRRRR ] Sending or editing text messages in the outgoing message list Requirement: You have opened a text message in the outgoing message list to read...
-
Page 59: Sending A Text Message To An E-Mail Address
SMS (text messages) Sending a text message to an e-mail address You can send a text message to an e-mail address. To do this you should write the recip- ient's e-mail address at the start of the text message and send this text message to the number for your SMS send centre's e-mail service. -
Page 60: Receiving Text Messages, Incoming Message List
SMS (text messages) Sending a text message as an e-mail You must send the text messages to the number for your send center's e-mail service. Enter the number of the e-mail service. Dest.call no. 6245 X Í à Press the display key to open the menu. Confirm. - Page 61 SMS (text messages) Opening with the message key Requirement: There is at least one new message in the list. Press the message key. If there are no new calls/messages in the other lists, then the first new text message is opened immedi- ately.
- Page 62 SMS (text messages) Deleting the entire incoming message list This function deletes all new and old text messages in the incoming message list. Requirement: You have opened the incoming message list (page 57). ¢ Delete list Press the display key to confirm the prompt. [RRRRRRRRRRRRRRRRRRRRRRRRRR ] Replying to or forwarding text messages While you are reading a text message you can use the following functions:...
- Page 63 SMS (text messages) Changing the character set While you are reading a text message you can use the following function: © Press the display key to open the menu. Text is shown in the selected character set. Character Set Calling back the text message sender Open the incoming message list (page 57).
- Page 64 SMS (text messages) Copying a phone number from a text message to the directory Your telephone can "identify" phone numbers in a received text message. It indicates this by highlighting the sequence of digits (max. 32). If the text message contains mul- tiple strings of digits, the first string of digits is highlighted.
-
Page 65: Sms On A Pabx
SMS (text messages) on a PABX You can only receive a text message if Calling Line Identification is forwarded to the extension on the PABX (CLIP). The CLIP for the phone number of the SMS centre is evaluated in your telephone. If your phone is connected to a PABX, you may have to prefix the number of the SMS centre with an access code (this depends on your PABX). - Page 66 SMS (text messages) Errors when receiving a text message A message appears on the screen if your phone cannot receive any more text messages. You cannot receive text messages under the following conditions: Call diversion is activated with All Calls, ◆...
-
Page 67: Making Cost-Effective Calls
Making cost-effective calls Making cost-effective calls Sign up with a network provider who offers particularly low-cost call rates (call-by-call) or view the call charges on the handset. You can use the call-by-call list to manage your call-by-call numbers. You manage entries in the call-by-call list in the same way as entries in the directory by opening the call-by-call list with the C key instead of the directory. -
Page 68: Call Charge Display
Making cost-effective calls Call charge display You can display the charges if you have requested this from your network provider. You can check the cumulative units/total charges and the charges of the last call made (depending on setting, see page 67). The total charges include the charges accrued by this handset. - Page 69 Making cost-effective calls Entering the price per unit In order for the Units cent.off.calculation method to be able to calculate charges, you must define the currency and the price per unit (by default: No rate). For this charge calculation, Units cent.off. must be set (factorydefault). ¢...
- Page 70 Making cost-effective calls Displaying and deleting the charge overview Call or charge units for either each internal subscriber, each configured MSN or the entire system are displayed, depending on the setting. ¢ ¢ ¢ í Call Charges Cost overview Scroll to the accounts for the individual internal sub- scribers or configured MSNs.
-
Page 71: Using Multiple Handsets
Using multiple handsets Using multiple handsets Using a handset as a room monitor With this function, a previously stored internal or external number is called when a set noise level in the room is reached (the baby cries). When you answer the call you hear the noise in the baby's room. - Page 72 Using multiple handsets Activating the room monitor function and entering the destination number ¢ ¢ í Room Monitor Go to the line Room M.: On. Scroll to the Call to: line and press the display key. R[RRRRRRRRRRRRRRRRRRRR] Edit The input field for the phone number is opened. To enter an internal number as the destination either ...
- Page 73 Using multiple handsets Changing the set external destination number Requirement: You are in the input field for the room monitor. Scroll to the Call to: line and press the display key. R[RRRRRRRRRRRRRRRRRRR] Edit Delete the existing phone number. either ... To enter the external destination number: Enter the new telephone number.
-
Page 74: Setting Walkie-Talkie Mode
Using multiple handsets Setting walkie-talkie mode Walkie-talkie mode allows two handsets to communicate regardless of how far away from the base station they are. Example: You go on holiday and take two handsets with walkie-talkie functionality with you. Set the walkie-talkie function on both handsets. You can now communicate using the handsets. - Page 75 Using multiple handsets Using a handset as a room monitor in walkie-talkie mode You can still use the room monitor function in walkie-talkie mode. ¢ à Room Monitor Activate the room monitor function in the Room M.: line. If required, jump to the Level: line and set the sensi- tivity for the noise level (Low or High).
-
Page 76: Setting Up The Answering Machine
Setting up the answering machine Setting up the answering machine On base station: CX253isdn SX255isdn SX353isdn Once you have connected your telephone your answering machine is ready for use. Answering machine AM1 is activated. It records all messages (on all receive MSNs). AM1 can be played back and set from all handsets (factory default). -
Page 77: Hiding/Showing An Answering Machine
Setting up the answering machine Hiding/showing an answering machine If you only want to use one or two answering machines for your connection, you can hide the other answering machine(s) from all displays and menus. An answering machine can only be hidden if it does not contain any messages or memos: If there are new messages/memos you have not yet played back on the answering ◆... -
Page 78: Deactivating/Activating Spoken Date And Time
Setting up the answering machine Deactivating/activating spoken date and time You can have the recording date and time (time stamp) announced when each mes- sage/memo is played back (activated by default). Requirement: You have selected an answering machine (page 122). Select and confirm. -
Page 79: Activating/Deactivating Automatic Pause
Setting up the answering machine Setting recording quality Requirement: You have selected an answering machine (page 122). Select and confirm. Settings Select and confirm. AM quality either ... To set high quality: Confirm (‰ = activated). High quality or ... To set long recording: Select and confirm (‰... -
Page 80: Setting The Time Control
Setting up the answering machine Activating/deactivating the AM lock By default, the answering machine lock is deactivated. Requirement: You have selected an answering machine (page 122). Select and confirm. Settings Select and confirm (‰ = lock set). AM lock Setting the time control You can set up the answering machine so that it is automatically activated and deacti- vated depending on the time (i. - Page 81 Setting up the answering machine Defining start times and announcements for Monday to Friday Requirement: You have selected an answering machine (page 122). Select and confirm. Settings Select and confirm. Time control Select and confirm. Mon - Fri ‰ = At least one start time entered. Select entry for the time section, e.
-
Page 82: Activating/Deactivating Automatic Listen In
Setting up the answering machine Activating/deactivating time control By default, time control is deactivated. Requirement: You have set at least one start time (page 78) and selected an answering machine (page 122). Select and confirm. Settings Select and confirm (‰ = activated). Time control either ... -
Page 83: Activating/ Deactivating Automatic Pickup
Setting up the answering machine Activating/deactivating listen in You can only activate the listen in function if a terminal has been assigned to the answering machine. Requirement: You have selected an answering machine (page 122). Select and confirm. Settings Select and confirm. Aut. -
Page 84: Activating/ Deactivatingautomatic Text Message Notification
Setting up the answering machine Activating/ deactivatingautomatic text message notification Your telephone can automatically send a text message to an external number (e. g. to a mobile phone) when you have received a new message on the answering machine. An example of such a text message would be: New message: 01712205625 for office at 18:27 on TH, 10.12.04. - Page 85 Setting up the answering machine Activating/deactivating text message notification You can only activate text message notification if a destination number is stored. Requirement: You have selected an answering machine (page 122). Select and confirm. Settings Select and confirm. SMS notificat. Open the submenu.
-
Page 86: Security Settings
Retype the new system PIN and confirm. Memorise the new system PIN! If you forget it, the device will require technical intervention. If this happens, contact the Siemens Hotline (page 135). Defining authorisations You can set different authorisations for all registered devices: ◆... -
Page 87: Emergency Numbers
Security settings Emergency numbers By default, the country-specific emergency numbers are entered. These cannot be edited or deleted. You may enter five emergency numbers of your own choice. An emergency number may also be dialled from a handset with limited authorisation (e. -
Page 88: Time Functions
Time functions Time functions Setting the date and time The first time you make a call on your phone, the date and time are transmitted by the exchange. You can choose between 12 hour and 24 hour format for the time (a.m. = 1st half of the day;... -
Page 89: Setting The Alarm Clock
Time functions Setting the alarm clock You can use your handset as an alarm clock. Requirement: You have set the date and time. Activating and setting the alarm clock If you want to use your handset as an alarm clock, you have to set the alarm time, choose a melody and activate the alarm clock. -
Page 90: Setting An Appointment
Time functions Setting an appointment You can use your handset to remind yourself of up to five appointments. To do this, you have to save the times. Activating and setting an appointment ¢ ¢ ì Set Appoints. Select and confirm. <New entry>... - Page 91 Time functions Managing appointments ¢ ¢ ¢ ì Set Appoints. (Appoint. select 1-5) Viewing/editing appointments Press the display key. The appointment is displayed. §View§ Press the display key to change entry if required §Edit§ Make the changes. To use additional menu functions: Open the menu.
-
Page 92: Displaying Missed Appointments, Anniversaries
Time functions Displaying missed appointments, anniversaries Missed appointments/anniversaries (page 41) are displayed in the Missed Dates list if: You do not accept an appointment/anniversary. ◆ The appointment/anniversary was signalled during a phone call. ◆ The handset is deactivated at the time of the appointment/anniversary ◆... - Page 93 Time functions Setting the destination Requirement:. Night service is deactivated (page 91) ¢ ¢ ¢ Ð Base Night service Select the MSN and confirm, e. g. MSN1: Anna. MSN1: Select and confirm. Forward. dest. either ... To set an external destination: Select and confirm.
- Page 94 Time functions Entering the start and end time for night service By default, the Start time is pre-set to 20:00 or 8:00 pm, and 08:00 or 8:00 am for the End time. ¢ ¢ ¢ Ð Base Night service Select the MSN and confirm, e. g. MSN1: Anna. MSN1: either ...
-
Page 95: Individual Handset Settings
Individual handset settings Individual handset settings Your handset has default settings. You can change these settings individually. Shortcuts for functions and numbers You can assign the left display key and each of the digit keys Q and 2 to O a number or a function. -
Page 96: Changing The Display Language
Individual handset settings Changing key assignments Display key Press and hold the left display key. The list of possible key assignments is opened. Proceed as described when first assigning a shortcut to the key (page 92). Digit key Briefly press the digit key. Press the display key. -
Page 97: Setting The Colour Scheme And Contrast
Individual handset settings Setting the colour scheme and contrast You have a choice of four colour schemes and several different contrasts. ¢ ¢ Ð Display either ... Select and confirm. Colour Scheme Select Colour Scheme and confirm (‰ = On). or ... -
Page 98: Setting Night Mode
Individual handset settings Setting night mode You can set up the display so that it does not light up while the handset is in the charger (night mode activated). ¢ ¢ Ð Display Confirm to deactivate or activate the function Night Mode (‰... -
Page 99: Changing The Handset And Handsfree Volume
Individual handset settings Changing the handset and handsfree volume You can set the volume for handsfree mode (telephone volume) to five different levels and the handset volume (voice volume) to three different levels. You can only make these adjustments during an external call. The handsfree volume can only be adjusted when handsfree mode (d) is activated. - Page 100 Individual handset settings Settings for external calls With the handset in idle status, open the menu Ringer Settings by pressing t briefly. ¢ ¢ ¢ ï Ringer Settings Ext. Calls Set the volume (1-6). Setting ringtones Skip to the next line. Select melody.
- Page 101 Individual handset settings Activating/deactivating the ringtone You can deactivate the ringtone on your handset before you answer a call or when the handset is in idle status; the ringtone can be deactivated permanently or just for the cur- rent call. The ringtone cannot be re-activated while an external call is in progress. Deactivating the ringtone permanently Press and hold the star key.
-
Page 102: Sound Manager
Individual handset settings Sound Manager The handset's Sound Manager manages ringtones and sounds which you can use as ringtone melodies. It can manage the following sound types: Icon Sound Format Ù Ringtones; mono- Standard phonic × Polyphonic Standard × Polyphonic .psf The icon is displayed in front of the name in the Sound Manager. -
Page 103: Activating/Deactivating Advisory Tones
Individual handset settings Activating/deactivating advisory tones Your handset uses ‘advisory tones’ to tell you about different activities and statuses. The following advisory tones can be activated and cancelled individually (the default setting is On). Key click: Each key press is acknowledged. ◆... -
Page 104: Setting The Alarm Clock
Individual handset settings Setting the alarm clock Requirement: the date and time have already been set (page 85). Activating/deactivating the alarm clock and setting the wake-up time ¢ ¢ ì Alarm Clock To change the multiple line entry: Select On or Off. Alarm Clock: Enter the wake-up time in 4-digit format. -
Page 105: System Settings
System settings System settings The abbreviations in brackets after the titles indicate the ISDN service concerned. Some services may only be used if they have been authorised by the network provider (there may be an extra charge). Changing the names for internal subscribers By factory default, all internal numbers are given the names Int.11, Int.12, etc., accord- ing to their numbering. -
Page 106: Setting Up/Deleting An Isdn Phone Number (Msn)
System settings Setting up/deleting an ISDN phone number (MSN) Your ISDN connection provides 2 telephone lines that can be used simultaneously (B channels). You can set up a maximum of ten separate phone numbers (MSN) on your base station. Setting up an ISDN phone number (MSN) / changing the name If you have not saved all the phone numbers with the Getting started wizard (page 15), you can enter them now. -
Page 107: Assigning A Phone Number (Msn)
System settings Assigning a phone number (MSN) You can assign particular individual phone numbers (MSNs) to registered terminals. This determines which phone number makes a registered terminal ring (receive MSN), ◆ under which number an internal subscriber dials (send MSN). ◆... -
Page 108: Setting Up The List Of Send Msns For The Next Call
System settings Setting up the list of send MSNs for the next call You can set up your handset so that after pressing the Talk key c or the handsfree key d a list of all available send MSNs is displayed. By default, MSN next call is not activated. -
Page 109: Setting Up Call Reject For The Entire Msn Group
System settings Setting up call reject for the entire MSN group You can reject an external call not only on your handset, but for all members of an MSN group. Pressing will give the caller a busy signal instead of a ringing tone. The REJECT entire group will no longer be called. - Page 110 System settings Specifying the number of ringing cycles Ring delay can be used to specify the number of ring cycles after which a call is to be diverted. The setting can be between 0 (= immediate call diversion) and 9 rings. A ring cycle lasts 5 seconds.
- Page 111 System settings Setting up a destination ¢ ¢ ¢ Ð Base Ext. call forw. Í Press the display key to open the menu. Select and confirm. New entry Select the receive MSN and confirm, MSN1: e. g. MSN1: Anna. Select the condition and confirm, Immediately e.
-
Page 112: Pre-Assigning The Call Diversion Destination - Cd (Call Deflection)
System settings Deleting external call diversion ¢ ¢ ¢ Ð Base Ext. call forw. Select call diversion, e. g. MSN1 to 22222. Open the submenu. Select and confirm. Delete entry Pre-assigning the call diversion destination – CD (Call Deflection) This function pre-assigns the call diversion destination for incoming calls. This destina- tion number is offered as a preset when setting up call diversion manually (page 34). -
Page 113: Setting Up An Internal Group Call Group
System settings Setting up an internal group call group You can make a group call from any handset to all other registered internal subscribers (page 24). By default, all registered subscribers with the device type "telephone" or "neutral" are set up in the group call group. -
Page 114: Activating/Deactivating Cw (Call Waiting)
System settings Activating/deactivating CW (call waiting) This function can be set up separately for each subscriber. When call waiting is activated the caller will hear the ringing tone if you are already making a call. This call is announced both acoustically, and visually on your handset screen. If call waiting is deactivated, the caller will hear the ringing tone if you are already mak- ing a call and other devices are assigned to the same MSN. -
Page 115: Setting Up The Waiting Melody
System settings Setting up the waiting melody An external subscriber hears the set waiting melody when the connection is on hold in the base station (internal) (page 111). An external subscriber whose connection is on hold in the telephone exchange (external), and an internal subscriber who is on hold, will not hear a waiting melody. -
Page 116: Changing The Access Code
System settings Changing the access code Access codes are the first few digits required when dialling another city (national) or another country (international). The default settings for Germany are as follows: For connections to other towns (national) For connections abroad (international) In other countries, different access codes could be used. -
Page 117: Calling An Answering Machine In The Network
System settings Calling an answering machine in the network On base station: CX203isdn SX205isdn SX303isdn Press 1 and hold. You are connected directly to the answering machine in the net- work. If you then press the handsfree key d, you can listen to the answering machine announcement in the network and operate the answering machine via the network. -
Page 118: Restoring The Default Settings
System settings Restoring the default settings You can select which type of reset is to be performed: Operational – All MSNs and access codes are deleted and the AM PIN (on Gigaset with integrated answering machine) is reset to 0000. The authorisations are reset to "Dial and answer". -
Page 119: Operation In A Pabx
Operation in a PABX Operation in a PABX Pay attention to the special features for SMS in a PABX (page 62). Access code Requirement: If your telephone is connected to a PABX, depending on the PABX, you must enter an access code (outside line code) for external calls when the phone is first installed. -
Page 120: Dialling Options
Operation in a PABX Dialling options The KEYPAD function allows you to control certain features by entering sequences of characters and digits. The KEYPAD function should be set when connecting your telephone to an ISDN PABX or to an exchange (e. g. Centrex), which is controlled by the KEYPAD protocol. The dig- its/characters 0–9, *, # are sent as keypad information elements. - Page 121 Operation in a PABX Activating/deactivating the keypad during a call In addition to the permanent settings described above, you can also switch temporarily to the keypad. The setting only applies to the current external call and is automatically deactivated after the call is ended. During a call: Open menu.
-
Page 122: Operation With Other Devices
Operation with other devices Operation with other devices Specifying the device type On base station: SX205isdn SX255isdn SX303isdn SX353isdn If your base station has the option of connecting an analogue terminal, you must set the device type (see user guide for base station). ¢... -
Page 123: Making Calls With Devices On Analogue Connection
Operation with other devices Making calls with devices on analogue connection (TAE connection) On base station: SX205isdn SX255isdn SX303isdn SX353isdn Telephones with tone dialling (DTMF = dual tone multi-frequency dialling) can be oper- ated on the analogue connections. Telephones with pulse dialling are not supported. For instructions on making calls using devices on the analogue connec- tion, refer to the user guide for your base station. -
Page 124: Direct Answering Machine Operation
Direct answering machine operation Direct answering machine operation On base station: CX253isdn SX255isdn SX353isdn Your ISDN telephone has three answering machines (AM1, AM2, AM3), each of which you can operate and set independently. You can operate the answering machines either directly via a registered handset (using the menu) or by remote control (internal or external call to the answering machine, see user guide for base station). -
Page 125: Selecting An Answering Machine
Direct answering machine operation Selecting an answering machine ¢ Ã If necessary, select answering machine and confirm, e. g. AM1. If AM lock is set (page 76): Enter answering machine PIN and confirm. The list of answering machines AM1, etc., is also opened if you press and hold the number key 1. -
Page 126: Recording/Changing Announcements
Direct answering machine operation By default, Announcement 1 is selected. The Concl.announcem is empty. ¢ ¢ (hold) Select answering machine (e. g. AM1) Announcements Select announcement, e. g. Announcement 2 Announcement 2 (‰ = set). Í Press the display key to open the submenu. Confirm. -
Page 127: Playing Back/Deleting Announcements
Direct answering machine operation Playing back/deleting announcements Only recorded announcements can be deleted. You cannot delete the default announcement. ¢ ¢ (hold) Select answering machine (e. g. AM1) Announcements Select announcement, e. g. Announcement 2 Announcement 2 (‰ = activated). Í... -
Page 128: Two-Way Recording
Direct answering machine operation Two-way recording You can make a two-way recording of a call. The two-way recording can then be played back or deleted like a message. During a call: ¢ Record Select an answering machine and confirm, e. g. AM1. The two-way recording starts immedi- ately. -
Page 129: Playing Back Messages
Direct answering machine operation Playing back messages New messages are indicated on the handset by the flashing message key f. Pressing the message key f gives you direct access to the new messages. You can also open the lists of new and old messages using the menu. ¢... -
Page 130: Returning A Call During Playback
Direct answering machine operation Returning a call during playback You can call back a caller immediately while a message is being played. Requirement: The caller's number has been identified (page 25). During playback: Í Press the display key to open the submenu. either ... -
Page 131: Playing Back Memos
Direct answering machine operation Playing back memos ¢ ¢ ¢ (hold) Select answering machine (e. g. AM1) Memos Play memo Skip to next or previous memo. Setting the playback speed You can set the playback speed for messages/memos to four levels Slow, Normal speed, Fast or Very fast. -
Page 132: Marking An Old Message Or Memo As "New
Direct answering machine operation Deleting all old messages/memos ¢ (hold) Select answering machine (e. g. AM1) either ... To delete all old messages: Confirm. Message playback begins. Messages Í Press the display key to open the submenu. Select and confirm. Del.old messages Confirm. -
Page 133: Operation With Door Intercom
Operation with door intercom Operation with door intercom On base station: SX205isdn SX255isdn SX303isdn SX353isdn Assigning internal subscribers to the door intercom call group If you have set up a door intercom (page 18), all internal subscribers registered on the base station are automatically assigned to the door intercom call group. - Page 134 Operation with door intercom Door intercom call waiting Accepting call waiting Press the display key. You accept the waiting call. ACCEPT If the interrupted call is an internal call, this connection is broken when you accept the waiting call. If the interrupted call is an external call, this call is put on hold when you accept the wait- ing call.
- Page 135 Operation with door intercom Deleting destination numbers for external call diversion ¢ ¢ ¢ ¢ ¢ Ð Base Settings Setup user Setup device Select internal subscriber, e. g. INT21: Int.21. INT21: Int.21 © Press the display key to open the submenu. Select and confirm.
-
Page 136: Appendix
When it has fully dried out, you will normally be able to use itagain. Questions and answers If you have any queries about the use of your telephone, you can contact us at any time at www.siemens.com/gigasetcustomercare. The table below contains a list of common problems and possible solutions. The display is blank. - Page 137 Appendix Handset does not ring. The ringtone is switched off. Activate the ringtone (page 98). ◆ Call diversion set to All Calls. Switch off call diversion. ◆ MSN is not assigned to internal subscriber or is incorrect. Specify receive MSN (page 104). ◆...
-
Page 138: Customer Service (Customer Care)
For personal advice on our range of products, call Premium Hotline United Kingdom: 0906 9597555 (0.75 £/minute) You can talk to qualified Siemens technicians who will guide you expertly through prod- uct information and installation. For fast and dependable assistance with any repairs or guarantee/warranty claims, contact our Service Centres. -
Page 139: Specifications
Appendix Specifications Recommended batteries (Valid at the time of going to press) Nickel-metal-hydride (NiMH): Sanyo Twicell 650 ◆ Sanyo Twicell 700 ◆ Panasonic 700mAh "for DECT" ◆ GP 700mAh ◆ Yuasa Technology AAA Phone 700 ◆ Varta Phone Power AAA 700mAh ◆... -
Page 140: Guarantee Certificate (United Kingdom)
The duration of the Guarantee shall not be extended by services rendered under the ◆ terms of the Guarantee. Insofar as no Guarantee default exists, Siemens reserves the right to charge the cus- ◆ tomer for replacement or repair. The above provisions does not imply a change in the burden of proof to the detri- ◆... -
Page 141: Guarantee Certificate (Ireland)
Any further claims are excluded. Siemens is not liable in any circumstances for ◆ downtime, loss of profits, loss of data or loss of any other information. The customer alone is responsible for safeguarding such data and information. -
Page 142: Pc Interface
You can connect the handset to your computer using a data cable. Your computer can then communicate with your handset using a program (free download from www.siemens.com/gigaset). You can access your handset's directory and load sounds from the computer on to the handset. -
Page 143: Order Of Directory Entries
Appendix Writing text messages (with predictive text) EATONI predictive text helps you when you are writing text messages. Each key between Q and O is assigned several letters and characters (see the character set tables, page 141). These appear in a selection line immediately below the text panel (above the display keys) as soon as you press a key. -
Page 144: Character Set Table
Appendix Character set table Standard characters Press the relevant key repeatedly or hold it down: â Â £ ¥ ¤ Space ä á à â ã ç ë é è ê ï í ì î ö ñ ó ò ô õ... -
Page 145: Menu Overview
Menu overview Menu overview Main menu Instead of scrolling to locate a menu function, you can select a menu function more quickly by opening the menu and keying in the digit combination ("Shortcut"). Example: v 4 2 1 for "Set ringtones for external calls". With the telephone in idle status, press v (open menu): î... - Page 146 Menu overview Î For continuation see submenu Answering machine (page 146) ì Set Appoints. Alarm Clock Missed Dates Ë Sound Manager ¢ Ð Submenu " Base" Entry: In handset idle status press v Ð Base Status Callback Withhold no. Call forwarding Ext.occupations ‰...
- Page 147 Menu overview Night service Activate? Deactivate? MSN list if night service activated Forward. dest. External Number editor Internal List of handsets Answering mach. List of handsets Start time End time Sat/Sun all day Settings Security Change PIN (Enter PIN) Authorisation Unrestricted Internal subscriber list...
- Page 148 Menu overview ISDN settings Set up MSN Edit entry List of all set up MSNs Ringer melody Delete entry Display entry Withhold no. Forward. dest. (Enter phone number) Lg.-dist. code National : 0 Change number Delete number Internat.: %V 00 Change number Delete number Code: 49...
- Page 149 Menu overview Î Submenu " " Entry: With the handset in idle status press v, Î, vL, select an answering machine, e. g. AM1, and confirm with Messages Continue List of all messages for AMx Delete message Call back Call-by-Call Repeat Del.old mes- sages...
- Page 150 Menu overview Settings Message/Memo Message length 1 minute 2 minutes 3 minutes Maximum Time stamp Time control Activate? Deactivate? – if time control is activated Mon - Fri Select ann. Announce- List of four ment 1 adjustable Announce- time periods ment 2 Announcem.
- Page 151 Menu overview Directory key and call-by-call list key Press the directory key s or the call-by-call list key C, select an entry with s and press v to open the corresponding list. The following menu functions are available: Display Number Edit Entry Delete Entry VIP Entry...
-
Page 152: Index
Index Index Anny Way ....Answer a call ....Access code . - Page 153 Index Area code ..... Call costs, see also Costs Assign Call delay ..... . phone number (MSN) .
- Page 154 Index status of settings ... . . Delete key ..... Check status .
- Page 155 Index contact with liquid ... . deactivate ..... EATONI (predictive text) .
- Page 156 Index Internal Listen in on answering machine ..call with door intercom ..Listen in to call ....calls .
- Page 157 Index Multiple line entry ....Put call on hold ....Muting handset .
- Page 158 Index set noise level ....receive MSN ....use in walkie-talkie mode .
- Page 159 Index SMS centres, managing phone numbers ... . SMS notification from answering machine ..Sound Manager ....Specifications .
Need help?
Do you have a question about the Gigaset S44 and is the answer not in the manual?
Questions and answers