Table of Contents
Advertisement
Advertisement
Chapters
Table of Contents

Related Manuals for Denon DN-700C


Summary of Contents for Denon DN-700C
- Page 1 Network CD/Media Player DN-700C Owner’s Manual...
-
Page 2: Fcc Information
This product, when installed as indicated in the instructions contained in this manual, 3. Do not place anything inside meets FCC requirements. Modification not expressly approved by DENON may void your Do not place metal objects or spill liquid inside the system. -
Page 3: Important Safety Instructions
IMPORTANT SAFETY INSTRUCTIONS READ BEFORE OPERATING EQUIPMENT This product was designed and manufactured to meet strict quality and safety standards. There are, however, some installation and operation precautions which you should be particularly aware of. 1. Read these instructions. 12. Use only with the cart, stand, tripod, bracket, or table specified by the manufacturer, or sold with the apparatus. - Page 4 n NOTE ON USE / HINWEISE ZUM GEBRAUCH CAUTION: (English) PRECAUCIÓN: (Español) To completely disconnect this product from the mains, Para desconectar completamente este producto de WARNINGS WARNHINWEISE disconnect the plug from the wall socket outlet. la alimentación eléctrica, desconecte el enchufe del • Avoid high temperatures.
- Page 5 n OBSERVATIONS RELATIVES A L’UTILISATION / NOTE SULL’USO / NOTAS SOBRE EL USO / ALVORENS TE GEBRUIKEN / OBSERVERA / NOTA SOBRE UTILIZAÇÃO AVERTISSEMENTS AVVERTENZE ADVERTENCIAS WAARSCHUWINGEN VARNINGAR AVISOS • Eviter des températures • Evitate di esporre l’unità a • Evite altas temperaturas. • Vermijd hoge temperaturen.
- Page 6 • D ECLARATION OF CONFORMITY • D ECLARACIÓN DE CONFORMIDAD (English) (Español) We declare under our sole responsibility that this product, to which this declaration relates, is Declaramos bajo nuestra exclusiva responsabilidad que este producto al que hace referencia in conformity with the following standards: esta declaración, está...
- Page 7 A NOTE ABOUT RECYCLING: This product’s packaging materials are recyclable and can be reused. Please dispose of any materials in accordance with the local recycling regulations. When discarding the unit, comply with local rules or regulations. Batteries should never be thrown away or incinerated but disposed of in accordance with the local regulations concerning battery disposal.
-
Page 8: Table Of Contents
Getting started Thank you for purchasing this Denon Professional product. To ensure proper operation, please read this owner’s manual carefully before using the product. After reading, be sure to keep for future reference. Contents Setting Defaults Other Functions (Product Manager) ·········································32 ···································································15... -
Page 9: Accessories
• Rack that has a guide rail or shelf board that can support this device • Rack Installation The DN-700C will work normally when the player unit is mounted within 10 degrees off the vertical plane at the front panel. If the unit is tilted excessively, the disc may not be loaded or unloaded properly. -
Page 10: Discs
Discs Discs playable on this unit Loading discs Cautions on storing discs • Only load one disc at a time. Loading two or more discs can damage • Be sure to remove discs after using them. Music CDs the unit or scratch the discs. • Be sure to store discs in their cases to protect them from dust, Discs marked with the logo at right can be played in • When the disc is drawn into the unit, be careful not to trap your... -
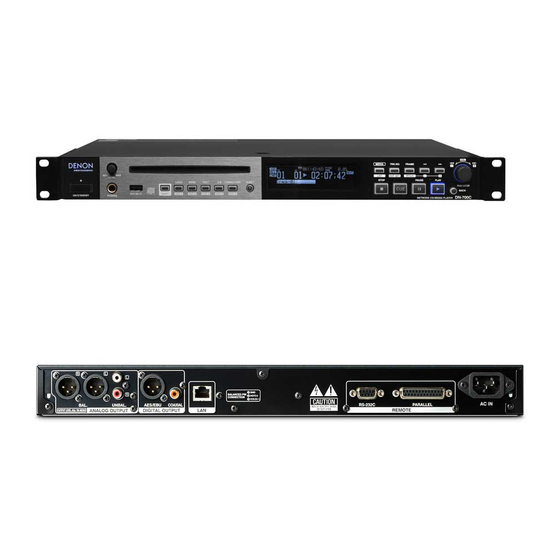
Page 11: Part Names And Functions
Part names and functions Front Panel For buttons not explained here, see the page indicated in parentheses ( ). W2 W1 W0 Q9 Q8 ON/STANDBY, Power indicator MENU/HOT 2 button ··························· (27, 30) BACK button ····························· (16, 21, 23, 28) TRK NO./HOT SET button ·························... -
Page 12: Rear Panel
Rear Panel Analog output (balanced) terminal ······································· (12) LAN Terminal ··········································································· (30) • Pin Arrangement: 1. GND/2. Hot/3. Cold • IEEE 802.3u/10/100Base-T(X) / RJ-45 • XLR Type RS-232C Terminal ···································································· (12) Analog output (unbalanced) terminal ··································· (12) Parallel port (PARALLEL) ························································ (12) • RCA Type • 25pin DSUB Connector (Female) Digital output (XLR) terminal ·················································... -
Page 13: Remote Control Unit
Remote control unit POWER button (X) RANDOM button Turns the power on and off. Switches to random mode. PITCH button PROGRAM button • Turns the pitch control ON/OFF. Switches to program mode. • Changes the pitch adjustment value. SINGLE/CONT. button Number buttons ( Switches the playback mode (SINGLE/CONTINUOUS). -
Page 14: Inserting The Batteries
Display Inserting the batteries Operating range of the remote control unit Point the remote control unit at the remote sensor when operating it. q Push the rear cover upwards w Load the two batteries properly in the direction of the arrows as indicated by the marks in the to remove it. -
Page 15: Display
Display The playback status and information about various media is displayed on the DN-700C display. Pitch display Displays the ON/OFF status of the pitch function, master key and playback speed (percentage). Display during playback Remaining time display Displayed in the “mmm (minutes):ss (seconds):ff (frame)” format. -
Page 16: Save
Display n Menu Screen File List Program List MENU Press the button to display the following screen. Displays folders and sound files. Displays the files registered for programmed playback. File List Current Folder Program List Program List BGM01.MP3 ---- < Up One Level > Hot List ---- Lower Folder... - Page 17 Display Hot List Misc List Preset Setting Displays the files registered for “Hot Start”. Select the “Save” menu when the “Hot List Menu” and“Program List Sets the operating status of the unit. Menu” is displayed to display this menu. Hot List Shift Mode Momentary The “Playlist”...
-
Page 18: Save Setting Firmware Version
Display Utility Media List Media Server List Displays the utility menu. Select the media to play back. Select servers that can be played back on the network. MEDIA Press the button to display the following screen. Load Setting Media Server List Save Setting HDD RECORDER 01 Media List... -
Page 19: Connections
Connections NOTE Audio connections • Do not plug in the power cord until all connections have been completed. Analog connection (unbalanced connection) Digital connection (COAXIAL) • When making connections, also refer to the operating instructions of the other components. Connect a line level analog cable to the analog output (unbalanced) Connect the COAXIAL digital output terminal to a digital input terminal. -
Page 20: Connecting The External Control Terminal
Be sure to connect the ground wire also. Parallel port Connect an external device to the parallel port. Parallel control can be used to control DN-700C from an external Power cord device. For details on parallel control, see “Parallel Control” (vpage 54). -
Page 21: Connecting Media
• Do not use an extension cable to connect the USB device. EJECT Press and remove the disc. n Messages The DN-700C displays various messages during use. The message contents are explained below. Message Content No Disc The disc slot is empty. -
Page 22: Setting Defaults
Setting Defaults Menu List Setting Item Page Setting Item Page Next Trk Reserve Set Current Track Preview Master Key Select Dimmer (Normal) File List Menu Select All Display Dimmer Copy* 5 LED Dimmer Preset Setting Property Screen Saver File List Change Folder Remain Time Mode Change Media* 4... -
Page 23: Setting Defaults
–48 dB. The DN-700C has a function for saving menu settings to USB media. This function is useful for sharing –42 dB: After a track has been selected, playback is cued at the point where the the same settings from one DN-700C on multiple DN-700C units. -
Page 24: Master Key
Setting Defaults Item Setting Details (Items in bold are factory default) Item Setting Details (Items in bold are factory default) Auto Fade Out Off: Does not function. Remain Time Mode Track: Displays the remaining time for each track. Sets fade out. 0.5 sec: Sets the volume to gradually decrease every 0.5 seconds. -
Page 25: Mono
Network Standby Off: Only Front Sub u-Con operates (low power operation). On: The display section and LEDs of the DN-700C are off, but power is supplied. Password ****: Sets a password (6 to 12 characters) for system settings and using the web. -
Page 26: Menu Operations (Utility)
Load Setting Rotate the jog dial to select “02 Save setting”, and press the jog dial. Reads the setting file stored in the root of the USB media device and changes the DN-700C's settings A pop up is displayed. - Page 27 Displays the firmware version of the DN-700C. ON/STANDBY. Press Press ON/STANDBY. The power of DN-700C is switched ON, and the display screen lights. The power of DN-700C is switched ON, and the display screen lights. MENU While DN-700C is stopped, press While DN-700C is stopped, press MENU The menu list is displayed.
-
Page 28: File And Folder Settings
File and folder settings File List Menu You can select files and check file information. Select copy targets (Select) Jog Dial/ SHIFT MEDIA BACK ENTER This is used when you want to select multiple items to copy. Select “Select” and press the jog dial. Close the file menu and return to the file list. -
Page 29: Copying Files (Copy)
File List Menu Copying files (Copy) Track Information Display (Property) Files selected with “Select” or “Select All” are copied. Displays information of the currently selected track. • If the selected copy source is CD-DA, WAV files are created in the copy destination (ripping function). Select “Copy”... -
Page 30: Media List
Media List Media Server List Media servers or PCs on the same network that the DN-700C is connected to that can be played back are Media that can be selected are displayed in a list. displayed. Jog Dial/ n Media Server List Display... -
Page 31: Playback
Rotate the jog dial to select the file that you want to ON/STANDBY. Press playback was previously started. playback, and press The power of DN-700C is switched ON, and the display screen n To pause playback lights and playback starts. lights. Press during playback. -
Page 32: Operations During Playback
Operations during playback A-B Repeat Playback (A-B Repeat) SINGLE/ Jog Dial/ CONT. ENTER SHIFT MENU MEDIA FRAME Repeat playback is performed between the set A and B point during playback. Press during playback. Set the repeat start point (A point). HOT 1 - 5 PITCH PITCH +/–... -
Page 33: Playback Pitch Adjustment (Pitch Control)
Operations during playback Playback pitch adjustment (Pitch control) Single playback or continuous playback Changing the output level (Single/Cont.) The playback speed can be adjusted within a range of –16 % to +16 Changes the output level of both analog and digital outputs. Select whether to playback one track or to playback continuously. -
Page 34: Remove All Load
HOT1 to 5 Hot List The “File List” is displayed. You can use the buttons on the DN-700C panel for hot start Displays the tracks currently registered to Hot Start. playback. Select “Execute” and register files to the “Program Hot List Select “Hot List”... -
Page 35: Ipod Playback
You can listen to music from an iPod using the DN-700C. NOTE Playback start You can also control the iPod using the DN-700C or the remote control. • D&M will accept no responsibility whatsoever for any loss of iPod • For details on compatible iPod models, see “Compatible iPod/iPhone Pause data. - Page 36 iPod ® Playback n Compatible iPod/iPhone models • iPod classic • iPod nano • iPod touch • iPhone...
-
Page 37: Connecting To A Network (Lan)
• When setting manually, check the setting contents with the network administrator. Modem NOTE Internet DENON assumes no responsibility whatsoever for any communication errors or troubles resulting from customer’s network environment or connected devices. To WAN To LAN side port LAN port/... -
Page 38: Network Settings
The screen returns to the “System Setting” screen. When connected to a network that has a DHCP function, settings for the DN-700C such as the IP address are configured automatically. When connected to a network that does not have a DHCP function, you need In the same way, enter the “Subnet Mask”, “Gateway”... -
Page 39: Other Functions (Product Manager)
Denon Professional Product Manager (hereinafter Product Manager) Installation of Product Manager Specify the installation folder, select “Everyone” or is an application that allows you to control DENON products from a “Just me” and click “Next”. PC or MAC. Insert the provided CD-ROM into the PC disc drive. -
Page 40: Product Manager Window
Other Functions (Product Manager) Product Manager Window Click “Next”. Installation starts. ❶ File menu, Edit menu, View menu, Help menu DENON Professional-... ❷ Batch power ON/OFF button Product Manager Installing Product Manager The power can be switched ON/OFF for connected devices in the... -
Page 41: Operations
Displays the web browser at the side of the Product Manager main window. The Control Cancel Screen (Web remote) is displayed when a Input NEW password DENON product is selected in the Product Manager window. Re-Input NEW password Version The version of this application is displayed. -
Page 42: Control Function
DN-700C from your computer. This is the first screen displayed when Web Remote is launched. To connect to the DN-700C via web remote, launch a web browser and type the IP address of the DN-700C in the address bar. Example: http://192.168.0.1. - Page 43 DOWNLOAD button Downloads the selected file to the computer. BACK button ENTER button DN-700C DN-700C LOAD button The file selected in the track list is loaded in the DN-700C. OPERATION SETTINGS OTHERS Transport controls CONTROL Track-01 Time and operating status display...
- Page 44 • Files can be deleted and added to the program list • Press the [Insert File] button to display the File List Screen and select tracks to insert. DN-700C DN-700C • The files selected in [Insert File] is inserted one line above the selected line. (To insert a file last, select MENU the EOL line.)
- Page 45 Press the [MAPPING] button in the HOT START screen or the [INSERT FILE] button in the PROGRAM • Press any of the buttons from [1] to [20] to start playback. screen to display the DN-700C file list and select files. • The time code display is updated every 0.1 to 0.3 seconds...
- Page 46 • Changes can only be made when in the STOP mode. • Changes can only be made when in the STOP mode. • For details on the setting items, see “Preset Settings” (vpage 16). • For details on the setting items, see “System Setting” (vpage 18). DN-700C DN-700C DN-700C DN-700C...
- Page 47 • Messages are displayed during the update, and the browser window needs to be closed before reboot. • A confirmation dialog appears when the POWER STANDBY button is pressed. The screen switches to the Power Off screen. CANCEL: No screen transition. DN-700C DN-700C OPERATION SETTINGS OTHERS...
-
Page 48: Various Playback Functions With Rc-F400S
If the firmware version of your RC-F400S is an earlier version than A-4.00 it will not work correctly with the DN-700C. Please visit our website (URL:http://www.d-mpro.com) for the latest firmware version. The RC-F400S version information is displayed under the startup screen that appears when it is turned on. - Page 49 FORMAT MP3 256kbps 44.1KHz CHANNEL STEREO Title display Displays “FILE LIST”. [Special Feature of DN-700C] File name display Folder display • FRAME: Press the FRAME button to start Displays the folder name. File number/total file count display Audible pause from that position, and switch “PROGRAM PLAY”...
-
Page 50: Connection
Various playback functions with RC-F400S Hot Start list display Connection As shown below, connect the RS-232C port on DN-700C to the HOT START LIST RS-232C port on RC-F400S using the straight cable that is supplied PAGE 1 EXIT with RC-F400S. -
Page 51: Hot Start Playback
• The fast forward/fast rewind speed changes in the order shown n Perform Hot Start playback below each time the button is pressed. After connecting DN-700C to RC-F400S, turn the • CD-DA: x2, x5, x10, x20, x50 n Stop • Others: x2, x10, x50, x100, x200 power switch on for the respective devices. - Page 52 Convert the allocated Hot Start list into a file and save it to a to the Hot Start buttons. to play back. USB device connected to the DN-700C. If this file exists in the USB device, the Hot Start list in this file is automatically used for FILE LIST FILE LIST allocation.
-
Page 53: Playback From The Main Screen
The button lights green and file playback starts. • Others: x2, x10, x50, x100, x200 n Pause • If the “Search Mode” settings in the “Preset Menu” of the DN-700C Press during playback or search modes. are set to “Normal”, sound is output when the search speed is 2x. -
Page 54: Other Functions
Other Functions Lock operating buttons (Key lock) “DENON Professional Pitch Control” App for iPhone/iPod Touch When LOCK is pressed for more than 1 second, the buttons in the following table are locked and you will not be able to operate them. -
Page 55: Serial Remote Control Function
(9-pin D-sub) connector. GThree control functionsH Controlling the DN-700C externally Ethernet cross Sending the status information to the host when DN-700C cable receives a status request command from the host IP Control (Ethernet) Automatically sending the status information to the host... -
Page 56: Series Extended Communication Format
Host device Status Request Command Status Information Command The status request command is a command used to obtain status information from the DN-700C. When the DN-700C receives a status request command, it uses a status information command to notify its status. - Page 57 Parameter part 3 Item Content Interpretation of Format Fixed as 0x11 in the DN-700C. received command Total Command Used to send commands that have parameters that do not fit into the Parameter Packet Pack. This is 1 when the parameter is less than 80 bytes.
- Page 58 Range of 0x30 0x30 0x30 0x30 - 0x31 0x39 0x39 0x39. Semicolon is used between SS and FF (;)0x3B MMM is displayed in 3 digits with 0 embedded expressions (000 - 999) In ASCII, DN-700C has a range of ±16.00%. However, the second value after the decimal Pitch value each digit is expressed in ASCII is always 0.
-
Page 59: D&M Rc Communication Format
Configuration of control commands DN-700C sends ACK (received successfully) to the host and executes When a status request is received from the host, the DN-700C returns The packets of control commands start with the Start Character “@”, the command. - Page 60 Serial remote control function e Automatic output of status information when the DN-700C status changes When the DN-700C status or recording or playback file changes, or when the storage status changes, the details of the change of status are sent to the host.
-
Page 61: Parallel Control
• Hot Start Mode • Normal Mode (Hot Start playback)” (vpage 27). • Hot Cue Mode DN-700C DN-700C Parallel remote mode switching NAME NAME • Parallel remote mode is switched according to the status of parallel remote inputs #5 and #6. PLAY... - Page 62 Parallel Control n Remote Control Connection • Connection Example Hot Start Mode Normal Mode Hot Cue Mode MODE2 MODE1 Skip back MODE2 MODE1 Playback pause Playback 6 Search 7 STOP Playback pause Playback RELOAD Start 1 Start 2 Start 3 Start 4 Start 5 FADER TRACK (–)
-
Page 63: Information
Not Connected • Check if it is properly connected to DN-700C. If this message – media on DN-700C or set the format to FAT16 or FAT32. For persists, replace the cable. details, see the operation instructions of the recording media. Not Supported • A device that is not supported by RC-F400S is connected. -
Page 64: Troubleshooting
Troubleshooting If a problem should arise, first check the following: 1. Are the connections correct? 2. Is the set being operated as described in the owner’s manual? 3. Are the external devices (mixer and player) operating properly? If this unit does not operate properly, check the items listed in the table below. If the symptom is not covered on the check list, contact your dealer or service centers. -
Page 65: Warranty
The following are not covered by the Warranty: THIS WARRANTY IS VALID IN THE U.S.A. ONLY. (1) Any product which is not distributed in the U.S.A. by Denon Professional div. D&M Professional. (2) Any product on which the serial number has been defaced, modified or removed. -
Page 66: Main Specifications
Main Specifications n Digital Audio System n Output n General 0 dBu=0.775 Vrms, 0 dBV=1.0 Vrms • System Network CD/ • Power supply AC 120 V, 60 Hz • BALANCED ANALOG OUT L/R Media Player (U.S.A and Canada models) • Compatible media CD Media, USB flash memory , XLR(1:GND, 2:Hot, 3:Cold) Type AC 230 V, 50/60 Hz... - Page 67 USB device ······················································ 14 Remote control unit ············································· 6 Copy ··································································· 22 Inserting the batteries········································ 7 RS-232C control ················································· 48 DENON Professional Pitch Control ···················· 47 Direct jump ························································· 26 Save Setting ······················································· 19 Display ·································································· 8 Select ································································· 21 Select All ····························································...
- Page 68 Appendix Appendix shows the list of commands that control this unit externally through a host device. Normally, it is dealers such as installers that use the list of commands to make settings, so this section is only in English. n 700 Series Extended Communication Format (MIDI) Control Command List Command code Category...
- Page 69 Appendix Command code Category Command Command Parameter 1 Parameter 2 Remarks Category code number File operation HOT LOAD XXXX 3 Name String Parameter1=File Name String specification HOT SAVE XXXX 4 Name String PPL File Name String specification PRG LOAD XXXX 5 Name String m3u File Name String specification PRG SAVE XXXX...
- Page 70 Appendix Command code Category Command Command Parameter 1 Parameter 2 Remarks Category code number Device setting DIMMER XXXX 1 Number Dimmer Value 1byte specification LOCK XXXX 2 Number Lock No. 1byte specification PRESET XXXX YYYY 3 Number Number “Parameter1=Preset Index 1byte Parameter2=Preset Value 4Bytes ” PRESET ALL CHG 4 Number Preset Value Table 37×4bytes...
- Page 71 Appendix n Status request command Command code Command Category Command Parameter 1 Parameter 2 Remarks Category code number Playback status GET TRP STAT GET CUR FDR GET ELP TIME GET REM TIME GET CUR FILE GET CUR TRK GET CUR IDX GET CUR SIZE GET CUR LEN GET CUR TITL...
- Page 72 Appendix Command code Category Command Command Parameter 1 Parameter 2 Remarks Category code number Device status GET POW STAT GET WIN STAT GET DIM STAT GET LOK STAT GET PITCH STAT GET PITCH VAL GET KEY STAT GET PRS XXXX 8 Number Preset Item Number specification GET UBL VOL...
- Page 73 Appendix n Status notification command Command code Command Category Command Parameter 1 Parameter 2 Remarks Category code number Playback status “0 : TSTA_STOP 1:TSTA_CUE 2:TSTA_CUE_EXECUTING 3:TSTA_PAUSE ANS TRP STAT* 60 Number 4 : TSTA_AUD_PAUSE 5:TSTA_SEARCH FWD 6:TSTA_SEARCH_BWD 7 : TSTA_PLAY” ANS CUR FDR 61 Name String Current Folder Name String reply...
- Page 74 Appendix Command code Category Command Command Parameter 1 Parameter 2 Remarks Category code number Device status “GET POW STAT 1byte reply 0:POWER ON 1:POWER NEUTRAL ANS POW STAT* 60 Number 2:POWER STANDBY” ANS WIN STAT 61 Number See FRS Main State. ANS DIM STAT* 62 Number Dimmer Value 1byte reply...
- Page 75 Appendix Command code Category Command Command Parameter 1 Parameter 2 Remarks Category code number Get list ANS MEDIA TTL 61 Number Media List Total No. 2bytes reply ANS MEDIA XXXX 62 Name String Media Name String reply of Media List Index No. ANS MSV TTL 64 Number Media Server Total No.
- Page 76 Appendix n D&M RC Communication format Control Command List Description Command Remarks KEY Control Standby @02312‘¥r’ PowerON @023PW‘¥r’ PLAY @02353‘¥r’ STOP @02354‘¥r’ PAUSE @02348‘¥r’ @02350‘¥r’ @02352‘¥r’ Track Jump nnnn @0Trnnnn‘¥r’ Track Jump >>I @02332‘¥r’ Track Jump I<< @02333‘¥r’ SKIP BACK @023SB‘¥r’...
- Page 77 Appendix Status Command List Status request command (host ! this unit) Status message (this unit ! host) Remarks Request. Command Ans. Command Status @0PW00‘¥r’ Power Status @0?PW‘¥r’ Power Mode Standby @0PW01‘¥r’ No Disc/USB Storage @0CDNC‘¥r’ Disc/USB Storage @0?CD ‘¥r’ Disc Disc/USB Storage In @0CDCI‘¥r’...
- Page 78 Appendix Status request command (host ! this unit) Status message (this unit ! host) Remarks Request. Command Ans. Command Track, Key Total Track Number @0?Tt‘¥r’ XXXX @0TtXXXX‘¥r’ 4 digits settings Track Number @0?Tr‘¥r’ XXXX @0TrXXXX‘¥r’ 4 digits During HOT START playback for No.XX @0HPxx‘¥n’...
- Page 79 Appendix Status request command (host ! this unit) Status message (this unit ! host) Remarks Request. Command Ans. Command xxxxxxxx : Version No. Version etc Version @0?VN‘¥r’ Version xxxxxxxx @0VNxxxxxxxxmmmmmmmm‘¥r’ mmmmmmmm : Model name APPENDIX...
- Page 80 License This section contains details of the consent agreement (license) of the software used in the DN-700C. The original text is used to ensure accuracy is maintained. [NFLC] (1) This product is installed with “NetFront Living Connect” home [GD] network interconnection software made by ACCESS Co., Ltd.
- Page 81 License This does not affect your ownership of the derived work itself, and the intent is to assure proper credit for the authors of gd, not to interfere with your productive use of gd. If you have questions, ask. “Derived works” includes all programs that utilize the library.
- Page 82 License /* Copyright (C) 1991-2, RSA Data Security, Inc. Created 1991. All rights reserved. License to copy and use this software is granted provided that it is identified as the “RSA Data Security, Inc. MD5 Message-Digest Algorithm” in all material mentioning or referencing this software or this function. License is also granted to make and use derivative works provided that such works are identified as “derived from the RSA Data Security, Inc.
- Page 83 License libpng This copy of the libpng notices is provided for your convenience. In case of any discrepancy between this copy and the notices in the file png.h that is included in the libpng distribution, the latter shall prevail. COPYRIGHT NOTICE, DISCLAIMER, and LICENSE: If you modify libpng you may insert additional notices immediately following this sentence.
- Page 84 License libpng versions 0.5, May 1995, through 0.88, January 1996, are Copyright (c) 1995, 1996 Guy Eric Schalnat, Group 42, Inc. For the purposes of this copyright and license, “Contributing Authors” is defined as the following set of individuals: Andreas Dilger Dave Martindale Guy Eric Schalnat Paul Schmidt...
- Page 85 Dimensions Unit: in. (mm) 19 (482.6) 1 49/64 1 49/64 13 35/64 (344.0) (45.0) (45.0) Weight: 9 lbs 0.62 oz (4.1 kg)
- Page 86 3520 10201 00AP...
Need help?
Do you have a question about the DN-700C and is the answer not in the manual?
Questions and answers