Table of Contents
Advertisement
Advertisement
Table of Contents

Related Manuals for Cooper Security Scantronic 9853


Summary of Contents for Cooper Security Scantronic 9853
- Page 1 ALARM SYSTEM USER GUIDE...
-
Page 2: Table Of Contents
Every effort has been made to ensure that the contents of this book are correct. However, neither the authors nor Cooper Security Limited accept any liability for loss or damage caused or alleged to be caused directly or indirectly by this book. The contents of this book are subject to change without notice. -
Page 3: Introduction
Alarm System The alarm systems described in this book comprise a control unit (model 9853, 9752 or 9751), one or more keypads, and various detectors. The control unit houses a main controller, power supply, stand-by battery and communication device. It is normally fitted in a safe place out of sight (for example, under the stairs). -
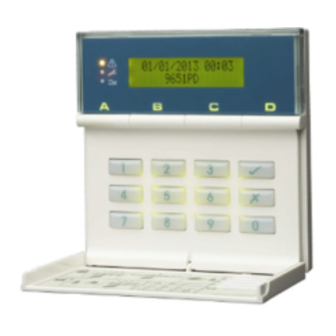
Page 4: Keypad
1. Introduction Keypad Your alarm system is fitted with a 9930 or 9940 keypad, from which you can set and unset the system. Figures 1 and 2 show the main features of these keypads. Refer to "4. Special Functions" on page 19 for information about other functions available from them. - Page 5 1. Introduction These may show nothing until a user is identified. Sensitive area Alert lamp (see page 20) Service lamp Mains lamp Present Flashes to highlight Glows if the Glows when proximity tags unacknowledged alarm, system needs using mains by touching fault or tamper conditions.
- Page 6 1. Introduction These may show nothing until a user is identified. Alert lamp (see page 20) Service lamp Mains lamp Flashes to highlight Glows if the Glows when unacknowledged alarm, system needs using mains fault or tamper conditions. an Installer power.
-
Page 7: 723R Telecommand/ 722R Pa
1. Introduction 723r Telecommand/ 722r PA If your alarm system has a radio expander connected to it, you can use a 723r telecommand (sometimes called a remote setting device) or the 722r PA (Figure 3). Transmit lamp Glows when sending a signal to the alarm system. -
Page 8: About This Guide
1. Introduction About this Guide The rest of this guide tells you how to use the system: 2. Everyday Operation Tells you how to set and unset the system. 3. After an Alarm Tells you how to switch off the sounders after an alarm, view what caused the alarm and reset the system so that it can be used again. -
Page 9: Everyday Operation
2. Everyday Operation During installation, your installer programs the system to create an exit route and entry route for your premises. When setting the system, you must follow the exit route. When unsetting the system, you must follow the entry route. If you stray from these routes, you may cause a false alarm. -
Page 10: General Procedure
2. Everyday Operation General Procedure To set the system: Secure all doors and windows. At the keypad, key in an access code (or present a tag). Note:If you enter an incorrect code, try again. If you enter an incorrect code four times, all keypads will be locked for 90 seconds. -
Page 11: Timed Set
2. Everyday Operation Timed Set With Timed Set, the system sets after a programmed exit time has expired. The time starts when you press a level key in a single system or y in a partitioned system, or when you press y to accept an omitted zone. Your installer will have made the exit time long enough for you to leave the premises and secure the final door When using Terminated Set (see below), your installer may have... -
Page 12: Instant Set
2. Everyday Operation Instant Set The area protected by a level or partition may not need an exit route or final door. With Instant Set, the system sets as soon as you press the appropriate key, without waiting for an exit time. The system gives a double "beep" to show that it is set. -
Page 13: Investigating Setting Problems
2. Everyday Operation Investigating Setting Problems This section offers general guidance but the configurable nature of 9x5x control units means that details of each alert and response vary. If you need assistance to resolve a problem, contact your installer. Detector Active If something is triggering a detector at the end of the exit procedure, the system will not set. -
Page 14: Keypad "Locks
2. Everyday Operation Keypad “Locks” If you make four incorrect attempts in a row to key in an access code, you may find that your keypad “locks” and will not let you continue. Wait for 90 seconds and the keypad will clear allow you to try again. This is to prevent someone guessing an access code by simply trying all the possibilities. -
Page 15: Unsetting The System
2. Everyday Operation Unsetting the System WARNING: If you enter your premises and an internal alarm starts, there may be an intruder. You can unset the system from a keypad or keyswitch. If your system is fitted with a radio expander and your installer has enabled the appropriate option, you can also unset it with a telecommand. -
Page 16: Keyswitch Unset
2. Everyday Operation Keyswitch Unset If your system is fitted with a keyswitch, you can use it to unset Level or Partition A. With a three-position keyswitch, switching from Part to Off unsets Level B (single system only). You do not need to enter an access code or present a tag. -
Page 17: After An Alarm
3. After an Alarm Responding to a Fire Alarm IMPORTANT: The system gives a fire alarm by Fire Z02 Alarm sounding a two-tone warning from the keypads and 9x5x alarm sounder. The display shows (for example): Evacuate the premises. Do not attempt to unset the alarm. If there is evidence of fire, call the Fire Brigade. - Page 18 . Up to 15 calls may be made to confirm the alarm . If you have a 9853 control unit (see page 32), the person taking the call can press 5 on the telephone keypad to acknowledge the notification and stop further calls.
-
Page 19: Special Functions
4. Special Functions Introduction As well as setting and unsetting the system, you can perform a number of other functions from the keypad while the system is unset: All Users Description Call To/From Downloader Access code (or tag) plus: View alerts Omit zones Require user code before installer code Read the log of system events... -
Page 20: Control Unit Calling Downloader
4. Special Functions Control Unit Calling Downloader Your installer may set up your alarm system using a program called Downloader, running on a computer connected to the telephone network, and ask you to instruct your alarm system to make an outgoing call to Downloader using one of two numbers programmed into the control unit. -
Page 21: Viewing Alerts
4. Special Functions Viewing Alerts The system records alarms, faults and tampers as alerts. It usually displays the first alert automatically when you unset the system but you can view alerts at any time by pressing 1. Viewing an alert acknowledges it. The Alert lamp ( ) flashes for unacknowledged alerts and glows for acknowledged alerts. -
Page 22: Omitting Zones
4. Special Functions Omitting Zones Your system may be programmed so that you can omit individual detectors. This enables you to ignore alarms coming from faulty detectors in non-critical positions. Refer to the table on page 32 to see which zones can be omitted in your system. -
Page 23: Requiring User Code Before Installer Code
4. Special Functions Requiring User Code before Installer Code You can specify that a user code must be entered before the installer code to access the installer menu. This enables you to supervise installer activities. Key in an access code (or present a tag). Press 3 to toggle between requiring and not requiring a user code. -
Page 24: Turning The Chime On And Off
4. Special Functions Turning the Chime On and Off Your system may be programmed so that a chime tone sounds when certain doors are opened while the system is unset. You can turn this on and off. Key in an access code (or present a tag). Press 7 to toggle chime on and off. -
Page 25: Testing Zones
4. Special Functions Testing Zones You can set the system so that it will allow you to walk around and test each of the detectors (a walk test). Do this when the premises are empty to avoid other people triggering movement detectors before you do, which would confuse the results of the test. -
Page 26: Access Codes
4. Special Functions When the system is delivered from the factory, all access codes are set to default values. Depending how your installer has set up the system , access codes may contain four or six digits. The default for the master user (U01) is "1234"... - Page 27 4. Special Functions Press y. In a partitioned system, the display shows the Partn. ABCD available partitions. Press keys A, B, C and/or D to assign the user to one or more partitions. Press y to store the new access code (in this case, 4926).
- Page 28 4. Special Functions Changing User Names The system can store up to 12 characters for each user name, including spaces and punctuation marks. The default names are in the form User nn. You can change the name when you set the access code. In step 3 of the procedure on page 26, the display shows the current user name with a flashing cursor under the first letter.
-
Page 29: Proximity Tags
4. Special Functions Proximity Tags Each normal user (Users 2 to 50) can have a tag, an access code or both. You cannot assign a tag to the master user (U01), the installer (U00), the guard (U50) or the duress code (U51). You set up a tag in a similar way to an access code (see page 26). -
Page 30: Appendix. Log Messages
Appendix. Log Messages Message Meaning Message Meaning AC Fail Mains power supply failed F== Tamper Forbikobler keypad tampered with AC Restore Mains power supply restored Fire Reset Fire alarm reset Al Conf Dis K== Alarm confirmation disabled by lock switch Fire Z== Alarm Fire alarm on zone == Al Confirm Z==... - Page 31 Log Messages Message Meaning Message Meaning PA K== Alarm Panic alarm started at keypad U== Change User == changed access code for user == PA Z== Alarm Panic alarm started in zone == U== Delete U== User == deleted access code for user == PA Z== Rstr Panic alarm reset in zone ==...
-
Page 32: Your Installation
Your Installation Zone Description D Omit Chime Entry Allow Time Company Name Contact Number (Day) Control Unit Model Contact Number (Night) Exit Time Bell Duration Partitioned or Single System Engineer Reset Dual Key Fire Medical Communicator Fitted Enabled? Meets DD243: 2004 Meets PD 6662 / prEN 50131-1: 2004 Note: If this table has not been completed, ask your Installer for the information.
Need help?
Do you have a question about the Scantronic 9853 and is the answer not in the manual?
Questions and answers
how do I shut off the alarm when it has just gone off for no reason
To turn off the Cooper Security Scantronic 9853 alarm when it goes off unexpectedly, enter a valid access code on the keypad. If the system is locked out, you may need to use a telecommand if required by the installer. If you accidentally trigger a false alarm and the system is connected to an ARC, you can cancel it within the set period by entering a valid access code.
This answer is automatically generated