
Related Manuals for ORION TELESCOPES & BINOCULARS Tabletop Equatorial Mount 9009


Summary of Contents for ORION TELESCOPES & BINOCULARS Tabletop Equatorial Mount 9009
- Page 1 INSTRUCTION MANUAL Orion ® Tabletop Equatorial Mount #9009 Customer Support (800) 676-1343 E-mail: support@telescope.com Corporate Offices (831) 763-7000 P.O. Box 1815, Santa Cruz, CA 95061 Providing Exceptional Consumer Optical Products Since 1975...
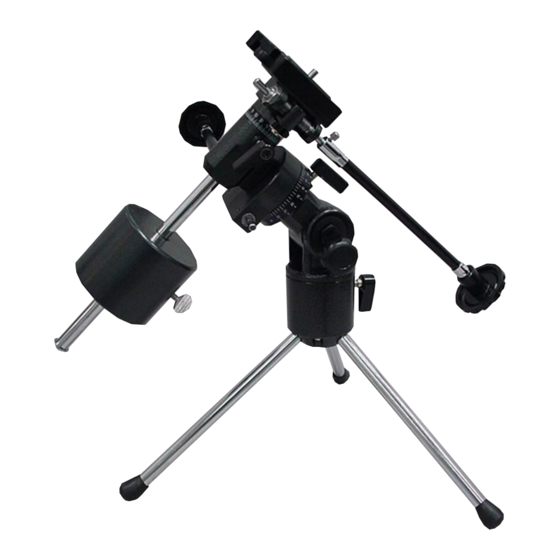
- Page 2 R.A. lock lever R.A. slow-motion control cable Dec. slow-motion Dec. lock lever control cable Counterweight Counterweight shaft Azimuth lock lever Counterweight lock thumb screw Latitude lock knob Tripod leg Figure 1. The Tabletop Equatorial Mount...
-
Page 3: Table Of Contents
ongratulations on your purchase of a quality Orion product. Your new Tabletop Equatorial Mount is extremely portable and can be conveniently taken with you wherever you go to observe. A quick- release mounting system allows fast and easy attachment of a wide variety of different telescope optical tubes. -
Page 4: Attaching A Telescope
shaft will prevent the counterweight from slipping off Now, attach the plate to your telescope by threading the shaft and possibly onto your foot if the counter- the stud into the telescope's 1/4"-20 mounting block. weight lock thumb screw should come loose. You can use a flat-head screwdriver in the slotted screw head on the underside of the mounting plate to 5. -
Page 5: Balancing The Telescope
4. Balancing the Telescope Once the telescope is attached to the equatorial mount, the next step is to balance the telescope about the mount's R.A. axis. Proper balance is required to insure smooth movement of the tele- scope on the equatorial mount. Keeping one hand on the telescope optical tube, loosen the R.A. - Page 6 to west over time. That apparent motion is caused by consult a geographical atlas to find it. For example, the Earth's rotation (from west to east). An equatorial if your latitude is 35° North, set the pointer to +35 mount is designed to compensate for that motion, (see Figure 9).
- Page 7 3. Loosen the azimuth adjustment lever and rotate the eyepiece. If the finder scope is properly aligned, the entire equatorial mount left-to-right so the telescope object should be visible somewhere in the field of tube (and R.A. axis) points roughly at Polaris. If you view.
- Page 8 That's 5 hours and 35.4 minutes in right ascension, and -5 degrees and 27 arc-minutes in declination (the nega- tive sign denotes south of the celestial equator). There are 60 minutes in 1 hour of R.A and there are 60 arc- R.A.
- Page 9 Figure 12: The mount is positioned as it would be if attempting to observe at the zenith. Similarly, to point the telescope directly south, the coun- To point the telescope to the east (Figure 13c) or west terweight shaft should again be horizontal. Then you (Figure 13d), or in other directions, you rotate the tele- simply rotate the scope on the Dec.
-
Page 10: Specifications
7. Specifications Mount: German-type equatorial Tripod: aluminum Height: 13" Weight: 9.8 lbs Counterweight: 5.0 lbs Maximum Loading Weight: about 7 lbs Slow-Motion Adjustment: both RA and Dec axes Setting Circles: RA scaled in 20 min. increments, Dec scaled in 2.5° increments Polar Axis Altitude Adjustment: 15°... - Page 11 One-Year Limited Warranty This Orion Tabletop Equatorial Mount is warranted against defects in materials or workmanship for a period of one year from the date of purchase. This warranty is for the benefit of the origi- nal retail purchaser only. During this warranty period Orion Telescopes & Binoculars will repair or replace, at Orion’s option, any warranted instrument that proves to be defective, provided it is returned postage paid to: Orion Warranty Repair, 89 Hangar Way, Watsonville, CA 95076.
Need help?
Do you have a question about the Tabletop Equatorial Mount 9009 and is the answer not in the manual?
Questions and answers