Table of Contents
Advertisement
Quick Links
i n s t r u c t i o n M a n u a l
Orion
SkyQuest
XXg
®
™
GoTo Truss Tube Dobsonians
#10148 XX12g, #8964 XX14g, #8963 XX16g
XX14g
Providing Exceptional Consumer Optical Products Since 1975
OrionTelescopes.com
customer support (800) 676-1343 • E-mail: support@telescope.com
Corporate Offices (831) 763-7000 • 89 Hangar Way, Watsonville, CA 95076
© 2010-2012 Orion Telescopes & Binoculars
IN 461 Rev. B 10/12
Advertisement
Table of Contents

Related Manuals for ORION TELESCOPES & BINOCULARS SkyQuest GoTo Truss Tube Dobsonians XXg Series


Summary of Contents for ORION TELESCOPES & BINOCULARS SkyQuest GoTo Truss Tube Dobsonians XXg Series
- Page 1 i n s t r u c t i o n M a n u a l Orion SkyQuest ® ™ GoTo Truss Tube Dobsonians #10148 XX12g, #8964 XX14g, #8963 XX16g XX14g Providing Exceptional Consumer Optical Products Since 1975 OrionTelescopes.com customer support (800) 676-1343 •...
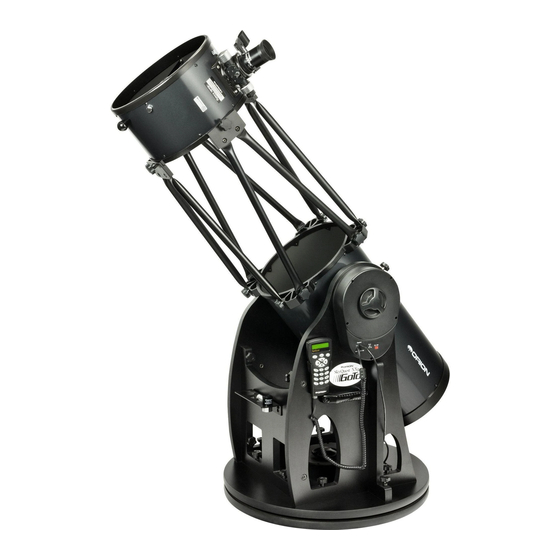
- Page 2 2" Dual-speed Upper optical Crayford focuser tube section 2" DeepView eyepiece EZ Finder II Navigation knob Truss poles Altitude motor and encoder housing Captive clamping knobs (x12) Altitude clutch knob Lower optical 1.25" eyepiece adapter tube section 2" extension adapter Handle Eyepiece rack Hand controller...
-
Page 3: Table Of Contents
Congratulations on your purchase of an Orion Table of Contents SkyQuest XXg GoTo Dobsonian. These revolu- tionary Dobs combine large-aperture optical per- 1. Unpacking ......3 formance with state-of-the-art computerized GoTo 2. - Page 4 Parts List RS-232 computer interface cable Hand controller bracket (with 2 mounting screws) Box #1: Optical Tube Assembly and Accessories Counterweight mounting bolts (XX14g, XX16g) (Figure 2) Cooling accelerator fan with battery holder Qty. Description (XX12g only) Lower optical tube section Instruction manual (not shown) Upper optical tube section Starry Night CD-ROM...
- Page 5 Primary mirror in Mirror mirror support cell retaining (XX12g) clips XX12g Collimation knobs XX14g XX16g Springs Center mark Washers Figure 3. Contents of the primary mirror box. a) The primary mirror, mirror cell, and collimation hardware for the XX12g. b) The primary mirrors and mirror support cells for the XX12g (top) and XX14g/XX16g are quite different.
- Page 6 Box #4: Dobsonian Base (Figure 5) Carrying handles Qty. Description Handle mounting bolts (socket head cap screws, 25mm long) Left side panel (with altitude motor and encoders pre- installed) Hex keys (size 2mm, 4mm, 6mm) Right side panel Plastic feet (XX12g only; feet are pre-installed on XX14g and XX16g) Front panel Feet wood screws (1"...
-
Page 7: Assembly
2. Assembly Now that you have unpacked the boxes and familiarized your- self with all the parts, it is time to begin assembly. Initial Assembly of the GoTo Dobsonian Base The GoTo bases of the SkyQuest XXg Dobs are shipped par- tially assembled for your convenience. - Page 8 Rubber washer Spacer (Don’t forget this!) Figure 9. Locations for connecting bolts in the front and side panels (one side panel not shown). Connecting bolts should be inserted in the predrilled holes in the direction indicated by the arrows. Now you will install the captive connecting bolts, each of which is already fitted with a black hand knob.
- Page 9 Now attach the front brace to the two side panels with the four appropriate captive connecting bolts. Use the hand knob to screw each bolt into the threaded metal recep- tacle recessed in the side panel. The side panels should be oriented so the side braces are facing outward.
- Page 10 Now install the azimuth motor connection cable. It is a flat cable that has an 8-pin RJ-45 plug on both ends. Plug one end into the jack on the azimuth motor hous- ing on the top groundplate; plug the other end into the jack labeled AZ MOTOR on the altitude motor housing (Figure 14).
- Page 11 Next, assemble the telescope’s rear end ring to the pri- mary mirror cell. Find a clean, flat surface, and turn the mirror cell over so that the mirror is facing downward. For the XX14g and XX16g, we recommend placing a soft towel on a flat surface and placing the mirror face Shaft down on the towel, because the aluminized outer edge...
- Page 12 procedure for installing the lower tube section on the mount first, then building the rest of the OTA from there. Altitude axis Mounting the Lower Tube Section (Only) on trunnion the Base Loosen the altitude clutch knob slightly so the altitude trunnion can rotate with relatively little resistance.
- Page 13 For the XX14g and XX16g, before assembling the rest of the optical tube, it is recommended that you install the Counterweight counterweights on the rear cell so that the tube, when assembled, will be properly balanced rather than front- heavy. (The XX12g does not utilize counterweights.) Without counterweights, the fully assembled tube could swing forward rapidly, possibly damaging the tube and mirrors.
- Page 14 Attach the upper tube section to the four truss connec- tors at the top of the poles. Orient the upper tube section as shown in Figure 23. Hold the upper tube section with Focuser one hand while threading the knobs in the truss connec- tors into the holes in the upper truss support ring.
- Page 15 that power has been turned on. Look through the back of the reflex sight with both eyes open to see the red dot. Position your eye at a comfortable distance from the back of the sight. In daylight you may need to cover the front of the sight with your hand to be able to see the dot, which is purposefully quite dim.
-
Page 16: The Goto Hand Controller
To install the 1.25" Illuminated Plössl eyepiece instead of the panel. All the hardware has hand knobs for tool-free manipu- lation and is captive so that nothing will drop off and get dirty 2" DeepView eyepiece, keep the 1.25" adapter in the focuser, and make sure the two thumbscrews on the 2"... - Page 17 source should be plugged into the 12V DC port on the Dobsonian base. There are four main categories of control buttons on the GoTo hand controller (Figure 29a): Display screen 1) Mode buttons 2) Directional buttons Mode buttons 3) Scroll buttons 4) Dual purpose buttons Directional buttons Mode Buttons...
-
Page 18: Setup For Autotracking Or Goto Mode
NGC, IC, M, Planet, and Object buttons: Allow direct access E), followed by the latitudinal coordinate and hemisphere (N or S). If you do not know the latitude and longitude to the database of objects in the most popular celestial cata- logs and categories. -
Page 19: Alignment For Goto Operation
star from a directional region of the sky and will provide a short list of the brightest stars in that region. With the Two Star alignment procedure the list of eligible stars is not grouped by region of sky. 315° – For the novice stargazer unfamiliar with the night sky or the 360°... -
Page 20: Using The Telescope In Goto Mode
Two-Star Alignment controller is displaying the name of the bright star you wish to align on, press ENTER. The standard two-star alignment is suggested if you have a star chart handy or are able to identify two bright stars visible The mount will not slew to the selected bright star auto- in the night sky. - Page 21 Messier – Complete list of 109 Messier objects ing is off a bit, the PAE function can be employed. PAE pro- vides a quick way to “sync” or “true up” the GoTo alignment. Caldwell – Complete list of 109 Caldwell objects Performing the PAE will correct the displacement error to Double Stars –...
- Page 22 Other Functions Clear PAE data – This function clears all PAE data stored in the hand controller. Doing the star alignment will also clear The GoTo hand controller is equipped with a variety of addi- the PAE data. tional functions that allow you to optimize performance and access other features of the system.
- Page 23 Tracking: Factory Setting: Allows hand controller to be reset to the fac- tory default setting. Note that this will not delete PAE settings Sidereal Rate: Activates tracking at sidereal rate. This is or User Defined objects. the default tracking rate. Lunar Rate: Activates tracking at lunar rate.
- Page 24 Use the scroll buttons to browse through the User Object Note: Do NOT disengage the SkyQuest XXg unit before you close the connection in the planetarium program. numbers until the number representing the object you Doing so may cause some programs to freeze. wish to view is displayed.
-
Page 25: Collimating The Optical System
Primary mirror center mark (XX12g only) Figure 31. Collimating the optics. (a) When the mirrors are properly aligned, the view down the focuser drawtube should look like this. (b) With the collimation cap in place, if the optics are out of alignment, the view might look something like this. (c) Here, the secondary mirror is centered under the focuser, but it needs to be adjusted (tilted) so that the entire primary mirror is visible. - Page 26 As an additional aid in collimating, the primary mirror of the XXg has a tiny adhesive ring marking its exact center (Figure 3a). This center ring will not affect the images you Collimation cap see when observing with the telescope in any way (since it lies directly in the shadow of the secondary mirror), but it will greatly facilitate collimating when using the supplied col- limation cap or other, more sophisticated collimation devices,...
- Page 27 mirror reflection in the secondary mirror, as in Figure 31d. Don’t worry that the reflection of the secondary mirror (the smallest circle, with the collimation cap “dot” in the center) is off-center. You will fix that in the next step. Aligning the Primary Mirror The final adjustment is made to the tilt of the primary mirror.
-
Page 28: Using Your Telescope
like the hole in a doughnut. If the “hole” appears off center, the Clutch tensioning knobs telescope is out of collimation. If you try the star test and the bright star you have selected is not accurately centered in the eyepiece, then the optics will always appear out of collimation, even though they may be perfectly aligned. - Page 29 If you find the drawtube tension when focusing is either too The XX12g, for example, has a focal length of 1500mm. So, tight (i.e., focus knob is difficult to turn) or too loose (i.e., the magnification with the supplied 28mm 2" eyepiece is: drawtube moves by itself under the weight of the eyepiece), 1500 mm = 54x...
-
Page 30: Care And Maintenance
10. Care and Maintenance the aluminum from oxidizing. These coatings normally last through many years of use before requiring re-coating (which If you give your telescope reasonable care, it will last a life- is easily done). time. Store it in a clean, dry, dust-free place, safe from rapid To clean the secondary mirror, you will need to remove it from changes in temperature and humidity. - Page 31 cell. Do not touch the surface of the mirror with your fin- drops of liquid dishwashing detergent, and if possible a gers; lift it carefully by the uncoated sides. capful of 100% isopropyl alcohol. Set the mirror, aluminized face up, on a clean, soft towel. With the mirror still in its support cell but with the rear end ring removed, grasp the mirror cell and hold the mirror Fill a clean sink or tub –...
-
Page 32: Specifications
11. Specifications SkyQuest XX12g GoTo SkyQuest XX14g GoTo Primary mirror 305mm diameter, parabolic, center-marked Primary mirror 356mm diameter, parabolic, center-marked Focal length 1500mm Focal length 1650mm Focal ratio f/4.9 Focal ratio f/4.6 Focuser Dual-speed Crayford (11:1), accepts 2" and Focuser Dual-speed Crayford (11:1), accepts 2"... - Page 33 SkyQuest XX16g GoTo Primary mirror 406mm diameter, parabolic, center-marked Focal length 1800mm Focal ratio f/4.4 Focuser Dual-speed Crayford (11:1), accepts 2" and 1.25" eyepieces with included adapter Optical tube material Rolled steel Azimuth bearing Thrust needle bearing Altitude bearing Ball bearing Eyepieces 28mm DeepView, 2"...
-
Page 35: Appendix B: Rs-232 Connection
Appendix B: RS-232 Positive Azm tracking: 80, 3, 16, 6, TrackRateHighByte, TrackRateLowByte, 0, 0 Connection Negative Azm tracking: 80, 3, 16, 7, TrackRateHighByte, TrackRateLowByte, 0, 0 The SkyQuest XTg Mount is designed to receive commands sent from a computer’s RS-232 COM port (via the computer Positive Alt tracking: 80, 3, 17, 6, TrackRateHighByte, interface cable). -
Page 36: Menu Tree
Menu Tree... -
Page 37: Star Charts
Star Charts... - Page 43 One-Year Limited Warranty The Orion XXg Truss Tube GoTo Dobsonians are warranted against defects in materials or workman- ship for a period of one year from the date of purchase. This warranty is for the benefit of the original retail purchaser only. During this warranty period Orion Telescopes & Binoculars will repair or replace, at Orion’s option, any warranted instrument that proves to be defective, provided it is returned postage paid to: Orion Warranty Repair, 89 Hangar Way, Watsonville, CA 95076.
Need help?
Do you have a question about the SkyQuest GoTo Truss Tube Dobsonians XXg Series and is the answer not in the manual?
Questions and answers