Advertisement
Quick Links
Advertisement

Related Manuals for ORION TELESCOPES & BINOCULARS AstroView 9822


Summary of Contents for ORION TELESCOPES & BINOCULARS AstroView 9822
- Page 1 INSTRUCTION MANUAL Orion ® AstroView ™ Equatorial Mount #9822 AstroView Equatorial Mount Customer Support (800) 676-1343 E-mail: support@telescope.com Corporate Offices (831) 763-7000 P.O. Box 1815, Santa Cruz, CA 95061 Providing Exceptional Consumer Optical Products Since 1975 IN 192 Rev. A 05/02...
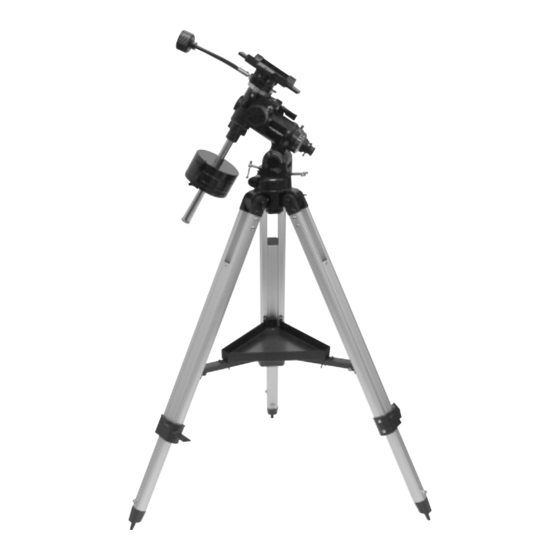
- Page 2 Declination slow-motion control cable Right ascension slow-motion control cable Declination lock lever Right ascension lock lever Polar axis finder scope Large counterweight Latitude scale Small counterweight Counterweight lock knobs Latitude adjustment T-bolts Counterweight shaft “Toe saver” Tripod leg Accessory tray bracket Leg lock knob Accessory tray Figure 1.
-
Page 3: Table Of Contents
ongratulations on your purchase of a quality Orion mount. Your new AstroView Equatorial Mount was developed to work with many different telescope optical tubes. Designed for astronomical use, this preci- sion mount allows convenient “tracking” of celestial objects as they move slowly across the sky, so they remain within your eyepiece’s field of view. -
Page 4: Attaching A Telescope
R.A. setting circle lock thumbscrew Pointer R.A. setting circle Date circle Meridian offset scale Ring with engraved time meridian indicator mark Polar scope housing Polar scope alignment thumbscrew (3) Polar axis finder scope Figure 3. The polar axis finder scope installed in the right ascension (R.A.) axis of the mount. -
Page 5: Setting Up And Using The Equatorial Mount
Figure 4a Figure 4b Figure 4c Figure 4d Figure 4a, b, c, d. Proper operation of the equatorial mount requires that the telescope tube be balanced on both the R.A. and Dec. axes. (a) With the R.A. lock lever released, slide the counterweight along the counterweight shaft until it just counterbalances the tube. (b) When you let go with both hands, the tube should not drift up or down. - Page 6 Little Dipper (in Ursa Minor) N.C.P. Big Dipper (in Ursa Major) Polaris Cassiopeia Azimuth fine adjustment knobs Figure 6. To find Polaris in the night sky, look north and find the Big Dipper. Extend an imaginary line from the two "Pointer Stars" in the bowl of the Big Dipper.
- Page 7 Aligning the Polar Axis Finder Scope the housing to redirect the crosshairs of the polar finder to the apparent center of this circular path. Repeat this pro- Aligning the polar axis finder scope so that it will accurately cedure until the position that the crosshairs point to does point at the true north pole is a two-step procedure.
- Page 8 Optional Motor Drives for Automatic Tracking For example, if it was November 1 at 9 PM, standard time, you would rotate the telescope in R.A. until the line above the “21” An optional DC motor drive can be mounted on the R.A. axis (9 P.M.) on the R.A.
-
Page 9: Specifications
Figure 8a Figure 8b Figure 8c Figure 8d Figure 8a,b,c,d. This illustration shows the telescope pointed in the four cardinal directions: (a) North, (b) South, (c) East, (d) West. Note that the tripod and mount have not been moved; only the telescope tube has move on the R.A. and Dec. axis. pointing straight overhead. - Page 12 One-Year Limited Warranty This Astroview Equatorial Mount is warranted against defects in materials or workmanship for a period of one year from the date of purchase. This warranty is for the benefit of the original retail purchaser only. During this warranty period Orion Telescopes & Binoculars will repair or replace, at Orion’s option, any warranted instrument that proves to be defective, provided it is returned postage paid to: Orion Warranty Repair, 89 Hangar Way, Watsonville, CA 95076.
Need help?
Do you have a question about the AstroView 9822 and is the answer not in the manual?
Questions and answers