Table of Contents
Advertisement
Quick Links
INSTRUCTION MANUAL
Orion
EQ-26 Motorized
®
German Equatorial Mount
#55029
Corporate Offices: 89 Hangar Way, Watsonville CA 95076 - USA
Toll Free USA & Canada: (800) 447-1001
International: +1(831) 763-7000
Customer Support: support@telescope.com
A N E M P L O Y E E - O W N E D C O M P A N Y
Copyright © 2022 Orion® Telescopes & Binoculars. All Rights Reserved. No part of this product instruction or any of its contents
may be reproduced, copied, modified or adapted, without the prior written consent of Orion Telescopes & Binoculars.
IN 682 11-22
Advertisement
Table of Contents

Related Manuals for ORION TELESCOPES & BINOCULARS EQ-26


Summary of Contents for ORION TELESCOPES & BINOCULARS EQ-26
- Page 1 INSTRUCTION MANUAL Orion EQ-26 Motorized ® German Equatorial Mount #55029 Corporate Offices: 89 Hangar Way, Watsonville CA 95076 - USA Toll Free USA & Canada: (800) 447-1001 International: +1(831) 763-7000 Customer Support: support@telescope.com A N E M P L O Y E E - O W N E D C O M P A N Y Copyright ©...
-
Page 2: Table Of Contents
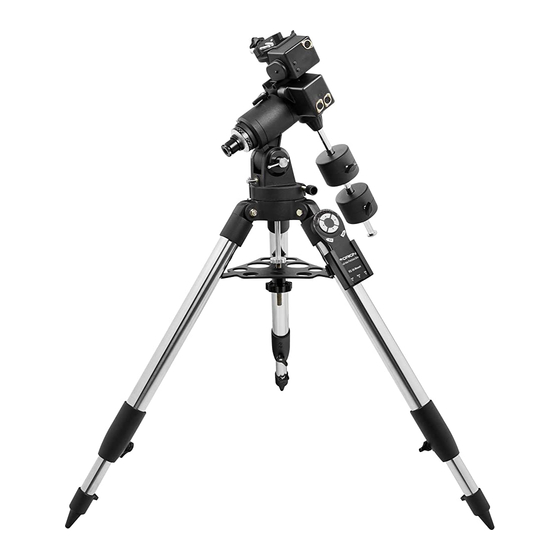
5. Now slide the tripod support tray up the shaft until the three tray arms are touching the legs of the tripod. The flat side Figure 1. The Orion EQ-26 Motorized German Equatorial Mount... - Page 3 Dual-axis hand controller shaft Figure 2. Components of the EQ-26 Mount of the support tray should be facing up. Make sure the “V” of each tray arm is buttressed against a tripod leg (Figure Post 5). Thread the large rosette knob clockwise onto the sup- port shaft until the knob is tight against the tray.
-
Page 4: Attaching A Telescope
Powering the EQ-26 Mount 1. To install a telescope on the mount, first ensure that the The EQ-26 Mount should be powered by a 12V DC power sup- counterweight is installed as in step 7 above, and that the ply (tip positive) capable of producing continuous current of RA and Dec clutch levers are tightened. - Page 5 The telescope is now balanced on the RA axis. To balance the 6. With one hand on the telescope optical tube, loosen the telescope on the Dec axis: Dec clutch lever. The telescope should now be able to rotate freely about the declination axis. Determine which 5.
- Page 6 Figure 10. A ) The dual-axis hand controller of the EQ-26 mount. ) Slide the hemisphere switch to N (Northern) or S (Southern) for your observing location ) The cable ports at the bottom of the hand controller.
-
Page 7: The Dual-Axis Hand Controller
3. Retighten the latitude clutch knob. useful for final centering of an object in the telescope’s The EQ-26 Mount comes with a polar axis finder scope (Figure 11) housed inside the RA housing of the mount. When properly aligned and used, it makes accurate polar alignment quick and easy to do. - Page 8 Azimuth Crux adjustment knobs Pointer Latitude scale Latitude adjustment Thumbscrew T-bar Pointer Bubble level R.A. setting circle Ignore this ring Allen screw Eyepiece Figure 14. Features for leveling the mount and adjusting its latitude and azimuth positions. the guidepost star is the star Sigma Octantis, in the constella- tion Octans.
- Page 9 5. Make sure that the polar scope is aligned with the RA oriented the same as those in the sky. For larger optical Axis. If it is not, follow the procedure in the following sec- tubes, you may need to remove the tube from the mount tion, “Aligning the Polar Scope”...
-
Page 10: Operating The Eq-26 Mount
R.A. is similar to longitude on Earth, and Dec. is simi- lar to latitude. The R.A. and Dec. values for celestial objects The EQ-26 mount can be moved by hand in RA or Dec or can be moved electronically with the included dual-axis hand can be found in any star atlas or star catalog. -
Page 11: Specifications
9. Specifications 1. Loosen the R.A. and Dec. lock knobs on the equatorial mount, so the telescope optical tube can move freely. Mount Type German Equatorial 2. Point the telescope at Altair. Lock the R.A. and Dec. lock knobs. Center the star in the eyepiece with the electronic con- Motors Dual stepper motors (R.A. - Page 12 One-Year Limited Warranty This Orion product is warranted against defects in materials or workmanship for a peri- od of one year from the date of purchase. This warranty is for the benefit of the original retail purchaser only. During this warranty period Orion Telescopes & Binoculars will repair or replace, at Orion’s option, any warranted instrument that proves to be defec- tive, provided it is returned postage paid.
Need help?
Do you have a question about the EQ-26 and is the answer not in the manual?
Questions and answers