Billion BiGuard 50G User Manual
802.11g dual wan security gateway
Hide thumbs
Also See for BiGuard 50G:
- User manual (223 pages) ,
- Quick start manual (7 pages) ,
- Specifications (2 pages)
Table of Contents
Advertisement
Quick Links
Download this manual
See also:
User Manual
Advertisement
Table of Contents

Related Manuals for Billion BiGuard 50G


Summary of Contents for Billion BiGuard 50G
- Page 1 BiGuard 50G 802.11g Dual Security Gateway www.billion.uk.com User’s Manual Deleted: 6 Version Release 1.03 (FW:1.xx) Deleted: 00 Deleted: 05...
- Page 2 Published by Billion Electric Corporation. All rights reserved. Disclaimer Billion does not assume any liability arising out of the application of use of any products or software described herein. Neither does it convey any license under its patent rights nor the patent rights of others. Billion reserves the right to make changes in any products described herein without notice.
-
Page 3: Safety Warnings
• DO NOT use your BiGuard 50G and any accessories outdoors. • If you wall mount your BiGuard 50G, make sure that no electrical, water or gas pipes will be damaged during installation. • DO NOT install or use your BiGuard 50G during a thunderstorm. -
Page 4: Table Of Contents
Table of Contents Chapter 1: Introduction 1.1 Overview 1.2 Product Highlights 1.2.1 Increased Bandwidth, Scalability and Resilience 1.2.2 Virtual Private Network Support 1.2.3 Advanced Firewall Security 1.2.4 Intelligent Bandwidth Management 1.3 Package Contents 1.3.1 Front Panel 1.3.2 Rear Panel 1.3.3 Cabling Chapter 2: Router Applications 2.1 Overview 2.2 Bandwidth Management with QoS... - Page 5 2.6.2 VPN Planning - Fail Over 2.6.3 Concentrator Chapter 3: Getting Started 3.1 Overview 3.2 Before You Begin 3.3 Connecting Your Router 3.4 Configuring PCs for TCP/IP Networking 3.4.1 Overview 3.4.2 Windows XP 3.4.2.1 Configuring 3.4.2.2 Verifying Settings 3.4.3 Windows 2000 3.4.3.1 Configuring 3.4.3.2 Verifying Settings 3.4.4 Windows 98 / ME...
-
Page 6: Quick Start
4.2.3 Routing Table 4.2.4 Session Table 4.2.5 DHCP Table 4.2.6 IPSec Status 4.2.7 PPTP Status 4.2.8 Traffic Statistics 4.2.9 CPU Statistics 4.2.10 System Log 4.3 Quick Start 4.3.1 DHCP 4.3.2 Static IP 4.3.3 PPPoE 4.3.4 PPTP 4.3.5 Big Pond 4.4 Configuration 4.4.1 LAN 4.4.1.1 Ethernet 4.4.1.2 Wireless Security... - Page 7 4.4.4.3 Firmware Upgrade 4.4.4.4 Backup / Restore 4.4.4.5 Restart 4.4.4.6 Password 4.4.5 Firewall 4.4.5.1 Packet Filter 4.4.5.2 URL Filter 4.4.5.3 Ethernet MAC Filter 4.4.5.4 Wireless MAC Filter 4.4.5.5 Block WAN Request 4.4.5.6 Intrusion Detection 4.4.6 VPN 4.4.6.1 IPSec 4.4.6.1.1 IPSec Wizard 4.4.6.1.2 IPSec Policy 4.4.6.2 PPTP 4.4.7 QoS...
- Page 8 Chapter 5: Troubleshooting - * see the CD provided 5.1 Basic Functionality 5.1.1 Router Won’t Turn On 5.1.2 LEDs Never Turn Off 5.1.3 LAN or Internet Port Not On 5.1.4 Forgot My Password 5.2 LAN Interface 5.2.1 Can’t Access Router from the LAN 5.2.2 Can’t Ping Any PC on the LAN 5.2.3 Can’t Access Web Configuration Interface 5.2.3.1 Pop-up Windows...
- Page 9 Appendix D: Network, Routing, and Firewall Basics D.1 Network Basics D.1.1 IP Addresses D.1.1.1 Netmask D.1.1.2 Subnet Addressing D.1.1.3 Private IP Addresses D.1.2 Network Address Translation (NAT) D.1.3 Dynamic Host Configuration Protocol (DHCP) D.2 Router Basics D.2.1 Why use a Router? D.2.2 What is a Router? D.2.3 Routing Information Protocol (RIP) D.3 Firewall Basics...
- Page 10 Appendix F: IPSec Logs and Events F.1 IPSec Log Event Categories F.2 IPSec Log Event Table Appendix G: Bandwidth Management with QoS G.1 Overview G.2 What is Quality of Service? G.3 How Does QoS Work? G.4 Who Needs QoS? G.4.1 Home Users G.4.2 Office Users Appendix H: Router Setup Examples H.1 Outbound Fail Over...
-
Page 11: Product Highlights
IPSec VPN is up to 30 simultaneous IPSec VPN connections are possible on BiGuard 50G, with performance of up to 30Mbps. PPTP VPN is up to 4 simultaneous PPTP VPN... -
Page 12: Advanced Firewall Security
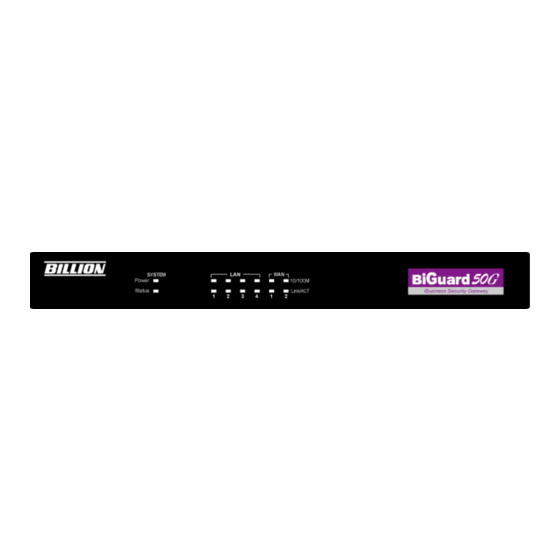
1.2.4 Intelligent Bandwidth Management BiGuard 50G utilizes Quality of Service (QoS) to give you full control over the priority of both incoming and outgoing data, ensuring that critical data such as customer information moves through your network, even while under a heavy load. - Page 13 Function Power A solid light indicates a steady connection to a power source. Status A blinking light indicates the device is writing to flash memory. Lit when connected to an Ethernet device. 1 – 4 10/100M : Lit green when connected at 100Mbps. Not lit when connected at 10Mbps.
-
Page 14: Rear Panel
1.3.2 Rear Panel Port Function Wireless One detachable 2.4GHz 5dbi SMA antenna Antenna WAN2 10/100M Ethernet port (with auto WAN2 crossover support); connect xDSL/Cable modem here. WAN1 10/100M Ethernet port (with auto WAN1 crossover support); connect xDSL/Cable modem here. Connect a UTP Ethernet cable (Cat-5 or Cat-5e) to one of the eight LAN ports when 1 —... -
Page 15: Cabling
One of the most common causes of networking problems is bad cabling. Make sure that all connected devices are turned on. On the front panel of BiGuard 50G, verify that the LAN link and WAN line LEDs are lit. If they are not, check to see that you are... -
Page 16: Chapter 2: Router Applications
Chapter 2: Router Applications 2.1 Overview Your BiGuard 50G router is a versatile device that can be configured to not only protect your network from malicious attackers, but also ensure optimal usage of available bandwidth with Quality of Service (QoS) and both Inbound and Outbound Load Balancing. -
Page 17: Qos Policies For Different Applications
Deleted: 2.2.2 QoS Policies for Different Applications By setting different QoS policies according to the applications you are running, you can use BiGuard 50G to optimize the bandwidth that is being used on your network. VoIP Normal PCs Restricted PC As illustrated in the diagram above, applications such as Voiceover IP (VoIP) require low network latencies to function properly. -
Page 18: Guaranteed / Maximum Bandwidth
2.2.3 Guaranteed / Maximum Bandwidth Setting a Guaranteed Bandwidth ensures that a particular service receives a minimum percentage of bandwidth. For example, you can configure BiGuard 50G to reserve 10% of the available bandwidth for a particular computer on the network to transfer files. -
Page 19: Priority Bandwidth Utilization
2.2.5 Priority Bandwidth Utilization Assigning priority to a certain service allows BiGuard 50G to give either a higher or lower priority to traffic from this particular service. Assigning a higher priority to an application ensures that it is processed ahead of applications with a lower priority... -
Page 20: Management By Ip Or Mac Address
Deleted: 2.2.6 Management by IP or MAC address BiGuard 50G can also be configured to apply traffic policies based on a particular IP or MAC address. This allows you to quickly assign different traffic policies to a specific computer on the network. -
Page 21: Dscp (Matching)
These markings can be used to identify traffic within the network. 2.3 Outbound Traffic This section outlines some of the ways you can use BiGuard 50G to manage outbound traffic. 2.3.1 Outbound Fail Over Configuring BiGuard 50G for Outbound Fail Over allows you to ensure that outgoing... -
Page 22: Outbound Load Balancing
In the above example, PC 1 (IP_192.168.2.2) and PC 2 (IP_192.168.2.3) are connected to the Internet via WAN1 (IP_230.100.100.1) on BiGuard 50G. Should WAN1 fail, Outbound Fail Over tells BiGuard 50G to reroute outgoing traffic to WAN2 (IP_213.10.10.2). Configuring your BiGuard 50G for Outbound Fail Over provides a more reliable connection for your outgoing traffic. -
Page 23: Inbound Traffic
IP address of the client. By balancing the load between WAN1 and WAN2, your BiGuard 50G can ensure that outbound traffic is efficiently handled by making sure that both ports are equally sharing the load, preventing situations where one port is completely saturated by outbound traffic. -
Page 24: Inbound Fail Over
In the above example, an FTP Server (IP_192.168.2.2) and an HTTP Server (IP_192.168.2.3) are connected to the Internet via WAN1 (ftp.billion.dyndns.org) on BiGuard 50G. A remote computer is trying to access these servers via the Internet. Under normal circumstances, the remote computer will gain access to the network via WAN1. -
Page 25: Inbound Load Balancing
For example, a sales force can be directed to www.billion2.dyndns.org, while the R&D group can access www.billion3.dyndns.org. By balancing the load between WAN1 and WAN2, your BiGuard 50G can ensure that inbound traffic is efficiently handled with both ports equally sharing the load, preventing situations where service is slow because one port is completely saturated by inbound traffic. -
Page 26: Dns Inbound
DNS Inbound is a three step process. First, a DNS request is made to the router via a remote PC. BiGuard 50G, based on settings specified by the user, will direct the requesting PC to the correct WAN port by replying the selected WAN IP address through the built-in DNS server. -
Page 27: Dns Inbound Fail Over
2.5.1 DNS Inbound Fail Over BiGuard 50G can be configured to reply the WAN2 IP address for the DNS domain name request should WAN1 fail. In the above example, an FTP Server (IP_192.168.2.2) and an HTTP Server (IP_192.168.2.3) are connected to the Internet via WAN1 (IP_200.200.200.1) on BiGuard 50G. -
Page 28: Dns Inbound Load Balancing
If WAN2 is experiencing a heavy load, BiGuard 50G responds to incoming DNS requests with WAN1. By balancing the load between WAN1 and WAN2, your BiGuard 50G can ensure that inbound traffic is efficiently handled, making sure that both ports are equally sharing the load and preventing situations where service is slow because one port is completely saturated by inbound traffic. - Page 29 HTTP request to the WAN1 IP address (6). The HTTP request will be send to BiGuard 50G’s URL Host Map (7). The Host Map will then redirect the HTTP request to the HTTP server (8). The HTTP server will reply (9). The URL Host Map will route the packet through WAN1 to the user (10).
-
Page 30: Virtual Private Networking
As such, it is perfect for connecting branch offices to headquarters across the Internet in a secure fashion. The following section discusses Virtual Private Networking with BiGuard 50G. 2.6.1 General VPN Setup There are typically three different VPN scenarios. The first is a Gateway to Gateway setup, where two remote gateways communicate over the Internet via a secure tunnel. -
Page 31: Vpn Planning - Fail Over
The following sections demonstrate the various ways of using BiGuard 50G to setup your VPN. 2.6.2 VPN Planning - Fail Over Configuring your VPN with Fail Over allows BiGuard 50G to automatically default to WAN2 should WAN1 fail. Because the dynamic domain name biguard.billion.com is configured for both WAN1 and WAN2, the active WAN port will announce the domain name through the WAN IP address. - Page 32 WAN1 through a secure VPN tunnel. Should WAN1 fail, outbound traffic from BiGuard 50G will automatically be redirected to WAN2. This process is completely transparent to the remote gateway, as BiGuard 50G will automatically update the domain name (biguard.billion.com) with the WAN2 IP address.
-
Page 33: Concentrator
VPN tunnel to headquarter with the exception of LAN-side traffic. This way, all branch offices can connect to each other through headquarter via the headquarter’s firewall management. You can also configure BiGuard 50G to function as a VPN Concentrator: Please refer to appendix H for example settings. -
Page 34: Chapter 3: Getting Started
Linux, Mac OS, and Windows 98/Me/NT/2000/XP operating systems. The following chapter takes you through the very first steps to configuring your network for BiGuard 50G. Take a look and see how easy it is to get your network up and running. 3.2 Before You Begin BiGuard 50G is a flexible and powerful networking device. -
Page 35: Connecting Your Router
4. Prepare to physically connect BiGuard 50G to Cable or DSL modems and a computer. Be sure to also review the Safety Warnings located in the preface of this manual before working with your BiGuard 50G. -
Page 36: Configuring Pcs For Tcp/Ip Networking
DHCP server. If using a fixed IP address, it is important to remember that it must be in the same subnet as the router. The default IP address of BiGuard 50G is 192.168.1.254 with a subnet mask of 255.255.255.0. Using the default configuration, networked PCs must reside in the same subnet, and have an IP address in the range of 192.168.1.1 to 192.168.1.253. -
Page 37: Windows Xp
If you are using Windows 3.1, you must purchase a third-party TCP/IP application package. Any TCP/IP capable workstation can be used to communicate with or through BiGuard 50G. To configure other types of workstations, please consult the manufacturer’s documentation. 3.4.2 Windows XP 3.4.2.1 Configuring... - Page 38 3. Select Internet Protocol (TCP/IP) and click Properties. 4a. To have your PC obtain an IP address automatically, select the Obtain an IP...
- Page 39 address automatically and Obtain DNS server address automatically radio buttons. 4b. To manually assign your PC a fixed IP address, select the Use the following IP address radio button and enter your desired IP address, subnet mask, and default gateway in the blanks provided. Remember that your PC must reside in the same subnet mask as the router.
-
Page 40: Verifying Settings
To verify your settings using a command prompt: 1. Click Start > Programs > Accessories > Command Prompt. 2. In the Command Prompt window, type ipconfig and then press ENTER. If you are using BiGuard 50G’s default settings, your PC should have:... - Page 41 - An IP address between 192.168.1.1 and 192.168.1.253 - A subnet mask of 255.255.255.0 To verify your settings using the Windows XP GUI: 1. Click Start > Settings > Network Connections.
- Page 42 2. Right click one of the network connections listed and select Status from the pop-up menu. 3. Click the Support tab.
-
Page 43: Windows 2000
If you are using BiGuard 50G’s default settings, your PC should: - Have an IP address between 192.168.1.1 and 192.168.1.253 - Have a subnet mask of 255.255.255.0 3.4.3 Windows 2000 3.4.3.1 Configuring 1. Select Start > Settings > Control Panel. - Page 44 2. In the Control Panel window, double-click Network and Dial-up Connections. 3. In Network and Dial-up Connections, double-click Local Area Connection.
- Page 45 4. In the Local Area Connection window, click Properties. 5. Select Internet Protocol (TCP/IP) and click Properties.
- Page 46 6a. To have your PC obtain an IP address automatically, select the Obtain an IP address automatically and Obtain DNS server address automatically radio buttons. 6b. To manually assign your PC a fixed IP address, select the Use the following IP address radio button and enter your desired IP address, subnet mask, and default gateway in the blanks provided.
- Page 47 7. Click OK to finish the configuration.
-
Page 48: Verifying Settings
1. Click Start > Programs > Accessories > Command Prompt. 2. In the Command Prompt window, type ipconfig and then press ENTER. If you are using BiGuard 50G’s default settings, your PC should have: - An IP address between 192.168.1.1 and 192.168.1.253... -
Page 49: Windows 98 / Me
- A subnet mask of 255.255.255.0 3.4.4 Windows 98 / Me 3.4.4.1 Installing Components To prepare Windows 98/Me PCs for TCP/IP networking, you may need to manually install TCP/IP on each PC. To do this, follow the steps below. Be sure to have your Windows CD handy, as you may need to insert it during the installation process. - Page 50 You must have the following installed:...
- Page 51 - An Ethernet adapter - TCP/IP protocol - Client for Microsoft Networks If you need to install a new Ethernet adapter, follow these steps: a. Click Add. b. Select Adapter, then Add. c. Select the manufacturer and model of your Ethernet adapter, then click OK.
- Page 52 If you need TCP/IP: a. Click Add.
- Page 53 b. Select Protocol, then click Add. c. Select Microsoft. TCP/IP, then OK. If you need Client for Microsoft Networks: a. Click Add.
-
Page 54: Configuring
b. Select Client, then click Add. c. Select Microsoft. Client for Microsoft Networks, and then click OK. 3. Restart your PC to apply your changes. 3.4.4.2 Configuring 1. Select Start > Settings > Control Panel. - Page 55 2. In the Control Panel, double-click Network and choose the Configuration tab.
- Page 56 3. Select TCP / IP > ASUSTek or the name of any Network Interface Card (NIC) in your PC and click Properties. 4. Select the IP Address tab and click the Obtain an IP address automatically radio button.
- Page 57 5. Select the DNS Configuration tab and select the Disable DNS radio button. 6. Click OK to apply the configuration.
-
Page 58: Verifying Settings
3.4.4.3 Verifying Settings To check the TCP/IP configuration, use the winipcfg.exe utility: 1. Select Start > Run. 2. Type winipcfg, and then click OK. 3. From the drop-down box, select your Ethernet adapter. -
Page 59: Factory Default Settings
The window is updated to show your settings. Using the default BiGuard 50G settings, your PC should have: - An IP address between 192.168.1.1 and 192.168.1.253 - A subnet mask of 255.255.255.0 - A default gateway of 192.168.1.254 3.5 Factory Default Settings... -
Page 60: Username And Password
The Status LED will remain solid as the device boots. Once the boot sequence is complete, the LED will shut off, indicating that BiGuard 50G is ready. 3.5.2 LAN and WAN Port Addresses... -
Page 61: Information From Your Isp
If your account uses PPP over Ethernet (PPPoE), you will need to enter your login name and password when configuring your BiGuard 50G. After the network and firewall are configured, BiGuard 50G will login automatically, and you will no longer need to run the login program from your PC. -
Page 62: Configuration Information
- One or more domain name server (DNS) IP addresses Depending on your ISP, a host name and domain suffix may also be provided. If any of these items are dynamically supplied by the ISP, your BiGuard 50G will automatically acquire them. - Page 63 2. Double-click the Network icon. 3. In the Network Connections window, right-click Local Area Connection and select Properties.
- Page 64 4. Select Internet Protocol (TCP/IP) and click Properties. 5. If an IP address, subnet mask and a Default gateway are shown, write down the information. If no address is present, your account’s IP address is dynamically...
- Page 65 assigned. Click the Obtain an IP address automatically radio button. 6. If any DNS server addresses are shown, write them down. Click the Obtain DNS server address automatically radio button. 7. Click OK to save your changes.
-
Page 66: Web Configuration Interface
3.7 Web Configuration Interface BiGuard 50G includes a Web Configuration Interface for easy administration via virtually any browser on your network. To access this interface, open your web browser, enter the IP address of your router, which by default is 192.168.1.254, and click Go. - Page 67 Deleted: If the Web Configuration Interface appears, congratulations! You are now ready to configure your BiGuard 50G. If you are having trouble accessing the interface, please refer to Chapter 5: Troubleshooting on the CD for possible resolutions.
-
Page 68: Chapter 4: Router Configuration
Chapter 4: Router Configuration 4.1 Overview The Web Configuration Interface makes it easy for you to manage your network via any PC connected to it. On the Web Configuration homepage, you will see the navigation pane located on the left hand side. From it, you will be able to select various options used to configure your router. - Page 69 The following sections will show you how to configure your router using the Web Configuration Interface. Please consult the manual on the CD provided for detailed configuration – see sections 4.2-4.8 4.2 Status The Status menu displays the various options that have been selected and a number of statistics about your BiGuard 50G.
- Page 70 The system up-time is restarted when there is a power failure or upon software or hardware reset. Registration: Click on the Register button to open a web page on Billion’s website to register the BiGuard 50G. Registration enables users to access new firmware, a user’s manual, latest product news, quick customer support, and FAQ.
- Page 71 Telephone Support for Internet Access ONLY is available during office hours from Mon-Fri 10am–5pm on 0870-8501528. If you are successfully connected to the Internet and have a support query please contact www.billion.uk.com/esupport submit a ticket. This symbol on the product or in the instructions means that your electrical and electronic equipment should be disposed at the end of its life separately from your household waste.
Need help?
Do you have a question about the BiGuard 50G and is the answer not in the manual?
Questions and answers