Interlogix TruVision User Manual
Outdoor ip camera
Hide thumbs
Also See for TruVision:
- User manual (169 pages) ,
- Quick start manual (113 pages) ,
- Configuration manual (68 pages)
Table of Contents
Advertisement
Advertisement
Table of Contents

Related Manuals for Interlogix TruVision


Summary of Contents for Interlogix TruVision
- Page 1 TruVision Outdoor IP Camera User Manual P/N 1072587B-EN • REV 1.0 • ISS 17JAN13...
- Page 2 Copyright © 2013 UTC Fire & Security Americas Corporation, Inc. Interlogix is part of UTC Climate Controls & Security, a unit of United Technologies Corporation. All rights reserved. Trademarks and The TruVision and Interlogix names and logos are trademarks of patents United Technologies.
-
Page 3: Table Of Contents
Mounting the bullet camera 12 Using the camera with TVR 60/ TVN 20/ TVN 40/ LNVR and other systems 12 Using the camera with TruVision Navigator 13 Chapter 3 Network and streaming configuration 15 Checking your web browser security level 15... - Page 4 Searching event logs 46 Archiving recorded files 48 Controlling zoom and focus 49 Appendix A Specifications 51 TruVision outdoor IP dome cameras 51 TruVision outdoor IP bullet cameras 52 Appendix B Pin definitions 53 Index 55 TruVision Outdoor IP Camera User Manual...
-
Page 5: Chapter 1 Introduction
Chapter 1 Introduction Product overview This is the user manual for TruVision Outdoor IP camera models: TVC-N225E-2M-N(-P) (IP bullet camera) TVC-M1245E-2M-N(-P) (1.3MPX WDR bullet camera) TVD-N225E-2M-N(-P) (IP dome camera) TVD-M1245E-2M-N(-P) (1.3MPX WDR dome camera) Features This section describes the camera features. - Page 6 0BChapter 1: Introduction TruVision Outdoor IP Camera User Manual...
-
Page 7: Installation
Chapter 2 Installation This chapter provides information on how to install the TruVision Outdoor IP dome and bullet cameras. Installation environment When installing your product, consider these factors: • Electrical: Install electrical wiring carefully. It should be done by qualified service personnel. -
Page 8: Package Contents
• Video cable for testing (except bullet cameras) • Quick start guide • CD with user manual and TruVision Device Finder. CAUTION: Use direct plug-in UL listed power supplies marked Class 2/CE certified or LPS (limited power source) of the required output rating as listed on the unit. -
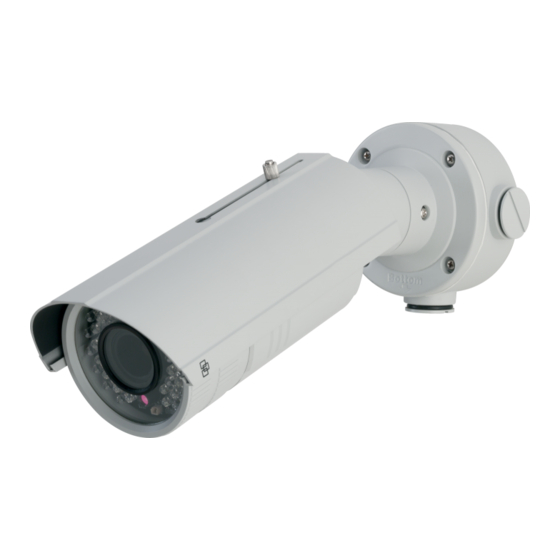
Page 9: Camera Descriptions
5. Micro SD slot 3. ACT LED: The blue LED blinks when the 6. Reset switch. network is correctly functioning. Figure 2: Outdoor IP bullet camera Sun shield Mounting bracket Safety cable Threaded knockout for cable access TruVision Outdoor IP Camera User Manual... -
Page 10: Setting Up The Camera
5. Program the camera to suit its location. See “Chapter 4 Camera configuration” on page 25. Connecting the devices A qualified service person, complying with all applicable codes, should perform all required hardware installation. TruVision Outdoor IP Camera User Manual... -
Page 11: Accessing The Sdhc Card
(see Figure 1 on page 5). The card is not supplied with the camera. Video and log files stored on the SDHC card can only be accessed via the Web browser. You cannot access the card using TruVision Navigator or a recording device. TruVision Outdoor IP Camera User Manual... -
Page 12: Mounting The Dome Cameras On A Ceiling
Cable hole 2. Secure the housing to the ceiling with screws. 3. Loosen the screws on the dome enclosure (1) using the supplied hex wrench and remove the enclosure and the dome liner (2). TruVision Outdoor IP Camera User Manual... - Page 13 Side knockout 5. Connect the network and power cables. 6. While viewing the video on the monitor, adjust horizontally and vertically the camera pan and tilt. Adjust the lens focus to get optimal video effect. TruVision Outdoor IP Camera User Manual...
- Page 14 If you need to route the cables from the camera base, cut a cable hole in the wall. Cable hole 2. Secure the housing to the wall with screws. Note: Position the threaded side knockout facing downwards to prevent moisture from entering the camera. TruVision Outdoor IP Camera User Manual...
- Page 15 5. While viewing the video on the monitor, adjust horizontally and vertically the camera pan and tilt. Adjust the lens focus to get optimal video effect. TruVision Outdoor IP Camera User Manual...
-
Page 16: Mounting The Bullet Camera
6. Adjust the camera position and angle as required. Using the camera with TVR 60/ TVN 20/ TVN 40/ LNVR and other systems Please refer to the head-end user manuals for instructions on connecting and operating the camera with these systems. TruVision Outdoor IP Camera User Manual... -
Page 17: Using The Camera With Truvision Navigator
Using the camera with TruVision Navigator A camera must be connected to a TVR 60/ TVN 20/ TVN 40 in order to be operated by TruVision Navigator. Please refer to the TruVision Navigator user manual for instructions on operating the camera with the TruVision Navigator. - Page 18 1BChapter 2: Installation TruVision Outdoor IP Camera User Manual...
-
Page 19: Network And Streaming Configuration
Tools menu. 2. On the Security tab, click the zone to which you want to assign a web site under “Select a web content zone to specify its security settings”. 3. Click Custom Level. TruVision Outdoor IP Camera User Manual... -
Page 20: Windows Vista And 7 Users
Internet Explorer for Windows Vista and Windows 7 operating systems have increased security measures to protect your PC from any malicious software being installed. To have complete functionality of the Web browser interface with Windows Vista and Windows 7, do the following: TruVision Outdoor IP Camera User Manual... -
Page 21: Accessing The Camera Over The Internet
To access the camera online: 1. In the web browser enter the camera’s IP address (default is 192.168.1.70). Use the tool, TruVision Device Finder, enclosed on the CD to find the IP address of the camera. The Login dialog box appears. -
Page 22: Overview Of The Camera Web Browser
DVRs, is not changed. Figure 5: Web browser interface Item Name Description PTZ controls For autofocus. Note: Only the zoom function is available for fixed IP cameras with motorized lens. TruVision Outdoor IP Camera User Manual... -
Page 23: Configuring The Camera's Network Settings
The camera Web browser lets you configure the camera remotely using your PC. The camera is configured using on-screen display (OSD) menus. In the Web browser window click the Configuration button on the toolbar to display the TruVision Outdoor IP Camera User Manual... -
Page 24: Local Configuration
Display mode Specifies the width/height ratio of the image. Options include: Full screen, 4:3, 16:9 or adjustable. Package file size Specifies the maximum file size. Options include: 128 MB, 256 MB and 512 MB TruVision Outdoor IP Camera User Manual... - Page 25 See “Information about the camera” on page 22. Channel parameters Defines the OSD properties of camera information, recording parameters and schedules, motion detection parameters, image quality, alarm responses, and overlay text. See “Camera configuration” on page 25. TruVision Outdoor IP Camera User Manual...
-
Page 26: Information About The Camera
Use the “Network Parameters” folder to define the network settings. See Figure 8 on page 23 for further information. Note: When a network parameter is modified, the camera will prompt you to save and reboot. TruVision Outdoor IP Camera User Manual... - Page 27 From the NIC Type drop-down list, select the required value. Enter the values for the IP address, subnet mask, gateway, DNS server and HTTP port. Click Save to save changes. TruVision Outdoor IP Camera User Manual...
- Page 28 “Network settings” menu. 4. Click the E-mail setting subfolder to open its window and enter the SMTP server, SMTP port, user name and password and the e-mail sender and receiver addresses. Click Save to save changes. TruVision Outdoor IP Camera User Manual...
-
Page 29: Camera Configuration
IR mode, image flip, power mode and white balance. • Time & date: Defines the synchronization of the time and date with the NTP server. TruVision Outdoor IP Camera User Manual... -
Page 30: Defining How Information Is Displayed
4. Select the date format from the Date format list box. Formats include: • YYYY-MM-DD • MM-DD-YYYY (Default) • DD-MM-YYYY 5. Select the time format from the Time format list box. Formats include: 24- hour and 12-hour. TruVision Outdoor IP Camera User Manual... -
Page 31: Defining The System Time
Synchronize with an NTP server: Check the enable box and enter the server NTP address. - Or - Set manually: Enter the current date and time values. 3. Select your time zone. 4. Click Save to save changes. TruVision Outdoor IP Camera User Manual... -
Page 32: Alarm Parameters
4. Select another day of the week to set up its event schedule. - Or - Copy the event schedule to other days of the week by checking the days required and click Copy. 5. Click Save to save changes. TruVision Outdoor IP Camera User Manual... -
Page 33: Defining Recording Parameters
Value is prepopulated High. It cannot be changed. Bit rate type Specifies whether variable or fixed bit rate is used. Variable produces higher quality results suitable for video downloads and streaming. Default is Constant. TruVision Outdoor IP Camera User Manual... -
Page 34: Defining A Recording Schedule
To disable recording, deselect the option. 3. Select the post record time from the drop-down list. 4. Select whether the recording will be for the whole week (All day recording) or for specific days of the week (Section recording). TruVision Outdoor IP Camera User Manual... -
Page 35: Motion Detection Alarms
You can define the area on screen where the motion is detected, the level of sensitivity to motion, the schedule when the camera is sensitive to detecting TruVision Outdoor IP Camera User Manual... - Page 36 See “Events scheduling” on page 28 and “Defining a recording schedule” on page 30. 1. In the Channel Parameters folder click the Motion detection subfolder to open its window. TruVision Outdoor IP Camera User Manual...
-
Page 37: Adding Extra On-Screen Text
Each text line can be positioned anywhere on screen. To add on-screen text: 1. In the Channel Parameters folder click the Text Overlay subfolder to open its window. TruVision Outdoor IP Camera User Manual... -
Page 38: Configuring The Video Image
IR mode, image flip, power mode and white balance. Figure 13: Camera image settings menu Parameter Description Brightness Modifies the different elements of picture quality by adjusting Video saturation the position of the values for each of parameter. Sharpness TruVision Outdoor IP Camera User Manual... - Page 39 Select one of the options: Auto: White balance is determined automatically. White balance 1: White balance for indoor environments. White balance 2: White balance for outdoor environments. This option is only available on 1.3 MPX camera models. TruVision Outdoor IP Camera User Manual...
-
Page 41: Camera Management
There is no default password provided for all users. Users can modify their password. However, only the administrator can create a password for a user. Note: Keep the admin password in a safe place. If you should forget it, contact technical support. TruVision Outdoor IP Camera User Manual... -
Page 42: Adding And Deleting Users
5. Enter the IP address and physical address (MAC address) of the user’s computer. 6. Select the type of user from the drop-down list. The options are Viewer and Operator. 7. Click to save the changes and return to the main “User management” window. TruVision Outdoor IP Camera User Manual... -
Page 43: Formatting The Sdhc Card
Before formatting the HDD (the SDHC card) stop all recording. Once formatting is completed, reboot the camera as otherwise the device will not function properly. When the card becomes full, it overwrites the oldest recordings. TruVision Outdoor IP Camera User Manual... -
Page 44: Restoring Default Settings
(digicap.DAV) into the flash memory. You need to upgrade firmware when it has become outdated. When you upgrade the firmware, all existing settings are unchanged. Only the new features are added with their default settings. TruVision Outdoor IP Camera User Manual... -
Page 45: Rebooting The Camera
4. Click Update. You will receive a prompt asking you to reboot the camera. Rebooting the camera The camera can be easily rebooted remotely. Click the folder Reboot device to open its window. Click to the question “Restart the device?” The camera reboots. TruVision Outdoor IP Camera User Manual... - Page 46 4BChapter 5: Camera management TruVision Outdoor IP Camera User Manual...
-
Page 47: Chapter 6 Camera Operation
See “Figure 5: Web browser interface” on page 18 for the description of the interface. You can stop and start live view by clicking the Start/stop live view button the bottom of the screen. TruVision Outdoor IP Camera User Manual... -
Page 48: Playing Back Recorded Video
SDHC card. To search recorded video stored on the camera’s SDHC card for playback, click Playback on the menu toolbar. The Playback window displays. See Figure 16 on page 45. TruVision Outdoor IP Camera User Manual... - Page 49 The timeline can also be scrolled to earlier or later periods for play back. Time moment Vertical bar shows where you are in the playback recording. The current time and date are also displayed. TruVision Outdoor IP Camera User Manual...
-
Page 50: Searching Event Logs
The Log window appears. See Figure 17 on page 47. Note: You must have view log access rights to search and view logs. See “User management” on page 37 for more information. TruVision Outdoor IP Camera User Manual... - Page 51 Transparent Channel, Net Stop Transparent Channel, Net Get Parameter, Net Config, Net get Status, Net Alert On, Net Alert Off, Net Reboot, BiComStart (Start Voice Talk), BiComStop (Stop Voice Talk), Net Upgrade, Net File Play, Net Time Play, Net PTZ TruVision Outdoor IP Camera User Manual...
-
Page 52: Archiving Recorded Files
To archive a recorded video segment during playback: 1. While playing back a recorded file click the save button to start recording and click it again to stop recording. A video segment is created. TruVision Outdoor IP Camera User Manual... -
Page 53: Controlling Zoom And Focus
PTZ. Center button is used to start auto-pan by the PTZ dome camera. Zoom, focus and iris: Adjusts zoom, focus and iris. PTZ movement: Adjusts the speed of PTZ movement. Turns on/off camera light Turns on/off camera wiper Auto focus Initializes the lens TruVision Outdoor IP Camera User Manual... - Page 54 5BChapter 6: Camera operation TruVision Outdoor IP Camera User Manual...
-
Page 55: Appendix A Specifications
Environmental rating IP66 PC requirements Intel-based PC 1 GHz or faster Memory 1 GB RAM Operating system Windows® XP, Vista or Windows 7 Direct X 9.0 or later Browser Microsoft Internet Explorer 6.0 or later TruVision Outdoor IP Camera User Manual... -
Page 56: Truvision Outdoor Ip Bullet Cameras
CoS 802.1 p/Q, QoS, IPv4 PC requirements Intel-based PC 1 GHz or faster Memory 1 GB RAM Operating system Windows® XP, Vista or Windows 7 Direct X 9.0 or later Browser Microsoft Internet Explorer 6.0 or later TruVision Outdoor IP Camera User Manual... -
Page 57: Appendix B Pin Definitions
Orange Orange White-Green White-Green Blue Blue White/Blue White/Blue Green Green White/Brown White/Brown Brown Brown Figure 20: Cross-over cable White/Orange White/Orange Orange Orange White-Green White-Green Blue Blue White/Blue White/Blue Green Green White/Brown White/Brown Brown Brown TruVision Outdoor IP Camera User Manual... - Page 58 7BAppendix B: Pin definitions Please make sure your connected cables have the same pin assignment and color as above before deploying the cables in your network. TruVision Outdoor IP Camera User Manual...
-
Page 59: Index
Live view mode starting, 43 Logging on and off, 43 Date format set up, 26 Logs Day/night setup, 35 information type, 47 Default settings search logs, 46 restore, 40 viewing logs, 46 Device information TruVision Outdoor IP Camera User Manual... - Page 60 18 configuring, 29 Web browser security level checking, 15 White balance setup, 35 Wiring the bullet camera, 7 Saturation setup, 19, 34 Wiring the dome camera, 7 SDHC card accessing in camera, 7 TruVision Outdoor IP Camera User Manual...
Need help?
Do you have a question about the TruVision and is the answer not in the manual?
Questions and answers