Table of Contents
Advertisement
Quick Links
OWNER'S MANUAL - OPERATION/INSTALLATION INSTRUCTIONS
Model RM-4610, no Digital Magic
Model RM-DM61 with Digital Magic
Model RM-DM55 with Digital Magic
INSTALL "FRONT" INSCRIBED
ON BASE TOWARD FRONT
OF VEHICLE!
WINEGARD
RV Digital Satellite System
with RS-1000 Antenna
Winegard Company • 3000 Kirkwood Street • Burlington, IA 52601
319/754-0600 • FAX 319/754-0787 • www.winegard.com 2451070 Rev5 12/12
Elevation Sensor
TM
TM
(No Power Supply)
TM
Made in U.S.A.
1
®
Elevation Sensor
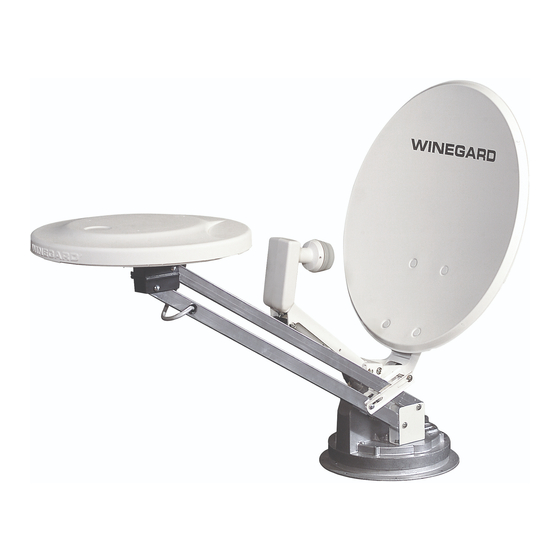
PARTS INCLUDED:
Reflector (dish)
Gasket
RS-1000 antenna
Interior parts
Mount/base assembly
Hardware
Models RM-DM61/DM55
Electronic elevation sensor
Models RM-4610/DM61
Power supply
Advertisement
Table of Contents

Subscribe to Our Youtube Channel
Related Manuals for Winegard RM-4610


Summary of Contents for Winegard RM-4610
- Page 1 Mount/base assembly Hardware Models RM-DM61/DM55 Electronic elevation sensor INSTALL “FRONT” INSCRIBED Models RM-4610/DM61 ON BASE TOWARD FRONT Power supply OF VEHICLE! Winegard Company • 3000 Kirkwood Street • Burlington, IA 52601 319/754-0600 • FAX 319/754-0787 • www.winegard.com 2451070 Rev5 12/12...
- Page 2 4. Do lower antenna before moving vehicle. 4. Don’t apply paint on top of base plate or anywhere on STEP 3. Press button on Winegard Digital Display wall STEP 3. Slowly raise, then lower the antenna until you the lift.
-
Page 3: Installation And Assembly
CAUTION: DO NOT drill through wiring. Remove cable from LNBF before testing. Carefully drill a 1-3/4” hole through roof and ceiling of 6. Contact your dealer or Winegard Technical Services at vehicle. Inspect hole to make sure wiring is intact. 800/788-4417. - Page 4 STEP 7. Facing the front of the dish, find coax cables STEP 3. Remove backing from gasket. Attach FIGURE 9 FIGURE 6 adhesive side to base plate. IF YOU ARE attached to side of the feed arm, Figure 9. Measure 24” of coax from this point and mark.
- Page 5 FOR RM-DM61/RM-DM55 ONLY DIGITAL ELEVATION SENSOR ROOF CONNECTIONS The illustrations below show the different methods of connecting wires at roof level. Method will depend on model. Wire colors MUST MATCH (i.e. red to red, green to green, black to black, white to white). Supplied with the DM-2000 only.
- Page 6 Roof Template ALIGN WITH BASEPLATE AREA MARKED “FRONT” POINT TO FRONT OF VEHICLE 1-3/4” DIA. DRILL COMPLETELY THROUGH CEILING 1/8” DRILL BIT 8 HOLES. DO NOT DRILL THROUGH CEILING.
- Page 7 Use ABS (plastic pipe) glue. Worm NOTE: For roofs thicker that 5-1/4”, a longer Gear aluminum hex shaft will be needed. Contact Winegard Company for this part. Threaded CUTTING SHAFT LENGTH, Figure 14A: FIGURE 14A Ceiling Plate Flip down handle on the elevating crank handle.
-
Page 8: Exploded Parts View
CAUTION: After INITIAL FIGURE 15 EXPLODED PARTS VIEW INSTALLATION, the antenna should ROTATE appRoximately 360° FROM TRAVEL POSITION. The pointer on the DIRECTIONAL HANDLE should point towards the RED SCREW on the ROTATION CLAMP when in TRAVEL POSITION. ASSEMBLED VIEW Elevating Shaft Threaded Tube Directional... -
Page 9: Parts List
PARTS LIST SPECIFICATIONS Height when raised ..30” with satellite antenna in vertical position INTERIOR Height in travel position ..8” Ceiling Base HARDWARE KIT Operating radius ..35” (70” diameter circle) RK-CEIL Roof space required ..19.5” x 46.75” Directional Dial LNBF .. - Page 10 REPLACEMENT PARTS KITS HEAD ASSEMBLY RP-RS00 TURRET ASSEMBLY RP-9500 Head w/bracket and nut ....1 Spring ..........1 Pins ..........2 Roll Pin ..........1 E-Clip ..........2 Gear for worm shaft .......1 Elevation gear ........1 Bushing ..........2 REFLECTOR RP-REFL Seal..........2 Dish..........1 O-ring ..........1 Bolt..........4 Clamp ..........2 Nut ..........4 Shaft ..........1...
-
Page 11: Winegard Mobile Products Limited Warranty
Customer must provide proof of purchase to verify the product is under warranty. If the product is brought to an authorized Winegard dealer for service prior to expiration of year one (1) of the warranty period and a defect in material or workmanship is verified by Winegard Technical Services, Winegard Company will cover the Winegard dealer’s labor charges for warranty service.
Need help?
Do you have a question about the RM-4610 and is the answer not in the manual?
Questions and answers