
Subscribe to Our Youtube Channel
Related Manuals for Technicolor TD5130


Summary of Contents for Technicolor TD5130
- Page 1 TD5130 Setup & User Guide Copyright © 2012 Technicolor. All rights reserved. DMS-CTC-20120508-0000 v1.0.
-
Page 2: Table Of Contents
BROADBAND CONNECTION ................23 DSL Connection ..................23 Internet Services ..................24 TOOLBOX ...................... 25 Remote Assistance ..................25 Enable Remote Assistance ................ 25 7.1.1 Disable Remote Assistance ............... 26 7.1.2 Copyright © 2012 Technicolor. All rights reserved. DMS-CTC-20120508-0000 v1.0. - Page 3 Local Network Interface ................38 8.2.1 Wireless Access Point ................39 8.2.2 APPENDIX A WIRELESS CONSIDERATIONS .............. 43 APPENDIX B REGULATORY & SAFETY INFORMATION ..........44 APPENDIX C SPECIFICATIONS ................46 Copyright © 2012 Technicolor. All rights reserved. DMS-CTC-20120508-0000 v1.0.
-
Page 4: Product Overview
▪ Supports Wi-Fi Multimedia (WMM) ▪ Supports Wi-Fi Protected Setup (WPS) for easy connection ▪ Supports wireless data encryption with 64/128-bit WEP standard ▪ Supports enhance security for WPA-TKIP, WPA2-AES, WPA, and WPA2 Copyright © 2012 Technicolor. All rights reserved. DMS-CTC-20120508-0000 v1.0. -
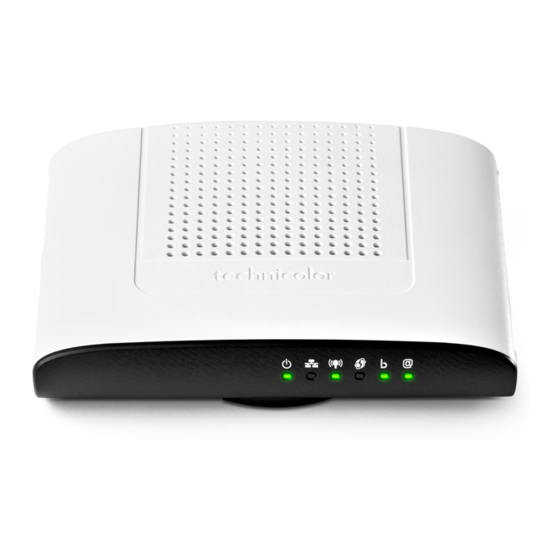
Page 5: Hardware Overview
▪ Flashing GREEN (slow) – DSL line detection in progress. ▪ Flashing GREEN (fast) – Attempts to synchronize with DSL line. ▪ Solid GREEN – DSL connection is established. ▪ Off – Modem power is off. Copyright © 2012 Technicolor. All rights reserved. DMS-CTC-20120508-0000 v1.0. -
Page 6: Rear Panel
Power button Press to turn your device on or off. WPS button Press 1 to 8 seconds to enable or disable WLAN. Press for more than 8 seconds to enable WPS. Copyright © 2012 Technicolor. All rights reserved. DMS-CTC-20120508-0000 v1.0. -
Page 7: Installation
4 To connect more than four computers, use a hub or switch. Connect one end of an RJ-45 cable to the hub or switch and the other end to the computer. Copyright © 2012 Technicolor. All rights reserved. DMS-CTC-20120508-0000 v1.0. -
Page 8: Connect Wireless Devices
3 Connect the other end of the RJ-11 cable to the MODEM port of the splitter. 4 Connect the telephone to the LINE port of the splitter using another RJ-11 cable. Copyright © 2012 Technicolor. All rights reserved. DMS-CTC-20120508-0000 v1.0. -
Page 9: Check The Installation
▪ Ethernet LED ▪ DSL LED The lighted LED indicators vary depending on the type of connection that you make. See “Front Panel” on page for more information about the LED indicators. Copyright © 2012 Technicolor. All rights reserved. DMS-CTC-20120508-0000 v1.0. -
Page 10: Configure The Computer
(TCP/IP) is checked. If not, check it to enable the Properties button. 4 Select Internet Protocol (TCP/IP), and then click Properties. 5 Select Obtain an IP Address automatically and Obtain DNS server address automatically. 6 Click OK. General Page Copyright © 2012 Technicolor. All rights reserved. DMS-CTC-20120508-0000 v1.0. -
Page 11: Windows 7
5 Select Internet Protocol (TCP/IP), and then click Properties. 6 On the General tab, select Obtain an IP Address automatically and Obtain DNS server address General Page automatically. 7 Click OK. Copyright © 2012 Technicolor. All rights reserved. DMS-CTC-20120508-0000 v1.0. -
Page 12: Access The Wireless Gateway
4 Access the Wireless Gateway Use the Web Configurations utility to configure your Wireless Gateway. Login For more advanced configuration, access the Technicolor web configuration utility. 1 Launch the web browser. 2 On the address bar, type http://192.168.1.1, and then press Enter. -
Page 13: The Interface
(in the above example, “admin”). To change the menu language, click es for Spanish or en for English. In some screens, shortcut items are available on the bottom of the screen. Click a shortcut to access the page. See example below. Copyright © 2012 Technicolor. All rights reserved. DMS-CTC-20120508-0000 v1.0. -
Page 14: Using The Menu
The following menu items are available: ▪ Home — Displays the Home screen. ▪ Technicolor Gateway — Allows you to configure your Wireless Gateway, such as system date and time, and to view event logs. ▪ Broadband Connection — Allows you to view the DSL connection status of your Wireless Gateway and configure a dial-up connection and establish or terminate the Internet connection. - Page 15 SETUP & USER GUIDE 3 The Technicolor Wizard screen appears. Click Next to continue. The required information on the succeeding screens must be obtained from your Internet Service Provider (ISP). 4 Select the DSL account service: Bridge, Routed PPP, or Routed IP. Then click Next.
- Page 16 Select the VPI/VCI, and then click Next. b If your network is using a DHCP server, keep the DHCP Server box checked, if not, remove it. c Click Next to continue. Then, skip to step 8. Copyright © 2012 Technicolor. All rights reserved. DMS-CTC-20120508-0000 v1.0.
- Page 17 The Internet Account Settings screen appears. Obtain the necessary information from your ISP. c Type your Internet account user name in User Name. d Type your account password in Password and Confirm Password. e Click Next to continue. Copyright © 2012 Technicolor. All rights reserved. DMS-CTC-20120508-0000 v1.0.
- Page 18 The Internet Account Settings screen appears. Obtain the necessary information from your ISP. c Type External IP Address, Subnet Mask, and Default Gateway. d Click Next to continue. Then, skip to step 8. Copyright © 2012 Technicolor. All rights reserved. DMS-CTC-20120508-0000 v1.0.
- Page 19 8 Review your Wireless Gateway settings, and then click Start to apply the settings. Bridge Connection Routed PPP Connection Routed IP Connection 9 The configuration may take a while to finish. When complete, click Finish. 10 Close the web browser. Copyright © 2012 Technicolor. All rights reserved. DMS-CTC-20120508-0000 v1.0.
-
Page 20: Technicolor Gateway
SETUP & USER GUIDE 5 Technicolor Gateway The Technicolor Gateway menu allows you to view the system information and configure the Wireless Gateway. This menu is divided into three sections: Information, Configuration, and Event Logs. System Information The System Information page displays the product name, device serial number, and software release information. -
Page 21: System Configuration
The System Configuration page allows you to configure the Internet service and the system date and time, and enable web browsing interception. To view the System Configuration page, click Technicolor Gateway > Configuration. To modify the system configuration, click Configure. -
Page 22: Web Browsing Interception
Event Logs The Event Logs page allows you to view and clear system logs. To access the Event Logs page, click Technicolor Gateway > Event Logs. You can filter the list by selecting a category from the drop-down lists. The log is automatically refreshed every 10 seconds. -
Page 23: Broadband Connection
▪ On the main menu, click Broadband Connection > DSL Connection. DSL connection cannot be modified from this point. To modify the DSL connection, see “5.2.1 DSL Service Configuration on page 21”. Copyright © 2012 Technicolor. All rights reserved. DMS-CTC-20120508-0000 v1.0. -
Page 24: Internet Services
To modify the account username and password, re-type the information on the corresponding boxes, and then click Connect. To view more connection details, click Details on the upper corner of the page. Copyright © 2012 Technicolor. All rights reserved. DMS-CTC-20120508-0000 v1.0. -
Page 25: Toolbox
5 Click Apply to save changes. ▪ Only one remote session is allowed at a time. ▪ The Wireless Gateway also supports dynamic DNS host names for remote access. See "7.6 Dynamic DNS" on page 33. Copyright © 2012 Technicolor. All rights reserved. DMS-CTC-20120508-0000 v1.0. -
Page 26: Disable Remote Assistance
To view the Game & Application Sharing page, do one of the following: ▪ From the Home screen, click Game & Application Sharing under Toolbox. ▪ On the main menu, click Toolbox > Game & Application Sharing. Copyright © 2012 Technicolor. All rights reserved. DMS-CTC-20120508-0000 v1.0. -
Page 27: Assign A Game Or Application
4 On the Device field, select the network device to assign the game or application to. 5 To log access, check the Log box. 6 Click Add to add the assigned entry to the table. Copyright © 2012 Technicolor. All rights reserved. DMS-CTC-20120508-0000 v1.0. -
Page 28: Modify Assigned Game Or Application
2 From the Game & Application page, click the Create a new game or application shortcut at the bottom of the screen. 3 On Name, type the name of the game or application. Copyright © 2012 Technicolor. All rights reserved. DMS-CTC-20120508-0000 v1.0. -
Page 29: Modify A Game Or Application
4 Modify the necessary information. 5 Click Apply to save changes. To delete a game or application, click the Delete button of the game or application you want to delete. Copyright © 2012 Technicolor. All rights reserved. DMS-CTC-20120508-0000 v1.0. -
Page 30: Parental Control
▪ Redirect — If Redirect is selected in Action, enter the URL address to where you want to redirect the site. ▪ Click Add to save the changes to the table. Copyright © 2012 Technicolor. All rights reserved. DMS-CTC-20120508-0000 v1.0. -
Page 31: Firewall
2 Click the Create a new Security Level shortcut at the bottom of the screen. The New Firewall Level screen appears. 3 Enter the name for the new firewall security level. 4 Select a security level. 5 Click Apply to save changes. Copyright © 2012 Technicolor. All rights reserved. DMS-CTC-20120508-0000 v1.0. -
Page 32: Set Filter Rules
5 Click Apply to save changes. The new firewall rule appears on the Firewall Settings table. To edit a firewall rule, click Edit. To delete a firewall rule, click Delete. Copyright © 2012 Technicolor. All rights reserved. DMS-CTC-20120508-0000 v1.0. -
Page 33: Intrusion Detection
▪ Interface — The DDNS interface is the Internet. ▪ Username — Enter the username provided by the DDNS service provider. ▪ Password — Enter the password provided by the DDNS service provider. Copyright © 2012 Technicolor. All rights reserved. DMS-CTC-20120508-0000 v1.0. -
Page 34: User Management
To switch to another user, click the Switch to another user shortcut at the bottom of the screen. This brings you back to the login page, then login with the desired user account. Copyright © 2012 Technicolor. All rights reserved. DMS-CTC-20120508-0000 v1.0. -
Page 35: Dmz
3 Check the Status box to enable the DMZ host function. 4 On IP Address, type the IP address of the computer you want to assign as the DMZ host. 5 Click Apply to save changes. Copyright © 2012 Technicolor. All rights reserved. DMS-CTC-20120508-0000 v1.0. -
Page 36: Home Network
3 Type desired device name in New Name. 4 Select the device type in Type. 5 To assign a static IP address, check the Always use the same IP address box. 6 Click Apply to save changes. Copyright © 2012 Technicolor. All rights reserved. DMS-CTC-20120508-0000 v1.0. -
Page 37: Assign Game Or Application To Device
4 On Device, select the network device that you want to assign the public IP address. 5 Click Apply. Or, to remove the assigned IP address from a network device, click Unassign. Copyright © 2012 Technicolor. All rights reserved. DMS-CTC-20120508-0000 v1.0. -
Page 38: Interfaces
1 On the IP Addresses table, click the corresponding Edit button of the IP address you want to modify. 2 Modify the IP address (first box) and the subnet mask (second box). 3 Click Apply to save changes. Copyright © 2012 Technicolor. All rights reserved. DMS-CTC-20120508-0000 v1.0. -
Page 39: Wireless Access Point
Click Home Network > Interfaces > WLAN to open the Wireless Access Point page. This page displays the information of your wireless network. To view the advanced settings, click Details on the upper-right corner of the screen. Copyright © 2012 Technicolor. All rights reserved. DMS-CTC-20120508-0000 v1.0. - Page 40 "To Set up Security Settings" on page 41 . 4 If necessary, set up MAC filter. See "To Set up MAC Filter" on page 42. 5 Click Apply to save changes. Copyright © 2012 Technicolor. All rights reserved. DMS-CTC-20120508-0000 v1.0.
- Page 41 ▪ WPA-PSK Preshared Key — Type the desired passkey. Users need to enter this passkey to connect to the wireless network. ▪ WPA-PSK Version — Select the WPA-PSK version to use. 5 Click Apply at the bottom of the page to save changes. Copyright © 2012 Technicolor. All rights reserved. DMS-CTC-20120508-0000 v1.0.
- Page 42 Deny — To deny Internet access to devices with MAC address listed on the MAC List table. Allow — To allow Internet access only to devices with MAC address listed on the MAC List table. 6 Click Apply to save changes.Appendix Copyright © 2012 Technicolor. All rights reserved. DMS-CTC-20120508-0000 v1.0.
-
Page 43: Appendix A Wireless Considerations
8 Your device supports Wired Equivalent Privacy (WEP), and Wi-Fi Protected Access (WAP/WPA2) encryption. To ensure a high level of security, enable the highest security encryption and use strong passphrases, avoid using words that can be found in the dictionary. Copyright © 2012 Technicolor. All rights reserved. DMS-CTC-20120508-0000 v1.0. -
Page 44: Appendix B Regulatory & Safety Information
FCC Rules. Operation is subject to the following two conditions: 1 This device may not cause interference, and 2 This device must accept any interference, including interference that my cause undesired operation of this device. Copyright © 2012 Technicolor. All rights reserved. DMS-CTC-20120508-0000 v1.0. - Page 45 10 mW EIRP in the frequency range of 2454 – 2483.5 MHz. For detailed information the end-user should contact the national spectrum authority in France. Copyright © 2012 Technicolor. All rights reserved. DMS-CTC-20120508-0000 v1.0.
-
Page 46: Appendix C Specifications
Reserved: 1 IPEX connectors for external dipole antenna connection DC inputs 12VDC 1A Temperature Operating: 0°C ~ 40° C Storage: -10°c ~ 70°C Humidity Operating: 10% ~ 95%, RH, no condensation PCB Dimensions 142 x 117 x 1.6 mm Copyright © 2012 Technicolor. All rights reserved. DMS-CTC-20120508-0000 v1.0.
Need help?
Do you have a question about the TD5130 and is the answer not in the manual?
Questions and answers