Table of Contents
Advertisement
Quick Links
Advertisement
Table of Contents

Related Manuals for Technicolor TD5136


Summary of Contents for Technicolor TD5136
-
Page 2: Table Of Contents
4.2 Login ........................21 4.3 The Interface ....................... 21 4.4 Using the Menu....................22 Chapter 5: Technicolor Gateway ................. 23 5.1 System Information..................... 23 5.2 System Configuration ..................24 5.2.1 DSL Service Configuration ..............24 5.2.2 Date and Time Configuration............24 5.2.3 Web Browsing Interception............... - Page 3 6.1.1 DSL Connection .................. 26 6.1.2 Internet Services ................. 27 Chapter 7: Toolbox ...................... 28 7.1 Rem ote Assistance....................28 7.1.1 Enable Remote Assistance ..............29 7.1.2 Disable Remote Assistance..............29 7.2 Ga me & Application Sharing ................29 7.2.1 Assign a Game or Application ............30 7.2.2 Modify Assigned Game or Application ..........
- Page 4 Chapter 8: Home Network................... 46 8.1 Devices ......................... 47 8.1.1 View or Modify Device Information..........48 8.1.2 Assign Game or Application to Device..........48 8.1.3 Remove a Shared Game or Application ..........48 8.1.4 Assign a Public IP Address to Device ..........49 8.2 Interfaces ......................
-
Page 5: Chapter 1: Product Overview
Product Overview Chapter 1: Product Overview ® Thank you for choosing Technicolor Wireless n ADSL2+ Gateway. This Wireless Gateway combines the functionality of an ADSL / ADSL2 / ADSL2+ modem and Internet gateway in one. You can access the Internet and share resources such as printers, scanners, and files, via a wireless connection or through one of the Ethernet ports. -
Page 6: Package Contents
Product Overview Package Contents Check if the package contains the following items. If any item is missing or appears damaged, contact your dealer. Wireless n ADSL2+ Gateway Power adapter CD-ROM with User’s Guide RJ-45 Ethernet cable RJ-11 telephone cable Wireless ADSL2+ Gateway... -
Page 7: Hardware Overview
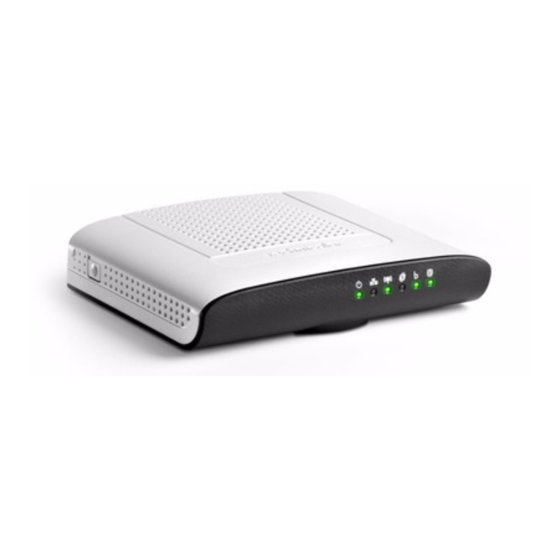
Product Overview Hardware Overview 1.3.1 Front Panel 1 2 3 4 5 6 Description Lights up when the device is powered on. • Solid GREEN – Indicates normal operation. Power LED • Flashing GREEN – Firmware upgrade in progress. • Solid RED –... - Page 8 Product Overview Description Lights up to indicate the Wi-Fi Protected Setup (WPS) connection status. • Solid GREEN – WPS-enabled device is connected. 3G or WPS LED • Flashing GREEN – 3G card is connected and data transmission is in progress. •...
-
Page 9: Rear Panel
Product Overview 1.3.2 Rear Panel Ports / Buttons Description DSL port Connects to the DSL line using the RJ-11 cable. Press and hold this button for at least 10 seconds to restore Reset button your device to its original factory default setting. The LAN LED (1, 2) lights up when a device is connected to LAN LED 1, 2 the Ethernet port (1, 2). -
Page 10: Chapter 2: Installation
Installation Chapter 2: Installation Make sure that all devices are powered off before starting installation. Installation Diagram Connect the Power 1. Connect the power adapter to the DC In jack of your Wireless Gateway. 2. Plug the power adapter to a wall outlet or a power strip. NOTE: •... -
Page 11: Connect Wired Devices
Installation Connect Wired Devices Connect devices such as computers, printers, and other Ethernet-enabled devices to the LAN port of the Wireless Gateway. NOTE: When setting up the Wireless Gateway for the first time, connect the host computer via Ethernet connection. 1. -
Page 12: Connect The Broadband (Dsl)
Installation Connect the Broadband (DSL) 1. Connect one end of the RJ-11 cable to the DSL port of your Wireless Gateway. 2. Connect the other end of the RJ-11 cable to a wall jack with DSL service. 2.4.1 Use a Splitter You need a splitter when connecting the Wireless Gateway to the wall jack that also connects to a telephone. -
Page 13: Chapter 3: Configure The Computer
Configure the Computer Chapter 3: Configure the Computer This chapter will guide you on how to configure your computer according to the operating system you are using. ® Windows XP, see below. ® Windows Vista, see page 16. ® Windows 7, see page 16. -
Page 14: Windows Vista
Configure the Computer Windows Vista ® If you are using Windows Vista, follow the instructions below to configure your computer. 1. Click Start > Control Panel > Network and Internet Connections > Network Connections. 2. Right-click Local Area Connection, then click Properties. -
Page 15: Chapter 4: Access The Wireless Gateway
Access the Wireless Gateway Chapter 4: Access the Wireless Gateway Use the Web Configurations utility to configure your Wireless Gateway. Initial Setup 1. Launch the web browser. When your Wireless Gateway is successfully connected to the computer, the web browser is automatically directed to the default IP address of your Wireless Gateway. - Page 16 “Error! Reference source not found.” on page Error! Bookmark not defined.. 4. The Welcome screen appears. Click on Set up my Technicolor Gateway. It is recommended to follow the wizard to set up the network and configure the Wireless Gateway.
- Page 17 Access the Wireless Gateway NOTE: • The required information on the succeeding screens must be obtained from your Internet Service Provider (ISP). 6. Select the DSL account service: Bridge or Routed PP, and then click Next. 7. If you select Routed PPP, skip to step 8. If you select, Bridge, do the following: a.
- Page 18 Access the Wireless Gateway b. If your network is using a DHCP server, keep the DHCP Server box checked, if not, remove it. c. Click Next to continue. Then, skip to step 9. 8. If you select Routed PPP, do the following: a.
- Page 19 Access the Wireless Gateway b. The Internet Account Settings screen appears. Obtain the necessary information from your ISP. c. Type your Internet account user name in User Name. d. Type your account password in Password and Confirm Password. e. Click Next to continue. 9.
- Page 20 Access the Wireless Gateway 11. Review your Wireless Gateway settings, and then click Start to apply the settings. 12. The configuration may take a while to finish. When complete, click Finish. 13. Close the web browser. Wireless ADSL2+ Gateway...
-
Page 21: Login
Access the Wireless Gateway Login For more advanced configuration, access the Technicolor web configuration utility. 1. Launch the web browser. 2. On the address bar, type http://192.168.1.254, and then press Enter. 3. Login with the user name and password you set in the initial setup. -
Page 22: Using The Menu
• Home — Displays the Home screen. • Technicolor Gateway — Allows you to configure your Wireless Gateway, such as system date and time, and to view event logs. • Broadband Connection — Allows you to view the DSL connection status of your Wireless Gateway and configure a dial-up connection and establish or terminate the Internet connection. -
Page 23: Chapter 5: Technicolor Gateway
Technicolor Gateway Chapter 5: Technicolor Gateway The Technicolor Gateway menu allows you to view the system information and configure the Wireless Gateway. This menu is divided into three sections: Information, Configuration, and Event Logs. System Information The System Information page displays the product name, device serial number, and software release information. -
Page 24: System Configuration
The System Configuration page allows you to configure the Internet service and the system date and time, and enable web browsing interception. To view the System Configuration page, click Technicolor Gateway > Configuration. To modify the system configuration, click Configure. -
Page 25: Web Browsing Interception
Event Logs The Event Logs page allows you to view and clear system logs. To access the Event Logs page, click Technicolor Gateway > Event Logs. You can filter the list by selecting a category from the drop-down lists. The log is automatically refreshed every 10 seconds. -
Page 26: Chapter 6: Broadband Connection
Broadband Connection Chapter 6: Broadband Connection The Broadband Connection menu allows you to view and modify the Internet service configuration of your Wireless Gateway. This menu is divided into two sections: DSL Connection and Internet Services. To view the Broadband Connection page, click Broadband Connection. 6.1.1 DSL Connection To view the DSL connection status, do one of the following: •... -
Page 27: Internet Services
Broadband Connection 6.1.2 Internet Services Use the Internet Services page to configure the settings and connect to the Internet. To view the Internet page, do one of the following: • From the Home screen, click Internet • On the Broadband Connection page, click View more under Internet •... -
Page 28: Chapter 7: Toolbox
Toolbox Chapter 7: Toolbox The Toolbox menu allows you to protect your network, share games and applications with other people on the Internet, and manage your local network. This menu is divided into eight sections: Remote Assistance, Game & Application Sharing, Parental Control, Firewall, Intrusion Detection, Dynamic DNS, User Management, and Content Sharing. -
Page 29: Enable Remote Assistance
Toolbox 7.1.1 Enable Remote Assistance 1. Select the remote assistance Mode: • Permanent Mode — Once remote assistance is enabled, the remote session only ends when users disable this feature or when the Wireless Gateway is restarted. • Temporary Mode — The remote session automatically ends after 20 minutes of inactivity. -
Page 30: Assign A Game Or Application
Toolbox 7.2.1 Assign a Game or Application Your Wireless Gateway comes with predefined games and applications. Each game or application can be assigned to a network device. 1. To assign a game or application, do one of the following: Click Configure on the upper-right corner of the screen. •... -
Page 31: Modify Assigned Game Or Application
Toolbox 2. To enable Universal Plug and Play (UPnP) function, check the Use UPnP box, then click Apply. 3. On the Assigned Games & Applications table, select a game or application on the Game or Application field. 4. On the Device field, select the network device to assign the game or application to. -
Page 32: Create A New Game Or Application
Toolbox 7.2.3 Create a New Game or Application If the game or application is not included in the predefined list, you need to create the game or application. 1. On the main menu, click Toolbox > Game & Application Sharing. 2. -
Page 33: Modify A Game Or Application
Toolbox a. Select the protocol. b. Enter the incoming port range and the outgoing trigger port. c. Click Add to save the settings. 8. Creating of game or application is complete. 7.2.4 Modify a Game or Application 1. On the main menu, click Toolbox > Game & Application Sharing. 2. -
Page 34: Par Ental Ontrol
Toolbox Parental Control The Parental Control page allows you to filter web sites that a network device may access or be denied access. To view the Parental Control page, do one of the following: • From the Home screen, click Parental Control under Toolbox. •... -
Page 35: Firewall
Toolbox • Web Site — Enter the URL of the web site to block or allow. Action — Select one of the following options: • • Block: To block the web site. • Allow: To allow access to the web site. Redirect: To redirect to another web site if the web site defined on the •... -
Page 36: Create A New Security Level
Toolbox 7.4.2 Create a New Security Level 1. On the Firewall page, click Configure on the upper-right corner of the screen. 2. Click the Create a new Security Level shortcut at the bottom of the screen. The New Firewall Level screen appears. 3. -
Page 37: Intrusion Detection
Toolbox 4. Enter the necessary parameters: • Name — Enter desired firewall rule name • Enabled — Check this box to enable this firewall rule. • Source Interface — Select the interface to apply the firewall rule. • Source Address — Select the firewall source address. •... -
Page 38: Dyn Amic Ns
Toolbox Dynamic DNS The Dynamic DNS (DDNS) service allows you to assign a fixed DNS host name to an Internet connection even if it is using a dynamic IP address. As soon as your Wireless Gateway internal connection gets a new IP address, the dynamic DNS service updates the host name entry to the new IP address. -
Page 39: User Management
Toolbox • Username — Enter the username provided by the DDNS service provider. Password — Enter the password provided by the DDNS service provider. • Confirm Password — Re-type the password to confirm. • Service — Select the DDNS service provider where your account is registered. •... -
Page 40: Reset Password
Toolbox 7.7.2 Reset Password To reset a password, on the User Management screen, click on the user account that you want to reset the password. Then click Reset Password. Aside from resetting the password, no other setting can be modified unless by users of higher privileges. -
Page 41: Share Content Using Network File Server
Toolbox 7.8.1 Share Content Using Network File Server Your Wireless Gateway supports the Samba function through which you can directly access the data and media files on your storage device with other users on the network. When enabled, the USB storage disk appears on the network folders and is accessible to other devices on the network. -
Page 42: Share Media Files Using Media Servers
Toolbox 7.8.2 Share Media Files Using Media Servers You can share media files with media devices like IP set-top boxes. 1. On the main menu, click Toolbox > Content Sharing. 2. On the Content Sharing page, click Configure on the upper-right corner of the screen. -
Page 43: Usb Printer Sharing
Toolbox 7.8.5 USB Printer Sharing You can share a USB printer connected to your Wireless Gateway among network devices. Before using USB printer sharing, you must configure the printer server first. Do the following: NOTE: The following illustrations are from a Windows 7 computer. Similar procedures apply to other Windows OS versions. - Page 44 Toolbox d. Type the host name or IP address of f. Select Custom, then click Settings. your Wireless Gateway. e. Check Query the printer and automatically select the driver to use. k. Click Next to continue. g. Enter the port name or IP address of your Wireless Gateway.
- Page 45 Toolbox m. Type desired Printer name, then click l. If the computer cannot detect the Next. printer driver, select your printer from the list, then click Next. n. Select Do not share this printer. p. Print a test page. o. Click Next to continue. q.
-
Page 46: Dongle Sharing
Toolbox 7.8.6 3G Dongle Sharing You can share a 3G network when a USB 3G dongle is connected to your Wireless Gateway. 1. Plug the USB 3G dongle to the USB port of your Wireless Gateway. 2. If the 3G dongle is supported, the Wireless Gateway automatically detects the 3G dongle in Home Network >... -
Page 47: Devices
Home Network Chapter 8: Home Network The Home Network menu displays the network configuration of your Wireless Gateway, along with interfaces and connected devices. This menu is divided into two sections: Devices and Interfaces. To view the Home Network page, click Home Network on the main menu. Devices This page displays the devices connected on your network via the Wireless Gateway Ethernet ports. -
Page 48: View Or Modify Device Information
Home Network 8.1.1 View or Modify Device Information 1. Click the device name. The device information is displayed on screen. 2. To modify the device information, click Configure on the upper right corner of the screen. 3. Type desired device name in New Name. 4. -
Page 49: Assign A Public Ip Address To Device
Home Network 8.1.4 Assign a Public IP Address to Device The Assign Public IP page allows you to assign the public IP address of your Internet connection to a specific device on your local network. 1. Cick Home Network > Devices. 2. -
Page 50: Local Network Interface
Home Network 8.2.1 Local Network Interface Click Home Network > Interfaces > LocalNetwork to open the Local Network page. This page displays the interface information including the TCP/IP configuration, IP Addresses, DHCP pool. To modify the settings, click Configure on the upper-right corner of the screen. - Page 51 Home Network To Modify the DHCP Pool 1. Click the Edit button of the pool you want to modify. The LAN_Private screen appears. • Interface — Displays the current network interface. • Start Address — Type the starting address of the DHCP pool. •...
-
Page 52: Wireless Access Point
Home Network 8.2.2 Wireless Access Point Click Home Network > Interfaces > WLAN to open the Wireless Access Point page. This page displays the information of your wireless network. To view the advanced settings, click Details on the upper-right corner of the screen. To Configure the Wireless Network Click Configure on the upper-right corner of the screen. - Page 53 Home Network • Broadcast Network Name — Check the box to enable wireless devices to see the SSID of your wireless network. • Encryption — Select an encryption method: • Disabled: No encryption. Use WEP Encryption — To use WEP encryption. •...
-
Page 54: Appendix
Appendix Appendix A. Wireless Considerations Connection Performance A number of factors affect wireless connections. To ensure high-range and stable connectivity, do the following: 1. Keep the Wireless Gateway and other wireless devices away from obstructions, such as walls or buildings. Each obstruction can reduce the range of a wireless device. -
Page 55: Regulatory & Safety Information
Appendix B. Regulatory & Safety Information Wireless LAN, Health and Authorization Radio frequency electromagnetic energy is emitted from Wireless LAN devices. The energy levels of these emissions however are far much less than the electromagnetic energy emissions from wireless devices like for example mobile phones. Wireless LAN devices are safe for use frequency safety standards and recommendations. - Page 56 Appendix • Connect the equipment into an outlet on a circuit different from that to which the receiver is connected. • Consult the dealer or an experienced radio/TV technician for help. FCC Caution: Any changes or modifications not expressly approved by the party responsible for compliance could void the user’s authority to operate this equipment.
- Page 57 Appendix CE statement Europe – EU Declaration of Conformity This device complies with the essential requirements of the R&TTE Directive 1999/5/EC. The following test methods have been applied in order to prove presumption of conformity with the essential requirements of the R&TTE Directive 1999/5/EC: EN60950-1: 2006 Safety of Information Technology Equipment EN 50385: 2002...
-
Page 58: Specifications
Appendix C. Specifications • Main chip: RTL8672-VK • AFE: RTL8271B-VR • Ethernet: RTL8305N-GR • WiFi: RTL8192CE-GR • DDR1: 32MB • Flash: 8 MB Serial • ADSL2+: POTS • 2x2 11n 2.4GHz single band User Interface • 4x 10/100 Base-T Ethernet LAN ports •...
Need help?
Do you have a question about the TD5136 and is the answer not in the manual?
Questions and answers