Grizzly H7507 Owner's Manual
Router table extension
Hide thumbs
Also See for H7507:
- Instruction sheet (2 pages) ,
- Parts breakdown (1 page) ,
- Owner's manual (32 pages)
Table of Contents
Advertisement
Quick Links
MODEL H7507
ROUTER TABLE EXTENSION
OWNER'S MANUAL
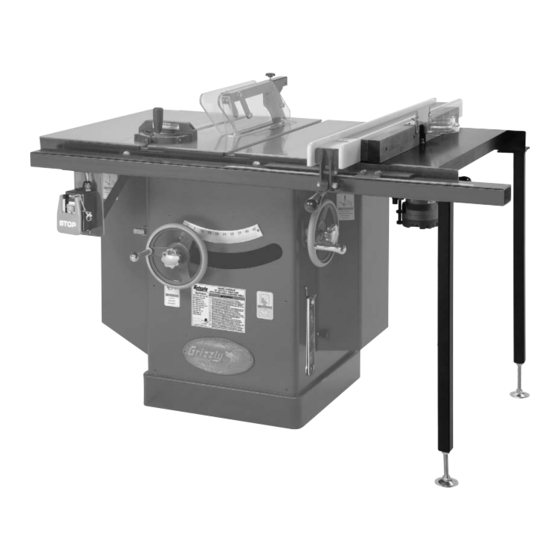
Model H7507 Shown Installed on Model G1023RLW
Copyright © SEptEMBEr, 2010 By grizzly induStrial, inC.
WARNINg: NO pORTION Of THIS MANUAL MAy BE REpRODUcED IN ANy SHApE
OR fORM WITHOUT THE WRITTEN AppROvAL Of gRIzzLy INDUSTRIAL, INc.
(For ModElS ManuFaCturEd SinCE 3/05) #Bl13275 printEd in taiWan
Advertisement
Table of Contents

Related Manuals for Grizzly H7507


Summary of Contents for Grizzly H7507
- Page 1 Model H7507 Shown Installed on Model G1023RLW Copyright © SEptEMBEr, 2010 By grizzly induStrial, inC. WARNINg: NO pORTION Of THIS MANUAL MAy BE REpRODUcED IN ANy SHApE OR fORM WITHOUT THE WRITTEN AppROvAL Of gRIzzLy INDUSTRIAL, INc. (For ModElS ManuFaCturEd SinCE 3/05) #Bl13275 printEd in taiWan...
-
Page 3: Table Of Contents
Machine description ... 2 identification ... 3 SEcTION 1: SAfETy ... 4 Safety instructions for Machinery ... 4 additional Safety for router tables ... 6 SEcTION 2: SETUp ... 7 needed for Setup ... 7 unpacking ... 7 inventory ... 8 hardware recognition Chart ... -
Page 4: Introduction
18" by 27" precision-ground cast iron table. included with the Model h7507 are adjustable support legs, a router guard that sup- ports routers with a base thickness between ⁄... -
Page 5: Identification
Model h7507 (Mfg. since 3/05) Identification Shop Made guard Fence (not included) router (not included) Foot To reduce the risk of serious injury when using this machine, read and understand manual before beginning any operations. router Bit router table this... -
Page 6: Section 1: Safety
NOTICE This symbol is used to alert the user to useful information about proper operation of the machine. Safety Instructions for Machinery OWNER’S MANUAL. EYE PROTECTION. HAZARDOUS DUST. WEARING PROPER APPAREL. HEARING PROTECTION. MENTAL ALERTNESS. Model h7507 (Mfg. since 3/05) - Page 7 DANGEROUS ENVIRONMENTS. ONLY USE AS INTENDED. USE RECOMMENDED ACCESSORIES. CHILDREN & BYSTANDERS. REMOVE ADJUSTING TOOLS. SECURING WORKPIECE. FEED DIRECTION. Model h7507 (Mfg. since 3/05) FORCING MACHINERY. GUARDS & COVERS. NEVER STAND ON MACHINE. STABLE MACHINE. AWKWARD POSITIONS. UNATTENDED OPERATION. MAINTAIN WITH CARE.
-
Page 8: Additional Safety For Router Tables
Use this and other machinery with caution and respect. failure to do so could result in serious per- sonal injury, damage to equipment, or poor work results. Model h7507 (Mfg. since 3/05) -
Page 9: Section 2: Setup
Model h7507 (Mfg. since 3/05) Needed for Setup the following are needed to complete the setup process, but are not included with the router table. -
Page 10: Inventory
⁄ "-20 x ⁄ " ... 2 ⁄ " ... 2 ⁄ "-20 ... 2 NOTICE SUFFOCATION HAZARD! Keep children and pets away from plastic bags or packing materials unpacked with this machine. Discard immediately. Model h7507 (Mfg. since 3/05) -
Page 11: Hardware Recognition Chart
Hardware Recognition chart Model h7507 (Mfg. since 3/05) -
Page 12: Cleanup
PLASTIC paint scraper to scrape off the majority of the coating before wiping it off with your rag. (Do not use a metal scraper or you may scratch your machine.) Steps 2–3 Model h7507 (Mfg. since 3/05) toxic inhaled. -
Page 13: Assembly
To assemble and install your router table... - Page 14 11. replace the front rail tube on the rail. figure 10 shows an example of the Model h7507 installed on a saw. figure 10. Example of Model h7507 installed.
-
Page 15: Mounting Router
Mounting Router the Model h7507 will support a router with a base thickness between ⁄ " and ⁄ ". To mount a router to the router table: diSConnECt SaW and routEr FroM poWEr! Slide three of the router hold-down assem-... -
Page 16: Router Guard
Model h7507 (Mfg. since 3/05) fence face. board. - Page 17 STEP 7 STEP 8 figure 19. Steps for drilling and countersinking screw holes into support board. Model h7507 (Mfg. since 3/05) re-attach the fence face at both ends, as shown in figure 20. figure 20. reattaching fence face. 10. attach the support board to the fence with the #10-24 x 2 the kit, as shown in figure 21.
- Page 18 12. Cut your fence in half. one side will be the infeed fence and the other side will be the outfeed fence. — if you are using a router bit that will not remove the entire face of your workpiece, as illustrated in figure 23, then skip ahead to Step 14.
- Page 19 Note: If you followed Step 13, be sure to install the modified board on the infeed side. Model h7507 (Mfg. since 3/05) ⁄ " (see figure 27. attaching fence boards.
-
Page 20: Dust Collection
" clearance between the router bit and the fences. -18- Dust collection DO NOT use the Model H7507 without an ade- quate dust collection system. An attached router will create substantial amounts of wood dust while operating. failure to use a dust collection system can result in short and long-term respiratory illness. -
Page 21: Section 3: Operations
OMMEND that you read books, review industry trade magazines, or get formal training before beginning any projects. Regardless of the content in this section, grizzly Industrial will not be held liable for accidents caused by lack of training. Model h7507 (Mfg. since 3/05) Operation Overview this overview outlines the basic process that hap- pens during an operation with the router table. -
Page 22: Table Inserts
-20- Table Inserts the Model h7507 features a 29 x 99mm insert and a 60 x 99mm insert that fit into the opening on the router table. the smallest size table opening provides maxi- mum support and stability to the workpiece during operation, which increases safety. - Page 23 30. figure 30. Fence jointer setup (guard removed for clarity. Model h7507 (Mfg. since 3/05) lock the fence assembly in place, adjust the router guard as needed and secure it, con- nect the router to power, then perform the cut (see figure 31).
-
Page 24: Groove Cutting
Step 3, as illustrated in figure 34. figure 34. Example of a zero-clearance fence. Note: Make the outline as close as possible to the cutter and spindle without interfering with rotation. Model h7507 (Mfg. since 3/05) -
Page 25: Free-Hand Routing
Model h7507 (Mfg. since 3/05) figure 35. illustration of free-hand cutting with a to reduce this tendency, use a starting block (see figure 36). - Page 26 35 on the previous page. Model h7507 (Mfg. since 3/05)
-
Page 27: Section 4: Maintenance
Model h7507 (Mfg. since 3/05) cleaning Cleaning the Model h7507 is relatively easy. Vacuum excess wood chips and sawdust, and wipe off the remaining dust with a dry cloth. if any resin has built up, use a resin dissolving cleaner to remove it. -
Page 28: Section 5: Parts
CARRIAGE BOLT 1/4-20 X 1/2 30-7 PH7507021 CLEAR GUARD 30-8 PW08 FLAT WASHER #8 30-9 PLW13 LOCK WASHER #8 30-10 PN14 HEX NUT 8-32 30-11 PS36 PHLP HD SCR 10-24 X 2-1/2 30-12 PW06 FLAT WASHER 1/4 Model H7507 (Mfg. since 3/05) - Page 29 The following information is given on a voluntary basis. It will be used for marketing purposes to help us develop better products and services. Of course, all information is strictly confidential. Note: We never use names more than 3 times. _____________________________________________________________________ _________________________________________________________________________________ _________________________________________________________________________________...
-
Page 31: Warranty And Returns
WARRANTy AND RETURNS... - Page 32 Buy Direct and Save with Grizzly – Trusted, Proven and a Great Value! ® ~Since 1983~ Visit Our Website Today For Current Specials! ORDER 24 HOURS A DAY! 1-800-523-4777...
Need help?
Do you have a question about the H7507 and is the answer not in the manual?
Questions and answers