Table of Contents
Advertisement
Quick Links
Advertisement
Table of Contents

Related Manuals for Waldorf microQ Keyboard


Summary of Contents for Waldorf microQ Keyboard
- Page 1 User´s Manual microQ Omega/lite/Keyboard...
-
Page 2: Product Information Microq Series
(see page 6). The microQ lite can be upgraded to a microQ Omega (with up to 75 voices). Therefore you need a hardware modification that is done exclusively by official Waldorf Distributors or official Waldorf Service Centers. -
Page 3: Waldorf Merchandise
Waldorf Merchandise Dance & Techno Construction Soundset for microQ and Q 300 Sounds, 2 Drum Maps and 30 Multis for your electronic music production CD-ROM with bonus tools Euro 60,00 Zeitlos II The latest ambient & electronic music CD from Waldorf Records. -
Page 4: Warranty / Support
Produktgarantie / Product Warranty Vielen Dank für den Kauf dieses Waldorf Produktes. Es zeichnet sich durch Thank you for choosing this Waldorf product. It is a dependable device and Zuverlässigkeit und Langlebigkeit aus. Dennoch können Material- oder is designed to last. However, the potential for defects in material or Verarbeitungsfehler nicht völlig ausgeschlossen werden. - Page 5 Produktunterstützung / Product Support Wenn Sie Fragen zu Ihrem Waldorf Produkt haben, gibt es vier If you have any questions about your Waldorf product, feel free to contact us Möglichkeiten, uns zu kontaktieren: via one of the four options listed below.
-
Page 6: Foreword
Foreword – Development Foreword Thank you for purchasing the Waldorf microQ, microQ Keyboard or microQ lite. You now own a synthesizer featuring a wide range of unique sounds from analog to digital. To ensure your instrument functions properly and enjoys a long life, please read and heed the instructions in this manual. -
Page 7: Control Features And Connections
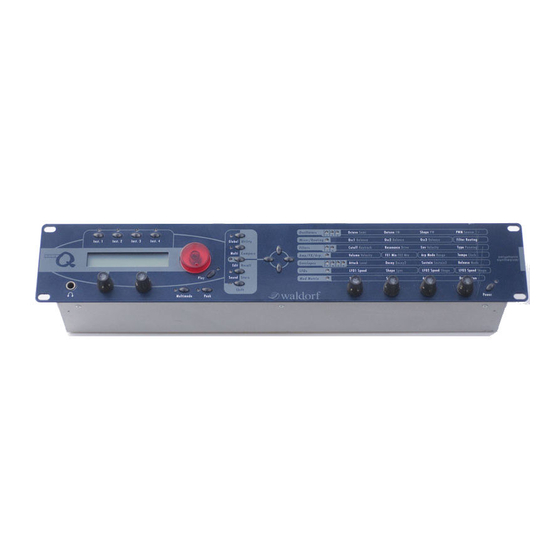
Control Features and Connections – Front Panel microQ Rackversion Control Features and Connections Front Panel microQ Rackversion Octave Semi Detune Shape Source Oscillators Mixer/Routing Osc1 Balance Osc2 Balance Osc3 Balance Filter Routing Inst. 1 Inst. 2 Inst. 3 Inst. 4... -
Page 8: Front Panel Microq Keyboard
Control Features and Connections – Front Panel microQ Keyboard (additional controls) Front Panel microQ Keyboard (additional controls) Picture 2: microQ Keyboard Pitch Bend Modulation Wheel Program Select Section 3-octave keyboard with aftertouch Keyboard Transpose buttons Full Metal Jacket Waldorf microQ User´s Manual... -
Page 9: Rear Panel Microq Rack Version
Control Features and Connections - Rear Panel microQ Rack version Rear Panel microQ Rack version Picture 3: Rear Panel Stereo External In jack for feeding external audio MIDI In jack. Used to receive MIDI data from an signals into the Mixer section. -
Page 10: Rear Panel Microq Keyboard
Control Features and Connections – Rear Panel microQ Keyboard Rear Panel microQ Keyboard 4. Rear Panel microQ Keyboard Stereo External In jack for feeding external audio MIDI Thru jack. Echoes MIDI data received at signals into the Mixer section. the MIDI In. -
Page 11: Table Of Contents
Audio Connections..........22 Sound Edit Menu .......... 50 External Input............ 23 Oscillators Introduction ........53 Hold Pedal Input (microQ Keyboard only) ... 23 Oscillator Shapes.......... 53 Control Pedal/CV Input (microQ Keyboard only) .. 23 Oscillator Section..........59 Oscillator Parameter Controls ......59 Overview............24... - Page 12 MIDI Implementation Chart......156 Envelope Edit Menu ........114 CE Declaration..........157 LFO Section............ 115 LFO Parameter Controls ......115 LFO Edit Menu ........... 116 Mod Matrix Section ......... 121 Mod Matrix Parameter Controls ....121 Waldorf microQ User´s Manual...
-
Page 13: Introduction
Introduction About this Manual This manual was written to help you to become familiar with the Waldorf microQ. It will also aid experienced users with routine tasks. Since this manual is valid for the microQ Keyboard as well as the rack-versions (microQ Omega and microQ lite) we will seperately point out the particular differences. -
Page 14: What To Read
Is this your first or second synthesizer? Then you should first read the whole manual once. You don’t need to do that while you’re exploring the microQ - you can also read it as you would read a good book. But read it. You don’t need to understand everything but after you’ve read the manual, you know where to find a particular topic. - Page 15 Controller Send Input Gain MIDI Control Channel Based MIDI Program Change Messages Messages Poly Pressure Messages Influencing and Editing all chapters Sounds over MIDI Other Functions Updating the System Software Table 1: Suggested chapters for advanced users Waldorf microQ User´s Manual...
-
Page 16: If You Are A Synthesizer Hotshot
Do you already own any Waldorf synthesizers so that you are familiar with their structure and terminology. Then make sure to read at least the following chapters. They describe the extraordinary features and functions of the microQ. -
Page 17: General Safety Guidelines
Do not expose the device to extreme vibrations. • Power Supply Never use a different power supply or cable than the one that came with the microQ. • Never install a different plug. If the included power supply is not equipped with a suitable •... -
Page 18: Proper Use
Any other use is prohibited and voids the warranty extended by Waldorf- Music AG. Waldorf-Music AG is not liable for damages due to incorrect use. Don´t let your microQ beside children or animals. This could leads into critical interactions. Waldorf microQ User´s Manual... -
Page 19: Setup And Connection
Place the microQ on a clean, even surface. We recommended the installation in a stable 19" rack for the microQ rack version. If you choose to take the device on the road, we suggest transporting it in a special keyboard case, which should be available from your dealer. - Page 20 Sub Out 2 too. 3. To play the microQ rack version you need a MIDI master keyboard. Connect its MIDI Out jack to the microQ´s MIDI In jack . Instead of this you can also connect the microQ to a MIDI computer system.
-
Page 21: Audio Connections
Setup and Connection – Audio Connections 5. Connect the power supply cable or the power cable that came with the microQ with the Power Supply jack. 6. Plug the other side of the power supply cable or the power cable into a suitable AC power outlet. -
Page 22: External Input
Therefore, the signal can be processed via the filters and the effects section in the same way as the oscillators. As the external signal is treated like any other sound source within the microQ, it is necessary to trigger the Amplifier Envelope to get the signal passed through. To do so, notes must be sent to the microQ’s sound generation, either by playing on the keyboard, receiving MIDI notes or... -
Page 23: Overview
Overview – Memory Structure Overview Memory Structure The memory architecture of the microQ is divided into three main sections as shown in the following picture. All memory locations are freely programmable, so there is no separation into preset and user programs. -
Page 24: Basic Operation
AC outlet, even if it was switched to standby mode before the power was disconnected. This enables you to switch the microQ on or off through e.g. a main power switch in your studio. However, if you switched the microQ off manually you can switch it on again... -
Page 25: System Volume
To play back another demo song: Press another highlighted Instrument button • If this gave you an idea of the microQ´s capabilities of, it is time to leave the Demo Playback and to start exploring it yourself. To exit the Demo Playback Mode: Press Peek to exit the demo mode. -
Page 26: The Master Section
A button labelled Shift that is used to activate alternative functions of knobs and buttons, • labelled in blue color. A button labelled Play/OK. Pressing this button will bring back the microQ to Play mode, • where sounds can be selected. -
Page 27: Selecting Programs
Single Mode The Single Mode of the microQ consists of four Instruments that can be played one after the other or at once. This offers a fast way to switch between different sounds in a live situation or to create layered sounds in a studio session without deeper programming. -
Page 28: Fast Selection Of Sound Banks In Single Mode
Multi:009 Venice Beach Drum Maps can be found in sound position 01 to 20 in Bank D. The microQ can only hold up to 20 Drum Maps. Therefore higher storage positions aren’t available. Fast Selection of Sound Banks in Single Mode In Play mode the Banks can be changed quickly by using the endless knob right below the display. -
Page 29: Additional Switching Banks In The Mqk
Release the Multi/Sound button again. Category Search The microQ offers a special function to enable easy searches for sounds of similar categories. If you’re searching for pad sounds, only these sounds will be displayed as you scan the storage banks with the red dial. -
Page 30: Instruments And Sounds
Instruments and Sounds Switching between Instruments to change Sounds As mentioned before, the Single Mode of the microQ uses four Instruments that can be accessed through the buttons Inst. 1…Inst. 4 In a live situation, for example, you can set up the Sounds for the Instruments in advance and quickly switch to them during your performance. -
Page 31: Editing Sounds In Layers
Switching the Octave/Semitone setting on the microQ Keyboard The microQ keyboard features a built-in 3 octave keyboard that can be used to play internal sounds as well as to generate MIDI notes for external devices. As a default, C1 is the lowest note on the keyboard, C3 is the middle note and C5 is the highest. -
Page 32: Editing Parameters
Basic Operation – Editing Parameters Editing Parameters In order to change or edit a program in the microQ, you must access the appropriate parameters. In spite of the microQ’s compactness it uses a sophisticated user interface allowing a fast editing of any parameter. -
Page 33: Editing Display Menu Parameter
In addition to the Edit button, three other buttons located on the right hand of the Master section allow you to set up further parameters: The Global parameters provide the basic settings of the microQ, valid for all programs. •... -
Page 34: Edit Buffers
Inst:1 Sound:A001e Zeitlos The microQ has a number of different edit buffers, each holding a program of the specific type when you edit them: 1 Multi edit buffer: • This buffer holds the currently selected Multi in Multi mode. -
Page 35: Comparing Edited Programs
Sound:A001c Zeitlos 4. You will hear the unedited version of your program when you play the microQ. 5. Press the Shift + Compare again. 6. The c in the display changes to e again. The edited version of the program is now active again. -
Page 36: Storing Programs
After you have finished editing a program, you must store it if you intend to use it again. Any of the microQ´s memory locations are available for this purpose. The type of program that is stored depends on the page you were in before performing the Store function. -
Page 37: Multi Mode
Multi Mode The Waldorf microQ offers a 16 part Multi mode. As soon as you want to arrange keyboard layers for a live performance or want to do multi track recordings in a studio, you should start to program your own Multis that you can use to quickly switch between completely different setups. -
Page 38: Instrument Settings
In a Multi-Program you can use only one Drum Map at a time. When you’re assigning a Drum Map to an instrument, any other instrument using a Drum Map will be restored to the normal program assignment. Waldorf microQ User´s Manual... - Page 39 63 for full right. In case you want to have the sound in the mid position select center. With this function you can set the stereo outputs of the microQ to mono outputs by selecting the full left or full right position for the panning.
- Page 40 Global menu FX2 can be assigned either globally or to Instruments 1 through 4. Please also see the chapter “Global Menu” on page 130. Transpose|Detune Transpose -48…+48 Transposes the Instrument in semitone steps. I.e., a value of –12 means that the Instrument sounds one octave lower than it was originally programmed. Waldorf microQ User´s Manual...
- Page 41 Modifiers or the Modulation Matrix. The highest possible Controller number is 120 because all higher numbers are reserved for non-real-time purposes. If global is selected, the corresponding settings for Ctrl W...Z made in the global parameter section are used. Waldorf microQ User´s Manual...
- Page 42 Multi Mode – Instrument settings The most important Sound parameters of the microQ can be controlled by MIDI Continuous Controller messages. If you set one of the Ctrl W…Ctrl Z to a Controller that is also used for a Sound parameter, the microQ disables this Controller as Sound parameter Controller and uses it exclusively for one of the Ctrl W…Ctrl Z.
-
Page 43: Multi Mixer
Multi Mode – Instrument settings Multi Mixer (not available for the microQ lite) ˇ_____ˇ____ˇ____ 127 The Multi Mixer offers fast graphical editing of Volume, Panning and Effect Send for all 16 instruments. The 16 horizontal segments represent the 16 available instruments. A small cursor below the corresponding segment indicates the chosen instrument. -
Page 44: Sound Parameters
Signal … Picture 6: Block schematic diagram of a sound As you can see, the microQ consists of two different types of components for sound generation and sound shaping: Oscillators, Ring Modulator, Noise Generator, External Audio Signal, Mixer, Filters, •... -
Page 45: Modulation Speed Levels
This is the fastest modulation speed level. These calculations are performed for each generated sample or, in other words, 48000 times per second (48kHz). Five modules of the microQ’s sound generation offer FM - the three oscillators and the two filters. When you browse the list of available sources for this type of modulation, you will find almost exclusively those sources that make sense to modulating the destination with sample speed. - Page 46 Output shaped by the Amplifier Envelope Table 4: Pre-routed Modulation destinations In addition to the pre-routed Fast Modulation destinations, the microQ offers eight slots for individual routing connections that are updated at the same speed level: the Fast Modulation Matrix. The...
-
Page 47: Standard Modulation
F1 FM, F2 FM FM Amount modulation of Filter 1…2 F1 Drive, F2 Drive Drive of Filter 1…2 F1 Pan, F2 Pan Pan of Filter 1…2 Volume Amplifier output volume LFO1Speed, LFO2Speed, LFO3Speed Speed of LFO 1…3 Waldorf microQ User´s Manual... - Page 48 MIDI modulation wheel (controller #1) Sust. Ctr MIDI sustain pedal (controller #64) Foot Ctr MIDI foot control (controller #4) BreathCtr MIDI breath control (controller #2) Control W, X, Y, Z assignable MIDI controller W, X, Y, Z Waldorf microQ User´s Manual...
-
Page 49: Triggering Of Voices
Triggering of Voices As soon as a note is played, the microQ triggers one or several voices. How this triggering is done is set by the following parameters. You can find these parameters in the Sound Edit menu located in the Master section. - Page 50 Afterwards the release phase is active. This setting is only active as long as the Parameter Mode is set to Mono (only Envelope 4). Otherwise the envelope behaves as though set to Normal. Waldorf microQ User´s Manual...
- Page 51 You can edit up to 16 characters per name. To save all your changes, please store the sound before leaving this menu. Waldorf microQ User´s Manual...
-
Page 52: Oscillators Introduction
What he implemented into his synthesizer were the still well-known waveforms sawtooth, square and triangle. For sure, this is only a minimal selection of the endless variety of waveforms, but the Waldorf microQ gives you exactly these waveforms at hand, plus other classic waveforms like pulse (which is the father of the square waveform) and the sine wave (also part of every other waveform). - Page 53 The same is true for a brass instrument. The string in this case are the lips while the bow is the air. The lips are moved by the air to a certain extent and abruptly move back to their original position. Waldorf microQ User´s Manual...
- Page 54 They consist of a tube that can contain a certain amount of air. The player blows air through the tube in a way such that the air starts to vibrate. This vibration is almost completely symmetrical, resulting in a hollow timbre. Waldorf microQ User´s Manual...
- Page 55 When the pulse width is changed, the waveform starts to sound thicker. This happens because the effect is very similar to what you hear when you have two oscillators running with slightly different frequencies. They interfere and create irregular troughs in the resulting waveforms. Waldorf microQ User´s Manual...
- Page 56 It could act as a suboscillator wave, to emphasize certain frequencies or to frequency modulate other oscillators. The triangle wave sounds like a woodwind instrument, i.e. a clarinet. It can also be used for mallet instruments like vibraphone, xylophone etc. Waldorf microQ User´s Manual...
- Page 57 The following overview explains how the Wavetable Synthesis works: A wavetable into the microQ is a table consisting of 128 waveforms. Each waveform is classified by its own special sound character. The main difference of wavetable synthesis in comparison with other sound generation principles is the facility not only to play one waveform per oscillator, but also to walk through the wavetable via different modulations.
-
Page 58: Oscillator Section
Sound Parameters – Oscillator Section Oscillator Section The most important controls of the oscillators can be found in the parameter matrix. The following picture shows the microQ’s Oscillators Section: Oscillators Octave Semi Detune Shape Source Picture 11: Oscillators Section Selecting an Oscillator Choose the Oscillators section with the navigation buttons, and then the Oscillator you wish to edit. - Page 59 This waveform produces a hollow / metallic sound. If the Pulse waveform is selected, the parameters Pulsewidth and PWM are used to change the pulsewidth of the waveform. Furthermore, the modulation Waldorf microQ User´s Manual...
- Page 60 The tips listed here of course are only suggestions. The variety of tones among all Waveforms in the microQ are nearly inexhaustible. Oscillators should be set to “off” when not using them. This saves DSP Power and therefore can contribute to increased polyphony.
- Page 61 Please note that you can use unipolar as well as bipolar modulation sources. For instance, set the Pulsewidth Parameter to 64, nearly the middle of the wavetable, and use a slow LFO to sweep through the whole wavetable. Waldorf microQ User´s Manual...
- Page 62 Note that you can apply unipolar and bipolar modulation sources . For example, set Pulsewidth to 64, which is almost the middle of the wavetable and apply a slow running LFO to PWM Source to sweep through the whole wavetable. Waldorf microQ User´s Manual...
-
Page 63: Oscillator Edit Menu
Determines how much the pitch of the oscillator 2 depends on the MIDI note number. For more information please refer to "01 Keytrk". 02 BendRg (Bendrange) -24…+24 Determines the intensity of the pitchbend via MIDI Pitchbend messages in semitones for oscillator 2. Waldorf microQ User´s Manual... - Page 64 Selects the source for the frequency modulation of oscillator 3. 03 FM Amt (FM Amount) 0...127 Please read the "FM" in the chapter "Oscillator Parameter Controls" on page 60. FM requires a lot of CPU Power, which can lead to decrease polyphony. Waldorf microQ User´s Manual...
- Page 65 Staccato played notes start on the exact pitch of their note. Glissando makes the normal Glissando effect in the same manner by changing the pitch in • semitones. Fingered Gliss is similar to Glissando but generates a pitchchange only when notes are • played legato. Waldorf microQ User´s Manual...
- Page 66 Sub- and Main oscillator frequencies. Higher values represent a lower tuning. When Alt-Waveforms are selected for the first two oscillators and the Suboscillators are activated, the microQ can create up to 5 (!) oscillators per voice. Waldorf microQ User´s Manual...
-
Page 67: Mixer/Routing Section
The microQ offers two independent filters and panning units. In fact, the panning units are part of the filters in the microQ. The routing control makes it possible to change the signal flow from a parallel to a serial filter configuration and vice versa. Furthermore, the routing control is modulatable via the modulation matrix. -
Page 68: Mixer/Routing Edit Menu
1000 10000 Picture 15: Noise Please note that if you use an external sound source, you still have to trigger the microQ’s envelopes to get the signal passed through. So you have to generate MIDI notes from a connected sequencer or the internal arpeggiator to hear the audio signal. - Page 69 Keytrack is lowered to i.e. 50%. If you turn down the pitch of one oscillator markedly, you can get an effect very similar to Amplitude modulation. Use this for sounds with a periodic element if you wish. Waldorf microQ User´s Manual...
- Page 70 Filter 2 and decrease the amount of signal that feeds Filter 1. If set to mid, both filters will receive the same signal level. If set to F2 63, the signal is sent to Filter 2 only. Waldorf microQ User´s Manual...
-
Page 71: Filter Introduction
Sound Parameters – Filter Introduction Filter Introduction Once the audio signal leaves the mixer, it is sent to the filters. The microQ has two independent filter units, each with its own individual settings. The signal flow in the filters can be controlled via the Routing function. - Page 72 Picture 19: Low Pass Filter Resonance If the resonance is raised to a great extent, then the filter will begin self-oscillation, i.e. the filter generates an audible sine wave even when it does not receive an incoming signal. Waldorf microQ User´s Manual...
-
Page 73: Filter Section
Sound Parameters – Filter Section Filter Section The most commonly used controls of the filters can be found in the parameter matrix. The following picture of the microQ’s parameter matrix shows the Filter section: Cutof f Keytrack Resonance Drive Velocity... - Page 74 Use this feature to give a more expressive character to the sound. When you hit the keys smoothly, only minimal modulation is applied. When you hit them harder, the modulation amount also gets stronger. The following picture illustrates the functionality of this parameter: Waldorf microQ User´s Manual...
-
Page 75: Filter Edit Menu
Controls the amount of cutoff modulation for Filter 1. Positive amounts will increase the cutoff frequency when positive modulation is applied, e.g. by pressing the aftertouch on the keyboard. Negative amounts will decrease the cutoff frequency when positive modulation is applied. Waldorf microQ User´s Manual... - Page 76 F2 FM Amt – Filter 2 FM Amount Off, 0…127 Sets the amount of frequency modulation that is applied to the filter by the selected source for Filter 2. FM needs a lot of CPU power, which results in decreased polyphony. Waldorf microQ User´s Manual...
-
Page 77: Filter Types
Use this setting to bypass the filter. This is useful if you want to disable the filter temporarily and listen to the oscillators’ pure signals. With this setting the microQ doesn’t need any DSP Power for this operation. If you do not want to use Filter 1 or Filter 2 then switch them to “Bypass”. -
Page 78: 24Db Band Pass And 12Db Band Pass
Use the 24dB slope if you want to create sounds with a typical audible filtered character; use the 12dB slope if you want to get softer results. Level Resonance Frequency Cutoff Picture 23: High Pass Filter Type Waldorf microQ User´s Manual... -
Page 79: 24Db Notch And 12Db Notch
However, you will still be able to hear slight differences when you change the Resonance because of phase changes. Anyway, the effect isn’t that spectacular. Waldorf microQ User´s Manual... -
Page 80: Comb+ And Comb
The frequency of the colorization is set by the delay length, which is controlled in the microQ through Cutoff, while the amount of colorization is set by the Comb filter feedback, which is controlled in the microQ through Resonance. - Page 81 You might ask why you should use a Comb filter type to produce Chorus instead of using the FX section of the microQ. Here are some reasons: The FX sections remain free for other purposes. Also, in Multi Mode, the Comb filter works no •...
- Page 82 However, the Comb filter enables you to create abstractions of those sounds that can be played expressively.
-
Page 83: Amp/Fx/Arp Section
Sound Parameters – Amp/FX/Arp Section Amp/FX/Arp Section This section is the last of the microQ’s signal routing. Its purpose is to set the volume of the sound and contains the effect settings. Furthermore this section controls the arpeggiator. The following picture of the microQ’s Parameter Matrix shows the Amp/FX/Arp section: Amp/FX/Arp. - Page 84 Sound Parameters – Amp/FX/Arp Section AmpMod -64…+63 Determines the amount of volume modulation. Waldorf microQ User´s Manual...
-
Page 85: Effects
Sound Parameters – Effects Effects The microQ has two effect units. The first effect unit is always part of the Sound Program. The second effect can be assigned either globally or to Instruments 1 through 4. To use the effect units in Multimode please read the chapter “Multi Mode”... -
Page 86: Bypass
With extreme settings you can hear a whistling sound which is very characteristic of a Flanger effect. A Mix setting of 48 to 96 produces the strongest effect because both the unaffected signal and the processed signal are mixed together. Speed Depth Speed 0…127 Sets the LFO speed of the Flanger effect. Waldorf microQ User´s Manual... -
Page 87: Phaser
Feedback 0…127 Controls the feedback amount of the delay signal. Polarity positive / negative Determines whether the feedback signal is fed back into the Phaser as is, or is inverted beforehand. Waldorf microQ User´s Manual... -
Page 88: Overdrive
You should turn the Mix control fully up with this effect type because you probably want the sample rate reduction to process the whole signal. The Ring Mod and the Chor/Dlay effect have their own mix control. Waldorf microQ User´s Manual... - Page 89 Main in means that the source is the summed audio signal that is routed to the microQ´s • Main Out jack Sub1 In means that the source is the summed audio signal that is routed to the microQ´s Sub • Out 1 jack Sub2 In means that the source is the summed audio signal that is routed to the microQ´s Sub...
-
Page 90: Delay
Auto Pan. An important feature of the microQ’s Delay effect is that the Delay length can be changed without clicks or pitch changes. This allows you to experiment with different Delay lengths without getting annoying side effects in the output signal. - Page 91 Clocked is set to on. When set to internal, the Tempo is synced to the Global Tempo which in turn is generated by the microQ itself or evaluated from incoming MIDI Clock. See the chapter “The Tempo” on page 124 for details.
-
Page 92: Vocoder
Easy Setup for working with the Vocoder Building a Vocoder setup 1. Connect the audio input of your microQ with a 1/4-inch mono or stereo plug. In practice, a socalled “insert” or “Y” cable is perfect for a stereo or dual mono signal input for the vocoder. - Page 93 You should hear the vocoder effect. We recommend using speech or drum loops as external audio material. 6. Try different settings of the vocoder parameter and tune to taste. First we recommend the use of the vocoder preset patches at the end of bank C in the microQ´s factory soundset. Bands 002…025...
- Page 94 EQ Middle 001…025 Selects the band that is emphasized or attenuated by Mid Level. The surrounding bands are scaled to match the level of the Middle EQ. Waldorf microQ User´s Manual...
-
Page 95: Reverb
-64…+63 Emphasizes or attenuates the band selected with EQ Middle by ±18dB. The following FX types are not available for the microQ lite and can only be selected for FX2. Reverb The Reverb effect is probably the most widely used effect in music production. It is used to add a realistic ambience to clean and dry audio recorded in a studio. -
Page 96: Surround Delay Types
The sixth channel supports the so-called LFE channel (Low Frequency Effects) which is almost always connected to a subwoofer (x.1). To use the full performance of the surround delays please connect the microQ´s audio outputs to your mixing unit or to a special surround amplifier as follows:... - Page 97 Determines the relative delay of the effect signal pertaining to the setting of the Delay parameter. RearSL V.!Delay S1L | 100.0 % Rear SL Volume 0...127 Determines the volume of the effect signal for the left Rear Speaker (Sub Out 1 L). Waldorf microQ User´s Manual...
- Page 98 5.1 D.Clk This surround delay type is similar to the 5.1 Delay. With this delay type, the delay time is synchronized to the microQ´s internal tempo. For more information about tempo settings refer to the chapter „The Tempo“ on page 124.
-
Page 99: Arpeggiator
Different sequence modes can be defined for the Arpeggiator to cover a wide range of applications. In addition to the synthesis features, the microQ offers a deeply programmable Arpeggiator for every sound program. It can play a wide range of different rhythm patterns including accents and different timings, and allows creating sophisticated custom rhythm patterns. -
Page 100: Arpeggiator Parameter Of The Amp/Fx/Arp Edit Menu
See the section "Arpeggiator Step Data Pages" below about the pattern settings you can create. 1…15 selects one of the 15 internal ROM rhythm patterns. See the table below for an • overview of each ROM rhythm pattern: Waldorf microQ User´s Manual... - Page 101 127/192, the Arp Steplen parameter lets you change the relative length of each step. However, when Length is set to legato, all arpeggio notes are played without pauses between each step and Arp Steplen therefore has no effect. Waldorf microQ User´s Manual...
- Page 102 Vel Mode Each Note / First Note / Last Note Determines how velocity is interpreted in the arpeggio. Note that each arpeggio step might have an additional positive or negative offset set by the Arp Accent parameter. Waldorf microQ User´s Manual...
- Page 103 Table 11: Arpeggio with Pattern Reset set to On If On is selected, the note list will be restarted as soon as the rhythm pattern is restarted. • The same arpeggio might now look like this (note the two C1s in sequence): Waldorf microQ User´s Manual...
-
Page 104: Arpeggiator Step Data Pages
"Bass Line" melody character. Make sure that you set up a reasonable glide effect in the Oscillator Edit menu. If off is selected (empty space), the glide effect is disabled for this step. • Waldorf microQ User´s Manual... - Page 105 As you can see, the effects can differ greatly depending on what you set up here. The following arpeggio shows an example of the effect when the notes C1, E1 and G1 are pressed: Waldorf microQ User´s Manual...
- Page 106 If a vertical line (˚) is shown, the step is held for the time set in the Length parameter. • Values pointing to the right (¸, ˝, ˛) extend the note duration of this step. • Waldorf microQ User´s Manual...
-
Page 107: Envelope Section
All parameters of the microQ’s envelopes can be edited via the Parameter Matrix. The microQ offers 5 different envelope types. Their parameters are described here in order. Some envelope types do not use the full number of parameters available to the envelope section. -
Page 108: Adsr Envelope
Determines the sustain level which is held until a note ends. Release 0…127 Once the note has ended, the release phase begins. During this phase, the envelope fades to zero at the rate determined by the Release value. Waldorf microQ User´s Manual... -
Page 109: Ads1Ds2R Envelope
Determines the level which is maintained until a note ends. Release 0…127 Once the note is released, the release phase begins. During this phase, the envelope fades to zero at the rate determined by the Release value. Waldorf microQ User´s Manual... -
Page 110: One Shot Envelope
Determines the decay rate or amount of time it takes for a signal to reach the Sustain level. Sustain 0…127 Sets a breakpoint level between the Decay and the Release rate. Release 0…127 The Release phase fades the envelope to zero after the Sustain level is reached. Waldorf microQ User´s Manual... -
Page 111: Loop S1S2 Envelope
Sets the second Sustain level. As soon as this level is reached, the loop starts by using the first Decay rate to go to the first Sustain level. Release 0…127 Once the note is released, the release phase begins. During this phase, the envelope fades to zero at the rate determined by the Release value. Waldorf microQ User´s Manual... -
Page 112: Loop All Envelope
The Release phase takes effect while the note is pressed, as last stage before the loop restarts with the Attack phase. When the note is released, the loop stops and the Release phase is used to fade the envelope to zero. Waldorf microQ User´s Manual... -
Page 113: Envelope Edit Menu
Filter Envelopes are shown here as an example for a normal ADSR-Type with corresponding values: F-Env:ADSR A000 D010 S127 R030 Waldorf microQ User´s Manual... -
Page 114: Lfo Section
Sound Parameters – LFO Section LFO Section In addition to the main oscillators, the microQ is equipped with three low frequency oscillators (LFO) that can be used for modulation purposes. Each LFO generates a periodic waveform with adjustable frequency and shape. -
Page 115: Lfo Edit Menu
After this time, the LFO is faded in and then runs with full magnitude. When Fade is set to –64…-01, the LFO runs with full magnitude for the time set with the • Delay parameter. After this time, the LFO is faded out to zero. Waldorf microQ User´s Manual... - Page 116 LFO1 Clk - LFO 1 Clocked Off / On When LFO1 Clk is activated, the LFO is synced to the global Tempo of the microQ. The LFO Speed setting for LFO 1 is changed to offer musically meaningful values. Please read the section "The Tempo" on page 124 for further information.
- Page 117 LFO2 Clk - LFO 2 Clocked Off / On When LFO2 Clk is activated, the LFO is synced to the global Tempo of the microQ. The LFO Speed setting for LFO 2 is changed to offer musically meaningful values. Please read the section "The Tempo" on page 124 for further information.
- Page 118 Controls the initial phase of the LFO when a new note is started. Free means that the LFO isn’t restarted on a new note but runs freely while other values set the LFO phase to the respective offset in degrees. Waldorf microQ User´s Manual...
- Page 119 LFO3 Clk - LFO 3 Clocked Off / On When LFO1 Clk is activated, the LFO is synced to the global Tempo of the microQ. The LFO Speed setting for LFO 3 is changed to offer musically meaningful values. Please read the section "The Tempo" on page 124 for further information.
-
Page 120: Mod Matrix Section
"source" and "destination". The microQ offers 16 independent modulation assignments (slots) each with individual settings of source, destination and amount. The Modulation Matrix (Mod Matrix) is the key of the power of each Waldorf synthesizer, so start experimenting with it right now. -
Page 121: Mod Matrix Edit Menu
The parameter for the modifiers can be found after the pages of the Mod Matrix Edit Menu for the Modulation slots. Please select these pages with the Page Dial. Md1 Src1 !Source 2 LFO1 !constant Md1 Src - Source #1 see Table “Standard Modulation Sources” Selects the first source signal used for the calculation. Waldorf microQ User´s Manual... - Page 122 Defines a value for modifier functions that require a constant parameter. See the Operation parameter described above for further details. The three other Modifiers Md2, Md3 and Md4, are available to you on the remaining pages of this menu. They can be edited in the same way as Md1. Waldorf microQ User´s Manual...
-
Page 123: The Tempo
The Tempo Tempo 40…300 The Tempo control is one of the most important parameters in all operation modes of the microQ. It controls the tempo of the Arpeggiator, some Effect types and the LFOs for which Clocked is activated. In Multi Mode, Tempo controls the overall tempo of the current Multi, affecting all Sounds that are used in its Instruments. -
Page 124: Drum Map
Each Multi program can hold one Drum Map which, combined with the 16 part Multi mode of the microQ, gives you 15 + 32 = 47 different sounds simultaneously. To select a Drum Map, refer to the chapter “Selecting Programs” on page 28. Drum Maps are stored in Bank D. - Page 125 Please note that this parameter shifts the incoming note. When you’ve set the oscillators of the selected Sound to ignore keytrack (O1…O3 Keytrack 0%), this parameter also has no effect on the pitch of the oscillators. #01 Volume Volume 0…127 Sets the maximum output volume of the selected Drum Map entry. Waldorf microQ User´s Manual...
-
Page 126: Global Parameters
Sysex ID on your microQ when you want to upgrade it to a newer OS. If you have only one microQ, leave Sysex ID on 0. There is no need at all to change this setting to any other value. - Page 127 Keyboard to a sequencer by MIDI, you should set Local to Off. The MIDI data flow then is as follows: when you play a note on the microQ Keyboard, it is send to the sequencer. The sequencer eventually maps the note to a different MIDI channel and sends it out through a specific MIDI port.
- Page 128 Bank change messages will be ignored. This setting can be used in case you wish to work with only one sound bank. With Nmb.+Bank being active the microQ reacts to program as well as bank changes. This • setting is recommended for normal use.
- Page 129 Tuning 430…450 Hz Controls the microQ’s overall pitch in Hertz. The value specified here is the reference pitch for MIDI note A3. The default setting is 440Hz, which is commonly used by most instruments. You should only change this setting if you really know what you’re doing. You will have to adjust all your other instruments, too.
- Page 130 Mix In to!MixLevel Inst.1 FX! This parameter allows you to send an external audio signal directly into the microQ’s effect section without the need of a note trigger. Main out will route an external signal directly to the microQ’s Main Out.
- Page 131 For a standard keyboard velocity response, you should set On Velocity Curve to linear or exp 1. Other curves might be applicable under special circumstances only. Rel. Velocity Curve (microQ Keyboard only) Off / exp 2 / exp 1 / linear / log 1 / log 2 / fix 32...127...
- Page 132 Global Parameters – Global Menu Pedal/CV Offset (microQ Keyboard only) -64…+63 Pedal/CV Offset Sets the initial gain for Control Pedal/CV that is used when the pedal is at its minimum position. To find out which value is suited for the Control Pedal/CV you want to use, do the following: To adjust Pedal/CV Offset: 1.
- Page 133 Sets the display contrast. If you accidentally set this parameter to 0, you may not be able to read the display any more. If you then switch the microQ off and back on later, it might appear that the microQ is defective. If this should ever happen, open this manual and proceed as follows: To restore the Display Contrast to a normal setting: 1.
- Page 134 Code for MQ upgrade: 1111-1111-1111-1111 On this menu page the upgrade code for the microQ lite can be found. It is used when making an upgrade to a fullrange microQ. For more information about prices and handling please refer to our website: http://www.waldorf-music.com...
-
Page 135: Utility Menu
Init Sound A001 [Utility] The microQ provides a special function for setting all parameters of a Sound program to initial values. You can use it to create a new program from scratch. This is how you initialize a Sound program: Select the designated Sound program. - Page 136 [Utility] The microQ provides a special function for setting all parameters of a Drum Map to initial values. You can use it to create a new Drum Map from scratch. This function is only available if a Drum Map is selected.
-
Page 137: Midi Control
All received channel based MIDI messages are played back by the active Instrument or Layer. In Multi Mode, the microQ can send and receive on all 16 MIDI Channels at once, depending on the Instrument settings of the current Multi program. - Page 138 All Notes Off Message The microQ sends an All Notes Off Message to the internal tone generator and over MIDI on all channels when the Power button is pressed briefly. When the microQ receives an All Notes Off Message, it forces the envelopes of all sounding voices to go into their release phases.
-
Page 139: Modifying / Editing Sounds Over Midi
MIDI (dump). Sending System Exclusive Data When you activate the send functions, the microQ sends the contents of its memory to the MIDI Out jack. Using a sequencer or a special sound editor program, you can record and archive this data. -
Page 140: Receiving System Exclusive Data
Receiving System Exclusive Data You are not required to activate a special receive mode of the microQ in order to receive system exclusive data through MIDI. However, there are a few things you should check before you transmit system exclusive data to the microQ: Make sure none of the microQ’s programs is in Edit mode. -
Page 141: Other Functions
Possibly there can be a .zip file containing the new OS, new sounds and a manual addendum. If you don’t have Internet access, please ask your local dealer for a disk copy. The microQ keyboard and rack version are using the same operating system! It is not possible to update a microQ lite. - Page 142 If this message appears: SysEx Timeout the file wasn’t transmitted completely to the microQ or played back too slowly. Try to download the file from the Internet again. New functions in future OS will be documented in PDF files which are available on our website (http://www.waldorf-music.com) or at our ftp-server (...
-
Page 143: Appendix
You can create further movement by applying an LFO to the comb filter cutoff. The perfect place to read this user manual is your favorite bathroom. We recommend 5 • pages per session! Waldorf microQ User´s Manual... -
Page 144: Tips For Better Voice Performance
Appendix – Tips for better voice performance Tips for better voice performance The dynamic voice management of the microQ makes optimal use of its processing power. The following table shows you how to set up your microQ for the best voice performance. -
Page 145: Parameter Index
Sub Vol (Oscillator) Depth (Phaser FX) Output (Multi) Sustain (Envelope) Detune (Multi) Overdrive (5FX) Sync (Oscillator) Detune (Oscillator) Sync (LFO) Diffusion (Reverb FX) SysEx ID (Global) Direction (Arpgeggiator) Disp.Time (Global Menu) Drive (Filter) Drive (Overdrive FX) Waldorf microQ User´s Manual... -
Page 146: Technical Data
Power Supply Frequency range: 5Hz-24kHz Nominal voltage: AC 12V CV Inputs (microQ Keyboard only) Maximum current consumption: 1.0A Maximum power consumption: Hold Pedal: Stereo Jack with a connection to +5V on the ring, for standard Sustain Pedal with open state... -
Page 147: Glossary
A low pass filter dampens all frequencies above the cutoff frequency. A high pass filter in turn Waldorf microQ User´s Manual... - Page 148 An envelope generator can use this signal for its trigger purposes, and as a result a VCA unit can be controlled. Waldorf microQ User´s Manual...
-
Page 149: Midi Channel
This is often These are MIDI messages that switch sound generated by an envelope or an LFO. programs. Program numbers 1 through 128 can be changed via program change messages. Waldorf microQ User´s Manual... - Page 150 Appendix - Glossary Volume VCF is the acronym for voltage-controlled filter. It is a The term describes a sound's output level. filter component that allows you to manipulate the filter parameters via control voltages. Waldorf microQ User´s Manual...
-
Page 151: Midi Controller
LFO 3 Delay 0…127 16, 28, 40…112 Osc 1 Octave 128’…1/2’ 52…76 Osc 1 Semitone -12…+12 0…127 Osc 1 Detune -64…+63 0…127 Osc 1 FM 0…127 0…5 Osc 1 Shape pulse, saw, triangle, sine, alt 1, alt 2 Waldorf microQ User´s Manual... - Page 152 0…127 0…127 Osc 3 Balance F1 64…mid…F2 63 0…127 N/E Level 0…127 0…127 N/E Balance F1 64…mid…F2 63 - not used - undefined - not used - - not used - undefined - not used - Waldorf microQ User´s Manual...
- Page 153 0…127 Filter 2 Pan L64…center…R63 0…127 Filter 2 Panmod -64…+63 0…127 Amp Volume 0…127 0…127 Amp Velocity -64…+63 0…127 Amp Mod -64…+63 0…127 FX 1 Mix 0…127 0…127 FX 2 Mix 0…127 0…127 FE Attack 0…127 Waldorf microQ User´s Manual...
- Page 154 - not used - - not used - Omni Mode On - not used - - not used - Poly Mode On/Off - not used - - not used - Poly Mode On - not used - Waldorf microQ User´s Manual...
-
Page 155: Midi Implementation Chart
Controller Numbers” for all controllers that can be sent and received. 3 ModWheel is transmitted by microQ Keyboard only 4 Sustain Pedal is transmitted by microQ Keyboard only if additional pedal is connected 5 Bank Select LSB is used to switch between Banks A to D. -
Page 156: Ce Declaration
Appendix - Declaration of Conformity Waldorf microQ User´s Manual... - Page 157 1. IMPORTANT NOTICE: DO NOT MODIFY THIS UNIT! This product, when installed as indicated in the instructions contained in this Manual, meets FCC requirements. Modifications not expressly approved by Waldorf may void your authority, granted by the FCC, to use this product.
- Page 158 ©Waldorf-Music AG 2003• All rights reserved •Printed in Germany Waldorf-Music AG • Schloß Ahrenthal • D-53489 Sinzig • Germany Phone: +49-(0)26 42 - 90 20 8-0 • Fax +49-(0) 26 42 - 90 20 8-77 http://www.waldorf-music.com• info@waldorf-music.com...
Need help?
Do you have a question about the microQ Keyboard and is the answer not in the manual?
Questions and answers