Table of Contents
Advertisement
Advertisement
Table of Contents

Related Manuals for Waldorf QUANTUM


Summary of Contents for Waldorf QUANTUM
-
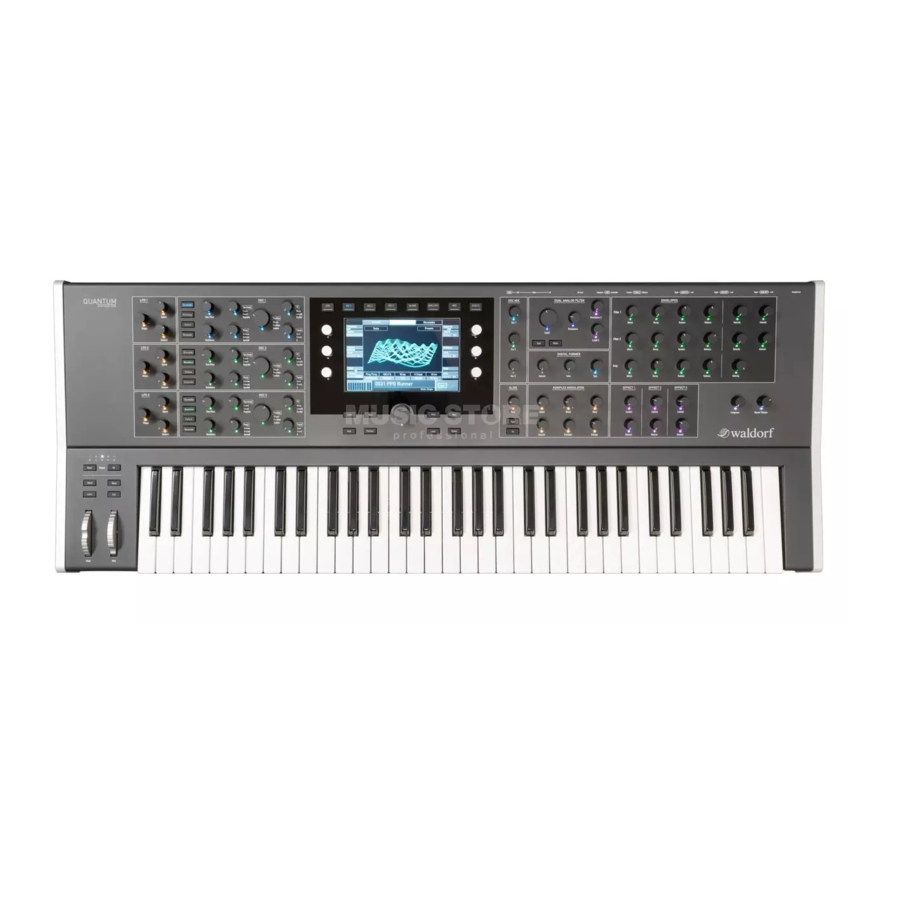
Page 1: Setup
USER MANUAL... -
Page 2: Table Of Contents
Connections ...................... 1 1 The Effects Section .................. 1 24 The Rear Panel Connections ................ 1 3 Output Section .................... 1 43 The Wheel Section ..................... 1 6 The Modulations of Quantum .............. 1 44 Basic Operation ......................19 Additional Modes ....................150 Master Volume ..................... 1 9 Perform Mode Page .................. 1 50 The Quantum Mode Pages . -
Page 3: The Rear Panel Connections
Content Appendix ......................... 206 How to update the Quantum Operating System ........ 206 Wavetable Synthesis ..................207 Waveform Oscillators Introduction ............209 A Short Introduction to Granular Synthesis ........215 Filter Introduction ..................215 FAQ - Frequently Asked Questions ............217 Modulation Sources and Destinations ........... 219 Technical Data ....................223 Glossary ....................... 224 Product Support ....................230 Quantum Manual... -
Page 4: Foreword
What to read? and that the manual contains no contradictory informati- on. Waldorf Music extends no liabilities in regard to this The biggest problem with any manual is to find a way to manual other than those required by local law. -
Page 5: Saving Programs
Dangles, Sascha Dikiciyan, Richard Devine, Ian Dunlop, Please visit our website for further support and Wolfram Franke, Reinhold Heil, Mike Huckaby, Joerg downloads for your Quantum & Quantum MK2: Huettner, Dirk Krause, Peter Jung, Christian Kleine, waldorfmusic.com/quantum Torsten Quaeschning, Howard Scarr, Lukas Schütte, Don Solaris, SonicMayhem, Steven Wartofsky, Synthmill, Bjoern Vogelsang, Rolf Wöhrmann... -
Page 6: Control Features & Connections
Control Features & Connections Control Features & Connections Front Panel Wheel Section 5) Selection Dial & Mode Pages Buttons 9) Effects Section Oscillator Section 6) Dual Analog Filter + Digital Former Sections 10) Output Section LFO Section 7) Envelopes Section Touchscreen Display 8) Komplex Modulator Quantum Manual... -
Page 7: Rear Panel Connections
Rear Panel Connections Headphones Output Main & Aux Out Outputs Audio Inputs Pedal Inputs USB Connections SD Card Slot MIDI In / Out /Thru Jacks Power Jack & Switch Quantum Manual... -
Page 8: About This Manual
Examples: users with routine tasks. Press the Load button. To avoid confusion, the terminology in this manual is ba- • sed on the Quantum parameter names. You will find a Turn the Cutoff knob. • glossary at the end of this manual; it explains the various terms used. -
Page 9: General Safety Guidelines
General Safety Guidelines General Safety Guidelines Power Supply Only use the power cable that came with Quantum. • Please read the following safety tips carefully! They Unplug the device when you are not using it for longer • include several precautions you should always ob- periods. serve when dealing with electronic equipment. Read all of the instructions before operating your device. Never touch the plug with wet hands. • Always pull the plug when unplugging the device - •... - Page 10 Proper Use This device is designed exclusively to produce low- frequency audio signals for the purpose of generating sound. Any other use is prohibited and voids the warranty extended by Waldorf Music. Waldorf Music is not liable for damages due to incorrect use. Please do not press and hold the Global, Perform and Load buttons during start up procedure. This will activate the Skynet artificial intelligence. Waldorf is not responsible for further courses of the timeline. Quantum Manual...
-
Page 11: Setup And Connections
Setup and Connections Setup and Connections To connect the devices: 1. Turn all units off. The Waldorf Quantum comes complete with: 2. Connect the Quantum’s Main Out audio outputs The Waldorf Quantum Synthesizer itself to your mixing console or your computer audio • interface. Optionally connect the stereo A power cable • Headphones outputs to a headphone. A printed Quick Start manual • 3. If you want to use a computer, connect the Quan- Please ensure all the above items were included. If some-... - Page 12 Please take care that the connected this, the Quantum is ready to play. playback device is suitable for the line level of an electronic instrument. Never use the microphone or The overall volume of the Quantum can be control- phono input of the connected amp! led with the Master Volume dial. This also affects the Headphones output but not the AUX output.
- Page 13 The Main and Headphone out- put contains no signal unless spe- puts are affected by the setting of the Master Volume con- cified in the Layer page for example trol and the Comp(ressor) dial. Use 2x TS mono jack cables when using split or layered sounds. to connect the Main output to a mixer. The Quantum is a The Aux Outputs are neither affected stereo instrument. There is no inherent mono output. Use by the Master Volume nor are using the master compres- your mixing console to appropriately distribute the stereo sor. For more information on how to set up the Aux output channels in case.
- Page 14 Make sure that you use a USB 2 port on your compu- sed and others close, it is neces- ter and a USB 2 compatible cable to avoid problems sary that the connected pedal is with data transmission. not pressed when switching on the Quantum. This enables The Computer USB port connects the Quantum to your Quantum to match the pedal. computer or iOS device with the following system requi- The Control Pedal input allows you to connect any suitab- rements: le pedal. In the simplest case, you can plug in an expression Windows PC: Windows 7 or newer, a USB 2 port pedal. For using its full-range signal as a modulation...
- Page 15 Updating the Iridium Keyboard’s operating system- to control external sound mo- • dules with the Quantum keyboard: just connect the DIN MIDI out (or USB Controller port) to your external gear SD Card Slot and play. For use with a computer we recommend the Computer USB port.
- Page 16 When you play legato, only the first note that was played triggers those envelopes which have the SingleTrig para- Octave Down/Up Buttons meter activated. Those envelopes with SingleTrig deacti- Although the MIDI standard vated will re-trigger at each note even when played legato. requires 128 keys, Quantum You can freely mix and match SingleTrig settings between offers only 61, so we added all envelopes. The SingleTrig mode is for sustained these buttons to enable you to sounds like typical 1970s solo sounds.
- Page 17 Sequencer in ‘The Perform Mode’ chapter. Quantum MK2) We recommend to push the Chord button instead of Latch, when using the arpeggiator. In Latch mode, Quantum MK2 offers a brand new Fatar TP8 keyboard all played notes are held until their key is pushed with 61 light-weighted sensitive keys with polyphonic again. aftertouch – possibly one of the best synthesizer key- boards money can buy.
- Page 18 For example, you can play and hold 10 keys at a time and move your fingers to create poly- phonic aftertouch data. Each finger creates its own da- ta stream for modulation purposes. As you can probably imagine, the Quantum MK2 offers polyphonic aftertouch. In this way, massive tonal changes are possible when playing live - from subtle sound forma- tions to extreme sound alienations.
-
Page 19: Basic Operation
Basic Operation Basic Operation The Quantum Mode Pages The Quantum offers mode pages in addition to the panel parameters or for global settings. To enter a desired mode Switching On / Off page, just press the corresponding mode button above or below the touchscreen display. The following mode pages Quantum is equipped with a are available: power switch. To switch Quantum on: Press the Power switch •... - Page 20 (VUs: Voices & Main). Tap on the monitor section to open a pop-up menu for selecting futher representations. VUs: In, Main & Aux shows VU meters for the incoming audio signal when using Quantum´s recording option (read more on that in the ‘Global chapter’ (Audio tab). Scope delivers a realtime waveform display of the current stereo...
- Page 21 The scope can be further configured in the Global Loading Programs Scope screen. Analyzer (lin) offers a realtime analyzer to The Quantum offers different ways of loading sound pro- display the linear frequency content of the signal, while grams: Analyzer (log) shows a logarithmic representation like most analyzers. Finally, a MIDI Monitor displays all MIDI...
- Page 22 Attributes. These settings can be made while saving a connected SD card or a USB storage device. All related sound program (see chapter ‘Saving Sounds’). samples will be stored in a sub directory called ‘samp- les’ preserving further sub-folder structures. If you By tapping on the Init button, you can initialize the current keep this structure, then importing these patches on a loaded sound. No sound program is overwritten during different machine will also automatically import all re- this action. If in Layered mode, a popup window will open where you can choose if the current selected layer (Cur- Quantum Manual...
- Page 23 Delete opens a pop-up window for deleting sound • access the appropriate parameters. Depending on the type program(s). Here, you can define a slot range of the of parameters, there are different ways to achieve this: programs to delete. After confirmation, the programs The controls on the Quantum’s front panel offer direct will be deleted irrecoverably. • access to the most important sound parameters. The Rebuild Cache lets you rebuild the internal data cache •...
-
Page 24: The Effects Section
Basic Operation parameters are called Display Menu Parameters. For soon as the value 0 is reached, the sweep is stopped for a each parameter the original value from a loaded patch short period to make it easier to edit Quantum. is indicated by a vertical bar in the main bottom area For each parameter the original value from the and in the encoder displays. loaded patch is indicated by a vertical bar in the Some functions can be edited via the touchscreen dis- main bottom area and in the encoder displays. - Page 25 Saving Programs board. The program name can use up to 32 cha- racters. Tap on Return to confirm. Tap on After you have finished editing a sound program you must Cancel to cancel the naming procedure. save it if you intend to use it again. All of Quantum’s me- Tap on the Bank name to open a pop-up menu mory locations are available for this purpose. for selecting a desired sound bank. You can also add a new bank by tapping on + next to the bank name.
- Page 26 Use the Save function for copying sound programs. There is no need to edit a program before storing it. The Sound Layers Quantum offers a dual sound mode which means that two different sounds can be played simultaneously either as layered or as split sounds. To switch between Layer 1 and Layer 2 just tap on the Layer 1 / 2 buttons in the lower right corner of the touch- screen display. The current selected Layer button lights up. Below the Layer buttons the current layer mode is...
-
Page 27: Sound Parameter
Sound Parameter Sound Parameter Overview of Functions Waldorf Quantum consists of numerous sound-shaping components. The following pages describe all parameters in detail. Note that Quantum consists of two different types of com- ponents for sound generation and sound shaping: Sound synthesis: Oscillator models, Analog Filters, • Digital Former, Amplifier, Effects. These modules re- present the audio signal flow. Sound generation actual- ly occurs within the oscillators. They can produce dif- Potential signal routing for an audio signal ferent shapes based on the selected model – e.g. classic... -
Page 28: Oscillator Section
The Oscillator Section for Oscillator 1 The Quantum offers three oscillators with different capaci- ties: Wavetable Oscillator, Waveform Oscillator, Partic- le Generator, Resonator, and Kernel synthesis. The most important oscillator controls can be found in the Oscillator section on the Quantum’s user panel. Choose the desired oscillator model by pressing the cor- responding button. To enter the Kernel mode, press Wave- table and Waveform buttons simultaneously. The button of the chosen model lights up. Every model uses its own color – as is the case for the oscillator parameter knobs. - Page 29 The audible result of detuned oscillators is a waves of a wavetable. chorus-like effect. Use a positive setting for one oscillator An LFO or envelope can modulate the position within and an equivalent negative setting for another. • the wavetable. You can create subtle to drastic sound changes. Quantum Manual...
- Page 30 LFO, or any other modulation source. You can also set up Position different Travel Modes. Please refer to the corresponding section below. This parameter defines the start-point of the selected wavetable. A setting of 0 selects the first wave; the maxi- Use Travel with a setting of 3 seconds to get an mum setting selects the last wave of the wavetable. impression of the diversity of the factory wavetab- les. Determines the amount of saturation/gain that is added to the wavetable signal. If set to 0, no saturation/gain will be Quantum Manual...
- Page 31 Modulations: opens the Mod menu to set up a modu- • lation for this parameter. More information can be found in ‘The Modulation Mode’ chapter. In contrast to the stepped nature of the semitone control, pitch mo- dulation changes the pitch continuously according to the modulation source shape. MIDI Learn CC: activates MIDI Learn, which maps an • incoming MIDI control change to this parameter. Quantum Manual...
- Page 32 Determines how much the pitch of the selected oscillator Tap on Osc 1/2/3 Vol to open a pop-up menu for further depends on the MIDI note number. The reference note for settings: Keytrack is C3, note number 60. For positive settings, the oscillator pitch rises on notes above the reference note; for Normal: changes Oscillator volume on a normal scale. • negative settings the oscillator pitch falls by the same Fine: changes Oscillator volume more fine grained. amount, and vice versa. A setting of +100% corresponds to • a 1:1 scale – e.g. when an octave is played on the keyboard Quantum Manual...
- Page 33 Digital Former section (DF) Fine: Oscillator panning change is about 0.2 %. • and the Dual Analog Filter section (Fil). If you want to send the signal, for example, through the Digital For- Super Fine: Oscillator panning change is about 0.02 %. • mer section by 30% and through the analog filter by Set Default: sets Osc 1/2/3 panning to its default • setting Center. Quantum Manual...
- Page 34 To simulate the pitch variations that analog circuits have Tap on Osc 1/2/3 Dest to open a pop-up menu for further due to component tolerances, missing calibration and settings: temperature effects, the Quantum assigns each oscillator of each voice a random out-of-tune coefficient at startup. The Set Default: sets Osc 1/2/3 Dest to its default setting • amount by which these out-of-tune coefficients affects Main.
- Page 35 Set Default: sets Min Note to its default key C-2 and • Max Note to G8. Set Last Loaded: resets the parameter to the last • loaded value from the current sound patch. MIDI Learn CC: activates MIDI Learn, which maps an • incoming MIDI control change to this parameter. Set From Keys: Tap on this option to set the Min or • Max note with your keyboard. Quantum Manual...
- Page 36 MIDI Learn CC: activates MIDI Learn, which maps an • incoming MIDI control change to this parameter. Same functionality as for the corresponding panel parame- ter. Tap on Position to open a pop-up menu for further set- tings: Normal: Wavetable position change is about 0.64. • Fine: Wavetable position change is about 0.06. • Super Fine: Wavetable position change is about 0.006. • Set Default: sets Wavetable position to its default • value 0.00. Quantum Manual...
- Page 37 Modulations: opens the Mod menu to sets up a modu- • Fine: Phase change is about 0.5 degree. • lation for this parameter. More information can be found in ‘The Modulation Mode’ chapter. Super Fine: Phase change is about 0.1 degree. • MIDI Learn CC: activates MIDI Learn, which maps an • Set Default: sets Phase l to its default value 0.0 degree. • incoming MIDI control change to this parameter. Set Last Loaded: resets the parameter to the last • loaded value from the current sound patch. Quantum Manual...
- Page 38 Set Last Loaded: resets the parameter to the last • Modulations: opens the Mod menu to sets up a modu- • loaded value from the current sound patch. lation for this parameter. More information can be found in ‘The Modulation Mode’ chapter. MIDI Learn CC: activates MIDI Learn, which maps an • incoming MIDI control change to this parameter. MIDI Learn CC: activates MIDI Learn, which maps an • incoming MIDI control change to this parameter. Quantum Manual...
- Page 39 One Shot: a wavetable stops when the last wave is • are available: Legacy emulates the wavetable playback reached. The last wavetable position is played and quality of the very first Waldorf synthesizers. Harsh pro- held. Every played note starts its own travel cycle. duces additional non-harmonic components in the lower pitch ranges which result in more rich to aggressive timb- Ping Pong: a wavetable automatically starts a reverse •...
- Page 40 (e.g. Microwave) when Travel Set Default: sets Stepped to its default setting Smooth. • reaches the end of the wavetable and blends back to Set Last Loaded: resets the parameter to the last • the start wave position. loaded value from the current sound patch. Tap on Limit to open a pop-up menu for further settings: MIDI Learn CC: activates MIDI Learn, which maps an • Set Default: sets the Limit to its default setting Limit. incoming MIDI control change to this parameter. • Quantum Manual...
- Page 41 These words will be synthesized as a wavetable when tapping on Return. Reduce: performs value quantizations similar to samp- • le reduction. Analyze Audio: enables you to select an audio file • from the file browser of Quantum's Flash memory or a Truncate: performs value quantizations similar to bit • connected SD card/USB storage device. This audio file reduction. will be automatically synthesized as a new wavetable. Select the desired file and tap on Analyze.
- Page 42 Sound Parameter Card/USB storage device. This enables you to exchange Free single-cycle waveforms can be found here user wavetables with other Quantum users. www.adventurekid.se/akrt/waveforms but there are many more available as free and commercial Save Wavetable: exports the current wavetable to the • waveforms. internal Flash memory (Internal) or a connected SD Card or USB storage device. This enables you to Import from .wav: creates a wavetable from .wav/.aiff...
-
Page 43: Output Section
Import: imports a Wavetable oscillator preset from a • connected SD card/USB storage drive into the Quan- tum’s Flash memory. The imported preset is shown within the Wavetable oscillator preset list. Export: exports the current selected Wavetable oscilla- • tor preset to a connected SD card/USB drive. Delete: deletes the current selected Wavetable oscilla- • tor preset after a security confirmation. Init: initializes the current selected Wavetable oscilla- • tor to its default settings. Quantum Manual... -
Page 44: The Modulations Of Quantum
Sound Parameter The Waveform Oscillator Waveform Oscillator Panel Parameters Quantum offers a standard oscillator model to create typi- Semitones cal analog synthesizer waveforms (sawtooth, triangle etc.) plus other classic waveforms like square (which is the Sets the pitch of the oscillator in semitone steps. The stan- father of the pulse waveform) and the sine wave (also part dard setting for this parameter is 0, but there are cases of every other waveform). Also, different noise signals can where different values are interesting as well. be choosen. Fine Pitch The Waveform oscillator also can generate up to eight oscillator signals (called Kernels) simultaneously. Here,... - Page 45 • with a pulse width of 50% has only the odd harmonics soft rising saw wave (lowest setting) into a regular sine of the fundamental frequency present. This waveform wave (middle setting) to a soft falling saw wave (hig- produces a hollow/metallic sound. hest setting). Pink Noise – this special kind of noise produces higher • If Triangle is selected, the Warp parameter blends from • levels in the deeper frequency range. It is a better a rising saw wave (lowest setting) into a regular triang- match with the human hearing than the unfiltered whi- te noise. Quantum Manual...
- Page 46 Here you find parameters relating to tuning and some Sync basic settings. The functions and options are the same as for the Wavetable oscillator. Please refer to the correspon- Adds a typical oscillator synchronisation to the selected ding chapter. oscillator shape (except Pink Noise and White Noise). As a result, interesting sound effects may be generated – espe- Timbre Mode Tab cially when higher Sync settings are used. Here you find specific parameters for the Waveform oscil- lators. Quantum Manual...
- Page 47 Set Last Loaded: resets the parameter to the last • loaded value from the current sound patch. Count MIDI Learn CC: activates MIDI Learn, which maps an • incoming MIDI control change to this parameter. Same functionality as for the corresponding panel parame- ter. Detune Tap on Count to open a pop-up menu for further settings: Same functionality as for the corresponding panel parame- Normal: Count change is about 0.3. • ter. Fine: Count change is about 0.03. • Tap on Detune to open a pop-up menu for further settings: Super Fine: Count change is about 0.003. • Normal: Detune change is about 0.3 cents. • Set Default: sets Count to its default value 1.0 kernel. • Fine: Detune change is about 0.03 cents • Quantum Manual...
- Page 48 Higher settings move the signals within the stereo field. Same functionality as for the corresponding panel parame- ter. Tap on Stereo to open a pop-up menu for further settings: Tap on Warp to open a pop-up menu for further settings: Normal: Stereo change is about 2 degree. • Normal: Warp position change is about 1 %. • Fine: Stereo change is about 1 degree. • Fine: Warp position change is about 0.1 %. • Super Fine: Stereo change is about 0.1 degree. • Super Fine: Warp position change is about 0.01 %. • Set Default: sets Stereo to its default value of 0.0 %. • Set Default: Warp position is set to its default value of • Set Last Loaded: resets the parameter to the last • 50.0 %. loaded value from the current sound patch. Quantum Manual...
- Page 49 Set Last Loaded: resets the parameter to the last • loaded value from the current sound patch. MIDI Learn CC: activates MIDI Learn, which maps an • incoming MIDI control change to this parameter. MIDI Learn CC: activates MIDI Learn, which maps an • incoming MIDI control change to this parameter. Set Last Loaded: resets the parameter to the last • loaded value from the current sound patch. Phase Determines the start phase of the selected oscillator shape. Quantum Manual...
- Page 50 Tap on the Presets button to open a pop-up window for This is where the samples can come from: loading, saving and managing Waveform oscillator set- tings. For more information on the available options please From Quantum’s internal Flash memory. Here are • refer to the Presets chapter in the Wavetable section. located many factory samples that can be loaded into the Particle generator.
- Page 51 Sets the pitch of the particle generator in semitone steps. Global page features an audio recorder. All recorded fi- The standard setting for this parameter is 0, but there are les are stored in the internal Flash memory and can be cases where different values are interesting as well. loaded into the Particle generator. From the audio input of Quantum by using the Live • Fine Pitch Granular mode. Read more on this in the correspon- ding section. Fine-tunes the particle generator in steps of 1/128th of a semitone. The audible result of detuned oscillators is a...
- Page 52 Positive values allow a forward move- ment, negative values a backward movement. Lower valu- Here you find specific parameters for the Particle Genera- es slow down the movement speed, higher values speed it tor as well as the option to load samples into this genera- up. Cyclic means that a sample starts automatically again tor. from the beginning when the end is reached. If you don’t Here, the display visualizes the envelopes and grain distri- want a cyclic modulation, use the Position parameter bution. modulated with an envelope, an LFO, or any other modula- Quantum Manual...
- Page 53 Mode is set to ‘Granular’. This can be done by • lation for this parameter. More information can be tapping on the Particle button (and confirming the found in ‘The Modulation Mode’ chapter. granular mode switch) or selecting Granular with the Mode parameter. MIDI Learn CC: activates MIDI Learn, which maps an • incoming MIDI control change to this parameter. Quantum Manual...
- Page 54 Set Last Loaded: resets the parameter to the last Length (only in Granular Mode) • loaded value from the current sound patch. Same functionality as for the corresponding panel parame- MIDI Learn CC: activates MIDI Learn, which maps an ter. • incoming MIDI control change to this parameter. Tap on Length to open a pop-up menu for further settings: Travel (only in Granular Mode) Normal: Length change is about 2.5 msec. • Same functionality as for the corresponding panel parame- Fine: Length change is about 0.25 msec. • ter. Super Fine: Length change is about 0.025 msec • Quantum Manual...
- Page 55 Tap on Gate Length to open a pop-up menu for further Fine: Grain Jitter change is about 0.1 %. • settings: Super Fine: Grain Jitter change is about 0.01 %. • Normal: Gate Length change is about 0.9 %. • Set Default: sets Grain Jitter to its default value 0.0%. • Fine: Gate Length change is about 0.09 %. • Set Last Loaded: resets the parameter to the last • Super Fine: Gate Length change is about 0.009 %. • loaded value from the current sound patch. Set Default: sets Gate Length to its default value of • 100.0 %. Quantum Manual...
- Page 56 Modulations: opens the Mod menu to sets up a modu- • lation for this parameter. More information can be Global: a granular sample automatically starts again • found in ‘The Modulation Mode’ chapter. from the beginning when the end is reached. Every no- te played uses the same travel cycle. MIDI Learn CC: activates MIDI Learn, which maps an • incoming MIDI control change to this parameter. Tap on Travel Mode to open a pop-up menu for editing. Quantum Manual...
- Page 57 50.0 %. Set Last Loaded: resets the parameter to the last Same functionality as for the corresponding panel parame- • loaded value from the current sound patch. ter. Tap on Grain Poly to open a pop-up menu for editing. MIDI Learn CC: activates MIDI Learn, which maps an • incoming MIDI control change to this parameter. Set Default: sets Grain Poly to its default value 8. • Set Last Loaded: resets the parameter to the last • loaded value from the current sound patch. Quantum Manual...
- Page 58 • 0.10. Set Last Loaded: resets the parameter to the last • loaded value from the current sound patch. Modulations: opens the Mod menu to sets up a modu- • lation for this parameter. More information can be found in ‘The Modulation Mode’ chapter. MIDI Learn CC: activates MIDI Learn, which maps an • incoming MIDI control change to this parameter. Pitch Mode Determines by which method pitches will be altered. Here you can select between five options: Quantum Manual...
- Page 59 Set Last Loaded: resets the parameter to the last • modulated, so you can animate the chord or scales to be loaded value from the current sound patch. used. The semitone entries do not need to be in any order, such as rising or falling, and could be anything. MIDI Learn CC: activates MIDI Learn, which maps an • incoming MIDI control change to this parameter. Tap on Pitch Mode to open a pop-up menu for further settings: Quantum Manual...
- Page 60 Set Last Loaded: resets the parameter to the last • loaded value from the current sound patch. MIDI Learn CC: activates MIDI Learn, which maps an • incoming MIDI control change to this parameter. Presets Tap on the Presets button to open a pop-up window for loading, saving and managing Particle Generator settings. For more information on the available options please refer to the Presets chapter in the Wavetable section. Quantum Manual...
- Page 61 The speed of the repeats depends on the the keyboard range. Decay settings on the Resonator display page. For a better understanding on how the Resonator Spread works, we recommend initializing a sound program (on the Load page) and starting with a default Re- Extends or compresses the partials of the resonator, which sonator. Try out all parameters to become familiar leads to massive timbre changes. There are two Spread with the functionality of this powerful sound crea- modes that can be set on the Resonator display page. tion tool. Quantum Manual...
- Page 62 For more information about loading and editing Timbre Mode Tab samples, please refer to ‘The Loading & Editing Samples’ chapter. Here you find specific parameters for the Resonator. Determines the resonance of the created partials. The higher the setting, the longer the duration of the created sounds. Quantum Manual...
- Page 63 • ter. Fine: Q Curve change is about 0.001. • Tap on Q to open a pop-up menu for further settings: Super Fine: Q Curve change is about 0.0001. • Normal: Q change is about 0.01. • Set Default: sets Q Curve to its default value of 0.32. • Fine: Q change is about 0.001. • Set Last Loaded: resets the parameter to the last • Super Fine: Q change is about 0.0001. • loaded value from the current sound patch. Set Default: sets Q to its default value of 0.68. • MIDI Learn CC: activates MIDI Learn, which maps an • incoming MIDI control change to this parameter. Quantum Manual...
- Page 64 MIDI Learn CC: activates MIDI Learn, which maps an • repeats. incoming MIDI control change to this parameter. Tap on Decay to open a pop-up menu for further settings: Attack Normal: Decay change is about 0.01. • Works similar to the attack parameter of an envelope. It Fine: Decay change is about 0.001. • controls the attack phase of the exciter. The more partials the exciter has (e.g. Exciter parameter set to maximum), Super Fine: Decay change is about 0.0001. • the more the Attack parameter has an influence. Set Default: sets Decay to its default value of 0.10. • Quantum Manual...
- Page 65 • MIDI Learn CC: activates MIDI Learn, which maps an out exponentially. This sounds like a sawtooth wave. • incoming MIDI control change to this parameter. The more Timbre is turned up, the more partials will suddenly disappear. This leads to a less complex sound. Quantum Manual...
- Page 66 Dual Analog Filter section, it Set Default: sets Spread Mode to its default Stretch • automatically becomes mono because of the mono signal setting. path within this circuitry. If you want to hear the full ste- reo effect, you should route the signal directly to the VCA Quantum Manual...
-
Page 67: Layer Mode Page
This parameter boosts F0 independently from the partials. the Presets chapter in the Wavetable section. Tap on F0 Boost to open a pop-up menu for further set- tings: Set Default: sets F0 Boost to its default value of 0.15. • Set Last Loaded: resets the parameter to the last • loaded value from the current sound patch. MIDI Learn CC: activates MIDI Learn, which maps an • incoming MIDI control change to this parameter. Quantum Manual... - Page 68 Sound Parameter The Kernel Synthesis Mode presenting feedback, level, pitch, and wavetable position as modulation targets in the Quantum’s Modulation Matrix. Press the Wavetable and the Meanwhile, kernel pitch can be set in relation to note pitch, Waveform buttons simultaneously as well as being set to fixed frequency in audio or LFO to activate the Kernel mode for the range. Pitch envelopes can be also applied to each kernel corresponding oscillator 1, 2, or 3.
- Page 69 Here you find specific parameters for the Kernel mode as nand corresponds to the 5 template parameters shown in well as the option to load templates into this synthesis the touchscreen display. For example, if the template "FM engine. Simple" is loaded, the Position dial controls Timbre, the Spectrum dial controls Ratio and so on. This allows rapid editing of all important parameters of a template. Quantum Manual...
- Page 70 We wanted to editing mode. create a creative middle ground, to provide an inspiring The idea of the template mode is to provide a mezzanine sound design without becoming an FM wizzard. level in which you can focus on your sound design and But some fearless might want to press “Edit”: music by just using a few macro parameters. In fact these Quantum Manual...
- Page 71 Tap on the Algo button switch to the Algorithm display ability control all aspects of the kernel synthesis – be it just page. to modify an existing template in a deeper way than the 5 The Algorithm page graphically shows how the kernels are template macro parameters allow, or to eventually create a connected with each other. Unused kernels will not be new template for later re-use. Both are perfectly possible. shown automatically. The kernel connections can be made You can start from scratch using the oscillator in INIT state freely and individually on the Kernel Mod page, but in without any template macro defined and build up from Quantum Manual...
- Page 72 Before getting into modulation scenarios, just press • Init to Single to have a single kernel running to check out its capabilities on its Wave, Env and Level Pages. Once you are familiar with these, you can go to its Mod page and add Kernel 2 as its modulation source. You can also Init All to Out, to have all kernels running • parallel to the Out. Prev Preset and Next Preset will browse between • some classic FM algorithms (an algorithm determines how kernels/operators are connected to each other). After tapping on one of the four option buttons, the template name automatically changes to Custom. Kernel 1 Wave display page Quantum Manual...
- Page 73 K1..6 Type: Each kernel can generate Sine waves for K1...6 Level determines the level of the corresponding classic FM, the whole range of Quantum factory wavetab- kernel. For a kernel sending to the oscillator out, this is les, classic waveforms like Saw up/down, Triangle, Square, simply its volume. For kernels modulating other kernels,...
- Page 74 Set Default: sets the parameter to its default value. • Fixed: Sets the kernel to a fixed frequency from 0-10 Set Last Loaded: resets the parameter to the last • • kHz ignoring the oscillator base frequency. Still, this fi- loaded value from the current sound patch. xed frequency can be modulated. MIDI Learn CC: activates MIDI Learn, which maps an • LFO: Like Fixed mode, but with a low frequency range. incoming MIDI control change to this parameter. • Quantum Manual...
- Page 75 Modulation). The modulating kernel modulates the phase of the target (or carrier) kernel. This can have huge sonic effects which are mainly determined by the level of the modulation and their pitch ratio. That me- ans that once you have selected the modulating kernel here, you should change to the modulating kernel and edit its level and pitch ratio to control the sound. True FM modulates the actual frequency (and not the • phase like in traditional phase-based FM). Compared to Phase FM the sonic effect is even more drastic and can quickly get very nasty. If that is what you want, this is The Mod display page for Kernel 1 your mode. The following parameters are available: Ring does classic ring modulation between modulating • K1...6 ModSrc 1/2/3: Each kernel can have up to 3 other kernel and target kernel. The sonic effect is mostly de- kernels as direct kernel modulation sources (not to be termined by the pitch difference of both kernels. Turn Quantum Manual...
- Page 76 When a kernel is already FM-modulated by another kernel, self- Envelope page for Kernel 1 feedback can still be applied and added. Quantum Manual...
- Page 77 This is of course only valid for kernels that have been activated to send to the output by the Out button. This parameter is identical to the corresponding parameter on the Level page. The envelope parameters below the envelope graphic set the envelope stages in milliseconds (ms) except for the Level page for Kernel 1 Quantum Manual...
- Page 78 K1...6 OutPan determines how the kernel signal (which itself is mono) is panned to the oscillator stereo output. This is of course only valid for kernels that have been activated to send to the output by the Out button. This parameter is identical to the corresponding parameter on the Env page. Quantum Manual...
- Page 79 Each knob macro, as well as the overall template, can be given a descriptive name. All these settings will of course be saved in the Quantum sound patch, but if you made something interesting, just save it as an oscillator preset and re-use your template in other sounds. This is what...
- Page 80 So, these irst two modulation levels are all happening Select K1 and then Mod to set the modulation source. • inside the kernel oscillator. The third level is simply the fact that the 5 knob macros are available in the Quantum Select K2 in K1 ModSrc 1 (top left encoder). • modulation matrix as modulation targets. With these, you can use Quantum’s LFOs, Envelopes, Komplex Modulator Select K2 from above to edit kernel 2.
-
Page 81: The Global Mode
Select K1 again to edit kernel 1. template! • Go to Wave, set K1 Type to Wavetable, choose a • wavetable to your liking but leave the position at 0. Go to Patch -> Controls. • Change Macro to Center using the top left encoder. • Keep Slot at 1. • Set Macro3 Dest1 with middle right encoder to K1 • WTB Pos. Set Amount to around 80%. • Play around with the middle dial. • Tap on Edit Name in the middle below the dial graphic • and rename it to Timbre (or whatever you like!). Quantum Manual... -
Page 82: Oscillator Mixer (Osc Mix) Section
‘Glide’ or ‘Portamento’ describes the tes start on the exact pitch of their note. continuous gliding from one note to another. This effect can be created on fret- less stringed instruments or some brass instruments (e.g. trombone). It is very common on synthesizers and used throug- hout all music styles. Please note that Glide affects the pitch of all oscillators. Quantum Manual... -
Page 83: Dual Analog Filter Section
The Dual Analog Filter Section quency. When the setting is raised to maximum, the filter starts to self-oscillate, generating a pure sine wave. This Quantum offers 8 analog filter voices and 8 digital feature can be used to create analog-style effects and per- filter voices, sp the maximum polyphony is about 16 voices. Read more on that in Layer chapter. - Page 84 Filter 1 and 2 dif- ter circuitry. The necessary signal adaption is done by fers. The following modes are available: a saturation stage. This leads to a harsh driven audio Single: only Cutoff 1 and Resonance 1 (Filter 1) have signal. • an affect on the sound signal. Cutoff 2 and Resonance 24dB LP removes frequencies above the cutoff point • 2 have no influence here. with a 24dB slope. The oscillator signal need to be sent Quantum Manual...
- Page 85 2. Higher values increase Cutoff 1 and decrease Cutoff 2. Lower values increase Cutoff 2 and decrease Cutoff 1. Cutoff 2 and Resonance 2 have no influence here. Endless: similar to Opposition, but cutoff frequency • from Filter 2 has a different behaviour relationship. Cutoff 2 and Resonance 2 have no influence here. Independent: both filters allow independent settings • for Cutoff 1 and 2 and Resonance 1 and 2. Quantum Manual...
- Page 86 MIDI Learn CC: activates MIDI Learn, which maps an • found in ‘The Modulation Mode’ chapter. incoming MIDI control change to this parameter. MIDI Learn CC: activates MIDI Learn, which maps an • Keytrack (for Analog Filter 1 & 2) incoming MIDI control change to this parameter. Determines how much the cutoff frequency depends on the MIDI note number. The reference note for Keytrack is Quantum Manual...
- Page 87 Set Default: sets Keytrack to its default value of • MIDI Learn CC: activates MIDI Learn, which maps an +0.0 %. • incoming MIDI control change to this parameter. Set Last Loaded: resets the parameter to the last • loaded value from the current sound patch. MIDI Learn CC: activates MIDI Learn, which maps an • incoming MIDI control change to this parameter. Quantum Manual...
- Page 88 Filter 1 & 2 Env Amount (for Analog Filter 1 & 2) incoming MIDI control change to this parameter. This parameter is only displayed when the ENV Filter Pan (for Analog Filter 1 & 2) button is activated. It is similar to the Amount pa- rameter in the Envelopes section. This parameter is only displayed when the ENV button is deactivated. Quantum Manual...
- Page 89 Filter 1 & 2 Velocity Amt (for Analog Filter 1 & 2) Type (forAnalog Filter 1& 2) This parameter is only displayed when the ENV button is activated. It is similar to the Velocity pa- See corresponding description in the ‘Filter Panel Parame- rameter in the Envelopes section. ters’ chapter. Tap on Type to open a pop-up menu for selection. Quantum Manual...
- Page 90 MIDI Learn CC: activates MIDI Learn, which maps an • incoming MIDI control change to this parameter. MIDI Learn CC: activates MIDI Learn, which maps an • incoming MIDI control change to this parameter. Filter Routing (forAnalog Filter 1& 2) State Determines the routing of the audio signal that comes from the oscillators. Determines the state of the corresponding filter. When set to Active, the filter works in normal condition. If set to Bypass, the filter is bypassed but Level and Pan can still be controlled. If set to Off, the filter is completley deactivated. Quantum Manual...
- Page 91 Nave: offers a filter type with Waldorf Nave • Tools Button synthesizer characteristic. Tap on the Tools button to open a pop-up menu for PPG: offers a filter type with Waldorf PPG Wave • selecting the following filter screen options: 3.V synthesizer characteristic. Show/Hide Analyzer: Activates/deactivates a real- Quantum: offers a filter type with Waldorf •...
-
Page 92: Digital Former Section
Filter section before or after passing the Digital Model determines the character of the drive. You can Former section. Therefore, the Routing parameter is also deactivate the drive curves completely. The follo- available on the Digital Former as well on the Dual wing drive curves are available: Analog Filter display page. PNP generates a distortion based on a bipolar tran- • sistor. Tube simulates the asymmetric distortion of a tube • circuit. Quantum Manual... - Page 93 Feedback. Largo LP 12 / LP 24: offers a lowpass filter with • Quantum offers two comb filter types (+ and -) which resonance as in the Waldorf Largo synthesizer. Freq differ in the shape of the peaks. controls the cutoff frequency while Reso controls the emphasis.
- Page 94 Nave HP 12 / HP 24: offers a highpass filter with • frequency while Reso controls the emphasis. resonance as in the Waldorf Nave synthesizer. This filter type was implemented due to compatibility Nave Notch 12 / Notch 24: offers a notch filter with •...
- Page 95 To access the Digital Former display page for further pa- rameters, press the FILTERS button. Tap on the Digital Former tab on the touchscreen to select the correspon- ding display page. Digital Former display page with Nave LP24 Type Based on the selected Type, the display may look different. Type See corresponding description in the ‘Digital Former Panel Parameters’ chapter. Tap on Type to open a pop-up menu for further settings: Set Default: sets Type to its default Bypass setting. • Quantum Manual...
- Page 96 More information can be Set Last Loaded: resets the parameter to the last • loaded value from the current sound patch. found in ‘The Modulation Mode’ chapter. Modulations: opens the Mod menu to sets up a modu- MIDI Learn CC: activates MIDI Learn, which maps an • • lation for this parameter. More information can be incoming MIDI control change to this parameter. found in ‘The Modulation Mode’ chapter. Quantum Manual...
- Page 97 • Super Fine: Keytrack change will be very fine. incoming MIDI control change to this parameter. • Set Default: sets Keytrack to its default setting. • Set Last Loaded: resets the parameter to the last • Sets the panning for the audio signal that comes from the loaded value from the current sound patch. Digital Former section. MIDI Learn CC: activates MIDI Learn, which maps an • Tap on Pan to open a pop-up menu for further settings: incoming MIDI control change to this parameter. Normal: Pan change will be normal. • Level Fine: Pan change will be fine. • Sets the output level for the Digital Former section. Super Fine: Pan change will be very fine. • Quantum Manual...
- Page 98 Dual Analog Filter section and from there into the overlay. Keep in mind, that the analyzer curve displays Digital Former section. the filtered audio signal. Parallel: the audio signal is routed in equal parts to the • Animate/Hide Mods: Animates the filter curve when a • Digital Former section as well as into the Dual Analog modulation (e.g. via LFO) is set up. Filter section. This enables simultaneous parallel processing. Quantum Manual...
- Page 99 Based on the setting of the Routing parameter, the • Filter and DF blocks change their position within the Here you see a graphic overview of the Quantum’s signal graphic. If Digital Former Type is set to Bypass, the DF routing. You can also control the routing of the three oscil- block is greyed out. lators, ring modulators, and set up the audio outputs for Depending on the defined audio outputs, the last FX5 the current sound.
- Page 100 30% and by 70% through the analog filter, form all harmonic components behave like interac- select DF 30 Fil 70 here. The routing also depends on ting sine waves, resulting in a wide spectral range of the Routing parameter setting on the Filter page. the ring modulated sound. Tap on Osc 1/2/3 Dest to open a pop-up menu for further Tap on the corresponding RingMod to open a pop-up settings: menu for further settings: Quantum Manual...
- Page 101 Tap on Send Main to open a pop-up menu for further settings: Determines the routing of the audio signal that comes from Set Default: sets Send Main to its default On setting. the oscillators. • Set Last Loaded: resets the parameter to the last Former -> Filter: the audio signal first leads into the • • loaded value from the current sound patch. Digital Former section and from there into the Dual Analog Filter section. Quantum Manual...
- Page 102 FX Routing Set Last Loaded: resets the parameter to the last • The FX section offers an independent routing. Here, you loaded value from the current sound patch. can select between different routing options. MIDI Learn CC: activates MIDI Learn, which maps an • The current effect routing is displayed in the graphic incoming MIDI control change to this parameter. representation. 5 serial: all 5 effects are connected in series. • Quantum Manual...
-
Page 103: Envelopes Section
Release. The envelope is started by pressing a key. It ascends to its maximum value at the rate determined by the Attack The Envelope Section with Filter 1+2 and Amp envelopes parameter. It then descends at the rate determined by the Quantum’s envelopes allow you to manipulate sound pa- Decay value until it reaches the predetermined Sustain rameters via rate or timed modulations. Quantum offers value. It remains at this value until the key is released. The six independent programmable envelopes for every sound envelope then descends to zero at the rate determined by program: the Release parameter. - Page 104 – especially when a filter does not behave as you expect. You can also create interesting effects by setting one para- meter to a positive and the other to a negative amount. Quantum Manual...
- Page 105 • Set Last Loaded: resets the parameter to the last • loaded value from the current sound patch. Modulations: opens the Mod menu to sets up a modu- • lation for this parameter. More information can be found in ‘The Modulation Mode’ chapter. MIDI Learn CC: activates MIDI Learn, which maps an • incoming MIDI control change to this parameter. The display page parameters for every one of the six envelopes are similar. Delay Delays the start of the envelope by the selected time after a note trigger happens. Quantum Manual...
- Page 106 Tap on EnvelopeVar to open a pop-up menu for further settings: Set Last Loaded: resets the parameter to the last • loaded value from the current sound patch. Normal: EnvelopeVar change is about 0.01. • MIDI Learn CC: activates MIDI Learn, which maps an • Fine: EnvelopeVar change is about 0.001. • incoming MIDI control change to this parameter. Super Fine: EnvelopeVar change is about 0.0001. • Set Default: sets EnvelopeVar to its 0.35 default value. • Quantum Manual...
- Page 107 After releasing the note, the loop ends and the Release phase of the envelope Sets the characteristic of the release phase. commences. Exponential (Exp) switches the release phase to ex- • ADSR Loop is identical to AD except that the loop • ponential. continues after the note is released and blends with the Release phase. Quantum Manual...
- Page 108 • own voice; also works when playing legato. When set to On, the envelopes of all voices of a selected • patch behave like a single envelope. This is the perfect setting for playing legato. The common envelope starts as soon as the first note is played. The sustain level remains until the last note is released. Afterwards the release phase is active. Tap on Single Trig to open a pop-up menu for further settings: Quantum Manual...
-
Page 109: Lfo Section
Sound Parameter LFO Section LFO 1 – 3 Panel Parameters In addition to the main oscillators, Quantum is equipped Shape with six low frequency oscillators (LFOs) that can be used for modulation purposes. Each LFO generates a periodic Sets the type of waveform generated by the corresponding waveform with adjustable frequency and shape. LFO. The Sine shape is best suited for oscillator FM or pan •... - Page 110 Sound Parameter form a complete cycle while higher values are in the audib- LFO Display Page le range. To access the LFO display page, press the LFOS button. Tap When the LFO Sync parameter is set to On, you can adjust on the corresponding tab (LFO1 to 6) to select the desired Speed in musical values. The lowest possible value is 1024 LFO you want to edit. bars, meaning that a complete LFO cycle would need 1024 bars. Amount Determines the amount of the corresponding LFO modula- tion applied to all destinations. Since the modulation is, in fact, a multiplication of the source signal and this parame- ter, the resulting amplitude depends on the type of modu- lation source you select. The display page parameters for every one of the six LFOs are similar. You can also switch through the LFOs by pressing the LFO button again and again. Quantum Manual...
- Page 111 If Saw (down or up) is selected, the waveform is • • folded. Settings below 0.00% also reduce the LFO phase Super Fine: Speed change is about 0.028 Hz. • from bipolar to unipolar. Set Default: sets Speed to its default value of 6.25 Hz. • If S&H (Sample & Hold) is selected, Warp shapes the • edges of the held waveform and smooths it. Set Last Loaded: resets the parameter to the last • loaded value from the current sound patch. Quantum Manual...
- Page 112 Tap on All Amounts to open a pop-up menu for further settings: Decay Normal: All Amounts change is about 2.0 %. Controls the speed with which the LFO is faded out. With • this parameter you can create slowly falling modulations Fine: All Amounts change is about 0.2 %. • that might create interest when routed to pitch or volume. Super Fine: All Amounts change is about 0.02 %. • Tap on Decay to open a pop-up menu for further settings: Normal: Decay change is normal. • Quantum Manual...
- Page 113 MIDI Learn CC: activates MIDI Learn, which maps an When Sync is activated, the corresponding LFO is synced • incoming MIDI control change to this parameter. to the global Tempo of the Quantum (can be set with the Bpm parameter). The Speed setting (called Speed Ratio Slew here) can be changed to offer musically meaningful values.
- Page 114 Set Last Loaded: resets the parameter to the last • loaded value from the current sound patch. MIDI Learn CC: activates MIDI Learn, which maps an • incoming MIDI control change to this parameter. Delay Controls the delay in seconds, with which the correspond- ing LFO is faded in. With this parameter you can create slowly rising modulations that might create interest when routed to wave, pitch, or volume. Tap on Delay to open a pop-up menu for further settings: Set Default: sets Delay to its default value of 0 secs.. • Quantum Manual...
-
Page 115: Komplex Modulator Section
(B 100%) only uses Curve B. Other settings morph Curve A into Curve B, and vice versa. The Komplex Modulator Section Warp To hear result of the Komplex Modulator you should The Warp parameter folds the waveform in different ways define it as a modulation source for a desired para- depending on the Komplex Modulator shape generated. meter like pitch, filter cutoff frequency, or any other The result may look different, based on the initial wave- parameter you like. form. Quantum Manual... - Page 116 Controls the speed with which the Komplex Modulator is faded in and out. With this parameter you can create slow- ly rising and falling modulations that might create interest when routed to pitch or volume. Entropy Determines how much inluence a random noise signal has on the time axis. The higher the Entropy value, the more randomly the complete waveform seems to be in all cycles. Due to its random nature, the waveform shown in the graphic display is indicative only. Further Komplex Modulator parameters can be found on the Mod display page. Quantum Manual...
- Page 117 • Warp lation for this parameter. More information can be found in ‘The Modulation Mode’ chapter. See corresponding description in the ‘Komplex Modulator Panel Parameters’ chapter. MIDI Learn CC: activates MIDI Learn, which maps an • incoming MIDI control change to this parameter. Tap on Warp to open a pop-up menu for further settings: Speed Normal: Warp change is about 0.02. • Fine: Warp change is about 0.002. See corresponding description in the ‘Komplex Modulator • Panel Parameters’ chapter. Super Fine: Warp change is about 0.0002. • Tap on Speed to open a pop-up menu for further settings: Set Default: sets Warp to its default value of +0.0%. • Quantum Manual...
- Page 118 Tap on All Amounts to open a pop-up menu for further settings: Entropy Normal: All Amounts change is about 2.0 %. • See corresponding description in the ‘Komplex Modulator Panel Parameters’ chapter. Fine: All Amounts change is about 0.2 %. • Tap on Entropy to open a pop-up menu for further set- Super Fine: All Amounts change is about 0.02 %. • tings: Envelope Normal: Entropy change is about 0.1. • See corresponding description in the ‘Komplex Modulator Fine: Entropy change is about 0.01. • Panel Parameters’ chapter. Super Fine: Entropy change is about 0.001. • Set Default: sets Entropy to its default value of 0.00. • Quantum Manual...
- Page 119 Sync Tap on Mode to open a pop-up menu for further settings: When Sync is activated, the Komplex Modulator is synced Set Default: sets Mode to its default Poly setting. • to the global Tempo of the Quantum, which can be deter- mined via the Arpeggiator or Sequencer pages. The Set Last Loaded: resets the parameter to the last • Speed setting (called Speed Ratio here) changes to offer loaded value from the current sound patch. musically meaningful values. MIDI Learn CC: activates MIDI Learn, which maps an •...
- Page 120 MIDI Learn CC: activates MIDI Learn, which maps an • incoming MIDI control change to this parameter. The Curve A & B Tabs Here you can edit the two curves A and B. Tap on the but- Delay ton Curve A or Curve B to open the corresponding edit page. Controls the speed in seconds, at which the Komplex Mo- dulator is faded in. With this parameter you can create Quantum Manual...
- Page 121 Tap on Num Steps A or B to open a pop-up menu for wing: further settings: Tap on the corresponding step and move your finger • Set Default: sets Num Steps to its default value of 8. • up or down to change its level. The selected step is lit in red. Set Last Loaded: resets the parameter to the last • loaded value from the current sound patch. Quantum Manual...
- Page 122 Tap on Curve Type to open a pop-up menu for further settings: See corresponding description in the ‘Komplex Modulator Panel Parameters’ chapter. Set Default: sets Curve Type to its default Lin setting. • Tap on All Amounts to open a pop-up menu for further Set Last Loaded: resets the parameter to the last • settings: loaded value from the current sound patch. Quantum Manual...
- Page 123 Set Last Loaded: resets the parameter to the last • loaded value from the current sound patch. MIDI Learn CC: activates MIDI Learn, which maps an • incoming MIDI control change to this parameter. The Edit Button Tap on the Edit button to open a pop-up window with additional tools for editing Curve A or B. This parameter does not affect the number of the steps. Quantum Manual...
- Page 124 Sound Parameter The Effects Section Effects Panel Parameters (for Effect 1 to 3) Depending on the selected effect type, both dials offer Quantum offers five effect units with a bunch of different different parameters. effect types. Two basic parameters of the first three effect units can be controlled via panel parameters while deeper editing is done on the Effect display page. Amount for Effect 1, 2, and 3...
- Page 125 Depending on the selected effect type, different Every effect type offers an Active and a Presets button. effect parameters are provided. Tap on it to activate its function: Hint: Most of the effect parameters can be modula- By tapping on Active the corresponding effect unit is • ted by any modulation source the Quantum offers. set to bypass. No effect signal is generated. Tap on By- pass to unmute the effect again. Quantum Manual...
- Page 126 Previous effect set- tings will be overwritten. With the Save option you can save the selected • effect settings. You can also enter a desired name. Import imports an effect preset from a connected • SD card or a USB storage device into the Quantum’s Flash memory. The imported preset is shown within the effect preset list. Export exports the current selected effect preset to • a connected SD card or a USB storage device. Delete deletes the current selected effect preset af- •...
- Page 127 Tremolo effect. After that, it is split into 2 serial incoming MIDI control change to this parameter. signal paths. The first one uses a Phaser and a Flan- ger effect, the second one a Reverb and a EQ. Noth Lane 1/2/3 Level singla outputs are mixed together into the Master Sets the volume fort he corresponding signal path lane. output. Keep in mind, that not all Routing configurations offer different lanes. The number of shown Lane Level parame- ters depends on the selected routing. Quantum Manual...
- Page 128 (level) of an audio signal to create a periodic Set Last Loaded: resets the parameter to the last movement oft he volume. • loaded value from the current sound patch. Modulations: opens the Mod menu to sets up a modu- • lation for this parameter. How to set up a modulation can be read in ‘The Modulation Mode’ chapter. MIDI Learn CC: activates MIDI Learn, which maps an • incoming MIDI control change to this parameter. Depth Sets the he depth of the amplitude modulation. Quantum Manual...
- Page 129 Speed. Depth sets the amplitude for the action of the fil- tering, while Feedback amplifies certain harmonics. Shape Determines the shape of the LFO waveform, which is used for the tremolo modulation. You can select between a sine, a triangle and a square waveform. Smooth Determines the slew rate of the selected LFO waveform. The higher the setting, the smoother the slew rate. Sync Synchronizes the delay to the internal tempo of the Quan- tum. If activated, you can set up Sync Ration in musical values. Quantum Manual...
- Page 130 Higher values lead to a wider stereo range. Determines the Phaser model that is used. You can select between the Phaser from Waldorf’s Nave and PPG Wave Spread 3.V. Controls the phase position of the Phaser signal. Lower settings produce a more resonant Phaser effect.
- Page 131 Set Last Loaded: resets the parameter to the last • loaded value from the current sound patch. Modulations: opens the Mod menu to sets up a modu- • lation for this parameter. More information can be found in ‘The Modulation Mode’ chapter. MIDI Learn CC: activates MIDI Learn, which maps an • incoming MIDI control change to this parameter. For the typical Chorus effect sound the Dry/Wet parameter should be set to 50%. Quantum Manual...
- Page 132 Chorus effect. The Chorus offers four chorus types with Sets the modulation depth of the Chorus effect. either two, four, six, or eight independent delay lines, whe- re half of them are routed to the left input and output and Speed the others to the right input and output. Sets the LFO speed of the Chorus effect. HighCut Delay Reduces the high frequencies of the chorus signal. Determines a delay for the chorus signal in milliseconds. LowCut Feedback Reduces the low frequencies of the chorus signal. Controls the feedback amount of the signal. Tap on the corresponding effect parameter to open a pop- up menu for further settings (not all settings are available Spread for all effect parameters): Controls the phase position of the chorus signal. Lower Normal: parameter change is about 1%. settings produce a more resonant chorus effect. • Fine: parameter change is about 0.1%. • Super Fine: parameter change is about 0.01%. • Quantum Manual...
- Page 133 More information can be hear a whistling sound which is very characteristic of a found in ‘The Modulation Mode’ chapter. flanger effect. MIDI Learn CC: activates MIDI Learn, which maps an • incoming MIDI control change to this parameter. For the typical Flanger effect sound the Dry/Wet parameter should be set to 50%. Quantum Manual...
- Page 134 Set Last Loaded: resets the parameter to the last • Controls the feedback amount of the flanger signal. loaded value from the current sound patch. Delay Modulations: opens the Mod menu to sets up a modu- • lation for this parameter. More information can be Determines a delay for the flanger signal in milliseconds. found in ‘The Modulation Mode’ chapter. Phase Diff MIDI Learn CC: activates MIDI Learn, which maps an • Determines the start phase of the modulation waveform in incoming MIDI control change to this parameter. degrees. Quantum Manual...
- Page 135 If Sync is activated, the delay length can be signal is sent to the output only so that no effect can be entered in musical values and is named Right Synced. heard. Higher values will increase the effect signal. At maximum setting of 100% the pure effect signal will be heard. Quantum Manual...
- Page 136 MIDI Learn CC: activates MIDI Learn, which maps an effect. This filter is routed before the feedback circuitry • incoming MIDI control change to this parameter. meaning that adjacent taps of the Delay will be dampened further. This creates the typical ‘high frequency loss’ that often happens in natural echoes. A minimal setting means that the signal isn’t filtered, while higher settings filter the high frequencies of the feedback signal. LowCut Dampens the low frequencies produced by the Delay effect. Tap on the corresponding effect parameter to open a pop- up menu for further settings (not all settings are available for all effect parameters): Quantum Manual...
- Page 137 Reverb Time Determines the reverb time. Lower settings simulate a The Reverb effect is probably the most widely used effect normal room while higher settings simulate a big hall or in music production. Quantum’s reverb effect is an additi- church. on to the sound to make it more expressive with a three- dimensional feel. Color Determines the spectral colorization of the reverb sound.
- Page 138 Sound Parameter Mod Depth EQ (Equalizer) Sets the intensity of the pitch modulation. Quantum offers a parametric equalizer to adjust the sound frequencies to your needs. Tap on the corresponding effect parameter to open a pop- up menu for further settings (not all settings are available for all effect parameters): Normal: parameter change is about 1%. • Fine: parameter change is about 0.1%. • Super Fine: parameter change is about 0.01%. • Set Default: sets the parameter to its default value. • Set Last Loaded: resets the parameter to the last • loaded value from the current sound patch. Modulations: opens the Mod menu to sets up a modu- • lation for this parameter. More information can be found in ‘The Modulation Mode’ chapter.
- Page 139 Controls the gain boost or cut of the low band. Mid Gain /Mid 2 Gain Freq Shift Controls the gain boost or cut of the corresponding band. Frequency shifting moves each frequency in a signal by the Mid Q / Mid2 Q set amount. This is different to pitch shifting. For example, set an EQ Mid band to 2000 Hz with a Gain of 10 dB; every Controls the quality or width of the corresponding band. frequency within the signal is shifted by the same amount Higher values result in a narrower band, lower values so that the harmonic relationships within the signal are widen it. broken, resulting in a very different sound. Quantum Manual...
- Page 140 This parameter controls the volume ratio between the original signal and the effect output. If set to 0%, the dry signal is sent to the output only so that no effect can be heard. Higher values will increase the effect signal. At Quantum Manual...
- Page 141 PNP generates a distortion based on a bipolar tran- • Modulations: opens the Mod menu to sets up a modu- • sistor. lation for this parameter. More information can be found in ‘The Modulation Mode’ chapter. Tube simulates the asymmetric distortion of a tube • circuit. MIDI Learn CC: activates MIDI Learn, which maps an • incoming MIDI control change to this parameter. PickUp simulates an electrostatic pickup. This dri- • ve type sounds very interesting when the audio signal level is modulated. Quantum Manual...
- Page 142 Sets the time after which the gain returns to its original level when the signal drops below the threshold. Output Gain Compensates for output gain loss caused by compression. Auto Gain Ratio Switch on the Auto Gain function for an automatic control Sets the amount of gain reduction (compression) applied of Output Gain when adjusting the Threshold. to signals above the set threshold. A ratio of 4:1 means that for every 4 dB the input level increases, the output level increases by 1 dB. Quantum Manual...
- Page 143 Set Last Loaded: resets the parameter to the last • Main Volume. loaded value from the current sound patch. Modulations: opens the Mod menu to sets up a modu- • lation for this parameter. More information can be found in ‘The Modulation Mode’ chapter. MIDI Learn CC: activates MIDI Learn, which maps an • incoming MIDI control change to this parameter. Quantum Manual...
- Page 144 A complete table of all available sources and destina- meter. tions can be found in the Appendix. This is how the Modulation Assignment works: Direct Panel Modulations If you have pressed the Mod button, first select a modulation destination by turning one of the pa- Quantum offers an easy way to introduce modulation by rameter dials that are lit in blue. This step is not using the dials on the panel. Modulation assignment can be necessary if the Modulation option is selected in called up in different ways: the pop-up menu of a display parameter. Press the Mod button below the touchsreen display • Select the corresponding modulation source by either turning one of the available panel dial...
- Page 145 MOD button. Tap on the Modulation Matrix tab on the touchscreen to select the display page. Keep in mind that you can set up positive or negati- ve modulation amounts. Positive amounts will be shown as as green bar while negatives will be shown as a red bar. The same goes for the LEDs below the corresponding modulation source. The Modulation Assignment window includes some more options: Clear Selected button: tap on the desired modulation • entry to select it. Tap on the Clear Selected button to delete the selected modulation assignment. Clear All button: tap on this button to delete all modu- • lation assignments that are shown in this list. Quantum Manual...
- Page 146 You can also add a Controller with a Control tion using the wheel. Amount to a modulation assignment. More on this below. Tap on Controller to open a pop-up menu for further settings: Slot Set Default: sets the parameter to its default Off set- • ting. Selects the respective Modulation Slots 1 to 40. Quantum Manual...
- Page 147 Set Last Loaded: resets the parameter to the last • amplitude lies within the range of -1…0…+1. These loaded value from the current sound patch. sources are: all LFOs, Keytrack, and Pitchbend. MIDI Learn CC: activates MIDI Learn, which maps an • Tap on Amount to open a pop-up menu for further set- incoming MIDI control change to this parameter. tings: Normal: parameter change is about 2%. • Quantum Manual...
- Page 148 Import: imports a modulation assignments presets • ton to disable the corresponding modulation assignment. from a connected SD card/USB storage drive into the The button is labeled ‘Disabled’ and the modulation slot is Quantum’s Flash memory. The imported preset is greyed out. Use this to temporarily bypass a modulation. shown within the modulation assignments preset list. Tap on Disabled to activate the modulation again. Quantum Manual...
- Page 149 Export: exports the current selected modulation as- • signments presets to a connected SD card/USB drive. Delete: deletes the current selected modulation as- • signments preset after a security confirmation. Init: initializes all modulation assignments to its • default settings. Close: closes the pop-up window. No further action is • taking place. Modulation Matrix List The matrix list shows all currently made modulations. If a Controller is selected, it will also be shown in the Source column. If a Control Amount is set, it will also be shown as a separate bar in the Amount column. Quantum Manual...
-
Page 150: Additional Modes
Repeat steps 1 and 2 until you have filled the matrix with your favorite sound programs. You Select the desired sound program by using the can tap on Set 1 to 6 to select a new favorite mat- Prev/Next buttons or tapping on the sound na- rix. me in the lower display section. To call up a favorite sound program just tap on the desired matrix block or use the Selection dial Quantum Manual... - Page 151 Sequencer. You can also choose Parameter Seq. More on that later! The Arpeggiator An Arpeggiator is a device that splits an incoming chord into its individual notes and repeats them rhythmically. Different sequence modes can be defined for the Arpeggia- tor to cover a wide range of applications. In addition to the synthesis features Quantum offers a programmable arpeg- giator. It can play a wide range of different rhythm pat- terns. Quantum Manual...
- Page 152 Bpm parameter this gives you further control over the playback speed. You can specify a value in frac- Mode tions of beats. For example, if Step Length is set to 1/8, the Quantum also offers a programmable Step Sequencer as arpeggio plays eight notes per measure. well as an Parameter Sequencer. This can be used as a luxury arpeggiator. Therefore, most of the parameters are Swing shared by the Arpeggiator and the Sequencer. Here you...
- Page 153 Determines the range of the single notes in octaves. When played backward and the octaves are transposed it is set to 1 oct, the note list will be played back in the downward down to the first note of the note list in the same octave as originally entered. Higher octave values original octave. Then the arpeggio is repeated. mean that the note list is repeated in higher or lower octa- ves. The octave in which the arpeggio starts is determined Quantum Manual...
- Page 154 E1, G1 and C1, the note list is sorted to C1, E1, and G1. Normal: parameter change is about normal. • Key Hi->Lo is the opposite of Key Lo->Hi. The example • Fine: parameter change is about fine. • would be sorted as G1, E1, and C1. Super Fine: parameter change is about super fine. • If Vel Lo->Hi is selected, the notes are sorted from the • Set Default: sets the parameter to its default value. softest to the loudest velocity. • Vel Hi->Lo is the opposite of Vel Lo->Hi. • Quantum Manual...
- Page 155 The display gives you an overview of all steps of a se- quence. You can edit this graphic directly using the follo- wing tools: Each block in the center of the graphic represents a • step. The number of blocks depends on the setting of Quantum Manual...
- Page 156 If Velo is selected, you can edit the velocity for the selected step. If Gate is selected, you can edit the gate length for the selec- Sets the overall tempo for the Arpeggiator and the Se- ted step. If Param 1...8 is selected, you can edit the modula- quencer in Bpm (beats per minute). This tempo also affects tion signal for the selected step. the functions that may depend on tempo settings (e.g. LFOs, Komplex Modulator, Delay effect). Quantum Manual...
- Page 157 If Ping-Pong is selected, the notes run from the first Determines the length of the step sequence. A sequence • step to the last, then back to the first note and so on. must contain a minimum of one step and can go up to 32 steps. If Forw-Back is selected, the notes run from the first • step to the last. The last step is repeated and the se- Quantum Manual...
- Page 158 The Sequencer Buttons Opens a pop-up menu with numerous musical scales, e.g. Chromatic, Major, Minor or Lydian dominant. Above the graphic you find four buttons for further set- tings. Scale Root Running/Off Determines the tonic keynote for the selected scale. Here you start or stop the sequencer playback. You can also use the Arp button in the Wheel section. Quantum Manual...
- Page 159 Tap on the Presets button to open a pop-up window for Presets chapter in the Wavetable section. loading, saving, and managing Step sequences. For more information on the available options please refer to the The Parameter Sequencer Presets chapter in the Wavetable section. Besides the arpeggiator and step sequencer, Quantum Mod Targets offers a so-called parameter sequencer designed for para- meter modulation purposes. Tap on this button to switch the display representation for assigning modulations for the parameter sequencer. Up to Tap on the Mode button and select Param Seq to switch 40 modulation assignments can be made.
- Page 160 To end the Mod Targets mode, tap on the Mod Targets • button. Read more about modulation assignments in the chapter 'Modulations of Quantum'. The Pad Trigger Mode The Parameter Sequencer with Mod Targets Tap on the Mode button and select Pad Trigger to switch to the corresponding display page. You can set up a modulation routing very easily: In this mode the 4x4 pads in the display will be sequential- Tap on Add to add a modulation routing. Up to 40 •...
- Page 161 This is high- Modulation Matrix. You can, for example, easily set up a lighted in white and only this will be used for playback, i.e. modulation for Cutoff (Pad X) and Resonance (Pad Y). when the algorithm is wandering through the pads only the latched ones will play. For the other ones a rest will be X/Y Polarity inserted. If you like to get back using all pads in playback, then simply press Latch to un-latch everything. Both controllers can be switched from Bipolar to Unipolar. For the so-called unipolar modulation sources the resul- Quantum Manual...
- Page 162 • loaded value from the current sound patch. MIDI Learn CC: Activates MIDI Learn, which maps an • incoming MIDI control change to this parameter. CC X/Y Here, you can determine a hardware MIDI controller for Selected Pad the X as well as the Y axis to control the corresponding pad axis with an external MIDI hardware. The selectable CCs Determines the selected pad for note assignment. You can can are CC01 to CC118 (or Off). also tap on a pad in the display representation. Quantum Manual...
- Page 163 Tap on the Scale tab to enter the scale mode. The touch- Tap on Velocity to open a pop-up menu for further set- screen display switches to the Scale representation. tings: Here, the notes are automatically assigned according to Normal: Velocity changes with normal values. • various scale types and root pitches. Fine: Velocity changes with fine values. • Super Fine: Velocity changes with super fine values. • Set Default: sets Velocity to its default value of 80.00%. • Quantum Manual...
- Page 164 Set Default: sets Scale to its default: Major. • Super Fine: Velocity changes with super fine values. • Set Last Loaded: resets the parameter to the last • Set Default: sets Velocity to its default value of 80.00%. • loaded value from the current sound patch. Set Last Loaded: resets the parameter to the last • MIDI Learn CC: activates MIDI Learn, which maps an • loaded value from the current sound patch. incoming MIDI control change to this parameter. Quantum Manual...
- Page 165 MIDI Learn CC: activates MIDI Learn, which maps an • incoming MIDI control change to this parameter. Latch Button If active, a pushed pad will hold its note until it is pressed again. Presets Button Selected Pad Tap on the Presets button to open a pop-up window for loading, saving, and managing scale assignments. For more Determines the pad for chord assignment. You can also tap information on the available options please refer to the on a pad in the display representation. Presets chapter in the Wavetable section. Quantum Manual...
- Page 166 Tap on the Presets button to open a pop-up window for Determines the velocity that is used for all 16 pads. loading, saving, and managing chord assignments. For more information on the available options please refer to Tap on Velocity to open a pop-up menu for further set- the Presets chapter in the Wavetable section. tings: Normal: Velocity changes with normal values. • Quantum Manual...
- Page 167 Unisono voices mode and the Glide function. To select the desired page, tap on the cor- responding tab (Levels, Pitch, Voices, or Master). Levels Tab Quantum offers a dual sound mode which means that two different sounds can be played simultaneously either as layered or as split sounds. Input Volume To switch between Layer 1 and Layer 2 just tap on the...
- Page 168 Main Output: an incoming audio signal is directly • Fine: Volume change with fine values. • routed to the Iridium Keyboard’s Main Output. Super Fine: Volume change with super fine values. • Aux Output: an incoming audio signal is directly rou- • ted to the Quantum’s Aux Output. Set Default: sets Volume to its default value of 0dB. • FX Layer 1: an incoming audio signal is directly routed Set Last Loaded: resets the parameter to the last • • into the Effect section of Layer 1. loaded value from the current sound patch.
- Page 169 Set Last Loaded: resets the parameter to the last • Send Main loaded value from the current sound patch. Modulations: opens the Mod menu to sets up a modu- Determines if the currently selected Layer sound is sent to • lation for this parameter. More information can be the Quantum’s Main outputs (On) or not (Off). If the Output found in ‘The Modulation Mode’ chapter. Routing on the Global -> Settings -> Audio display page is set to Global, this parameter globally assigns each layer to MIDI Learn CC: activates MIDI Learn, which maps an • certain outputs independend of patch settings and keep incoming MIDI control change to this parameter.
- Page 170 Use this feature to give more expression to the sound. With a setting of 0.0% velocity will have no effect AT Attack (only for Quantum MK2) on the volume. Classic organs work in this way because This option opens a slider to determine the behaviour of they do not have dynamic response. For positive settings...
- Page 171 Besides the Glide panel control parameters, here you can control the overall Pitch variation. AT Release (only for Quantum MK2) This option opens a slider to determine the behaviour of the polyphonic aftertouch. Normally, aftertouch ends im- mediately when a pressed key is released. Here, you can determine a release value, so that aftertouch is blended out with the specified time amount.
- Page 172 Tap on Glide Type to open a pop-up menu for further settings: Normal: Glide Rate change is about 0.08 secs. • Fine: Glide Rate change is about 0.01 secs. Set Default: sets Glide Type to its default mode: Onset. • • Super Fine: Glide Rate change is about 0.001 secs. Set Last Loaded: resets the parameter to the last • • loaded value from the current sound patch. Set Default: sets Glide Rate to its default 0.045 secs. • MIDI Learn CC: activates MIDI Learn, which maps an • incoming MIDI control change to this parameter. Quantum Manual...
- Page 173 More information can be found in ‘The Modulation Mode’ chapter. Voices tab display page with active Unisono section MIDI Learn CC: activates MIDI Learn, which maps an • Voice Allocation incoming MIDI control change to this parameter. Since the Quantum offers 8 analog and 8 digital filter voices, you can specify how these 16 voices should be used. Quantum Manual...
- Page 174 Additional Modes Timbre Mode Keep in mind that the Voice Allocation option is always available on all three Timbre mode pages. Quantum offers three different modes for the Sound lay- ers: Tap on the pop-up menu button to make your desired setting: Single: both Sound layers have individual settings and • cannot be played together. You can switch between 16 Voices: Analog Preferred: When playing with a •...
- Page 175 • • incoming MIDI control change to this parameter. which maps an incoming MIDI CC to this parameter. Please note that the number of Unisono voices will Uni Pan respectively lower the number of available voices. Controls the panning of the Unisono voices. Each voice is The following parameters (Unisono Detune, Pan and panned differently; with Uni Pan you control the overall Delay) are only available if Unisono is set to a voice degree amount. value other than Off. Quantum Manual...
- Page 176 MIDI Learn CC: activates MIDI Learn, which maps an • incoming MIDI control change to this parameter. Uni Delay Controls the delay of the Unisono voices relating to the first played note. Each voice is delayed differently; with Uni Delay you control the overall delay amount. Tap on Uni Delay to open a pop-up menu for further set- tings: Normal: Uni Delay changes with normal values. • Fine: Uni Delay changes with fine values. • Voices tab display page in Split Layer mode Super Fine: Uni Delay changes with super fine values. • Quantum Manual...
- Page 177 Additional Modes Layer 1 / 2 Voices (only for Split Mode) Controller (only for Split and Layered Mode) Here you determine how many voices the corresponding Determines which Layer will be affected by incoming Mod sound layer is able to play. Keep in mind that the Quantum wheel, Pitch bend, Aftertouch, Pads and Modulation pad offers an overall polyphony of 16 voices. If you set Layer 1 data. to 10 voices, Layer 2 automatically switches to 5, and vice Both: wheels and play controls affect both layers. •...
- Page 178 More information can be found in ‘The Modulation Mode’ chapter. MIDI Learn CC: activates MIDI Learn, which maps an • incoming MIDI control change to this parameter. Layer 1 / 2 Pan Determines the panning for the corresponding layer. The current volume of Layer 1, 2 as well as Main and Aux Tap on Layer Pan to open a pop-up menu for further set- volume is displayed in the gain meter representation. tings: Normal: panning change is about 2%. • Layer 1 / 2 Volume Fine: panning change is about 0.2%. • Determines the volume for the corresponding layer. Super Fine: panning change is about 0.02%. • Tap on Layer Volume to open a pop-up menu for further settings: Set Default: sets panning to its default Center value. • Quantum Manual...
- Page 179 Tap on Compression to open a pop-up menu for further Activates/deactivates the typical Waldorf bass emphasis settings: for the overall audio signal. Normal: Compression change with normal values. • Timbre Mode Fine: Compression change with fine values. • Quantum offers three different modes for the Sound lay- Super Fine: Compression change with super fine valu- • ers: es. Single: both Sound layers have individual settings and • cannot be played together. You can switch between Quantum Manual...
- Page 180 When playing the pads in Split mode, the current selected layer is used. Layered: both Sound layers are played simultaneously • over the whole keyboard range. Use this option to combine two sounds, such as a pad sound and a poly lead. Quantum Manual...
- Page 181 (as for Osc 1, 2 or 3) or the signal that Global button below the touchscreen passes a component of Quantum’s signal flow (Filter, display. To select the desired function tap Digital Former, VCA, Pre-FX, Compressor), a layer sig- on the corresponding tab in the upper display area. On the...
- Page 182 (like 1200 cents for an octave or anything else). The following options are available in the User Tuning Pitch Button window: Transpose: allows a global pitch transposition for the • New adds a new tuning table with definable Steps and • tone generator. Played notes are shifted by the number Repeat Intervals. of semitones. Insert adds a new tuning step after the current one. • Master Tuning: determines the Quantum’s overall • Delete removes the current tuning step. pitch in Hertz. The value specified here is the reference • Quantum Manual...
- Page 183 Additional Modes The Import/Export option allows you to load/save a • User Tuning table from and to Quantum´s SD card or a USB storage device. Tap on Pitch to return to the regular Pitch page. • If a User table is selected, it can be renamed, copied • and pasted using the corresponding buttons. You can also import Tuning tables that are made with the free software application Scala by Huygens- Fokker Foundation (http://www.huygens- fokker.org/scala). Tap on Import Tuning to import...
- Page 184 Turn the Rec. Source display dial to select the desired input signal. You can either record an ex- Here you find a simple and easy-to-use audio recorder and ternal audio signal (Input) or the output signal of sample editor to record and edit any audio signal from the Quantums Main or Aux outs. In the latter case, no Audio Input or the Outputs into the Quantum’s Flash me- further signal connection or setting is necessary mory. since the signal is recorded internally without any loss. Set the recording Trigger: Manual means that you have to start the recording manually. With...
- Page 185 Additional Modes If you want to record an external audio signal, first make Sample Editing sure to connect a suitable signal source to the Quantum´s You can make some basic sample edits to adapt the sample audio inputs: to your needs. Turn the Rec. Source display dial and select In- Tap on Select to select (All) or deselect (None) the put.
- Page 186 Reverse: reverses the selection so that it sounds as if • played backwards. Silence: allows you to replace the sample selection • with silence. Copy L -> R/Copy R -> L: copies the left channel sound • to the right channel or vice versa. Inputs Tap on the Undo button to undo the last edit command. If Here you can change settings regarding the MIDI inputs performed, the Undo button will become a Redo button to (DIN In, USB Controller In, USB Computer In): redo the last undo command. Quantum Manual...
- Page 187 MPE support individually. Further, if a connected MIDI to enable expressive electronic musical instruments MPE Controller sends MCM (MPE Configuration Messages), to control multiple dimensions of sound polyphonically. In these will be detected and will automatically put Quantum MIDI, channel-wide messages (such as pitch bend, CCs, and into MPE mode. channel aftertouch) are applied to all notes being played on a single channel; therefore, in MPE each note is assig-...
- Page 188 If you have a MIDI hardware controller routed in both directions, you could use your DAW automati- on function to easily control the Quantum parame- ters. State: Tap on this button to switch the corresponding • MIDI Out on or off. Keep in mind that the arpeggiator...
- Page 189 • coming MIDI Clock, nor does it send MIDI Clock. The Set Default: sets Bpm to its default value of 120.0 Quantum only syncs to its own tempo base that is set • by Bpm. This parameter can be also found on the Ar- Set Last Loaded: resets the parameter to the last •...
- Page 190 Load: loads a MIDI Controller mapping from the Flash • memory. Current MIDI Controller mappings will be overwritten. Save: saves the current MIDI Controller mapping to the • Quantum’s Flash memory. Use the MIDI CC parameter dial or your finger to scroll through the list and select a desired MIDI CC. Below the list there are a few more buttons regarding MIDI CC editing: Set: opesn a page allowing you to link a desired MIDI •...
- Page 191 General Page Screen Saver: sets the time in minutes until the screen • saver starts. It will automatically disappear when a no- te is played, a knob is turned, or a button is pressed. button. Quantum is always ready to play even when in screen saver mode. Keep in mind that the screen saver doesn not acti- vate a sleep mode. It is just to protect the screen from a burn-in effect when left running for hours.
- Page 192 Output Routing allows a Global override of the Main/Aux works almost the same as Pick-Up, but the current va- output settings for patches. In Layer view, it will be noted lue moves while turning until the dial position matches by Global Send Main if global override is active. By this the value. you can globally assign each layer to certain outputs inde- pendend of patch settings and keep this constant. The default setting is Patch. Quantum Manual...
- Page 193 Button Backlight: here, you can switch on/off the • backlight LEDs for all buttons. We recommend swit- ching it on when the ambient light is dark. Custom Section Color List: here, you can define a • custom LED color for every parameter section, for example, the LFOs or the Resonator. Select the corres- ponding section with the Item parameter or by tapping on the touchscreen and choosing the desired LED color Quantum Manual...
- Page 194 Update: here, you can update the operating system running time. Here you can also update the operating • software. system software and calibrate the Quantum keyboard. Tap on the desired button (Info, Calibrate, or Calibrate See the Appendix for details on how to update the AT) to open the corresponding display page.
- Page 195 Additional Modes Filters: tap on this button to open the Filter Calibrati- • on page. Here, you can calibrate the analog filters. Plea- se follow the on-screen instructions. Display: use this option to adjust the display horizon- • tally and vertically, if desired. Calibrate AT Page (only Quantum MK2) Velocity Curve: this determines the sensitivity for the • Iridium Keyboard from Soft to Hard. The default set- ting is Medium. Wheels: calibrates the pitch bend and modulation • wheel. Please tap on the Wheels button and follow the on-screen instructions. Ctrl. Pedal: calibrates a connected controller pedal.
- Page 196 Play the desired key on the keyboard. The corres- • ponding key in the display keyboard representati- on lights red. Provide your settings for this key by using the AT • Key Offset Min or Max slider in the touchscreen display. The value set is shown in the graphic grid below the display keyboard representation. Hit another key and repeat as necessary. • Quantum Manual...
-
Page 197: Loading & Editing Samples
8 to 32 (including floa- further editing. ting point format) and all sample rates. We recom- mend using 44.1 kHz as the sample rate, otherwise You can use samples within Quantum with the following you must use the Pitch parameter to set the sample oscillator modes: pitch accordingly. Sample loops are also recog- Particle Generator: one or more samples can be used nized by Quantum. - Page 198 Here you determine the velocity range of the currently selected sample. You can set up a minimum velocity for triggering (From Velo) and a maximum velocity value (To To edit the following parameters we recommend Velo) so the incoming velocity determines which sample is loading a sample. For more information please refer played. Use this function to create stacked samples that to ‘The Actions Tab’ chapter. react on different velocities. Quantum Manual...
- Page 199 Granular: uses the Quantum Particle engine for gra- Super Fine: Cutoff change is about 0.1 cents. • • nular playback. Set From Keys: play a key on your keyboard to set the • Live Granular: uses Quantum’s Audio Input for a live corresponding pitch. • granular transformation. Make sure to set up the audio input on the Layer page (Input Volume, Input Rou- From Note / To Note ting).
- Page 200 Stereo Width (only available for Particle Genera- tor) Round Robin: the samples are played repeatedly one • after the other from the top of the sample list to the The Quantum is able to play mono and stereo sample files. end, and so on. Sometimes stereo samples have a stereo width that doesn’t Reverse Robin: the samples are played repeatedly one fit with your needs. Use Stereo Width to adapt the stereo • after the other from the end of the sample list to the width of all samples as desired.
- Page 201 The Add Samples display page When you have chosen a sample from USB or SD By tapping the corresponding button below the window card, you will be asked if you want to copy the samp- you can perform further options: les to the internal Flash (recommended) or if you want to keep the samples on the external drive. Quantum Manual...
- Page 202 Clear Map: deletes all samples and their settings. • Delete: deletes the selected folder/sample after a • Import: imports a sample from a connected SD card or • confirmation. a USB storage device into the Quantum’s Flash memo- ry. If imported, the sample can be loaded by using the Rename: renames the selected folder/sample. • Add function. Move: moves the selected sample/folder. If per- • formed, the folder/sample is copied into a clip- Reload: if one or more samples don’t work properly, •...
- Page 203 Sample Start / Sample End corresponding pitch. Here, you determine the start position (Sample Start) and Loop Start/ Loop End end position (Sample End) of the currently selected samp- le. Use this function to adapt the sample length to your If Loop Mode is set to On, you can define a Loop Start and needs. Within the waveform representation two green Loop End. Within the waveform representation two yel- rulers shows the loop start and end. low rulers shows the loop start and end. Quantum Manual...
- Page 204 Ping Pong which lets the loop move for- Zoom In/Zoom Out: lets you zoom in and zoom out • wards and backwards again and again. the sample waveform representation. Track Pitch Zoom All: zooms to an overall representation of the • complete sampel waveform. Here, you can disable (No) the pitch tracking so that every Selection: displays the sample selection that is defined key plays the same pitch. This might be useful when using • before. To define a sample area, draw a selection with the sample as exciter for the Resonator. The default setting your finger. The area is shown in yellow. You can move is Yes. the area by holding and moving. Quantum Manual...
- Page 205 Loop: displays the area between loop start and loop • end points. The Close Button The Select Button Tap on the Close button to return to the Sample page. Tap on the Select button to open a pop-up menu with different selection options: All: selects the complete sample. • None: deselects any selection of the sample. • Start->End: selects the sample area between sample • start and end point. Quantum Manual...
-
Page 206: Appendix
How to update the Quantum Operating System After the file has installed correctly, the Quantum • saves the update into the internal flash memory. The Quantum has a service-friendly feature that makes it possible to update the system software without changing Wait until the operation is complete. If the update •... -
Page 207: Wavetable Synthesis
Appendix Wavetable Synthesis You should keep the following sentence in mind: The sound generation of the wavetables in Quantum is A wavetable is a list of two or more waves, between based on wavetable synthesis. which you can move at will. A wavetable is a table consisting of single waveforms, each Modulating Waves over time with its own special sound character. The main difference between wavetable synthesis and other sound-generation The graphic below shows a selection of 4 regularly- spaced principles is the ability to not only play one waveform per waves from a 60-wave wavetable along the vertical axis. oscillator but also to step through other waves in the... - Page 208 If Attack is 0 and Decay set to a medium value you get a percussive sound; if you turn up the attack, you get a soft- sounding start. You can also use an LFO to modulate the wavetable positi- on and, depending on the selected LFO Shape, you might get a wave scan that goes back and forth (triangle), in only ione direction followed by a hard reset to the origin (sawtooth) or between only two waves (square). Quantum Manual...
-
Page 209: Waveform Oscillators Introduction
Therefore, the sine wave sounds a little nimal selection of the endless variety of waveforms, but artificial to the ear. However, the sine wave can be an the Waldorf Quantum provides all those waveforms, plus interesting oscillator waveform to emphasize a certain other classic waveforms like square (which is the father of... - Page 210 Appendix Cyclic waveforms such as the waveforms in the Quantum only feature sine waves in integer frequency ratios to the 1st Harmonic Magnitude 1 fundamental like double frequency, triple frequency and so on. Those partials are called harmonics because their fre- quency is a harmonic multiple of the fundamental. 2nd Harmonic Magnitude 1/2 Confusing? Let’s generalize it to cyclic waveforms: a cyclic waveform – like sawtooth, square, etc. – only consists of...
- Page 211 11 13 15 Harmonics fifth magnitude and so on. The following images illustrates Additive components of a square wave with 50% pulse width how the individual harmonics build up the sawtooth wave: The square wave was thought as an abstraction of wind instruments like a pan flute or a recorder. They consist of a tube that can contain a certain amount of air. The player Quantum Manual...
- Page 212 9 11 13 15 Additive components of Pulse wave with different pulse widths The first thing you probably observe is that the lower part of the wave has a narrower excursion. This is because the energy of the wider pulse is higher than the one of the narrower pulse. If this were not compensated, the overall signal would have an unwanted DC offset. As you have read in the previous chapter the harmonic content of a 50% pulse wave is a special case. It has a very Quantum Manual...
- Page 213 – e.g. guitar or bass guitar, e-piano, or even a flute. The most powerful feature of the pulse wave is the ability to change its width while sounding. This is called pulse width modulation. When the pulse width is changed the waveform starts to sound thicker. This happens because the effect is very similar to what you hear when you have two oscillators running with slightly different frequencies. They interfere and create irregular troughs in the resulting waveforms. Quantum Manual...
- Page 214 Amplitude Magnitude Time Frequency 11 13 15 Harmonics Additive components of the Triangle wave The reason why the triangle wave is so popular in classic synthesizers is that it can act as a sub-oscillator wave, to emphasize certain frequencies or to frequency modulate other oscillators. Quantum Manual...
-
Page 215: A Short Introduction To Granular Synthesis
– such as drum loops and sound effects – to extract threshold are hardly affected. The frequency below the pitched spectra from them. Sounds with longer grains cutoff point is called the pass band range; the frequencies usually play back with the pitch of the original sample. above are called the stop band range. The Quantum’s filter If you play back the same portion of a sample over and dampens frequencies in the stop band with a certain slope. over again, the sound may become too static. You can use The slope can be 12dB or 24dB per octave. This means that... - Page 216 99%, ble sine wave even when it does not receive an incoming which in most cases means this portion of the signal is no signal. longer audible. The Quantum’s filter also features a resonance parameter. Resonance in the context of a low, band or high pass filter means that a narrow frequency band around the cutoff point is emphasized. The following image illustrates the Quantum Manual...
-
Page 217: Faq - Frequently Asked Questions
• puter directly and not through a hub. Use the rear USB, formatted. There are no known incompatibilities with any not front USB connection. SD card. Disconnect all other USB devices from your computer • Quantum doesn't recognize the update file, alt- which aren't needed at the moment. hough it definetly is located in the top directory of the SD card. Change the USB cable or try from a different computer. • Please allow a bit of time, sometimes Quantum needs up to macOS: Click on About this Mac in the Apple menu. - Page 218 Quantum crashes anyway, please generate a system logfile by pressing Global -> System -> Support Log. Include your No. This device only sends and receives MIDI via USB. Transferring audio or files isn't possible. name and crash date in the ilename when saving. Send us your file and we will investigate. Can I lift up Quantum by the aluminum rod on Which footswitch and expression pedals can I use the back? with my device? Yes, you can lift up Quantum and move it around using that rod as a handle. Any sustain pedal with a 6.3 mm jack that closes the contact when being pressed should work. Our recommen-...
-
Page 219: Modulation Sources And Destinations
Free Envelope 1 signal Rand Trig Random Trigger signal unipolar Free Env2 Free Envelope 2 signal Rand Trig Bipol Random Trigger signal bipolar Free Env3 Free Envelope 3 signal Constant Constant modulation value LFO 1 LFO 1 signal Mod Pad X Modulation Pad position X LFO 2 LFO 2 signal Mod Pad Y Modulation Pad position Y LFO 3 LFO 3 signal SeqParam 1 - 8 Step Sequencer parameter values LFO 4 LFO 4 signal LFO 5 LFO 5 signal LFO 6 LFO 6 signal Komplex Komplex Modulator signal Wheel Modulation wheel (CC #1) Pitchbend MIDI Pitchbend signal After Touch Keyboard Pressure Data MPE Y Axis Second MPE parameter Quantum Manual... - Page 220 Particle Pitch Spread of Oscil- Brilliance lator 1...3 lator 1...3 WT1/WT2/WT3 FX Wavetable FX of Oscillator Osc1/2/3 Samp Start Sample start point of Osc 1...3 1...3 RS1/RS2/RS3 Timbre Resonator Timbre of Oscilla- WT1/WT2/WT3 Table Wavetable selection of Oscil- tor 1...3 lator 1...3 RS1/RS2/RS3 Exciter Resonator Exciter of Oscilla- WF1/WF2/WF3 Warp Waveform Warp of Oscillator tor 1...3 1...3 Quantum Manual...
- Page 221 Digital Filter Color (based on Free1/2/3 Env Sustain Sustain level of Free Envelope the selected Type) 1/2/3 DF Pan Digital Filter Panning Free1/2/3 Env Relealse Release rate of Free Envelope DF Level Digiatal Filter Level 1/2/3 Filter 1/2 Cutoff Cutoff of Filter 1/2 FX1/2/3/4/5 DryWet FX Dry Wet for Effect 1...5 Filter 1/2 Reso Resonance of Filter 1/2 FX1/2/3/4/5 Control FX Control for Effect 1...5 Filter 1/2 Pan Analog Filter Panning (based on the selected FX Type) Filter 1/2 Level Analog Filter Level Volume Amplifier output volume VCA VCA Quantum Manual...
- Page 222 <- see destination name Drive DryWet <- see destination name Chorus Depth <- see destination name Drive Amount <- see destination name Chorus Speed <- see destination name Drive Gain <- see destination name Chorus Feedback <- see destination name Compress Ratio <- see destination name Phaser DryWet <- see destination name Compress Thresh <- see destination name Phaser Depth <- see destination name FX Lane 1/2/3 Level <- see destination name Phaser Speed <- see destination name Arp/Seq RelGate <- see destination name Phaser Feedback <- see destination name Arp/Seq Swing <- see destination name Phaser Spread <- see destination name Seq Length <- see destination name Flanger DryWet <- see destination name Flanger Depth <- see destination name Quantum Manual...
-
Page 223: Technical Data
Appendix Technical Data Power Supply Supply Voltage 100 – 240 V AC / 47-63 Hz Maximum current consumption: 1.3 A Maximum power consumption: 50 W Dimensions and Weight Width: 1006 mm Depth: 401 mm Height (including knobs): 131 mm Total weight: 17,8 kg Quantum Manual... -
Page 224: Glossary
Clipping is a sort of distortion that occurs when a signal exceeds its maximum value. The curve of a clipped signal is Amplifier dependent of the system where the clipping takes place. In the analog domain, clipping effectively limits the signal to An amplifier is a component that influences the volume its maximum level. In the digital domain clipping is similar level of a sound via a control signal. This control signal is to a numerical overflow and so the polarity of the signal’s often generated by an envelope or an LFO. part above the maximum level is negated. Quantum Manual... - Page 225 A filter is a component that allows some of a signal's fre- Decay quencies to pass through it and dampens other frequenci- es. The most important aspect of a filter is the filter cutoff ‘Decay’ describes the descent rate of an envelope once the frequency. The most common type is the lowpass filter. A Attack phase has reached its zenith and the envelope lowpass filter dampens all frequencies above the cutoff drops to the level defined for the Sustain value. frequency. Quantum Manual...
- Page 226 A lowpass filter dampens the portion of the signal that lies Essentially, this is how MIDI works: One sender is connec- above this frequency. Frequencies below this value are ted to one or several receivers. For instance, if you want to allowed to pass through without being processed. use a computer to play the Quantum, then the computer is the sender and the Quantum acts as the receiver. With a few exceptions, the majority of MIDI devices are equipped with two or three ports for this purpose: MIDI In, MIDI Out LFO is an acronym for Low-Frequency Oscillator. The LFO and in some cases, MIDI Thru. The sender transfers data to generates a periodic oscillation at a low frequency and features variable waveshapes. Similar to an envelope, an the receiver via the MIDI Out jack. Data is sent via a cable...
- Page 227 Its Release pitch is derived from the note number, which lies between An envelope parameter. The term ‘Release’ describes the 0 and 127. The velocity lies between 1 and 127. A value of descent rate of an envelope to its minimum value after a 0 for velocity is similar to ‘Note Off’. trigger is terminated. The Release phase begins immedia- tely after the trigger is terminated, regardless of the enve- Quantum Manual...
- Page 228 For instance, a MIDI note or an audio frequency (harmonics). A spectrum display like that is in signal can be used as a trigger. The events a trigger can the Quantum is a graphical overview of all the frequencies initiate are also very diverse. A common application for a of a wavetable with their amplitudes over time.
- Page 229 In con- trast to the samples in a sampler, all waves in Waldorf Wavetable synthesizers have the same lengths and are played back in the same pitch.
-
Page 230: Product Support
If you have any questions about your Waldorf product, feel Qunatum does not contain any user-serviceable parts. If free to contact us. We’re here to help. your Quantum develops a fault or needs servicing, please refer to a Waldorf authorised service center. For more Use the support form at our website. This is the most information, please ask your musicians dealer or your local efficient and fastest way to contact us. Your questions will... - Page 231 Waldorf Music GmbH Lilienthalstrasse 7 53424 Remagen Germany • • • © 2023 Waldorf Music GmbH All rights reserved • waldorfmusic.com...
Need help?
Do you have a question about the QUANTUM and is the answer not in the manual?
Questions and answers