Table of Contents
Advertisement
Advertisement
Table of Contents

Related Manuals for Waldorf M


Summary of Contents for Waldorf M
- Page 1 User Manual...
-
Page 2: Table Of Contents
Basic Operation ......................15 FAQ - Frequently Asked Questions ............. 7 5 Switching On / Off ..................... 15 A Short Introduction in Wavetable Synthesis ........ 7 7 Master Volume ....................15 Velocity Curve Maps .................. 7 9 The M Mode Pages ..................... 15 Modulation Sources and Destinations ............ 8 0 The Option Button Section ................16 MIDI CC Messages Support ................ 8 2 The Display and the 4 Encoders ..............16 Technical Data ..................... 8 3 Loading Sound Programs ................17 Glossary ........................ 8 4... -
Page 3: Foreword
Hint Thank you for purchasing the Waldorf M. You now own a classic hybrid wavetable synthesizer featuring a wide Waldorf Music is not liable for any erroneous information range of unique sounds with approved Waldorf quality – contained in this quickstart manual. The contents of this made in Germany! manual may be updated at any time without prior notice. - Page 4 Holger Steinbrink Steinbrink, Martin Stürtzer (Phelios) Revision: 1.0, July 2021 M contains sounds from Please visit our website for further support and New sounds: Kurt Ader, Jürgen Driessen, Wolfram Franke, downloads for your M: Rob Papen, Anthony Rother, Vladimir Salnikov, Martin waldorfmusic.com/m Stürtzer Classic Waldorf Microwave sounds: Claudius Brüse, Dirk Fabritius, Wolfram Franke, Dave Gould, Bruce Henderson, Uwe G. Hoenig, Tobias Menguser, Dr. Georg Müller, Rob Papen, Mike Rosen, Geoffry Ryle, Martin Stehl, Stefan Sten- zel M Manual...
-
Page 5: Specifications
Improved Ladder Type) with saturation MIDI: USB 2.0 and DIN (5-pin DIN connector with • Amplifier: Analog stereo VCA for each voice • In/Out/Thru) Envelopes: 4 Envelope Generators; 8 point • Compatible with classic Waldorf Microwave I sysex • loopable time/level Wave envelope generator, VCF messages (sound bank transfer/sound transfer) and VCA ADSR envelopes and a free assignable loop- able 4 points time/level envelope SD Card for loading / storing user content as sound- •... -
Page 6: Control Features & Connections
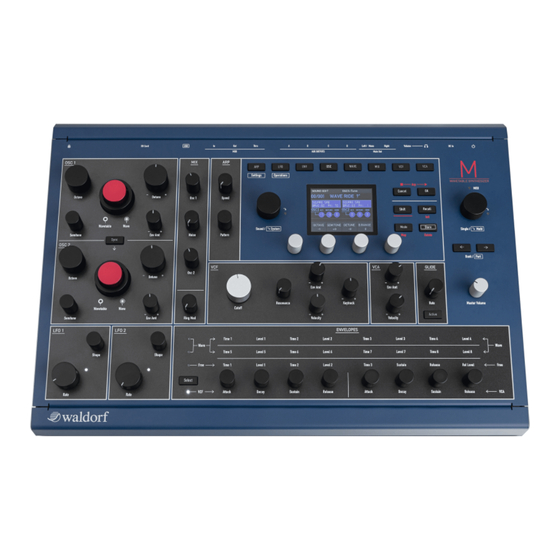
Control Features & Connections Control Features & Connections Front Panel 1) Display Section with encoders 4) Mixer Section 7) VCA, Glide & Master Volume 2) Wavetable Oscillator Section 5) Analog Filter Section (VCF) 8) Arpeggiator Section 3) LFO Section 6) Envelopes Section 9) Single/Multi Section M Manual... -
Page 7: Rear Panel Connections
Control Features & Connections Rear Panel Connections Power Supply Jack & Power Switch Headphones Output with Volume control Stereo Audio Outputs L (Mono) + R Stereo Aux Outputs A - D MIDI Thru, MIDI Out, MIDI In jacks USB 2.0 MIDI Port SD Card Port Kensington Compatible Receptacle ® M Manual... -
Page 8: About This Manual
About this Manual About this Manual Highlighted Control Features and Parameters All of the M’s buttons, controls and parameters are high- This manual was written to help you to become familiar lighted in bold letters throughout the manual. with the M synthesizer. It will also aid experienced users Examples: with routine tasks. -
Page 9: General Safety Guidelines
General Safety Guidelines General Safety Guidelines Power Supply Only use the power supply adapter that came with M. • Please read the following safety tips carefully! They Unplug the device when you are not using it for longer • include several precautions you should always ob- periods. serve when dealing with electronic equipment. Read all of the instructions before operating your device. Never touch the plug with wet hands. • Always pull the plug when unplugging the device - •... - Page 10 Use only a dry, soft cloth or brush to clean the device. • Never use alcohol, cleaning solutions or similar chemi- cals. They will damage the surface of the chassis. Proper Use This device is designed exclusively to produce low- frequency audio signals for the purpose of generating sound. Any other use is prohibited and voids the warranty extended by Waldorf Music. Waldorf Music is not liable for damages due to incorrect use. This M unit is NOT suitable for preparing convenience food. Please cook seasonal and regi- onal whenever it is possible. M Manual...
-
Page 11: Setup And Connections
M with the power Connections supply jack. Plug the other side of the power supply cable into a suitable AC power outlet. In order to get started with your M you will need an AC power outlet, a mixing console, an amp, and/or an audio 6. Press the power switch on the rear panel of your monitor such as a speaker cabinet or a headphone. - Page 12 M provides an analog stereo audio output, 4 additional stereo aux outputs and a headphones output. The main The overall volume of M can be controlled with the audio and headphones outputs are affected by the setting Master Volume. This also affects the Headphones of the Master Volume control dial.
- Page 13 • Apple ‘Lightning to USB Camera Adapter’ cable we added an elegant way to control external sound modules The USB connection of M allows transmitting and receiving with M: just connect the DIN MIDI out to your external of MIDI data transmitting. gear and use the knobs to control certain functions. For use with a computer we recommend the USB 2.0 port. M Manual...
- Page 14 Setup and Connections Physical Security Users that operating with M in areas with public or shared access such as live gigs, public studios or educational establishments can attach a Kensington compatible security lock to the slot ® on the rear panel of M. M Manual...
- Page 15 Basic Operation Basic Operation The M Mode Pages M offers mode pages in addition to the panel parameters. To enter a desired mode page, just press the correspon- Switching On / Off ding mode button above the display. The following mode pages are available: M is equipped with a power switch.
- Page 16 Shift and pressing the corresponding button with the red labeled text. Here, you find options for sound M Display (Oscillator 1 Tune menu page) initializing or storing a sound program. The top display area always shows the current mo- de/mode page, e.g. OSC1>Tune which means, that the With the Mode button, you switch between two Tuning page for Oscillator 1 is selected. Below the mode...
- Page 17 Basic Operation Loading Sound Programs Editing Parameters M offers a total of 2048 sound programs, divided into 16 In order to change or edit a sound program, you must banks with 128 sounds each. access the appropriate parameters. Depending on the type of parameters, there are different ways to achieve this: To avoid accidental overwriting of the sound edit The controls on M’s front panel offer direct access to •...
- Page 18 • tentiometers. Turning a dial clockwise increases the After you have finished editing a sound program you must corresponding value; turning it counterclockwise de- save it if you intend to use it again. All of M’s memory creases it. Bipolar parameters (parameters with positi- locations are available for this purpose. ve and negative values) use special gradation when changing their values. As soon as the value 0 is...
- Page 19 Use the Single/Multi encoder to select a desi- red storing location. This is displayed below the sound name. With the Bank/Part buttons, you can determine a desired bank. Finally, press the OK button to store the sound program at the selected location. After that, press the Cancel button to leave the Sound Store display page. Press the Cancel button to discard the storing process at any time and return to the last selec- ted display page. M Manual...
- Page 20 Sound Parameters Sound Parameters Waldorf M consists of numerous sound-shaping compo- nents. Sound synthesis: Oscillators with wavetable generators • (two modes available: Classic Microwave 1 and Mo- dern Microwave II/XT), VCF Analog Filters and VCA Amplifier. These modules represent the audio signal flow. Sound generation actually occurs within the oscil- lators. They can produce different wavetables. The VCF analog filter shapes the sound by amplifying (boosting) or attenuating (dampening) certain frequencies. The VCA amplifier are located at the end of the signal chain.
- Page 21 M.Early (Mono Earliest): When maximum number of • voices is reached, the newest note will be cut, when a PLAYMODE new note is triggered.
- Page 22 Sound Parameters A wavetable is a table consisting of single waveforms. Each Wavetable Oscillator Section waveform is classified by its own special sound character. M offers two wavetable oscillators with independent The main difference of wavetable synthesis in comparison wavetable generators. with other sound-generation principles is the ability to not only to play one waveform per oscillator but also to step through the wavetable via different modulations, thereby creating wavetable sweeps. The results can be dramatic –...
- Page 23 Sound Parameters The Oscillator Panel Parameters The Wavetables are the real power of your M. To make sure that you have access to all this power, Both oscillators offer the same panel parameters. you should make yourself familiar with the sound Keep in mind, that M offers 2 oscillator modes: Clas- and the characteristic of each wavetable. The best sic Microwave 1 and Modern Microwave II/XT. Press...
- Page 24 If you are programming strings or other high pit- are operating at different pitch settings. Using additional ched sound, set Octave to +1 . pitch modulation by envelopes, LFOs or pitchbend will bring further movement into sync sounds. Detune Fine-tunes the oscillator in increments of 64ths of a semi- tone. The audible result of detuning oscillators is a flan- ging. Use a positive setting for one oscillator and an equi- M Manual...
- Page 25 OSC2. Use the Sound/System encoder to scroll Same functionality as for the corresponding panel parame- through the display pages. ter. Both oscillators pages offer nearly the same display SEMITONE parameters. Same functionality as for the corresponding panel parame- ter. Osc 1 & 2 Tune Pages Here you find all parameters regarding oscillator tuning. DETUNE Same functionality as for the corresponding panel parame- ter. B.RANGE (Bend Range) Determines the intensity of the pitchbend (from 0 to 12 semitones) via MIDI Pitchbend messages in semitones for the corresponding oscillator. Oscillator 1 Tune display page M Manual...
- Page 26 The display also informs you about the current Selects a second modulation source for the pitch modulati- made modulations and the oscillator´s tuning status. on of the corresponding oscillator. MOD1SRC (Modulator 1 Source) MOD2AMT (Modulator 2 Amount) Selects the modulation source for the pitch modulation of Determines the amount of modulation applied to the cor- the corresponding oscillator. responding ocillator pitch. This parameter can be set to both positive and negative values. M Manual...
- Page 27 Using additional individual modulation settings. pitch modulation by envelopes, LFOs or pitchbend will bring further movement into sync sounds. Osc Sync & Glide Page Here you find parameters regarding the oscillator syn- GLIDE chronisation and glide functions. Same functionality as for the Glide panel button. M Manual...
- Page 28 FIXPITCH 1 / FIXPITCH 2 Determines, if incoming MIDI notes will change M´s pitch or not. If set to off, incoming notes change the oscillator´s pitch as defined by the corresponding MIDI note, as you would usually expect. If set to on, a note on message will...
- Page 29 WAV1. Use the Sound/System encoder to scroll Same functionality as for the corresponding panel parame- through the display pages. ter. Both Wave pages offer nearly the same display WAVE parameters. Same functionality as for the corresponding panel parame- ter. Wave Page Here you find all parameters regarding the wavetables. PHASE By means of this parameter you can define the Startwave and, as a result, the phase of the generated wave. Alterna- tive to a fixed value, you can use free to set the phase to a different, random value each time a note is generated. Wave 1 Wave display page M Manual...
- Page 30 Wave 1 Wave Envelope display page different wave. The display also informs you about the current Wave Modulation Pages made modulations and the oscillator´s tuning status. Here you find all parameters regarding the wavetable ENVAMT (Envelope Amount) modulations. Same functionality as for the corresponding panel parame- ter. M Manual...
- Page 31 When enabled, wave 2 uses the modulation Selects the sidechain controller that is used to scale the parameters of wave 1 for all Modulation settings, EnvAmt, output of the modulation source. A typical example is the EnvVelo and Ktrack. That means, whenever a modulation Modulation wheel as source and a LFO as the controller. is applied to wave 1, it is also used for wave 2. When disab- This allows you to control the intensity of the LFO modula- led, each wave uses its own individual modulation settings. tion using the wheel. If no controller is selected, no modu- M Manual...
- Page 32 Sound Parameters Classic Mode vs. Modern Mode Oscillator Mixer (MIX) Section As you have probably already noticed, M offers two diffe- In the Oscillator Mixer section you control rent operating modes for the oscillators - the Classic the volumes of both oscillators and the Microwave I mode and the Modern Microwave II/XT mo- Noise generator. If an oscillator volume dial...
- Page 33 Noise sound. Volume of the noise generator. The noise generator pro- duces pink noise and features no other controls. Noise is a fundamental source for any kind of analog-type percussi- on. Also wind and other sound effects can be created by using the noise generator. M Manual...
- Page 34 MIX>Levels. Use the Sound/System encoder to scroll Same functionality as for the corresponding panel parame- through the display pages. ter. OSC2LEV (Oscillator 2 Level) Same functionality as for the corresponding panel parame- ter. NOISELEV (Noise Level) Same functionality as for the corresponding panel parame- ter. RMLEV (Ring Modulator Level) Mix Levels display page Same functionality as for the corresponding panel parame- ter. The display for all 3 mix pages also informs you about the current level status for all sound generati- on sources. M Manual...
- Page 35 RMMODA O2MODS Determines the amount of modulation applied to the ring Selects the modulation source for the oscillator 2 level modulator level. This parameter can be set to both positive modulation. and negative values. O2MODA Determines the amount of modulation applied to the oscil- lator 2 level. This parameter can be set to both positive and negative values. M Manual...
- Page 36 Sound Parameters VCF Section The VCF Section Panel Parameters M offers an analog lowpass filter with 24dB/Oct and reso- Cutoff nance. This is a SSI 2144 Ladder type with saturation. This filter type dampens frequencies which are higher than the Determines the cutoff frequency for the low pass filter. All specified cutoff frequency. Frequencies below this frequencies above the cutoff frequency are damped. You threshold are hardly affected. To give you an idea of the can bring more movement into the sound by modulating...
- Page 37 Use this fea- ture to give a more expressive character to the sound. When you hit the keys smoothly, only few modulation is applied. When you hit them harder, the modulation amount also gets stronger. M Manual...
- Page 38 VCF display pages. The current selected VCF page is RESO shown in the upper right corner of the display, e.g. VCF>General. Use the Sound/System encoder to scroll Same functionality as for the Resonance panel parameter. through the display pages. ENVAMT General Page Same functionality as for the corresponding Env Amt panel Here you find all parameters regarding the filter settings. parameter. ENVVELO Same functionality as for the corresponding Velocity panel parameter. KTRACK Same functionality as for the Keytrack panel parameter. Mod1 Page Here you find all parameters regarding the filter modulati- VCF General display page ons. M Manual...
- Page 39 MOD1SCR modulation. Selects the modulation source for the filter cutoff modula- tion. MOD2AMT Determines the amount of modulation applied to the filter MOD1CTR cutoff modulation. This parameter can be set to both posi- tive and negative values. Selects the sidechain controller that is used to scale the output of the modulation source. A typical example is the Modulation wheel as source and a LFO as the controller. M Manual...
- Page 40 Sound Parameters R.MODSRC VCA Section Selects a second modulation source for the filter resonance M offers an a true stereo analog VCA with panning option. modulation. R.MODAMT Determines the amount of modulation applied to the filter resonance modulation. This parameter can be set to both positive and negative values. The VCA Section Panel Parameters Env Amt Determines the amount of influence the VCA envelope has on the volume. For positive settings, the volume is increa- sed by the modulation of the envelope, for negative set- tings, the volume is decreased. Sounds with a hard attack...
- Page 41 VCA off (as with Microwave 1). The otherwise there will be no output at all. Therefore reason for this is that M applies all modulations you must define the volume envelope in a useful way (EG * EG Amount) as CV source and not to the VCA even if you intend to use another envelope to shape CV itself (as for example for the VCF). So if there is 0...
- Page 42 ENVVELO (Envelope Velocity) Same functionality as for the Velocity panel parameter. KTRACK Determines the position in the stereo panorama. When the setting is -64, the sound is panned far left, when the setting Determines how much the volume depends on the MIDI is right +63, it is panned far right. If you want to set the note number. The reference note for Keytrack is C3, note sound into the middle of the stereo panorama, use the +0 M Manual...
- Page 43 Selects the sidechain controller that is used to scale the output of the modulation source. A typical example is the Modulation wheel as source and a LFO as the controller. This allows you to control the intensity of the LFO modula- tion using the wheel. If no controller is selected, no modu- lation takes place. If you want to use a classic source * destination behavior, set MOD1CTR to Max. M Manual...
- Page 44 The Glide Panel Parameters Active Button Enables or disables the glide effect. Rate Determines the glide time. Low values will give a short glide time in the range of milliseconds that gives a special character to the sound. High values will result in a long glide time up to several seconds which can be useful for solo and effect sounds. M Manual...
- Page 45 Sound Parameters LFO. E.g., the S&H shape of LFO1 samples LFO2 and vice LFO Section versa. More variations can be achieved by means of the In addition to the main oscillators, M is equipped with two SYMM parameter. Please read the corresponding para- low frequency oscillators (LFOs) that can be used for mo- graph later on in this chapter. dulation purposes. Each LFO generates a periodic wave- form with adjustable frequency rate and shape.
- Page 46 LFO square shape. When using it on a triangle waveshape, you can get a sawtooth Determines the source to alter the LFO level. Since the wave with a soft rising or falling slope. actual level of LFO intensity is set at the destination, ther M Manual...
- Page 47 To guarantee a smooth LFO on the note onset. Use Humanize to even furter enhance modulation, upon release of the key the LFO will follow the this behavior. If on is selected, all LFOs of the M’s voices VCA envelope curve in its release phase. In this configura- used by the sound program behave as one. Use a modest tion, the LFO is turned into an AR (attack/release) envelo- Humanize value to imitate bad circuit design.
- Page 48 LFO2 is staying back in its place (as a voice LFO). This global LFO is actually a third "synth level" LFO, which in addition could be synced to MIDI clock (see next options) MIDISYNC If set to on, the global LFO is synchronised to an incoming MIDI Clock signal. MSYNCTO If set to on, the Rate value of the global LFO can be set in musical notation. The range goes from 1/32 up to 1024 M Manual...
- Page 49 Sound Parameters Envelopes Section Multi segment envelopes are extremely flexible modulation sources. Their structure is made of M’s 4 programmable envelopes allow you to manipulate grouped time/level parameters that allows one to sound parameters via rate or timed modulations. generate an almost free modulation amount over •...
- Page 50 Parameters for the Wave/Free Envelopes Parameters for the VCF/VCA Envelopes M’s Wave envelope offers a multi segment charac- teristic with 8 separately adjustable times and le- Both VCF and VFA ADSR envelopes offer the same vels. The Free envelope features 4 times/levels. panel and display parameters.
- Page 51 WAVE ENV>General. Use the Sound/System en- Level (for Wave & Free Envelopes) coder to scroll through the display pages. End level that the corresponding segment finally reaches. The Wave envelope offers 8 Level paramneters, the Free envelope offers 4 Level parameters. WAVE Envelope Points 1-2 display page All envelope display pages show also a graphical representation of the current envelope shape. M Manual...
- Page 52 Here you find the parameters regarding the VCF and VCA envelope modulation settings for Attack and Decay phases. RELEASE ATKMODS Same functionality as for the corresponding VCF and VCA Release panel parameter. Selects the modulation source for the corresponding attack time modulation. Delay Page (only for VCF envelope) Here you find all parameters regarding the VCF envelope delay settings. M Manual...
- Page 53 Here you find the parameters regarding the VCF and VCA Here you find the parameters regarding the Wave envelo- envelope modulation settings for Sustain and Release pe settings. phases. The Time/Level parameter settings are identical for all 3 display pages. SUSMODS Selects the modulation source for the corresponding P1...8 TIME sustain level modulation. Same functionality as for the corresponding Time panel parameter. M Manual...
- Page 54 Determines the amount of modulation applied to the cor- which the envelope will remain until the key is released responding time point. This parameter can be set to both (the MIDI note-off command is received) and the release positive and negative values. portion of the Wave envelope begins. LEVMODS L.START Selects the modulation source for the corresponding level- Defines the segment at which the loop will start, if Loop is point modulation. set to on. The loop will always run between the loop start point and the Key off point. M Manual...
- Page 55 In M mode, it works in a different way : (i.e. sustain point) AFTER passing the release phase. If you Modulated value = settings Value + modulator * amount, use the same level for release as for sustain and the release i.e. the setting value does not affect the modulators pro- time is set to 0, it will be loop always, if both LOOP options duct, hence a modulation is independent of the original are active.
- Page 56 Shift + Stop, the arpeggiator stops through the display pages. playing. The Arp Section Panel Parameters Speed Sets the arpeggiator’s basic tempo in BPM (beats per minute) or via MIDI clock, if the MIDI Clock Mode option in the Sys- tem Settings is set to Ext or Auto (an incoming MIDI Clock signal is necessary). Based on the Speed setting, the ARP button flashes rhythmically (once per quarter of as 4/4 bar). Arp Main display page M Manual...
- Page 57 If One Shot is selected, the arpeggiator splits up all • played notes and plays back one arpeggio. After the ar- PLAYDIR peggio rhythm is played once, it is stopped automati- cally unless you hit a new chord. This mode is especial- Determines the sequence of generated notes according to ly useful in a live performance where you might have pitch. to "synchronize" yourself. Just hit a chord at each new bar. M Manual...
-
Page 58: About Modulation Assignments
• in this context are ‘Source’ and ‘Destination’. There is no note and sweeps down through the notes until it Modulation matrix as in our other Waldorf synthesizers. reaches the lowest note. It then starts at the top again. We made a conscious decision to set up the modulation facilities directly on the corresponding display page, i.e. in If Alt Up is selected, the arpeggio starts at the lowest •... - Page 59 On top of this, most modules have routable modulation and ending at the highest level; a LFO would be 180 inputs; this is true for both the audio as well as the modu- degrees out of phase with the original signal produced by lation inputs themselves. With a routeable modulation the mod control module. input, you can determine both the mod control module used as the modulation source as well as its amount. There are two different kinds of such modulation inputs: M Manual...
-
Page 60: The Multi Mode
The Multi Mode How to enter the Multi Mode Press the Single/Multi encoder to enter the Multi M offers a 4 part Multi mode. Each sound in a Multi setup mode. The LED near to the dial lits in white. If you based on a so-called Part. A Part offers some additional want to return to single mode, press the dial again. - Page 61 Here you find all parameters regarding volume and pan- on about all parts and their basic settings. ning settings. Main Page P.VOL Here you find all parameters regarding basic part settings. Determines the volume for the current Part. The overall volume is set with the Master Volume MIDI CH dial. The attenuation chain is Instrument VCA volu- Determines the MIDI receive channel for the current Part. me setting > Part Volume setting > Master Volume setting, M Manual...
- Page 62 Set this parameter to 127, if you want to turn velocity switching off. K.LIM L Tuning Page You can restrict the key range used for the current Part´s tone generation. Only notes with a key number higher or Here you find all parameters regarding the tuning settings. equal to the selected value are passed through. Set this M Manual...
- Page 63 "higher" Parts Min.Voices setting. This for part 1 (active), all other parts will be affected of the can be recognized as protection from stealing the voices same settings if LockVCF of any inactive (not currently between Parts. M Manual...
- Page 64 Multi Arrangement. The sound of one particular part in the Arrangement is effectively a link to the certain chosen sound from a certain chosen sound bank. That means, if a sound patch or a soundbank will be replaced, a arrangement will sound incorrectly. Please take this into account, when changing existed sound patches or sound banks. M Manual...
-
Page 65: The System Menus
The System Menus The System Menus The Settings Menu Pages Press the ARP button to enter the Settings menu The system parameters are settings that influence the M’s mode. The button lits in white. general response. These are determined separately from the programs and stored in a special memory location. Settings 1 System Page System parameters are stored automatically when swit- ching off the device. - Page 66 The System Menus LEDs Brightness Master Volume Controls the brightness of all LEDs. Sets the basic master volume of all M programs for all outputs. Pop-Up Show Time Settings 2+3 MIDI 1/2 Pages Here you can determine how long a popup message will be shown in the display. Here you find all parameters regarding the global MIDI settings. Master Tune Determines the M’s overall pitch. The value specified here...
- Page 67 Determines how M reacts to incoming MIDI Clock messa- sive data transmission. Transmission will only be executed ges. successfully if the sender and receiver setting coincide. Int means that M doesn’t react to incoming MIDI Clock. • Device ID 127 is a so-called broadcast ID that addresses all M only syncs to its own tempo base that is set by the connected M units. M can receive this from other devices, Speed dial or the BPM parameter which can found on but cannot send it itself. This function is limited to special the Arp display page. computer software. Ext means that M automatically syncs to incoming MIDI •...
- Page 68 The System Menus CC Controller A...D & W...Z When MIDI Clock Send is enabled while the M’s DIN or USB MIDI In and Out are connected to your se- quencer, you will probably get a MIDI loop. A total hangup of your system may result. Ensure to disable the M’s MIDI clock sending feature in such a case. Arpeggio Notes Out Here you can determine, where all notes generated by the Arpeggiator is being sent out. If off ist selected, no arp note data is send out. DIN means via DIN MIDI only, USB means via USB MIDI only and DIN+USB means on both MIDI ports. Velocity Curve These parameters are used to define modulation sources that are freely definable MIDI controllers. Each value re-...
- Page 69 31. Determines, how exactly M imports the user wavetable. Imagine 256 waves of a user wavetable. As M offers only 64 waves in a wavetable, this user wavetable cannot be M Manual...
- Page 70 63 will exactly follow the equal-tempered scale within 4-5 octaves (from C2 to C7 roughly). Lower C2 will be under tune, higher C6 possibly C7 - over tune. Of course, environment temperature plays a role. If your studio room is on the top floor and it´s sum- mer, we recommend to better tune the M in the night. MB VCT TC Voice 1...8 Use the display encoder 1 to change the voice, it will stay at resonance mode to tune. Use encoder 2 to tweak coeffi- cient (they are reverse-meaning, i.e. to tune higher, you...
- Page 71 The System Menus The Operations Menu Pages Important note: When a sound program sysex mes- sage will be received by M, it will be immediately Press the LFO button to enter the Settings menu mo- overwrite the current selected sound program. de. The button lits in white. Send Current Multi (SYSEX) System Operations Page Sends the currently loaded Multi program as MIDI SysEx Here you find all options for loading/saving the M content. dump by using the USB or DIN MIDI port. Save Current Bank (to SD)
- Page 72 Load Multi Bank (from SD) Loads all Multi banks from the accordingly named file at the root directory of a connected SD Card. Import User WT (from SD) M is capable load user wavetables directly from SD Card. The convention of the files, which contain wavetables is simple. The wavetable file can contain waves from 1 up to 256. Each wave is a sequence of 256 signed 8-bit samples.
- Page 73 /creating internal storage files in combination with the next action. If some appropriately named file will not be found in the root directory of the SD Card during the recovery process, M just creates this sound bank or multi bank in the internal flash, populated with defaults. M Manual...
-
Page 74: Appendix
M will perform a system reset and start by pressing the OK button again. Updating the Firmware & DSP Firmware Sometimes, a dedicated update of the internal DSP firmwa- M has a service-friendly feature that makes it possible to re could be necessary. update the system and/or DSP firmware by user. To update M’s DSP/EXP firmware: All firmware updates come in the form of a .dfu file that can be copied on every FAT file system formatted SD card. -
Page 75: Faq - Frequently Asked Questions
Then unplug the instrument, reboot your ma- directory of the SD card. chine and plug it back in. Please allow a bit of time, sometimes M needs up to a mi- M has crashed! nute after inserting the SD before it recognizes the card and the update file. In rare cases, you may try two or three First, please update M's Host and DSP firmware. Some- times. Opening the zip file isn't enough, the .dfu files need times we release a new firmware and we definetly recom- actually be unpacked. Maybe your file got corrupted ment going for it. The procedure takes less than a minute. during download, please try downloading it again. M's firmware is really stable so crashes rarely occur. - Page 76 Appendix This device has unbalanced outputs. We recommend using it with unbalanced cables. Does my device send audio via its USB connec- tion? No. This device only sends and receives MIDI via USB. Transferring audio or files isn't possible. M Manual...
-
Page 77: A Short Introduction In Wavetable Synthesis
A Short Introduction in Wavetable Synthesis creating wavetable sweeps. The results can be dramatic – The sound generation of the wavetables in M is based on much more so than anything any sample playback-based wavetable synthesis. - Page 78 (triangle with maximum Symmetry) or between only two waves (square). Exceeded Waves of a Wavetable Of course you can combine envelope and keytrack modula- Time tions or add other modulation sources. All these modulati- As soon as you play a note the envelope moves through the ons will be added so that maybe the end or the beginning wavetable positions generating different waveforms over of a wavetable could be exceeded. time. The decay stage would move through these waves in the opposite direction while ultimately holding a certain wave at its sustain stage. When you release the note, the envelo- pe decays to zero. Most wavetables are created so that they start with a hol- low wave at position 0 and go through increasingly brigh- ter waves up to maximum position. This results in a beha- M Manual...
-
Page 79: Velocity Curve Maps
Appendix Velocity Curve Maps M offers 10 different velocity curve maps, which are dis- played on the following pages. Exponential +/- and C/F +/- Velocity Curves Linear + and Linear - Velocity Curves M Manual... -
Page 80: Modulation Sources And Destinations
Source Description off No modulation source ModWh Modulation wheel (CC #1) Pbend MIDI Pitchbend signal LFO 1 LFO 1 signal LFO 2 LFO 2 signal AmpEnv Amplifier Envelope signal Flt Env Filter Envelope signal WavEnv Wave Envelope signal Free Env Free Envelope signal Mirrored Exponential +/- and C/F +/- Velocity Curves LFO1Env Envelope of LFO1 Sus Pdl MIDI Sustain pedal (CC #64) Vol Ctr MIDI Volume Controller (CC #7) Pan Ctr MIDI Foot Controller (CC #10) BrthCtr MIDI Breath Controller (CC #2) FootCtr MIDI Foot Controller (CC #4) ExprCtr MIDI Expression pedal (CC #11) Ctr A...D Assignable Controller A...D Ctr W...Z Assignable Controller W...Z M Manual... - Page 81 VCA Decay VCA Decay time VCA Sustain VCA Sustain level All destinations are available through the corres- VCA Release VCA Release time ponding Mod menu pages. WAVE Time Wave Envelope Times WAVE Level Wave Envelope Levels Destination Description FREE Time Free Envelope Times Osc1 & Osc2 Pitch Pitch of Oscillator 1 & 2 FREE Level Free Envelope Levels WAV1 & WAV2 Position Wavetable Position of Oscilla- tor 1 & 2 Osc1 & Osc2 Mix Level of Oscillator 1 & 2 Noise Mix Level of Noise generator Ring Mod Mix Level of Ring modulator VCF Cutoff Filter Cutoff frequency VCF Resonance Filter Cutoff resonance M Manual...
-
Page 82: Midi Cc Messages Support
Appendix MIDI CC Messages Support Detune * OSC2 Sync to the OSC1 Waldorf M supporting the classic MIDI CC layout as it was 45, 46, 47, 48 OSC1 Level, OSC2 Level, Ringmod Level, defined by the Waldorf Microwave II XT synthesizers (with Noise Level the addition of CC#63 to select a wavetable for OSC2). 50, 56 VCF Cutoff, VCF Resonance Below you find the mapping of the CC messages of the 51, 52, 53 VCF Keytrack, VCF EG Amount, VCF EG supported sound parameters. Also, if a sound parameter... -
Page 83: Technical Data
Appendix Technical Data Power Supply Supply Voltage Input 100 – 240 V AC / 50-60 Hz Nominal Voltage Output 12 V DC Maximum current consumption: 1.8 A max. Dimensions and Weight Width: 440 mm Depth: 305 mm Height (including knobs): 85 mm Total weight: 5.7 kg M Manual... -
Page 84: Glossary
Clipping is a sort of distortion that occurs when a signal exceeds its maximum value. The curve of a clipped signal is Amplifier dependent of the system where the clipping takes place. In the analog domain, clipping effectively limits the signal to An amplifier is a component that influences the volume its maximum level. In the digital domain clipping is similar level of a sound via a control signal. This control signal is to a numerical overflow and so the polarity of the signal’s often generated by an envelope or an LFO. part above the maximum level is negated. M Manual... - Page 85 Envelope A coffee filter is a coffee-brewing utensil, usually made of An envelope is used to modulate a sound-shaping compo- disposable paper. It is part of an essential toolkit for survi- nent within a given time frame so that the sound is chan- val when working with the Waldorf M. ged in some manner. For instance, an envelope that modu- lates the cutoff frequency of a filter opens and closes this filter so that some of the signal's frequencies are filtered Control Change (Controllers) out. An envelope is started via a trigger – usually a fixed...
- Page 86 Interface. It was developed in the early 1980s so that di- verse types of electronic musical instruments by different This is a very important element of most messages. A re- manufacturers could interact. At the time a communica- ceiver can only respond to incoming messages if its receive tions standard for different devices did not exist, so MIDI M Manual...
- Page 87 Its Release pitch is derived from the note number, which lies between An envelope parameter. The term ‘Release’ describes the 0 and 127. The velocity lies between 1 and 127. A value of descent rate of an envelope to its minimum value after a 0 for velocity is similar to ‘Note Off’. trigger is terminated. The Release phase begins immedia- tely after the trigger is terminated, regardless of the enve- M Manual...
- Page 88 In con- type or model. Every device has unique system exclusive trast to the samples in a sampler, all waves in Waldorf data. The most common applications for SysEx data inclu- M Manual...
- Page 89 Appendix Wavetable synthesizers have the same lengths and are played back in the same pitch. Wavetable An oscillator shape in M is based on waveform sets called wavetables. You should think of these as a sequence of up to up to 64 single waves. This can be played back in a static way or played through dynamically, which results in their typically interesting sound transformations. If the waves do not differ much, then the wavetable will probably sound smooth and pleasant. If they have a completely different structure then this will result in wild spectral changes. M Manual...
-
Page 90: Product Support
Product Support Product Support Service & Repair Any Questions? M does not contain any user-serviceable parts. If your M If you have any questions about your Waldorf product, feel develops a fault or needs servicing, please refer to a Wal- free to contact us. We’re here to help. dorf authorised service center. For more information, Use the support form at our website. This is the most please ask your musicians dealer or your local Waldorf efficient and fastest way to contact us. Your questions will... - Page 91 Waldorf Music GmbH • Lilienthal Straße 7 • D-53424 Remagen © 2021 Waldorf Music GmbH • All rights reserved www.waldorfmusic.com...
Need help?
Do you have a question about the M and is the answer not in the manual?
Questions and answers