LXE MX6 User Manual
Hide thumbs
Also See for MX6:
- Programming manual (380 pages) ,
- User manual (78 pages) ,
- Reference manual (338 pages)

Related Manuals for LXE MX6


Summary of Contents for LXE MX6
- Page 1 MX6 User’s Guide Note: This is the full User's Guide. Please download the LXEbook version of this guide to the MX6, not this one. Copyright © December 2003 by LXE Inc. All Rights Reserved E-EQ-MX6OGWW-A...
- Page 2 Notices Notice: LXE Inc. reserves the right to make improvements or changes in the products described in this manual at any time without notice. While reasonable efforts have been made in the preparation of this document to assure its accuracy, LXE assumes no liability resulting from any errors or omissions in this document, or from the use of the information contained herein.
-
Page 3: Table Of Contents
Table of Contents NTRODUCTION Overview ........................1 Important Battery Information....................1 Document Conventions ......................2 MX6 Environmental Specifications ..................2 UICK TART In General ........................3 Components ......................4 Insert Fully Charged Battery ..................7 Low Battery Condition ......................7 Power Key........................8 Reset or Reboot.........................8 Soft Reset ..........................8... - Page 4 Arrow Keys ..........................27 Modifier Keys.........................27 The IR Serial Port ....................28 Power Modes......................29 On Mode ..........................29 The Display ..........................29 The MX6 ..........................29 Suspend Mode ........................30 The MX6 ..........................30 Off Mode ..........................30 Batteries........................31 About Lithium-Ion Batteries ....................31 Main Battery ...........................31 Backup Battery ........................31...
- Page 5 AFETY NFORMATION NDEX Illustrations Figure 1 Front of MX6............................4 Figure 2 Back of MX6 ............................5 Figure 3 Trigger Handle Installed........................6 Figure 4 RS-232/USB Communications and Charging Port................6 Figure 5 Stylus Storage Locations ........................9 Figure 6 Align the Touchscreen.........................11 Figure 7 Set the Date and Time .........................12 Figure 8 Audio Jack Location..........................16...
- Page 6 Table of Contents MX6 User’s Guide E-EQ-MX6OGWW-A...
-
Page 7: Introduction
New batteries must be fully charged prior to use. • When a new battery is installed in the MX6 for the first time (or when the Backup battery is completely depleted), the Time and Date must be re-set. Li-Ion Battery When disposing of the MX6 Main Battery, the following precautions should be observed: The battery should be disposed of properly. -
Page 8: Document Conventions
DANGER Keyword that indicates a imminent hazardous situation which, if not avoided, will result in death or serious injury. MX6 Environmental Specifications Operating Temperature 14°F to 122°F (10°C to 50°C) [non-condensing] Storage Temperature -22°F to 176°F (-40°C to 80°C) [non-condensing]... -
Page 9: Quick Start
Communications cable with power supply. The sequence of events for a new MX6 is: 1. Insert a fully charged battery. (Always put a fully charged battery in the MX6 at the beginning of the shift or work day.) 2. -
Page 10: Components
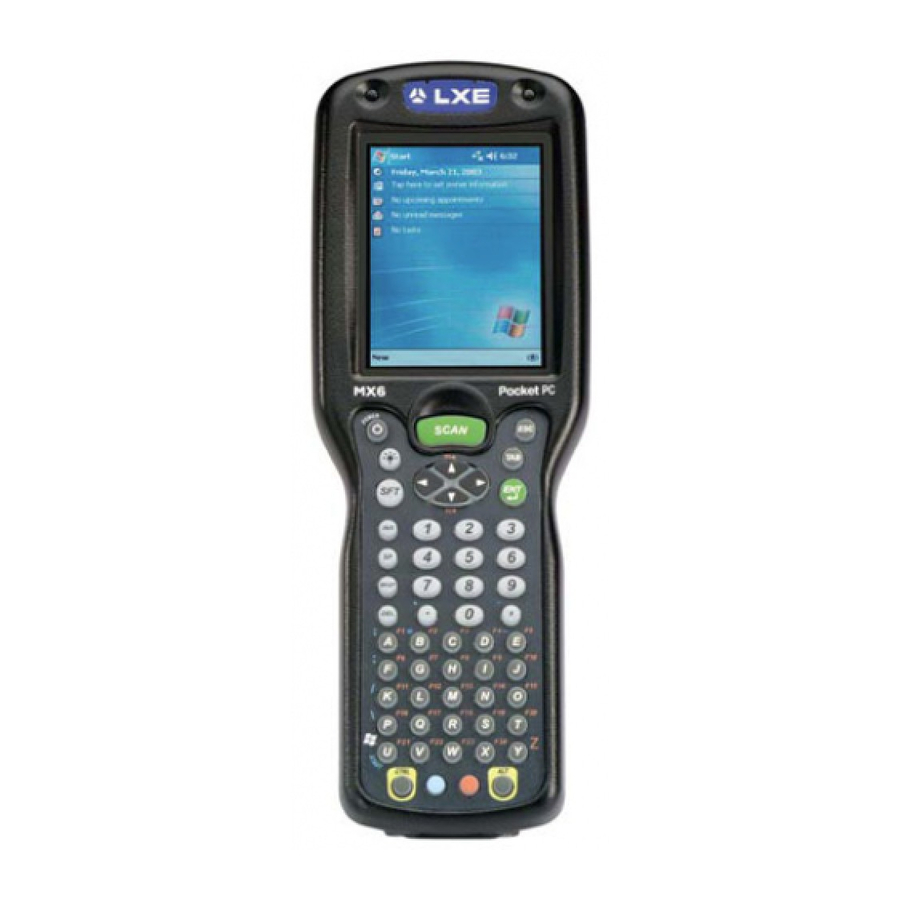
Components Components 1. Scan LED 2. Decode LED 3. Touchscreen Display 4. Power key 5. Scan key 6. Cursor keys 7. Backlight Toggle key on the 56-key keypad Figure 1 Front of MX6 MX6 User’s Guide E-EQ-MX6OGWW-A... -
Page 11: Figure 2 Back Of Mx6
Components 1. Image Aperture 2. Speaker 3. Handstrap Connector 4. Stylus (No Trigger Handle) 5. Microphone 6. Battery Well 7. Battery Figure 2 Back of MX6 E-EQ-MX6OGWW-A MX6 User’s Guide... -
Page 12: Figure 3 Trigger Handle Installed
2. Rubber Nose Bumpers 3. Scan Trigger 4. Rubber Bumper 5. Headphone Jack 6. Secure Digital Access Door 7. IrDA Port 8. Stylus and Tether (storage inside base of handle) Figure 4 RS-232/USB Communications and Charging Port MX6 User’s Guide E-EQ-MX6OGWW-A... -
Page 13: Insert Fully Charged Battery
Note: The battery should not be replaced in a dirty or harsh environment. When the battery is out of the MX6, any dust or moisture that enters the battery compartment can get into the main unit, potentially causing damage. Low Battery Condition When the Main Battery is low, a dialog box pops up and alerts the user to charge the battery. -
Page 14: Power Key
Release the key and the MX6 resets. The red and green LEDs blink for approximately three seconds. When the MX6 power key is pressed, to turn the unit on, it will need to be configured once again. See the section titled “Quick Start”. -
Page 15: Using The Stylus
The stylus is located on the back of an MX6 without a handle, and in the back of the handle of an MX6 with a handle. A tether is connected to the stylus in the handle. -
Page 16: General Windows Keyboard Shortcuts
Underlined letter in a command Carry out the corresponding command. name on an open menu Cancel the current task. Holding this key sequence (CTRL+ESC) down longer than needed to display the Start menu will cause a Hard Reset. MX6 User’s Guide E-EQ-MX6OGWW-A... -
Page 17: Align The Touchscreen
Use a clean, damp, lint-free cloth. Do not scrub optical surfaces. If possible, clean only those areas which are soiled. Lint/particulates can be removed with clean, filtered canned air. E-EQ-MX6OGWW-A MX6 User’s Guide... -
Page 18: Set The Date And Time
Or you can type a new year value in the field. • Select OK and select Yes to save your changes or select No to exit without saving your changes and exit Clock. • Select Cancel to return to Clock Properties. MX6 User’s Guide E-EQ-MX6OGWW-A... -
Page 19: Setting Display Backlight Action
(if “Turn on backlight when a button is pressed or the screen is tapped” is checked). If the MX6 is in Suspend, pressing the keypad backlight key has no effect – the MX6 remains in the Suspend state. -
Page 20: Backlight Intensity
Set the Power Off Timer Backlight Intensity You can set a different level for the intensity of the display backlight when the MX6 is running on battery power and a different level to use when the MX6 is running on external power. -
Page 21: Accessing Files In Flash Memory
Access: Start | Programs | Storage Card Select the file with the stylus and double-tap to run the file. Secure Digital (SD) cards are neither installed nor supported by LXE. The IPSM Folder Access: Start | Programs | File Explorer | My Device | IPSM Programs and files located in the IPSM folder are saved through a hard reset. -
Page 22: Connect The Audio Jack (Optional)
Connect the Audio Jack (Optional) The MX6 audio jack is located on the side of the unit next to the scan aperture and the SDA door (Secure Digital Access). The internal speaker is disabled when the audio jack is connected. -
Page 23: Connect External Power Supply (Optional)
Push the 17-pin power cable connector into the MX6 serial port. When the connector is seated over the pins, twist the cable fasteners to the right to secure the cable to the MX6. Twist to the left to loosen and remove the cable. Insert the barrel end of the AC/DC Power adapter into the short cable end on the power cord connected to the MX6. -
Page 24: Adjust The Handstrap
The MX6 has an integrated elastic hand strap that provides a comfortable, secure grip on the unit. It is attached to the MX6 with a clip on the bottom panel. The handstrap should be disconnected from the bottom clip when the Main Battery is to be removed or replaced. The handstrap can be removed from the MX6 if desired. -
Page 25: Using The Mx6
RS232 or the IR port are used to input/output data, and the keypad provides manual entry. MX6's with a touch screen and Microsoft Pocket PC software can use a stylus to input data, the COM ports and/or the keypad. A virtual keyboard is available in applications that expect keyed input. -
Page 26: The Integrated Imager
Figure 11 Scan and Decode LEDs To use the imager, aim the top of the MX6 at a barcode and press the Scan key or press the trigger on the handle. The imager scans as long as the key or the trigger is held down before the 10 second timeout occurs. -
Page 27: Unsuccessful Scan
Any of these factors may result in having to re-scan the label from a different distance or angle. E-EQ-MX6OGWW-A MX6 User’s Guide... -
Page 28: Touch Screen Display
Touch Screen Display Figure 13 Tapping with the Stylus The MX6 Touch Screen Display is a color TFT VGA display with a user programmable backlight. Display size is 320 x 240 pixels in portrait orientation. The display covering is designed to resist stains. -
Page 29: Soft Input Panel
Soft Input Panel The Soft Input Panel (SIP) is always available by tapping the SIP icon in the system tray when the MX6 is powered On. It is always available with one exception – when the Today screen is displayed. -
Page 30: Entering Text
To change word suggestion options, such as the number of words suggested at one time, tap Start> Settings>Personal >Input> Word Completion tab. Repeating Keystrokes The Soft Input Panel does not support repeating keystrokes. The MX6 keypads allow repeating keystrokes. International Characters Use the Soft Input Panel and the stylus to add International Characters to data entries. -
Page 31: Keypads
56-key 5250 Keypad Figure 16 The 35-key and 56-key Keypads See also: Appendix A “Key Maps”. Keys shown on the 35-key keypad that are inactive: Contrast Up Contrast Down Volume Up Volume Down Send and End E-EQ-MX6OGWW-A MX6 User’s Guide... -
Page 32: Special Keys
MX6 from sleep mode. Power Key The Power key puts the MX6 into and wakes the MX6 from suspend mode. Shift (SFT) The Shift key toggles the keypad from upper case alphabet mode to lower case alphabet mode and back. -
Page 33: Arrow Keys
The Red and Blue keys modify only the next key pressed; these keys must be pressed and released before each key to be modified to the Blue or Red case. E-EQ-MX6OGWW-A MX6 User’s Guide... -
Page 34: The Ir Serial Port
RS-232 serial mode, the IR port is used to transmit RS-232 level data out the IR port. The third pin along the bottom of the MX6 is used to receive RS-232 level data while in the dock. When transferring files using the IR port, flow control must be the same on both sides of the transmission (specifically, with Zmodem: both must use Xon/Xoff). -
Page 35: Power Modes
Main Battery is hot-swapped, the display is turned Off. The MX6 New Unit After a new MX6 has been received, a charged Main Battery inserted, and the Power key tapped, the MX6 is always On until both batteries are drained completely of power. Both Batteries Dead When the Main Battery and Backup Battery are drained completely, the unit is in the Off mode. -
Page 36: Suspend Mode
Power Modes the MX6 is placed in a powered docking cradle, or external power is applied to the MX6. The unit performs a Hard Reset upon receiving power from a charged Main Battery pack. Main Battery Hot-swapped The MX6 automatically enters Suspend mode when the Main Battery is removed while the backup battery has adequate power to maintain the MX6 operating system. -
Page 37: Batteries
When the main battery has lost most of its charge, an icon of an “empty” or “half-empty” battery appears. The MX6 also may be programmed to emit a beep at intervals when the battery is low. When you see the empty-battery icon or hear the warning beeps, you should turn the unit off and recharge or replace the battery as soon as possible. -
Page 38: Battery Chargers
The Desk Mount Cradle has an Auxiliary Battery Well that is used to charge a single Li-Ion battery in the charged desk mount docking cradle. The MX6 unit does not have to be in the main charging well because each charger operates independently of the other. The spare battery will charge in four hours. -
Page 39: Docking Cradles
The vehicle docking cradle uses a 12V cigarette lighter adapter or a bare wire 12-48V power supply to transfer power to the internal charging circuitry of the MX6 and, in turn, the MX6 recharges the Main Battery. A powered vehicle docking cradle gives the MX6 the ability to communicate with a host computer and other equipment. -
Page 40: Powered Vehicle Cradle
MX6 is properly seated in the charging bay and the Main Battery in the MX6 is charging. COMM w/serial port Serial data is being sent to the MX6 from the host. Green Serial data is being sent from the MX6 to the host. -
Page 41: Getting Help
Getting Help Getting Help LXE user guides are now available on CD and they can also be viewed/downloaded from the LXE website. Contact your LXE representative to obtain the LXE Manuals CD. You can also get help from LXE by calling the telephone numbers listed on the LXE Manuals CD, in the file titled “Contacting LXE”. - Page 42 MX6A308PSACWW Miscellaneous Accessories Replacement Stylus Kit, 3-pack MX6A510STYLUS Replacement Stylus Kit, w/ Tether, 3-Pack, For with MX6 w/ Handle MX6A511STYLUS Universal Vehicle Docking Cradle Mounting Bracket – Clamp Style MX6A015MTGBRCKT MX6 Desk Top Cradle Replacement Power Supply (No Power Cord)
-
Page 43: Appendixa Key Maps
Ctrl Ctrl Scan Scan Space Space Enter CapsLock (Toggle) double-tap the Sft Back Space Bksp BackTab Break Pause Up Arrow Up Arrow Down Arrow Down Arrow Right Arrow Right Arrow Left Arrow Left Arrow Insert Delete E-EQ-MX6OGWW-A MX6 User’s Guide... - Page 44 Press These Keys and Then … To Get This Key / Function Press This Key Caps Blue Ctrl Alpha Lock Home Page Up Up Arrow Page Down Down Arrow 2,2,2 3,3,3 4,4,4 5,5,5 6,6,6 7,7,7 7,7,7,7 8,8,8 9,9,9 MX6 User’s Guide E-EQ-MX6OGWW-A...
- Page 45 To Get This Key / Function Press This Key Caps Blue Ctrl Alpha Lock 9,9,9,9 2,2,2 3,3,3 4,4,4 5,5,5 6,6,6 7,7,7 7,7,7,7 8,8,8 9,9,9 9,9,9,9 Either press SFT or activate CapsLock when capital letters are needed. E-EQ-MX6OGWW-A MX6 User’s Guide...
- Page 46 Use Soft Keypad Use Soft Keypad Use Soft Keypad _ (underscore) , (comma) Use Soft Keypad ‘ (apostrophe) Use Soft Keypad ~ (tilde) Use Soft Keypad Use Soft Keypad “ Use Soft Keypad 2 or Blue+F6 & MX6 User’s Guide E-EQ-MX6OGWW-A...
-
Page 47: Inactive Keys On The 35-Key Keypad
To Get This Key / Function Press This Key Caps Blue Ctrl Alpha Lock Use Soft Keypad Use Soft Keypad Inactive Keys on the 35-key Keypad Contrast Up Contrast Down Volume Up Volume Down Send and End E-EQ-MX6OGWW-A MX6 User’s Guide... -
Page 48: 56-Key Full Alpha Numeric Keypad
Back Space Bksp BackTab Break Pause Print Screen Scroll Lock Up Arrow Up Arrow Down Arrow Down Arrow Right Arrow Right Arrow Left Arrow Left Arrow Insert Delete Home Page Up Up Arrow Page Down Down Arrow MX6 User’s Guide E-EQ-MX6OGWW-A... - Page 49 56-Key Full Alpha Numeric Keypad Press These Keys and Then … Press This Key To Get This Key / Function Caps Blue Ctrl Shift Lock E-EQ-MX6OGWW-A MX6 User’s Guide...
- Page 50 56-Key Full Alpha Numeric Keypad Press These Keys and Then … Press This Key To Get This Key / Function Caps Blue Ctrl Shift Lock Press Sft, then Red, then “y” MX6 User’s Guide E-EQ-MX6OGWW-A...
- Page 51 Use Soft Keypad > Use Soft Keypad Use Soft Keypad Use Soft Keypad Use Soft Keypad Use Soft Keypad , (comma) . (DOT) : (colon) ; (semicolon) . (period) . (DOT) Caps Lock must be On. E-EQ-MX6OGWW-A MX6 User’s Guide...
- Page 52 Alt+39 ~ (tilde) Use Soft Keypad Use Soft Keypad Use Soft Keypad “ Alt+34 B or Sft + 2 & Hold down the Alt key while typing 39 Hold down the Alt key while typing 34 MX6 User’s Guide E-EQ-MX6OGWW-A...
-
Page 53: Appendixb Regulatory Notices And Safety Information
Connect the equipment into an outlet on a circuit different from that to which the receiver is connected. • Consult the dealer or an experienced radio/TV technician for help. Warning: Changes or modifications to this device not expressly approved by LXE, Inc., could void the user’s authority to operate this equipment. RF Safety Notice... - Page 54 EN 300 328-2:2000 EN 301 489-1:2000 EN 301 480-17:2000 EN 60950:2000 EN 50361:2001 The following is the required safety label that appears on the back panel of the MX6 RF terminal equipped with an 802.11 radio. MX6 User’s Guide E-EQ-MX6OGWW-A...
- Page 55 EN60950: 2000 business equipment The product carries the CE Mark: We, LXE Inc., declare that the equipment specified above complies with all Essential Health and Safety Requirements of the above Directives and Standards, as amended. Date of issue: October 20, 2003 Cyril A.
- Page 56 Safety of information technology equipment, including electrical business equipment The product carries the CE Mark: We, LXE Inc., declare that the equipment specified above complies with all Essential Health and Safety Requirements of the above Directives and Standards, as amended.
-
Page 57: Lithium Battery Safety Statement
Pila de litio adentro. Peligro de explosión si la pila se reemplaza incorrectamente. Reemplace solamente con el mismo tipo o equivalente recomendado por el fabricante. (ES) Oppassen: Bevat Lithium-batterij. Incorrrecte plaatsing van batterij kan leiden tot explosiegevaar. Alleen vervangen door hetzelfde of door fabrikant aanbevolen gelijkwaardig type. (NL) E-EQ-MX6OGWW-A MX6 User’s Guide... - Page 58 Regulatory Notices and Safety Information Lithium Battery Safety Statement (KR) (GR) (CN) (JP) Dikkat: İçinde lityum bataryası bulunur. (TR) Legend: Chinese Italian Danish Japanese Dutch Korean English Norwegian Finnish Portuguese French Spanish German Swedish Greek Turkish MX6 User’s Guide E-EQ-MX6OGWW-A...
-
Page 59: Index
Pixels..............22 Display Backlight ..........13 Display Backlight and the Power Off timers..30 Manuals, reference ..........1 Entering Data............19 Off Mode ............... 30 Environmental Specifications........2 ON Mode characteristics ........29 Operating Temperature..........2 E-EQ-MX6OGWW-A MX6 User’s Guide... - Page 60 .......... 16 Cleaning ............11 ScanWedge ............20 Single and Four Bay Docks........33 Soft Input Panel ............. 24 Soft Input Panel (SIP)..........23 Warm reset............... 8 Speaker volume, How to ........16 warning beeps............31 MX6 User’s Guide E-EQ-MX6OGWW-A...
Need help?
Do you have a question about the MX6 and is the answer not in the manual?
Questions and answers