Crestron TPMC-8X Operation Manual
Isys i/o 8.4” wifi touchpanel
Hide thumbs
Also See for TPMC-8X:
- Operations & installation manual (16 pages) ,
- Design manual (84 pages) ,
- Quick manual (60 pages)
Table of Contents
Advertisement
Advertisement
Table of Contents

Related Manuals for Crestron TPMC-8X


Summary of Contents for Crestron TPMC-8X
- Page 1 Crestron TPMC-8X ® Isys i/O 8.4” WiFi Touchpanel Operations Guide...
- Page 2 All brand names, product names and trademarks are the property of their respective owners. ® ® ® Windows , Windows XP and Windows Vista are registered trademarks of Microsoft Corporation in the United States and other countries. ©2009 Crestron Electronics, Inc.
-
Page 3: Table Of Contents
Further Inquiries ......................65 Future Updates ......................65 Appendix A: TPMC-8X Security Pack (Atheros) ..............66 Appendix B: TPMC-8X Security Pack (Intel PROSet) ............70 Appendix C: TPMC-8X Multi-Language Pack ..............75 Software License Agreement....................76 Return and Warranty Policies ....................78 Merchandise Returns / Repair Service .............. -
Page 5: Isys I/O 8.4" Wifi Touchpanel: Tpmc-8X
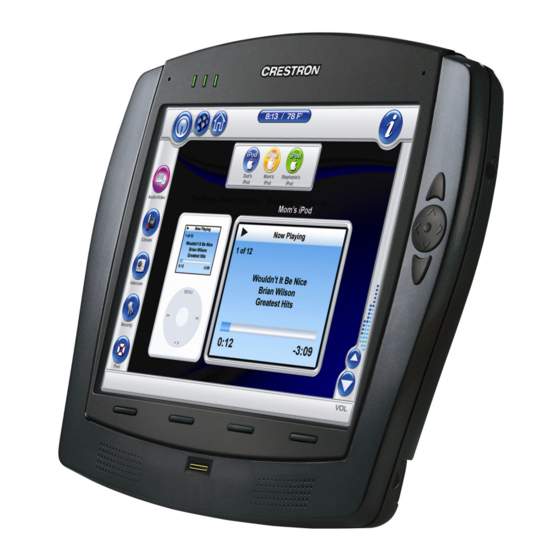
8.4” WiFi Touchpanel: TPMC-8X Introduction ® The Isys i/O TPMC-8X is a compact, stylish Wi-Fi touchpanel featuring the ® Windows XP Embedded OS to deliver a 2-way wireless control solution with blazingly fast performance and native capabilities for browsing the Internet, streaming multimedia and much more. - Page 6 Crestron TPMC-8X Advanced Ergonomics Incredibly thin and compact, the TPMC-8X is brilliantly designed to provide a powerful mobile control solution that is easy to hold and intuitive to use. Its magnesium alloy enclosure presents a sleek, modern appearance that is both rugged and lightweight.
- Page 7 In addition to the wide range of streaming video formats supported by its onboard media player applications, the TPMC-8X also features native support for video over IP from a variety of third-party Web cameras and servers using the motion-JPEG format.
-
Page 8: Specifications
® Isys i/O 8.4” WiFi Touchpanel Crestron TPMC-8X Specifications Specifications for the TPMC-8X are listed in the following table. TPMC-8X Specifications SPECIFICATION DETAILS Touchscreen Display Display Type TFT active matrix color LCD Size 8.4 inch (21.3 cm) diagonal Aspect Ratio... - Page 9 TCP/IP, UDP/IP, DHCP, IEEE 802.3U compliant Video Streaming/File Formats MPEG4 and MJPEG via Axis Media Control or Crestron MJPEG Viewer, plus all formats supported by the embedded media player applications Audio Hardware Features Dual onboard microphones, built-in stereo...
- Page 10 7. Refer to “Identity Code” on page 12 for details. 8. The latest software versions can be obtained from the Crestron website. Refer to the NOTE following these footnotes. 9. Crestron 2-Series control systems include the AV2 and PRO2. Consult the latest Crestron Product Catalog for a complete list of 2-Series control systems.
-
Page 11: Physical Description
Physical Description This section provides information on the connections, controls and indicators available on your TPMC-8X. TPMC-8X Physical View TPMC-8X Physical View (on optional TPMC-8X-DS Desktop Docking Station/Charger) ® 8.4” WiFi Touchpanel: TPMC-8X • 7 Operations Guide – DOC. 6539C... - Page 12 ® Isys i/O 8.4” WiFi Touchpanel Crestron TPMC-8X TPMC-8X Overall Dimensions (shown with optional TPMC-8X-BTPE External Battery Pack attached) 1.67 in 0.92 in (4.24 cm) (2.32 cm) 9.69 in (24.60 cm) 8.21 in (20.85 cm) ® 8 • Isys i/O 8.4”...
- Page 13 (1) Recessed slide switch inside battery SWITCH compartment, shuts off battery for long term storage; refer to “Internal Battery Switch” on page (Continued on following page) ® 8.4” WiFi Touchpanel: TPMC-8X • 9 Operations Guide – DOC. 6539C Isys i/O...
- Page 14 TPMC-8X-DSW Docking Station/Charger CONNECTOR (sold separately) 1. Refer to website or contact Crestron for a current list of compatible devices and embedded applications. To ensure reliable performance, new device drivers and applications are available only from Crestron through firmware updates.
-
Page 15: Industry Compliance
Isys i/O 8.4” WiFi Touchpanel Industry Compliance As of the date of manufacture, the TPMC-8X has been tested and found to comply with specifications for CE marking and standards per EMC and Radiocommunications Compliance Labelling. Federal Communications Commission (FCC) Compliance Statement This device complies with part 15 of the FCC rules. -
Page 16: Setup
The IP ID is set within the TPMC-8X’s table using Crestron Toolbox™. For information on setting an IP table, refer to the Crestron Toolbox help file. The IP IDs of multiple TPMC-8X devices in the same system must be unique. -
Page 17: Configuring The Touchpanel
“Security” window. Refer to “Security” on page 15 for more information. 4. When the “TPMC-8X Debug Output” window appears (shown below), select Project | Enter Setup Mode to enter the setup menu (refer to “Setup Menu Details” which starts on page 15). - Page 18 “Preparing to Load Project” message. Maintain touch until after the countdown, when the message will change to “Loading Setup Screen”. ® 14 • Isys i/O 8.4” WiFi Touchpanel: TPMC-8X Operations Guide – DOC. 6539C...
- Page 19 NOTE: To use the on-screen keyboard for security settings, touch Keyboard on the setup menu before touching Security. “Security Setup” Window ® 8.4” WiFi Touchpanel: TPMC-8X • 15 Operations Guide – DOC. 6539C Isys i/O...
- Page 20 The Certificates button can be used to install or uninstall certificates used for server and/or user authentication when making a secure connection (for example, to a secured wireless access point). In order to use certificates, the TPMC-8X Security ® 16 • Isys i/O 8.4”...
-
Page 21: Touch Screen
8.4” WiFi Touchpanel Pack must be installed (refer to “Appendix A: TPMC-8X Security Pack (Atheros)” which starts on page 66 or “Appendix B: TPMC-8X Security Pack (Intel PROSet)” which starts on page 70 for details). Touch Close to return to the setup menu. - Page 22 8.4” WiFi Touchpanel Crestron TPMC-8X NOTE: Projects can also be loaded via Crestron Toolbox. NOTE: If External is checked, the display list cannot be viewed via Crestron Toolbox. “Project and Firmware” Window (Project Tab) The Firmware tab of the “Project and Firmware” window (refer to illustration below) displays the Current Loaded Firmware and also has a Load New Firmware section.
- Page 23 The key click sound can be enabled or disabled with the Key Click On and Off radio buttons. When connected to the (optional) TPMC-8X-DSW docking station, the Audio Output section of the window provides radio buttons for selection of internal or external speakers.
- Page 24 (child windows) that open when you are in Internet Explorer (not the popup windows of the embedded applications). NOTE: Refer to the Crestron website (www.crestron.com), online help Answer ID 4190, for information on the latest versions of the software. Touch Close after all changes have been made. The touchpanel must be rebooted for changes to take effect.
- Page 25 NOTE: Save & Reboot on the setup menu must be selected for Embedded Apps changes to take effect. NOTE: While browsing the Internet with the TPMC-8X, clicking on a link may cause a message box titled "Restrictions" to appear that contains the text "This operation has been cancelled due to restrictions in effect on this computer.
- Page 26 “Biometric Configuration Properties” Window (Users) From the Users tab, touch Add (in the upper half of the window) to start the “Add New User Wizard”. ® 22 • Isys i/O 8.4” WiFi Touchpanel: TPMC-8X Operations Guide – DOC. 6539C...
- Page 27 Only one User ID should be used per person. “Add New User Wizard” Second Window At the next window, touch Start Enrollment. ® 8.4” WiFi Touchpanel: TPMC-8X • 23 Operations Guide – DOC. 6539C Isys i/O...
- Page 28 “Add New User Wizard” Window - Showing Scanned Fingerprint When scanning is complete you will see an “Enrollment Complete”. Touch Next to proceed. ® 24 • Isys i/O 8.4” WiFi Touchpanel: TPMC-8X Operations Guide – DOC. 6539C...
- Page 29 “Add New User Wizard” Window - Showing Options After Scanning To scan another finger, touch Swipe Another Finger. When done, touch Finish to return to the “Biometric Configuration Properties” window. ® 8.4” WiFi Touchpanel: TPMC-8X • 25 Operations Guide – DOC. 6539C Isys i/O...
- Page 30 “User Biometric Information” Window You can also touch Test to open the “Biometric Information” window, to practice finger swipes and verify identities. (Refer to illustration on the following page.) ® 26 • Isys i/O 8.4” WiFi Touchpanel: TPMC-8X Operations Guide – DOC. 6539C...
- Page 31 “Biometric Information” Window - Showing Match Found If the finger swipe does not match one in the touchpanel’s database, it will show an “Identification No Match Found” message. ® 8.4” WiFi Touchpanel: TPMC-8X • 27 Operations Guide – DOC. 6539C Isys i/O...
- Page 32 Touch OK at any time to return to the “Biometric Configuration Properties” window. From the Categories tab of the “Biometric Configuration Properties” window, you can add, edit or remove categories. ® 28 • Isys i/O 8.4” WiFi Touchpanel: TPMC-8X Operations Guide – DOC. 6539C...
- Page 33 Touch OK to accept (or touch CANCEL to cancel) and return to the “Biometric Configuration Properties” window. From the Events tab of the “Biometric Configuration Properties” window, you can add, edit or remove events. ® 8.4” WiFi Touchpanel: TPMC-8X • 29 Operations Guide – DOC. 6539C Isys i/O...
- Page 34 “Biometric Configuration Properties” Window (Events) Touching the down arrow will open a drop down list of events. “Biometric Configuration Properties” Window - Showing Event List (Events) ® 30 • Isys i/O 8.4” WiFi Touchpanel: TPMC-8X Operations Guide – DOC. 6539C...
- Page 35 (for example, too short). Crestron Toolbox includes a utility that will allow the database from one TPMC-8X to be shared with another, by backing up the database from one touchpanel and restoring it to another.
- Page 36 By default, hard key number 4 will release the touchpanel from the (optional) TPMC-8X-DSW docking station. Buttons are programmed using VT Pro-e. Touch Close to return to the setup menu. “Hard Buttons” Window ® 32 • Isys i/O 8.4” WiFi Touchpanel: TPMC-8X Operations Guide – DOC. 6539C...
- Page 37 1, a reserve join number in VT Pro-e or a device extender in SIMPL Windows. ® 8.4” WiFi Touchpanel: TPMC-8X • 33 Operations Guide – DOC. 6539C Isys i/O...
- Page 38 Reset CTP Port resets the default value of the CTP port to 41795, for terminal connection using Crestron Toolbox. To configure the appearance of popup messages and passcode messages, touch Configure Messages. The “Message Configurations Properties” window will open. ® 34 • Isys i/O 8.4” WiFi Touchpanel: TPMC-8X Operations Guide – DOC. 6539C...
- Page 39 Connected: A green popup message appears when the panel is connected to the control system. • Checking Connection: A yellow popup message appears when the panel is experiencing network issues. ® 8.4” WiFi Touchpanel: TPMC-8X • 35 Operations Guide – DOC. 6539C Isys i/O...
- Page 40 The Colors controls allow you to determine background and text color of passcode messages, which will appear when releasing the touchpanel from the (optional) TPMC-8X-DSW docking station (refer to “Docking Station Status Details” which starts on page 45 for details).
- Page 41 NOTE: The adapter listed in the “Ethernet Setup” window will depend on which adapter came with your TPMC-8X. Either an Atheros or Intel PRO will be displayed, as shown in the illustration below and the one on the following page.
- Page 42 “Ethernet Setup” Window (Intel PRO) NOTE: The “ASIX AX88772 USB 2.0 to Fast Ethernet Adapter” line in the “Ethernet Setup” window is seen only when the TPMC-8X is mounted on the optional (TPMC-8X-DS) Docking Station/Charger. NOTE: When the TPMC-8X is mounted on the optional Docking Station/Charger and the wired LAN connection is used, the touchpanel auto-switches to wired Ethernet communications.
- Page 43 From here you can add or remove wireless access points (WAPs) or routers. To view wireless networks being accessed or scan for access points, touch View Wireless Networks to view the “Wireless Network Connection” window. ® 8.4” WiFi Touchpanel: TPMC-8X • 39 Operations Guide – DOC. 6539C Isys i/O...
- Page 44 “Wireless Network Connection” Window Touch Refresh network list to scan for available access points. The TPMC-8X is already configured for DHCP. To establish static processing or to switch between DHCP and static IP, use the General tab of the “Wireless Network Connection Properties”...
- Page 45 “Network (your network name) Properties” Window 2. With Data encryption set to WEP, select Open from the Network Authentication dropdown list. 3. Enter and confirm the Network key. 4. Touch OK. ® 8.4” WiFi Touchpanel: TPMC-8X • 41 Operations Guide – DOC. 6539C Isys i/O...
- Page 46 The touchpanel can communicate with multiple control systems. For more information on IP tables, refer to the latest version of the Crestron 2-Series Control Systems Reference Guide (Doc. 6256), which is available from the Crestron website (www.crestron.com/manuals).
- Page 47 The hostname may be used when transferring a program over Ethernet using Crestron Toolbox. This window permits editing of the hostname and workgroup. “Network ID” Window NOTE: The hostname is required for Ethernet communication.
- Page 48 Up and Down buttons to set the Power Down from 0 through 120 minutes, where 0 disables the timeout. The power button (on the left side of the TPMC-8X) can also be used to manually put the touchpanel into power down mode. Press and release the power button to enter power down mode.
- Page 49 The WiFi Status section of the setup menu contains a bar graph showing the strength of the WiFi signal as well as an indicator to show when the TPMC-8X is communicating with a wireless access point (AP). SSID, BSSID, IP and MAC addresses are also shown.
- Page 50 Touch Exit to leave the setup menu and return to the project. If no project has been loaded, the touchpanel will display an error message and return to the setup menu. ® 46 • Isys i/O 8.4” WiFi Touchpanel: TPMC-8X Operations Guide – DOC. 6539C...
-
Page 51: Hardware Hookup
8.4” WiFi Touchpanel Hardware Hookup Ventilation The TPMC-8X should be used in a well-ventilated area. To prevent overheating, do not operate this product in an area that exceeds the environmental temperature range listed in the table of specifications. Connect the Device When making connections to the TPMC-8X, consider the following: •... -
Page 52: Recommended Cleaning
Therefore, apply cleaning solution to the cloth rather than the surface of the touchscreen. Wipe touchscreen clean and avoid getting moisture beneath the bezels. ® 48 • Isys i/O 8.4” WiFi Touchpanel: TPMC-8X Operations Guide – DOC. 6539C... -
Page 53: Programming Software
Have a question or comment about Crestron software? Answers to frequently asked questions (FAQs) can be viewed in the Online Help section of the Crestron website. To post a question or view questions you have submitted to Crestron’s True Blue Support, log in at http://support.crestron.com. - Page 54 IP ID as shown in the following illustration. C2Net Device, Slot 8 • Additional TPMC-8X devices are assigned different IP ID numbers as they are added. • If necessary, double click a device to open the “Device Settings” window and change the IP ID, as shown in the following figure.
-
Page 55: Programming With Visiontools Pro-E
There are no special programming requirements to use the functions of the TPMC-8X in a room-control system. Multi-Mode Objects Multi-mode objects offer high-... - Page 56 Pre-recorded WAV files for voice prompts and responses are available from Crestron. These files can be stored into and programmed for use in the touchpanel directly or may be edited with the Sound Recorder. For example, the individual files can be combined to create custom messages.
- Page 57 Properties” windows in VT-Pro-e. Refer to the following illustrations. VT Pro-e “Page Properties” Window – Bit Depth Selection VT Pro-e “Image Properties” Window – Bit Depth Selection ® 8.4” WiFi Touchpanel: TPMC-8X • 53 Operations Guide – DOC. 6539C Isys i/O...
-
Page 58: Embedded Applications
The embedded applications have the following features: • All embedded applications listed in the VT Pro-e ProjectView workspace are created by default for a new TPMC-8X project. • All applications are created at project-level – one instance per project. •... -
Page 59: Defaults For Embedded Windows Applications
Use the Default Path text box in the “Embedded Applications Properties” window to enter the default document for the application. Edit the Default Position and Size in the “Embedded Application Properties” window to point to your new location. ® 8.4” WiFi Touchpanel: TPMC-8X • 55 Operations Guide – DOC. 6539C Isys i/O... -
Page 60: Programming Embedded Windows Applications
Digital Join.” The feedback signal of the Open/Close State Digital Join is used to Open/Close the application. In this example, when fb11 goes high, Internet Explorer opens, and when fb11 goes low, Internet Explorer closes. However, since the ® 56 • Isys i/O 8.4” WiFi Touchpanel: TPMC-8X Operations Guide – DOC. 6539C... -
Page 61: Example Program
One-Shot to reset the state of the Toggle symbol. Now the toggle is properly synchronized if the user closes the application from the panel itself. Example Program An example program for the TPMC-8X is available from the Crestron website (www.crestron.com/exampleprograms). ®... -
Page 62: Uploading And Upgrading
ETHERNET STATION/CHARGER) The TPMC-8X connects to PC via Ethernet: 1. Enter the IP address, Subnet mask and Default gateway of the TPMC-8X in the “Internet Protocol (TCP/IP) Properties” window (refer to “Ethernet Details” which starts on page 37). 2. Confirm Ethernet connections between TPMC-8X and PC. -
Page 63: Program Checks
Be sure to use the Crestron Toolbox to create the TPMC-8X IP table. 1. Select Functions | IP Table Setup. 2. Add, modify or delete entries in the IP table. The TPMC-8X can have only one IP table entry. 3. A defined IP table can be saved to a file or sent to the device. -
Page 64: Operation
(TPMC-8X-DS) when it is connected to AC power or by connecting the TPMC-8X to the optional Wall Mount Docking Station/Charger (TPMC-8X-DSW). The TPMC-8X has four power modes: On, Standby, Power Down and Off. Refer to the following table for details. -
Page 65: Charging The Internal Battery
5. Viruses that attack web/FTP servers The TPMC-8X does not run a web or FTP server and is therefore not listening to port 21 or 80. The only ports the system listens to are the ports registered to Crestron. - Page 66 The TPMC-8X has ActiveX disabled and has no Java Virtual Machine installed. These applets cannot run on the TPMC-8X. NOTE: While browsing the Internet with the TPMC-8X, clicking on a link may cause a message box titled "Restrictions" to appear that contains the text "This operation has been cancelled due to restrictions in effect on this computer.
-
Page 67: Problem Solving
Crestron TPMC-8X Isys i/O 8.4” WiFi Touchpanel Problem Solving Troubleshooting The following table provides corrective action for possible trouble situations. If further assistance is required, please contact a Crestron customer service representative. TPMC-8X Troubleshooting TROUBLE POSSIBLE CAUSE(S) CORRECTIVE ACTION Touchpanel does... -
Page 68: Reference Documents
Reference Documents The latest version of all documents mentioned within the guide can be obtained from the Crestron website (www.crestron.com/manuals). This link will provide a list of product manuals arranged in alphabetical order by model number. List of Related Reference Documents... -
Page 69: Further Inquiries
Crestron's award winning customer service team by calling Crestron at 1-888-CRESTRON [1-888-273-7876]. You can also log onto the online help section of the Crestron website (www.crestron.com/onlinehelp) to ask questions about Crestron products. First-time users will need to establish a user account to fully benefit from all available features. -
Page 70: Appendix A: Tpmc-8X Security Pack (Atheros)
Atheros Client configuration utility. The Security Pack is available as a special firmware build (TPMC-8X_SP_1.4.zip or later) for the TPMC-8X. For details on how to upgrade firmware, refer to “Programs, Projects and Firmware” which starts on page 58. - Page 71 “Profile Management” Window (General) Enter a name for the profile in Profile Name and the name of your wireless network in SSID1. Then, touch the Security tab. ® 8.4” WiFi Touchpanel: TPMC-8X • 67 Operations Guide – DOC. 6539C Isys i/O...
- Page 72 WPA/WPA2 EAP Type or 802.1x EAP Type, will become enabled. Use the drop down box to make your selection, then touch Configure…. “Configure PEAP” Window ® 68 • Isys i/O 8.4” WiFi Touchpanel: TPMC-8X Operations Guide – DOC. 6539C...
- Page 73 With the Profile Management tab selected, the window will display the new entry. Select the entry within the window and touch Activate. To complete the process, close this window using the “X” in the upper right corner. ® 8.4” WiFi Touchpanel: TPMC-8X • 69 Operations Guide – DOC. 6539C Isys i/O...
-
Page 74: Appendix B: Tpmc-8X Security Pack (Intel Proset)
Intel PROSet Wireless configuration utility. The Security Pack is available as a special firmware build (TPMC-8X_SP_1.4.zip or later) for the TPMC-8X. For details on how to upgrade firmware, refer to “Programs, Projects and Firmware” which starts on page 58. - Page 75 Crestron TPMC-8X Isys i/O 8.4” WiFi Touchpanel “Profiles” Window Touch Add… to open the “Create Wireless Profile” window’s “General Settings”. “Create Wireless Profile” Window (General Settings) ® 8.4” WiFi Touchpanel: TPMC-8X • 71 Operations Guide – DOC. 6539C Isys i/O...
- Page 76 Enter a User Name, Domain and Password. The Roaming Identity should match the Domain. Then touch Next >> to proceed to the second “Security Settings” window. ® 72 • Isys i/O 8.4” WiFi Touchpanel: TPMC-8X Operations Guide – DOC. 6539C...
- Page 77 The “Profiles” window will now show your authenticated access point. “Profiles” Window - Showing Authenticated Access Point Touch Close to complete the process. ® The “Intel PROSet/Wireless” window will now show the connection. ® 8.4” WiFi Touchpanel: TPMC-8X • 73 Operations Guide – DOC. 6539C Isys i/O...
- Page 78 ® Isys i/O 8.4” WiFi Touchpanel Crestron TPMC-8X ® “Intel PROSet/Wireless” Window - Showing Connection ® 74 • Isys i/O 8.4” WiFi Touchpanel: TPMC-8X Operations Guide – DOC. 6539C...
-
Page 79: Appendix C: Tpmc-8X Multi-Language Pack
Appendix C: TPMC-8X Multi-Language Pack The TPMC-8X Multi-Language Pack adds support for 32 international languages in addition to the default English language support in the TPMC-8X. This allows the user to view documents written in those languages by all the embedded apps in the touchpanel. -
Page 80: Software License Agreement
This Agreement may only be modified by a writing signed by an authorized officer of Crestron. Updates may be licensed to You by Crestron with additional or different terms. This is the entire agreement between Crestron and You relating to the Software and it supersedes any prior representations, discussions, undertakings, communications or advertising relating to the Software. - Page 81 “applets” incorporated into the Software), the accompanying media and printed materials and any copies of the Software are owned by Crestron or its suppliers. The Software is protected by copyright laws and international treaty provisions. Therefore, you must treat the Software like any other copyrighted material, subject to the provisions of this Agreement.
-
Page 82: Return And Warranty Policies
Purchasers should inquire of the dealer regarding the nature and extent of the dealer's warranty, if any. CRESTRON shall not be liable to honor the terms of this warranty if the product has been used in any application other than that for which it was intended or if it has been subjected to misuse, accidental damage, modification or improper installation procedures. -
Page 83: Microsoft® Windows Xp ® Embedded End User License Agreement
Restricted Functionality. You are licensed to use the SOFTWARE to provide only the limited functionality (specific tasks or processes) for which the DEVICE has been designed and marketed by Crestron. This license specifically prohibits any other use of the SOFTWARE, or inclusion of additional software programs or functions, on the DEVICE. Subject to the terms of the “Limited Use of Particular Services”... - Page 84 Services tool. You may use the Remote Boot Installation Services tool only to deploy the SOFTWARE to one or more DEVICEs on which you are licensed to run the SOFTWARE (i.e. DEVICEs to which the appropriate Certificate of Authenticity is affixed). Please refer to the DEVICE documentation, if provided with your DEVICE, or contact Crestron for additional information.
- Page 85 ® Crestron TPMC-8X Isys i/O 8.4” WiFi Touchpanel This page is intentionally left blank. ® 8.4” WiFi Touchpanel: TPMC-8X • 81 Operations Guide – DOC. 6539C Isys i/O...
- Page 86 Crestron Electronics, Inc. Operations Guide – DOC. 6539C 15 Volvo Drive Rockleigh, NJ 07647 (2016825) Tel: 888.CRESTRON 06.09 Fax: 201.767.7576 Specifications subject to www.crestron.com change without notice.
Need help?
Do you have a question about the TPMC-8X and is the answer not in the manual?
Questions and answers