Table of Contents
Advertisement
Quick Links
Download this manual
See also:
Instruction Manual
Advertisement
Table of Contents

Related Manuals for Datavideo DN-600


Summary of Contents for Datavideo DN-600
-
Page 1: Quick Start Guide
HD/SD Recorder DN-600 Quick Start Guide www.datavideo-tek.com - 1 -... -
Page 2: Table Of Contents
Table of contents Warnings and Precautions ..........................- 3 - Warranty ................................ - 4 - Disposal ................................. - 4 - Packing List: ..............................- 5 - Outline and Features ............................. - 6 - How to mount 2.5" hard drive into removable caddy..................- 7 - Connections &... -
Page 3: Warnings And Precautions
7. This product should only be operated from the type of power source indicated on the marking label of the AC adapter. If you are not sure of the type of power available, consult your Datavideo dealer or your local power company. -
Page 4: Warranty
Equipment that fails after the warranty period, has been operated or installed in a manner other than that specified by Datavideo, or has been subjected to abuse or modification, will be repaired for time and material charges at the Buyer’s expense. -
Page 5: Packing List
Packing List: The following items should be included in the box. If any items are missing please contact your supplier. Power Supply (12V 1.5A) 2.5” Removable HDD Enclosure USB mini to standard USB (Y type) M3 X 4 m/m Screws 2.0 X 6 m/m Screws Label Quick Start Guide... -
Page 6: Outline And Features
DN-600 is available in recording times ranging from 3 to 9 hours per drive. DN-600 can be used in a docking bay for PC, stand-alone as portable media device, or with any of the PC interface adapters offered. ... -
Page 7: How To Mount 2.5" Hard Drive Into Removable Caddy
How to mount 2.5" hard drive into removable caddy. N.B Hard Drive Support. At the time of writing this manual the largest capacity HDD tested with the DN-600 is the WD3200BEVT Western Digital 320GB. For up to date information about HDD compatibility contact your local Datavideo Office If your DN-600 does not come with a hard drive pre-fitted in the caddy please follow these instructions to fit your own drive. -
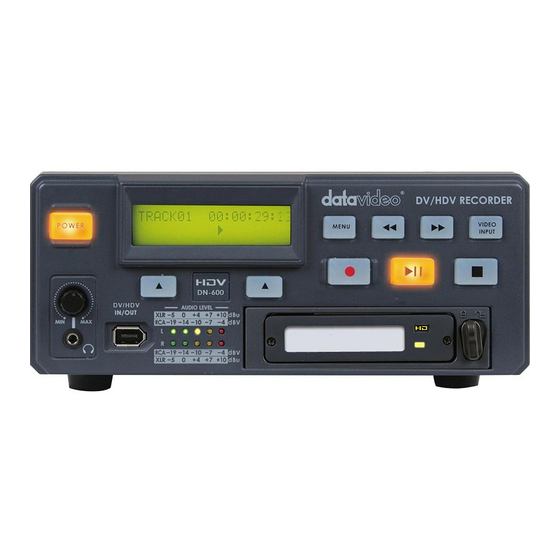
Page 8: Connections & Controls
Use this button to start navigating as well as exiting the various options offered by DN-600. The functions are called out in the bottom two rows of the LCD. Stepping through options is done by following the directions set in the LCD annotations. - Page 9 Record In Idle Mode, pressing the 'PLAY' while the 'REC' button is held down will make the unit ready to record. Play / Pause From the Stop or Idle mode, pressing the 'PLAY' button plays back video from the selected bin. While playing, pressing the 'PLAY' button will toggle between 'PLAY' and 'PAUSE'.
-
Page 10: Rear Panel
Rear Panel GPI IN The GPI socket can be used for simple external control. The DN-600 can accept pulse or level trigger inputs, which can trigger record or playback and pause commands RS-232 Used to remotely control the DN-600. Composite Video input & output The connection is composite video input. -
Page 11: Providing Power
Move the power switch to the ON position. The DN-600 will turn on and will wait for 5 seconds for you to press the Menu key to go into HDD mode, after the wait period it will go into the VTR mode. -
Page 12: Menu Navigation
Menu Navigation Main Level From the Idle or Start-up display, pressing the Menu key will enter the first level of options; these options are the most commonly used ones. The lower three lines will look as below: menu = exit MAKE MEDIA FILES ENTER NEXT... - Page 13 Record Setup Level Entered from the Main Level, this set of options enable various record related parameters and modes to be setup. The lower three lines will look as below: menu = exit RECORD SETUP ENTER NEXT There are 8 options and they are: SET RECORD FILE TYPE SYNCtoTAPE CONTROL SET RECORD DATE...
- Page 14 Play Setup Level Entered from the Main Level, this set of options enable various play related parameters and modes to be setup. The lower three lines will look as below: menu = exit PLAY SETUP ENTER NEXT There are 2 options and they are: SET LOOP PLAY PWR ON AUTO PLAY Pressing the Next key will bring up the next option down on the list and will return to the top option from the...
- Page 15 Allows the user to update the firmware of the recorder, provided a proper file has been loaded on the DN-600. SET GPI TRIGGER MODE The GPI socket can be used for simple external control. The DN-600 can accept pulse or level trigger inputs, which can trigger record or playback and pause commands.
-
Page 16: General Setup
Empty the current or all bins The DN-600 is primarily a capture device, as opposed to an archiving device, and it is best to start out with a fresh DN-600. Emptying (erasing) ALL bins will not only clear the DN-600 at once but it will also conveniently reset the file system. - Page 17 Set the file type: A choice must be made for the eventual file type of choice should you want to connect the DN-600 in the HDD mode to your computer and drag and drop your video content as files. The choices for DV are Microsoft .avi type II, Canopus .avi type II, both commonly used in PCs, .mov, the QuickTime format used in Macs and...
-
Page 18: Playback
Playing setup Set up loop play When loop play is enabled and the last frame of the last clip is reached the DN-600 will start playing over from the first frame of the first clip with no time lost. Power on auto play When this option is enabled the DN-600 will begin playing immediately when powered up in the VTR mode. -
Page 19: Hdd Mode
General The HDD mode is the mode where the DN-600 appears to the computer as a Hard Disk Drive and not as a VTR. The connection to the computer is done via the IEE-1394 connector. The HDD mode is entered by pressing the Menu key within the 5 seconds after the DN-600 is powered on. -
Page 20: Rs-232 Controller Command Set
RS-232 Controller Command Set - 20 -... - Page 21 - 21 -...
-
Page 22: Dimension
Dimension - 22 -... -
Page 23: Specifications
Specifications Analog Video Inputs Composite video 1.0Vp-p, 75 Ohms internally terminated Analog Video Outputs Composite video 1.0Vp-p, must be terminated Audio • Bandwidth 20~20KHz < +/- 3dB • S/N Ratio > • THD. < 0.15% Time Code In SMPTE, 0.5V to 5.0V p-p, BNC Digital Video In/Out IEEE-1394, 400Mbps max, 6-pin GPI Trigger... -
Page 24: Service & Support
It is our goal to make your products ownership a satisfying experience. Our supporting staff is available to assist you in setting up and operating your system. Please refer to our web site www.datavideo-tek.com for answers to common questions, support requests or contact your local office below.
Need help?
Do you have a question about the DN-600 and is the answer not in the manual?
Questions and answers