
Related Manuals for Lantronix SCSxx05


Summary of Contents for Lantronix SCSxx05
-
Page 1: User Guide
SCSxx05/SCSxx20 Secure Console Server User Guide Models SCS3205, SCS4805, SCS820, SCS1620 with Firmware v4.3 and later Part No. 900-287 Rev. D April 2004... -
Page 2: Linux Gpl Compliance
Copyright & Trademark © 2003, Lantronix. All rights reserved. No part of the contents of this book may be transmitted or reproduced in any form or by any means without the written permission of Lantronix. Printed in the United States of America. -
Page 3: Disclaimer & Revisions
Changes or modifications to this device not explicitly approved by Lantronix will void the user's authority to operate this device. The information in this guide may change without notice. The manufacturer assumes no responsibility for any errors that may appear in this guide. -
Page 4: Safety Precautions
Safety Precautions Please follow the safety precautions described below when installing and operating the SCSxx05/SCSxx20 Secure Console Server. Cover Do not remove the cover of the chassis. There are no user-serviceable parts inside. Opening or removing the cover may expose you to dangerous voltage that could cause fire or electric shock. -
Page 5: Precauciones De Seguridad
Precauciones de seguridad Al instalar y utilizar el servidor seguro de consola SCSxx05/SCSxx20, observe las precauciones de seguridad que se describen a continuación. Tapa No retire la tapa del chasis. En el interior no hay ninguna pieza que el usuario deba manipular. Abrir o retirar la tapa puede exponer al usuario a tensiones peligrosas que pueden causar fuego o electrocución. - Page 6 à un risque d’électrocution ou d’incendie. Confiez toute opération d'entretien ou de dépannage à du personnel agréé par Lantronix. Personnel d’entretien : Respectez les instructions relatives à la mise au rebut des batteries usagées. Il y a risque d’explosion si la batterie est remplacée par une autre batterie de type incorrect.
- Page 7 RS-232C). Sicherheitshinweise Beachten Sie bei der Installation und beim Betrieb des Secure Console Server SCSxx05/SCSxx20 die nachstehenden Sicherheitshinweise. Abdeckung Nehmen Sie nicht die Abdeckung des Gehäuses ab. Im Gerät befinden sich keine vom Benutzer wartbaren Teile. Durch Öffnen oder Entfernen der Abdeckung können Sie gefährlichen Spannungen ausgesetzt...
- Page 8 Schließen Sie den Konsolenport nur an Geräte mit seriellen Ports an, die EIA-232 (früher RS-232C) unterstützen. Меры предосторожности При установке и эксплуатации защищенного консольного сервера (Secure Console Server) SCSxx05/SCSxx20 соблюдайте описанные ниже меры предосторожности. Крышка Не снимайте крышку с рамы. Внутри нет деталей, которые должны...
- Page 9 Используйте только шнур питания, у которого номинальные значения напряжения и тока превышают номинальные значения напряжения и тока, указанные на устройстве. Установите устройство вблизи розетки переменного тока, к которой имеется легкий доступ. Всегда подсоединяйте любое оборудование, используемое вместе с изделием, к заземленным источникам питания с правильной электропроводкой.
- Page 14 xiii...
-
Page 16: Table Of Contents
LINUX GPL Compliance _______________________________________________________ i Contacts ___________________________________________________________________ i Disclaimer & Revisions ________________________________________________________ ii Safety Precautions _____________________________________________________ iii 1: Introduction ___________________________________________________ 1-1 SCSxx05 and SCSxx20_________________________________________________ 1-1 Hardware Features ____________________________________________________ 1-3 System Features ______________________________________________________ 1-4 Protocol Support ______________________________________________________ 1-4 System Components ___________________________________________________ 1-5... - Page 17 Connecting Using Telnet or Your Serial Terminal _____________________________ 4-2 Logging in as System Administrator _______________________________________ 4-2 Accessing the Setup Menu ______________________________________________ 4-2 Navigating ________________________________________________________________ 4-3 Done Option ______________________________________________________________ 4-4 Configuring Hostname and IP Address _____________________________________ 4-4 Configuring Timezone __________________________________________________ 4-6 Configuring DNS ______________________________________________________ 4-8 Configuring Services ___________________________________________________ 4-9 Enabling/Disabling Web Configuration ____________________________________ 4-10...
- Page 18 7: System Administrator and User Functions __________________________ 7-1 System Administrator Functions __________________________________________ 7-1 Security and Passwords _____________________________________________________ 7-1 Changing the Sysadmin Password _____________________________________________ 7-1 Changing the Root Password _________________________________________________ 7-2 If You Misplace the Sysadmin Password ________________________________________ 7-3 User Access and Functions______________________________________________ 7-3 Network Port Access________________________________________________________ 7-3 Terminal Port Access _______________________________________________________ 7-4 Modem Module ____________________________________________________________ 7-4...
- Page 19 A: Unix Command Help ____________________________________________ A-1 less command _____________________________________________________________ A-1 vi Editor Commands ________________________________________________________ A-3 B: Hexadecimal Conversion Chart ___________________________________ B-1 C: Pinouts and Adapters ___________________________________________ C-1 SCSxx05 ____________________________________________________________C-2 SCSxx05 Pinouts __________________________________________________________C-2 SCSxx05 Adapters _________________________________________________________C-3 SCSxx20 ___________________________________________________________C-12 SCSxx20 Pinouts _________________________________________________________C-12 xviii...
- Page 20 SCSxx20 Adapters ________________________________________________________C-13 D: Compliance and Warranty Information _____________________________ D-1 Compliance Information (1) ______________________________________________D-1 Compliance Information (2) ______________________________________________D-3 Warranty ____________________________________________________________D-4...
-
Page 21: Scsxx05 And Scsxx20
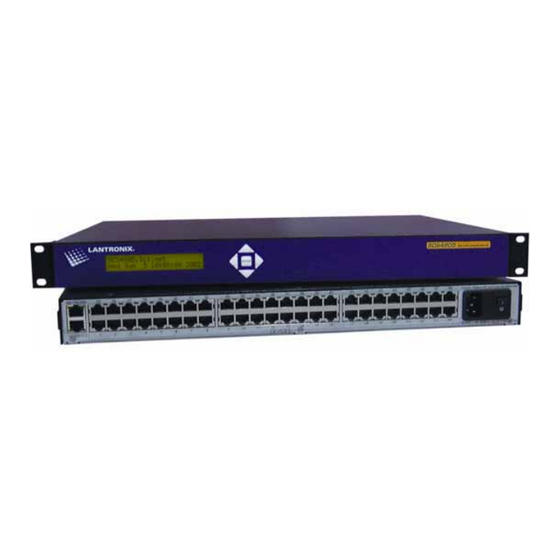
The Lantronix SCS family of Secure Console Servers enables IT professionals to remotely and securely configure and administer servers, routers, switches, telephone equipment, or other devices equipped with a serial port. This chapter introduces you to the Lantronix SCSxx05 and SCSxx20 products. It includes the following topics: Topic... - Page 22 SCSxx05/SCSxx20 User Guide 1: Introduction Figure 1-1. SCS4805 – 48 Device Ports, 1 Network Port, 1 Terminal Port, AC Powered This User Guide covers the following products: Model SCS820 - AC or DC Powered 8-Port Secure Console Server Model SCS1620 - AC or DC Powered 16-Port Secure Console Server...
-
Page 23: Hardware Features
SCSxx05/SCSxx20 User Guide 1: Introduction Figure 1-3. SCS1620A – 16 Device Ports, 1 Network Port, 1 Terminal Port, AC Powered Figure 1-4. SCS820 – 8 Device Ports, 1 Network Port, 1 Terminal Port, AC Powered Hardware Features 1U-tall (1.75 inches) rack-mountable secure console server... -
Page 24: System Features
Ability to Telnet to a serial port by IP address per port or by IP address and TCP port number Ability to work with an external modem (SCSxx05 and SCSxx20) and optional internal modem (SCSxx20) No unintentional break ever sent to attached servers (Solaris Ready Certified) Simultaneous access on the same port - "listen"... -
Page 25: System Components
All physical connections to the product are made to the rear panel using industry- standard cabling and connectors. All serial connections and network connections use conventional Category 5 (Cat5) cabling (RJ45 jacks). Required cables and adapters for certain servers, switches, and other products are available from Lantronix (see http://www.lantronix.com/.) Serial Devices... -
Page 26: Network
Both the SCSxx05 and the SCSxx20 can work with an external modem. Power Manager The SCSxx20 has an extra power manager port for connection to the Lantronix Power Control Unit (PCU8). However, any available device port may be used as the power manager port on the SCSxx05 and SCSxx20. -
Page 27: Device Port Buffer
SCSxx05/SCSxx20 User Guide 1: Introduction Device Port Buffer The SCS products support port data buffering of the messages on the system's device ports. Port buffers are enabled by default. 256K FIFO Buffer Each device port stores 256 KB (approximately 400 screens) of I/O data in a true FIFO buffer. -
Page 28: Technical Specifications
SCSxx05/SCSxx20 User Guide 1: Introduction Technical Specifications Table 1-1. SCSxx05 Technical Specifications CPU, Memory AMD SC520 133 MHz 128 MB FLASH Card Memory (non-volatile) 128MB RAM 256K FIFO Buffer RAM per Device Port Serial Interface RJ45-type 8-conductor connector (DTE default; configurable) -
Page 29: Product Information Label
SCSxx05/SCSxx20 User Guide 1: Introduction Table 1-2. SCSxx20 Technical Specifications CPU, Memory AMD SC520 133 MHz 128 MB FLASH Card Memory (non-volatile) 128MB RAM (includes 256K FIFO Buffer RAM per device port) Serial Interface RJ45-type 8-conductor connector (DCE default; configurable) -
Page 30: System Resource Information
SCSxx05/SCSxx20 User Guide 1: Introduction System Resource Information The SCS is programmable using OS-level commands and options. The system administrator configures the product using a command-line interface or one of several prepared scripts. Numerous resources on the Internet (and elsewhere) provide information about security options, programming tools and techniques, and configuration advice. -
Page 31: Physical Installation
This chapter provides instructions for installing the SCS. It includes the following topics: Topic Page Physical Installation Power Connecting a Terminal Connecting to a Device Port Connecting the Network Port Connecting the Modem Port (SCSxx20) Power Manager Interface Caution: To avoid physical and electrical hazards, please be sure to read Safety Precautions on page iii before installing the SCS. -
Page 32: Power
50/60 Hz. The power inlet to the chassis uses a conventional IEC-type cord set, which Lantronix provides. Rear-mounted IEC-type AC power connector(s) are provided for your universal AC power input. The SCSxx05 has a single supply/input, while the SCSxx20 has dual inputs and dual supplies. The power connector also houses a replaceable protective fuse and the on/off switch. -
Page 33: Connecting A Terminal
To connect a terminal: 1. Attach the Lantronix adapter to your terminal (use PN 200.2066A adapter for the SCSxx05 or PN 200.0066 for the SCSxx20 in most cases) or your PC's serial port (use PN 200.2070A adapter for the SCSxx05 or PN 200.0070 adapter for the SCSxx20). -
Page 34: Connecting To A Device Port
SCSxx05/SCSxx20 User Guide 2: Installation Connecting to a Device Port You can connect any device that has a serial console port to the SCS for consolidated remote administration. You can configure the device ports individually. The console port must support the RS-232C interface. Additionally, many servers must either have the serial port enabled as a console, or must have the keyboard and mouse detached. -
Page 35: Connecting The Network Port
SCSxx05/SCSxx20 User Guide 2: Installation Connecting the Network Port The SCS’s network port (10Base-T/100Base-TX) allows remote access to the attached devices and the system administrative functions. You must first set up the network parameters for the network port before you can reach the SCS remotely. -
Page 36: Power Manager Interface
Power Manager Interface The SCSxx20 has a dedicated port for the Lantronix PCU8 Power Control Unit. With the SCSxx05 (and the SCSxx20, if desired), you may use any available device port. The PCU8 uses a DB9 connector on its serial connector and requires a Part Number 200.0069 DB9 to RJ45 adapter for that connection. -
Page 37: 3: Quick Start
This chapter helps you get your IP network port up and running quickly, so you may administer the SCS using your network. There are two methods to quick start the network connections: You may use the front panel display and buttons, or You may use your existing IP network, accessing the default IP address Once you have identified your IP network parameters to the SCS, you can use your IP network connections to configure and administer it. -
Page 38: Method #1 - Using The Front Panel Display
SCSxx05/SCSxx20 User Guide 3: Quick Start Method #1 – Using the Front Panel Display You can use the front panel display and pushbuttons to set up the basic network interface. The system administrator can then access the SCS using your existing IP network. - Page 39 SCSxx05/SCSxx20 User Guide 3: Quick Start Figure 3-2. Front Panel Setup Options with Associated Parameters Normal Network Terminal Release Dates Time / Date Settings > IP Setting Settings System Timezone Subnet Mask Calendar Gateway DNS1 DNS2 DNS3 3. When the display shows the feature that you wish to edit, press the Enter key on the keypad to enter the editing mode.
-
Page 40: Method # 2- Using Telnet
SCSxx05/SCSxx20 User Guide 3: Quick Start Method # 2- Using Telnet You can use Telnet to connect to the SCS instead of using the terminal port if your workstation is configured to communicate with the default network settings of the SCS. The default IP address of the SCS is 10.0.0.1 with a subnet mask of 255.0.0.0. - Page 41 The setup command provides a text-based interface for administering the SCS. It requires VT100 terminal support using the keyboard (no mouse support). The setup command prompts the system administrator for appropriate entries to simplify the configuration process. The setup command runs automatically to initially configure the SCS;...
-
Page 42: Connecting Using Telnet Or Your Serial Terminal
SCSxx05/SCSxx20 User Guide 4: Configuration Topic Page Configuring Device Ports Updating Software 4-14 Using Done 4-16 Saving 4-17 Rebooting 4-17 Connecting Using Telnet or Your Serial Terminal If you are not already connected as described in Quick Start, you have two... -
Page 43: Navigating
SCSxx05/SCSxx20 User Guide 4: Configuration Figure 4-1. Setup (System Configuration) Program 2. To make changes to the system configuration, select Yes and press Enter. A setup (configuration) menu, including the available configuration options and a Done option, displays. (You must scroll down to see all of the menu options.) -
Page 44: Done Option
SCSxx05/SCSxx20 User Guide 4: Configuration Table 4-1. Setup Menu Navigation Action To select a menu option Use the up and down arrows on your keyboard (not on the numeric keypad) To select Yes or No Use the up and down arrows to move between Yes and No. - Page 45 The DNS domain name is determined from this answer. Answer: SCS4805 Be sure to include the domain name as well. In the following example, we add lantronix.com to the default factory name of SCS4805 to get SCS4805.lantronix.com. Hostname and IP Address Answer: SCS4805.lantronix.com...
-
Page 46: Configuring Timezone
SCSxx05/SCSxx20 User Guide 4: Configuration Ip Address in dot quad notation (e.g., 10.2.3.4) Answer: 172.20.201.28 8. Press Enter. The netmask prompt displays. 9. Enter the value of the netmask, in dot-quad notation. Hostname and IP Address What is the value for NETMASK? IP Netmask in dot quad notation (e.g., 255.255.255.0) - Page 47 SCSxx05/SCSxx20 User Guide 4: Configuration...
-
Page 48: Configuring Dns
SCSxx05/SCSxx20 User Guide 4: Configuration 4. At the end of the Timezone script, press Enter. The setup menu returns with Configure DNS selected. At this point, you may continue with the next setup menu item, you may use the arrow keys to select another item in the list, or you may arrow down to Done to exit the setup script. -
Page 49: Configuring Services
SCSxx05/SCSxx20 User Guide 4: Configuration Configuring Services With this menu option, you enable or disable the following: Syslog (system logging) (default is enabled) System logins using SSH (default is disabled) System logins using Telnet (default is enabled) Simple Network Management Protocol (SNMP Agent) (default is disabled) 1. -
Page 50: Enabling/Disabling Web Configuration
SCSxx05/SCSxx20 User Guide 4: Configuration Enabling/Disabling Web Configuration The SCS offers a Web-based configuration interface, which you can only access through your browser using SSL (Secure Sockets Layer) (https://). The Web interface has most of the same options as the console-based setup routine and may be useful for updating configuration options after you complete the initial setup. -
Page 51: Configuring Email Relay
Enter. If you selected Yes, the Telnet timeout prompt displays. If you selected No, the setup menu returns with Configure Modem (SCSxx20) or Configure CHAP Secrets (SCSxx05) selected. 3. To cause an idle Telnet connection to be disconnected after a specified number of minutes, backspace over the existing value and enter a number between 1 and 30 (minutes). -
Page 52: Configuring Modem (Scsxx20 Only)
Configuring Modem (SCSxx20 Only) The internal modem is available, but optional, in the SCSxx20 products. The Configure Modem option does not display on the SCSxx05 setup menu. Note: You configure an external modem by enabling a port as an operator port... - Page 53 SCSxx05/SCSxx20 User Guide 4: Configuration 1. With Configure Modem selected, press Enter. The enable modem logins prompt displays. 2. Select Yes to enable or No (default) to disable modem logins. Enable Modem Logins? Do you want to enable logins on the Modem? This will allow PPP and TTY logins.
- Page 54 SCSxx05/SCSxx20 User Guide 4: Configuration 8. Select Yes to enable a direct PPP login, or No to disable a direct PPP login. Enable PPP Logins? Do you want to enable PPP logins? This will allow a direct PPP login without having to log into a user shell.
-
Page 55: Configuring Chap Secrets
SCSxx05/SCSxx20 User Guide 4: Configuration Configuring CHAP Secrets The SCSxx20 supports either CHAP or PAP, but not both. PAP is the default authentication method. The CHAP parameters include: Client Server Secret (password used for authentication; generated by the system administrator) IP address (acceptable local IP address) 1. -
Page 56: Configuring Pap Secrets
SCSxx05/SCSxx20 User Guide 4: Configuration Configuring PAP Secrets PAP is the default authentication method. The parameters include: Client Server Secret (password used for authentication; generated by the system administrator) IP address (acceptable local IP address) 1. With PAP Secrets on the setup menu selected, press Enter. The PAP secrets prompt displays. -
Page 57: Configuring Nis
SCSxx05/SCSxx20 User Guide 4: Configuration 1. With Configure User Authentication selected, press Enter. The User Authentication menu displays with Configure NIS selected. Figure 4-3. User Authentication Menu 2. Follow the instructions below for the method (NIS, LDAP, or RADIUS) you want to use. -
Page 58: Configuring Ldap
SCSxx05/SCSxx20 User Guide 4: Configuration 6. Enter the IP Address (in dot quad notation) of at least the NIS master server (required), and press Enter. The first slave server prompt displays. You may configure up to five NIS slave servers (SLAVE-1 through SLAVE-5). Slave server values are optional. -
Page 59: Configuring Radius
Configuring RADIUS If you are using the RADIUS option for authenticating users, you must: Enable RADIUS (default is disabled) Enter the IP address of a RADIUS server Enter the shared secret (text string that serves as a password between a RADIUS client and the SCS) Enter the timeout (server connection timeout) 1. -
Page 60: Done User Authentication
SCSxx05/SCSxx20 User Guide 4: Configuration 1. With Configure Global Port Permissions selected, press Enter. The direct mode permissions prompt displays. 2. If desired, enter a range and/or list of ports (for example, 1, 3, 5-7) to which the direct mode permissions will apply. - Page 61 SCSxx05/SCSxx20 User Guide 4: Configuration 1. With NFS Mount selected, press Enter. The NFS mount prompt displays. Enable NFS? Do you want to mount an NFS share from an NFS server? Do not use packet filtering (firewall) if you are using NFS...
-
Page 62: Configuring Firewall (Packet Filtering)
SCSxx05/SCSxx20 User Guide 4: Configuration Configuring Firewall (Packet Filtering) The SCS incorporates a packet filtering option (a "firewall"). (The Web configuration interface uses the term “Packet Filtering.”) Note: You must not use packet filtering (firewall) if you are using NFS or NIS, because it would filter out the NFS or NIS packets. -
Page 63: Configuring Device Ports
SCSxx05/SCSxx20 User Guide 4: Configuration 7. To enter the list of TCP Public Services that the SCS should support, edit the text-entry list from the choices indicated in the Answer field (ftp-data, ftp, SSH, telnet, www, and https). Firewall.conf What is the value for TCP_PUBLIC_SERVICES? This is the list of ports we allow TCP connections to. -
Page 64: Device Port Configuration Options
SCSxx05/SCSxx20 User Guide 4: Configuration Device Port Configuration Options You can configure the device ports for port identity (apply a relevant name) and for feature access and buffer logging. You can configure device ports (for departments, for identifying equipment types, or for any other reason) in any combination;... -
Page 65: Device Port Parameters
Stop bits (default is 1) Parity (default is None) Flow control (default is XON/XOFF) Port type (default is DTE for the SCSxx05 and DCE for the SCSxx20)) Inhibit buffering (default is no) Define a Group of Ports to Configure 1. Select Device Port Parameters and press Enter. - Page 66 SCSxx05/SCSxx20 User Guide 4: Configuration 3. In the Answer field, enter the number, range, or combination of ports to be administered. What device port do you want to configure? Input a device number, a device name, or a range. Examples of ranges:...
- Page 67 RTS/CTS 2. Press Enter. The port type prompt displays. Port Type Each SCSxx05 device port is factory configured as a DTE device, ad each SCSxx20 device port is factory configured as a DCE device. Note: Make sure to select DTE if you enabled an operator port or group of ports.
-
Page 68: Device Logging Parameters
SCSxx05/SCSxx20 User Guide 4: Configuration 1. Select Yes to disable buffering, or select No (default) to enable buffering. 2. Press Enter. You have two options: To go back and change any of your settings for this port or group of... - Page 69 SCSxx05/SCSxx20 User Guide 4: Configuration File Logging by Port This option includes the following parameters: Enable/disable (default is disabled) Number of files saved per port Log file path (can be NFS mounted) Log file size (in bytes) 1. With File Logging Port selected, press Enter. The log to file flag prompt displays.
- Page 70 SCSxx05/SCSxx20 User Guide 4: Configuration 7. Enter the desired log file size in bytes (2048 = 2K). The default is 2048 bytes. The amount of available memory limits the maximum size of the log file. 8. Press Enter. the Device Logging Parameters menu returns with Syslog Port Logging, selected.
- Page 71 SCSxx05/SCSxx20 User Guide 4: Configuration 3. Enter the number (digits) of bytes of data the port will receive after which the SCS will capture log data and send an email regarding this port. In most cases, the terminal (console) port of your device does not send any data unless there is an alarm condition.
-
Page 72: Done Device Ports
SCSxx05/SCSxx20 User Guide 4: Configuration 10. Press Enter. The email address prompt displays. 11. Enter the complete email address of the message recipient(s) for each device port(s). Each device port has its own recipient list. If you wish to enter more than one email address, separate the addresses with a single space. - Page 73 SCSxx05/SCSxx20 User Guide 4: Configuration 1. With Software Updates selected, press Enter. The protocol prompt displays. What is the value for PROTOCOL? Please enter ‘tftp’ or ‘ftp’ to select the server type that will be used to obtain Software update files and as the server type for configuration save and restore.
-
Page 74: Using Done
SCSxx05/SCSxx20 User Guide 4: Configuration 6. Enter the ftp user password and press Enter. The install software updates prompt displays. Input value for Install Software Update(s) Enter a space separated list of software update files to apply. They will be obtained from the server specified by SERVERIPADDR. -
Page 75: Saving
SCSxx05/SCSxx20 User Guide 4: Configuration Saving This SAVE command saves all changes and updates to non-volatile memory. The SCS automatically saves the programmed parameters after running the setup script for the first time only. After that, the system administrator must run SAVE manually, as follows: 1. -
Page 76: Accessing The Web Interface
172.20.201.245. Figure 5-1. IP Address of SCS in URL An SSL security alert displays. 2. Click Yes. 3. Enter the username sysadmin and your sysadmin password (default is PASS). 4. Click OK. The Lantronix Web Configuration Utility Main page displays. -
Page 77: Web Configuration Utility Main Page
SCSxx05/SCSxx20 User Guide 5: Web Interface Web Configuration Utility Main Page The Web Configuration Utility allows the system administrator to configure the SCS, much like the setup script does via a network or terminal connection. Figure 5-2. The SCS Web Configuration Utility Main Page This section of the User Guide does not show each window, which are self- explanatory. -
Page 78: Web Access Delay
SCSxx05/SCSxx20 User Guide 5: Web Interface Table 5-1. Links to Setup Menu Parameters Parameter Link Page Network Configuring Hostname and IP Address Timezone Configuring Timezone Configuring DNS Services Configuring Services Configuring NTP 4-10 Email Relay Configuring Email Relay 4-11 Timeouts... -
Page 79: Saving Web Interface Entries
SCSxx05/SCSxx20 User Guide 5: Web Interface Saving Web Interface Entries Figure 5-6. Buttons at Bottom of Web Utility Configuration Page Apply Changes Applies the changes for the current page, but does not save them to flash memory. Closing the Web window does not save or apply any changes. -
Page 80: Installing A Modem Card
If your SCSxx20 was shipped with a modem installed, it is not necessary to perform the modem setup, and you can skip this chapter. This procedure is for installing a modem in the field. This chapter includes the following topics: Topic Page Installing a Modem Card... - Page 81 SCSxx05/SCSxx20 User Guide 6: Modem Setup To initialize the modem (only needed when first installed): 1. Login as sysadmin 2. Type install_modem at the sysadmin> prompt. 3. When the command has run completely, the sysadmin> prompt displays. The modem has reset and is ready to use.
-
Page 82: 7: System Administrator And User Functions
This chapter describes how the system administrator and users gain access to the system and the functions permitted for each role. It includes the following topics. Topic Page System Administrator Functions User Access and Functions System Administrator Functions The system administrator specifies settings such as user IDs, device configuration, and terminal and access rights to suit the application. -
Page 83: Changing The Root Password
SCSxx05/SCSxx20 User Guide 7: System Administrator and User Functions Changing the Root Password The system administrator must also change the password for the root level. Although users do not require root access, the system administrator can access it using SSH. Make sure to know the root access password and be certain that it has not been left as the common default value. -
Page 84: If You Misplace The Sysadmin Password
SCSxx05/SCSxx20 User Guide 7: System Administrator and User Functions If You Misplace the Sysadmin Password You can lock the system down and prevent programming access if you misplace your password. If this should happen, recover the system as follows: 1. Connect a terminal or PC running terminal software to the terminal port on the SCS. -
Page 85: Terminal Port Access
SCSxx05/SCSxx20 User Guide 7: System Administrator and User Functions Terminal Port Access To form a terminal port connection to the SCS, use a hardwired VT100 terminal or terminal emulation program that is connected to the terminal connector on the SCS. The system administrator normally uses this type connection during service events;... -
Page 86: Direct Mode
SCSxx05/SCSxx20 User Guide 7: System Administrator and User Functions Alpha, the prompt would read GEORGE-Alpha>. When this prompt displays, you are in monitor mode. There is no direct communication between you and the server. Note: You may select a server already selected by another user. -
Page 87: Logging Out
SCSxx05/SCSxx20 User Guide 7: System Administrator and User Functions To change the sequence, enter the new sequence and press Enter. If for some reason the sequence is unacceptable, an error message displays, and the sequence reverts to the existing character values. -
Page 88: 8: Commands
This chapter includes the following topics: Topic Page Summary of Commands System Commands Device Commands User Management Commands User Commands 8-12 Advanced Sysadmin Commands 8-13 Summary of Commands A summary of the SCS commands is provided below. Some commands only sysadmin can access, while all defined users can access others. -
Page 89: System Commands
SCSxx05/SCSxx20 User Guide 8: Commands sysadmin User Command Purpose passwd Sets user password. poweroff Powers-off (shuts down) the SCS. reboot Reboots the SCS. reset-modem Resets the internal modem. (SCSxx20 only) SAVE Commits (saves) programming changes. select Selects a port. Secures copy. -
Page 90: Poweroff
SCSxx05/SCSxx20 User Guide 8: Commands poweroff Use the poweroff command to shut the system off. This command allows the system to properly close any open files and gracefully exit and shut down. If you turn off the system without using the poweroff command (including power failure), the system will require some extra self-checks and start-up time the next time it boots up. -
Page 91: Passwd
SCSxx05/SCSxx20 User Guide 8: Commands passwd At the first login, the SCS uses the factory default password, PASS (all upper case). The sysadmin should change this default password as soon as possible to prevent access by unauthorized personnel. sysadmin>passwd Changing password for sysadmin... -
Page 92: Reset-Modem
SCSxx05/SCSxx20 User Guide 8: Commands sysadmin> sysadmin>info SCS4805 Shell V4.00 sysadmin> reset-modem Use this command to reset the internal modem. (SCSxx20 only) Use scp to perform a secure copy, using SSH, between two hosts. The file copy is encrypted and is therefore secure. -
Page 93: Timeout
SCSxx05/SCSxx20 User Guide 8: Commands − Device buffer examined (less or cat) − User becomes root The SCS comes set to log all warnings and higher events. The default file entry is *.warning, with lower level settings (a lower level generates more messages) in *.notice and *.info (even more events). -
Page 94: Device Commands
SCSxx05/SCSxx20 User Guide 8: Commands edituser V3.05 lcd V3.13 lciclear V3.06 lcistty V3.06 listen V3.21 listend V3.22 ltxloggerd V1.17 lu V3.05 modem_reset V3.10 perms V3.09 timeout V3.08 timeoutd V3.06 lci-system-configure V1.22 EXAR-XR16L788 Device Driver V2.8 SCS4805 release date: Thu Sep 19 16:14:49 2002 V4.0 sysadmin>... -
Page 95: Connections
The default settings are 1 stop bit, no parity, and 8 data bits. Check your equipment documentation for the proper settings. DCE/DTE The SCSxx05 device and terminal ports are factory configured as DTE devices. The SCSxx20 device and terminal ports are factory configured as DCE devices. Flow Control The device port flow control setting determines the method of flow control. -
Page 96: User Management Commands
SCSxx05/SCSxx20 User Guide 8: Commands User Management Commands The system administrator uses the following commands to add and delete users and to add and change settings for system users. The sysadmin is also a user, although one who cannot be deleted. -
Page 97: Edituser
SCSxx05/SCSxx20 User Guide 8: Commands The system automatically enters the edituser mode for this new user, allowing the system administrator to change any of the preset parameters. edituser Use this command to edit the port configuration and default operational sequences for that user profile. This command creates user IDs and privileges. -
Page 98: Deluser
SCSxx05/SCSxx20 User Guide 8: Commands 3. To accept the changes, type y for yes, or to reject the changes, type n or do not enter anything. 4. Press Enter. sysadmin> sysadmin>edituser Enter accepts present value Server number of 0 (zero) will remove all access to servers ESCAPE_SEQ= \x1bA >... -
Page 99: User Commands
SCSxx05/SCSxx20 User Guide 8: Commands User Commands After the user logs in to the system, the user name becomes the command prompt. For example, ross> displays after Ross logs in. Users log in to identify themselves to the system and to access the device ports to which the system administrator has assigned them privileges. -
Page 100: Advanced Sysadmin Commands
SCSxx05/SCSxx20 User Guide 8: Commands Advanced Sysadmin Commands You can access the following features from the command line interface or administer them using a Linux command line prompt through your network. Using ssh Keys and keygen Procedures The following info is taken, with great liberties, from an open source article discussing ssh and keygen. -
Page 101: Mounting File Systems During Boot
SCSxx05/SCSxx20 User Guide 8: Commands Using Single Signon to Save Time To automate and save time, try this: [max@miraclehut ~]$ ssh-agent /bin/bash [max@miraclehut max]$ ssh-add Need passphrase for /home/max/.ssh/identity (max@miraclehut). Enter passphrase: Identity added: /home/max/.ssh/identity (max@miraclehut) [max@miraclehut max]$ for target_host in host1 host2 host3 host4 host5 host[678] host9;... -
Page 102: Mounting File Systems Dynamically Using Autofs
SCSxx05/SCSxx20 User Guide 8: Commands To mount a file system at boot time, the /etc/fstab file must have an entry that is associated with the directory to mount. Following is an example of how to use this facility to automatically mount an NFS file on the SCS. - Page 103 SCSxx05/SCSxx20 User Guide 8: Commands You can only configure this feature from the bash shell as the root user. (See instructions for changing to the root user in Mounting File Systems During Boot.) The following files are needed to insure that autofs works properly:...
- Page 104 SCSxx05/SCSxx20 User Guide 8: Commands b) In the auto.export file, add the following: tomv -fstype=nfs,rw,intr,soft,bg erh62:/home/tomv where tomv The NFS mounted directory name. fstype The comma-delimited option list that mount will use. erh62:/home/tomv The server name and directory that the SCS will use.
-
Page 105: Telnet To Serial Port Feature
The SCS provides various ways of accessing serial ports. This chapter includes the following topics: Topic Page Telnet to Serial Port IP Address per Serial Port Feature Telnet to Serial Port Feature This section describes how to set up and use the Telnet to a Serial Port feature of the SCS. - Page 106 SCSxx05/SCSxx20 User Guide 9: Port Access IP Port Number Serial Port Number 9001 9002 9003 9008 9046 9047 9048 IP Port Number/Serial Port Number Cross-Reference If you are assigning an IP address per console server serial port, enter the following command on the client machine to directly access a serial port:...
-
Page 107: Assigning An Ip Port Number To A Serial Port
SCSxx05/SCSxx20 User Guide 9: Port Access Assigning an IP Port Number to a Serial Port You need to modify two files to assign an IP port number to a serial port. In our example we specify that: IP port number 9001 correlates to serial port 1 IP port number 9002 correlates to serial port 2 and so on, up to 9048 correlating to device port 48 in the SCS4805. -
Page 108: Testing
SCSxx05/SCSxx20 User Guide 9: Port Access Testing If you have not set up the (local or NIS) port permission file for users on the console server, they will not be able to access the serial ports. If the user does not have the appropriate serial port permissions, attempting to... -
Page 109: Ip Address Per Serial Port Feature
SCSxx05/SCSxx20 User Guide 9: Port Access IP Address per Serial Port Feature The IP Address per Serial Port feature allows you to set multiple network addresses on the same low-level network device driver (e.g., two IP addresses in one Ethernet card). It is typically used for services that act differently based on the address they listen on (e.g., multihosting, virtual domains, or virtual hosting... - Page 110 SCSxx05/SCSxx20 User Guide 9: Port Access The content of the first file, ifcfg-eth0:0, is: DEVICE="eth0:0" BOOTPROTO="none" ONBOOT="yes" IPADDR="192.168.202.11" NETMASK="255.255.255.0" The content of the second file, ifcfg-eth0:1 is: DEVICE="eth0:1" BOOTPROTO="none" ONBOOT="yes" IPADDR="192.168.202.12" NETMASK="255.255.255.0" 5. In this manner, set up the remaining 14 config files. Note that there are two lines that must be changed in each file.
-
Page 111: Testing
SCSxx05/SCSxx20 User Guide 9: Port Access Note: If you need to set up an additional gateway to access the aliased IP addresses from client workstation(s), for example, set up the /etc/sysconfig/static-routes file. (This is an additional gateway – the default gateway is set up through the sysadmin setup program.) By default, the static-routes file does not exist. -
Page 112: Saving The Changes To Flash
SCSxx05/SCSxx20 User Guide 9: Port Access Saving the Changes to Flash Once you have completed the setup and test, change the file system back to read-only and save the changes to flash. (Note that on the system shown below, NIS was running. NIS was used for both the login authentication of “kerrym” and to obtain the permissions for the serial port.) -
Page 113: Bypassing Authentication
SCSxx05/SCSxx20 User Guide 9: Port Access Bypassing Authentication Note: The ability to bypass the authentication mechanisms, as described below, may not be deployed on your particular console server. If it has been deployed on your console server and you have specified that... - Page 114 SCSxx05/SCSxx20 User Guide 9: Port Access 2. Set up the nobody.conf file and modify it accordingly. a) Log in to the sysadmin account, and then go into the bash shell. sysadmin>bash sysadmin@km3210 /var/tmp$ su Password: root@km3210 /var/tmp# cd /lci/users root@km3210 /lci# cp ../default.user.conf nobody.conf root@km3210 /lci# vi nobody.conf...
- Page 115 The system administrator uses some UNIX/Linux commands in administering the SCS. Some of the system commands automatically invoke the less command (e.g., if you run the devices command, less displays the information.) You may use the vi editor when you run setup. less command Use the less command when the data output to the terminal is longer than one screen can display.
-
Page 116: A: Unix Command Help
SCSxx05/SCSxx20 User Guide A: Unix Command Help SEARCHING /pattern Search forward for (N-th) matching line. ?pattern Search backward for (N-th) matching line. ESC-^B <c1> <c2> Find open bracket <c1> ?pattern Search backward for (N-th) matching line. Repeat previous search (for N-th occurrence). -
Page 117: Vi Editor Commands
SCSxx05/SCSxx20 User Guide A: Unix Command Help MISCELLANEOUS COMMANDS -<flag> Toggle a command line option [see OPTIONS below]. --<name> Toggle a command line option, by name. _<flag> Display the setting of a command line option. __<name> Display the setting of an option, by name. - Page 118 SCSxx05/SCSxx20 User Guide A: Unix Command Help If you are not sure which mode you are in at any time, press Esc, which returns you to the command mode. A summary of the modes and some vi commands follows. Using vi in Command Mode The following keyboard commands apply to vi in command mode.
-
Page 119: B: Hexadecimal Conversion Chart
Equivalent characters in italics are non-printing characters or signals. Hexadecimal to Character Conversion Hexadecimal Equivalent Hexadecimal Equivalent Code Character Code Character “ & ‘ < >... - Page 120 SCSxx05/SCSxx20 User Guide B: Hexadecimal Conversion Chart Hexadecimal Equivalent Hexadecimal Equivalent Code Character Code Character...
-
Page 121: C: Pinouts And Adapters
The SCS uses conventional Category 5 fully pinned network cables for all connections; the cables are available from Lantronix in various lengths. In some cases you will need an adaptor for your serial devices. Lantronix offers a variety of RJ45 to serial-connector adapters for many devices. These adapters convert the RJ45 connection on the SCS to a 9-pin or 25-pin serial connector found on some other manufacturer's serial devices. -
Page 122: Scsxx05
SCSxx05/SCSxx20 User Guide C: Pinouts and Adapters SCSxx05 SCSxx05 Pinouts Pinouts for SCSxx05 Terminal and Device Ports (DCE and DTE) SCSxx05 SCSxx05 Terminal / Device Terminal / Device (DCE) (DTE) Note: Default for Device Ports is DTE Setting pin 1... -
Page 123: Scsxx05 Adapters
C: Pinouts and Adapters SCSxx05 Adapters The adapters illustrated below are compatible with the Lantronix SCSxx05 models. RJ45 Receptacle to DB25M DCE Adapter for the SCSxx05 (Part# 200.2066A) Pin 1 DB25 Male RJ45 Use PN 200.2066A adapter with a dumb terminal or with most SUN applications. - Page 124 SCSxx05/SCSxx20 User Guide C: Pinouts and Adapters RJ45 Receptacle to DB25F DCE Adapter for the SCSxx05 (Part# 200.2067A) Pin 1 DB25 Female RJ45...
- Page 125 SCSxx05/SCSxx20 User Guide C: Pinouts and Adapters RJ45 Receptacle to DB9M DCE Adapter for the SCSxx05 (Part# 200.2069A) Pin 1 DB9 Male RJ45...
- Page 126 SCSxx05/SCSxx20 User Guide C: Pinouts and Adapters RJ45 Receptacle to DB9F DCE Adapter for the SCSxx05 (Part# 200.2070A) Pin 1 DB9 Female RJ45 Use PN 200.2070A adapter with a PC's serial port.
- Page 127 SCSxx05/SCSxx20 User Guide C: Pinouts and Adapters RJ45 Receptacle to DB9M DTE Adapter for the SCSxx05 (Part# 200.2071)
- Page 128 SCSxx05/SCSxx20 User Guide C: Pinouts and Adapters RJ45 Receptacle to DB9F DTE Adapter for the SCSxx05 (Part# 200.2072)
- Page 129 SCSxx05/SCSxx20 User Guide C: Pinouts and Adapters RJ45 Receptacle to DB25M DTE Adapter for the SCSxx05 (Part# 200.2073)
- Page 130 SCSxx05/SCSxx20 User Guide C: Pinouts and Adapters RJ45 Receptacle to DB25F DTE Adapter for the SCSxx05 (Part# 200.2074) C-10...
- Page 131 SCSxx05/SCSxx20 User Guide C: Pinouts and Adapters RJ45 to RJ45F Netra Adapter for the SCSxx05 (Part# 200.2225) Use this adapter for Netra/SUN/CISCO and others. C-11...
-
Page 132: Scsxx20
SCSxx05/SCSxx20 User Guide C: Pinouts and Adapters SCSxx20 SCSxx20 Pinouts Pinouts for SCSxx20 Terminal and Device Ports (DCE and DTE) SCS1620 SCS1620 Terminal / Device Terminal / Device (DCE) (DTE) Note: Default for Device Ports is DCE Setting pin 1... - Page 133 SCSxx05/SCSxx20 User Guide C: Pinouts and Adapters SCSxx20 Adapters The adapters illustrated below are compatible with the Lantronix SCSxx20 models. RJ45 Receptacle to DB25M DCE Adapter for the SCSxx20 (Part# 200.0066) Pin 1 RJ45 DB25 Male Use PN 200.0066 adapter with a dumb terminal or with most SUN applications.
- Page 134 SCSxx05/SCSxx20 User Guide C: Pinouts and Adapters RJ45 Receptacle to DB25F DCE Adapter for the SCSxx20 (Part# 200.0067) Pin 1 RJ45 DB25 Male C-14...
- Page 135 SCSxx05/SCSxx20 User Guide C: Pinouts and Adapters RJ45 Receptacle to DB9M Adapter for SCSxx20 (Part # 200.0069) Pin 1 RJ45 DB9 Male C-15...
- Page 136 SCSxx05/SCSxx20 User Guide C: Pinouts and Adapters RJ45 Receptacle to DB9F Adapter for SCSxx20 (Part# 200.0070) Pin 1 RJ45 DB9 Female Use PN 200.0070 adapter with a PC's serial port. C-16...
- Page 137 SCSxx05/SCSxx20 User Guide C: Pinouts and Adapters Netra t1 to SCSxx20 RJ45 Adapter (Part# 200.0225) Use this adapter for Netra/SUN/CISCO and others. C-17...
- Page 138 Compliance Information (1) Manufacturer’s Name & Address: Lantronix Inc., 15353 Barranca Parkway, Irvine, CA 92618 USA Declares that the following product: Product Name(s): Model SCS4805 Secure Console Server (Part No. SCS4805U-01) Conform to the following standards or other normative documents:...
- Page 139 This product meets the requirements for and carries the following marks: VCCI (Japan) AS/NZS (Australia/New Zealand) GS (Germany) GOST (Russia) S-Mark (Argentina) MIC (Korea) Manufacturer’s Contact: Director of Quality Assurance, Lantronix Inc. 15353 Barranca Parkway, Irvine, CA 92618 USA Phone: 949-453-3990 Fax: 949-453-3995...
- Page 140 D: Compliance and Warranty Information Compliance Information (2) (according to ISO/IEC Guide 22 and EN 45014) Manufacturer’s Name & Address: Lantronix Inc., 15353 Barranca Parkway, Irvine, CA 92618 USA Declares that the following product: Product Name(s): Models SCS820, SCS1620, SCS3205 Secure Console Servers...
- Page 141 Lantronix. Lantronix will ship the replacement media to the customer. In no event will Lantronix be responsible to the user in contract, in tort (including negligence), strict liability or otherwise for any special, indirect, incidental or...
Need help?
Do you have a question about the SCSxx05 and is the answer not in the manual?
Questions and answers