Table of Contents
Advertisement
Quick Links
Advertisement
Table of Contents

Related Manuals for Avid Technology M-Audio Fast Track


Summary of Contents for Avid Technology M-Audio Fast Track
- Page 1 ® Avid Recording Studio User Guide Version 8.0.3...
- Page 2 Avid Technology, Inc. Avid, Pro Tools, Pro Tools SE, M-Audio and Fast Track are either trademarks or registered trademarks of Avid Technology, Inc. All other trademarks contained herein are the property of their respective owners.
-
Page 3: Table Of Contents
contents Chapter 1. Introduction ............1 Recording Studio Features . - Page 4 Safety Compliance ............24 Avid Recording Studio User Guide...
-
Page 5: Chapter 1. Introduction
M-Audio® Fast Track® audio inter- M-Audio Fast Track Audio Interface face and Pro Tools® SE from Avid®. • Low latency performance Pro Tools is the industry standard platform in • Balanced XLR mic-level input with high-... -
Page 6: System Requirements
The following symbols are used to highlight im- Minimum System Requirements can be found portant information: on the Avid website at www.avid.com/support. User Tips are helpful hints for getting the A qualified version of Adobe® Flash® most from your system. -
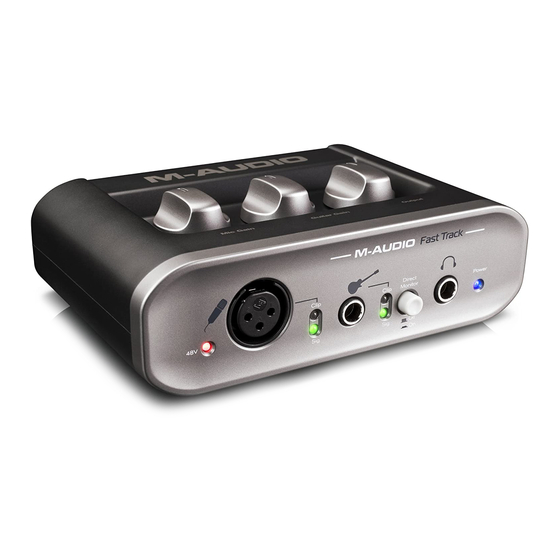
Page 7: Chapter 2. Controls And Connectors
chapter 2 Controls and Connectors Front Panel Phantom Power Indicator (48V) This LED il- Guitar Input This 1/4-inch jack lets you con- luminates when Phantom Power switched on. nect an electric guitar, bass, or other instrument. Direct Monitor Button This button switches Although phantom power can be used Direct Monitoring on and off, which provides a safely with most microphones, it may dam-... -
Page 8: Back Panel
Always plied USB cable. turn off phantom power and wait at least ten seconds before connecting a ribbon micro- phone. For more information, refer to the documen- tation for your microphone. Avid Recording Studio User Guide... -
Page 9: Top Panel
Top Panel Mic Gain Guitar Gain Output Microphone Gain Knob This knob controls Output Knob This knob controls the volume the volume for the Microphone input when set- for the front-panel Headphone output and back- ting recording levels. panel Line outputs. Guitar Gain Knob This knob controls the vol- For more information, refer to Chapter 5, ume for the Guitar/Line input when setting re-... - Page 10 Avid Recording Studio User Guide...
-
Page 11: Chapter 3. Installing Recording Studio
Installation Overview The Recording Studio installation includes the following steps: Installing Pro Tools SE. Installing M-Audio Fast Track driver. Recording Studio Installer Icon Connecting M-Audio Fast Track. Click “Continue” on the Welcome screen, and Software configuration. -
Page 12: Windows
Once the installation is complete and your appear to move but your software is still in- computer has been restarted, connect Fast Track stalling. Do not terminate your installation. to an available USB port on your computer. Avid Recording Studio User Guide... -
Page 13: Mp3 Export Option
When the following screen appears, choose Click “Finish” once the software has been in- the picture of Fast Track, and follow the on- stalled. screen instructions to install the Fast Track If the Found New Hardware Wizard reap- driver. pears, repeat steps 8 through 10. If the Windows Logo Testing or “trusted ap- plication dialog appears, Click “Continue Anyway”... -
Page 14: Hardware Connections
Pro Tools SE Icon Connect your microphone or instrument (elec- tric guitar or bass) to the appropriate input. If needed, connect your headphones to the Headphone output. Connecting your headphones disables the back-panel Line outputs. Avid Recording Studio User Guide... -
Page 15: Software And System Configuration
When the Pro Tools SE Quick Start dialog ap- This important information covers both pears, select the Demo Songs button. Mac OS X and Windows systems, and includes tips on hard drive configuration and mainte- nance. We strongly recommend reading these chapters to ensure the best performance from your Pro Tools SE system. - Page 16 Avid Recording Studio User Guide...
-
Page 17: Chapter 4. The Software Control Panel
chapter 4 The Software Control Panel The Software Control Panel lets you to adjust Latency Tab (Windows) various system settings for Mac OS X and Win- dows. The Control Panel is divided into separate pages, each accessible by clicking on the corresponding tab. -
Page 18: Sample Rate Tab (Windows Vista And Windows 7)
Clicking the links takes you Pro Tools SE, This page lets you to select a sam- to useful pages on the Avid website. ple rate of 44.1 kHz or 48 kHz. This is provided so that MME applications in Vista have access to both supported sample rates. -
Page 19: Chapter 5. Using Recording Studio
chapter 5 Using Recording Studio • Open any other session on your system. Launching Pro Tools SE • Open and view tutorials. The first step in beginning a Pro Tools project is The Pro Tools SE tutorials can be accessed working with a session. -
Page 20: Recording Audio Tracks
Gain knob for the input you are not using all the way down. Track Mute Button Press the Direct Monitor button for low-la- tency monitoring, if required. For more information, see “” on page 17. Avid Recording Studio User Guide... -
Page 21: Adjusting The Output Level
Switch the track to record mode by clicking its Click the Mute button for the track, so that Record Enable button. you can hear your recording during playback. Do not forget to save your work. Adjusting the Output Level The volume of the sound sent from Fast Track to your headphones, powered monitors, stereo Track Record Enable Button and Fader in Record Mode power amplifier, or mixer is adjusted using the... -
Page 22: Direct Monitoring
Video Projects ing function refer to your music software docu- mentation. If the final mix is intended for DVD, film or TV, a resolution of 24-bits with a sample rate of 48 kHz is recommended. Avid Recording Studio User Guide... -
Page 23: Opening A Recent Session
Opening a Recent Session To open a recent session: Launch Pro Tools SE. When the Pro Tools SE Quick Start dialog ap- pears click the Open Session button. Pro Tools SE Quick Start Dialog - Open Session From the list of recent session templates, se- lect the one you want. - Page 24 Avid Recording Studio User Guide...
-
Page 25: Appendix A. Additional Information And Support
We recommend not installing operating system M-Audio Drivers updates until a driver has been posted to the Avid website for that specific operating system. Should you experience any performance issues with your M-Audio hardware, please confirm The Avid website (www.avid.com) contains the... - Page 26 Avid Recording Studio User Guide...
-
Page 27: Appendix B. Compliance Information
appendix b Compliance Information Proposition 65 Warning Environmental Compliance This product contains chemicals, including lead, known to the State of California to cause cancer and Disposal of Waste Equipment by Users birth defects or other reproductive harm. Wash hands in the European Union after handling. -
Page 28: Emc (Electromagnetic Compliance)
Australian Compliance EMC (Electromagnetic Compliance) Avid declares that this product complies with the following standards regulating emissions and immunity: • FCC Part 15 Class A • EN55022 Class A • EN55024 • AS/NZS CISPR 22 Class A Canadian Compliance • CISPR 22 Class A... -
Page 29: Important Safety Instructions
Important Safety Instructions 12) For products that are not rack-mountable: Use only with a cart, stand, tripod, bracket, or table specified by the manufacturer, or sold with the equipment. When a cart is used, use caution when moving the cart/equipment combination to 1) Read these instructions. - Page 30 Avid Technical Support (USA) Product Information 5795 Martin Road Visit the Online Support Center at For company and product information, Irwindale, CA 91706-6211 USA www.avid.com/support visit us on the web at www.avid.com...
Need help?
Do you have a question about the M-Audio Fast Track and is the answer not in the manual?
Questions and answers