Denon PMA-1510AE Owner's Manual
Hide thumbs
Also See for PMA-1510AE:
- Service manual (41 pages) ,
- User manual ,
- Owner's manual (17 pages)

Related Manuals for Denon PMA-1510AE


Summary of Contents for Denon PMA-1510AE
- Page 1 INTEGRATED AMPLIFIER PMA-1510AE Owner’s Manual Bedienungsanleitung Manuel de l’Utilisateur Manuale delle istruzioni Manual del usuario Gebruiksaanwijzing Bruksanvisning...
- Page 2 ENGLISH ENGLISH DEUTSCH FRANCAIS DEUTSCH FRANCAIS ITALIANO ESPAÑOL NEDERLANDS SVENSKA ITALIANO ESPAÑOL NEDERLANDS SVENSKA IMPOTANT SAFETY SAFETY PRECAUTIONS CAUTION: INSTRUCTIONS To completely disconnect this product from the mains, disconnect the plug from the wall socket outlet. CAUTION The mains plug is used to completely interrupt the power supply to Read these instructions.
- Page 3 SVENSKA SVENSKA NEDERLANDS NEDERLANDS ESPAÑOL ESPAÑOL ITALIANO ITALIANO FRANCAIS FRANCAIS DEUTSCH DEUTSCH ENGLISH ENGLISH NOTE ON USE / HINWEISE ZUM GEBRAUCH / OBSERVATIONS RELATIVES A L’UTILISATION / NOTE SULL’USO / NOTAS SOBRE EL USO / ALVORENS TE GEBRUIKEN / OBSERVERA ANGÅENDE ANVÄNDNINGEN WARNINGS WARNHINWEISE AVERTISSEMENTS...
- Page 4 Batterier får absolut inte kastas i soporna eller brännas. Kassera dem enligt lokala bestämmelser • Plaats geen andere apparatuur op het toestel. för kemiskt avfall. DENON EUROPE z För att tillförsäkra god värmeavledning får utrustningen Denna apparat och de tillbehör som levereras med den uppfyller gällande WEEE-direktiv, med Division of D&M Germany GmbH...
-
Page 5: Table Of Contents
Getting started Getting started ·······································································1 UHC (Ultra High Current)-MOS single push-pull Thank you for purchasing this DENON product. To ensure proper Accessories ····················································································1 operation, please read this owner’s manual carefully before using the circuit installed to simultaneously achieve both Main features ·················································································1 product. -
Page 6: Cautions On Handling
• Before turning the power switch on The supplied remote control can be used to control DENON CD Check once again that all connections are correct and that there are players and tuners. -
Page 7: Part Names And Functions
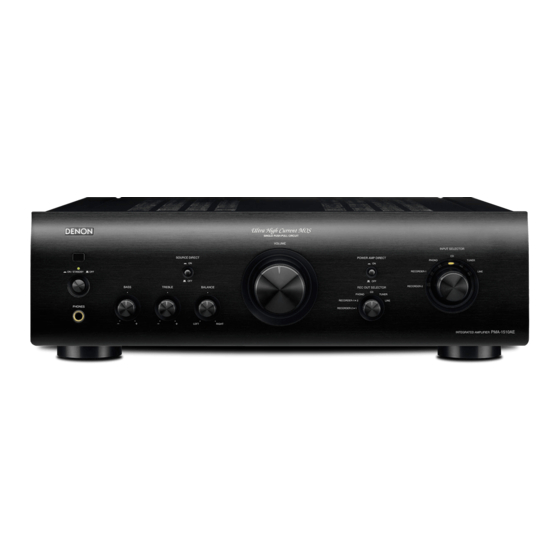
ENGLISH Part names and functions For buttons not explained here, see the page indicated in parentheses ( ). Rear panel Front panel q w e Power indicator ············································ (7) BASS control knob ··································· (7, 8) Input terminals (INPUTS) ···························· (6) Indicates the status of the unit’s as follows: TREBLE control knob ·······························... -
Page 8: Remote Control
TIME REPEAT • The supplied remote control can be used to CALL operate DENON CD player/Tuner. 8, 9 • When using it, also refer to the operating instructions of the other devices. • The remote control may not operate some 6, 7 products. -
Page 9: Basic Connections
If the protection circuit is activated even though there are no problems with the ventilation around the unit or in connections, the unit may be damaged. Turn off the power and then contact a DENON service center. -
Page 10: Speaker Connections
ENGLISH Basic connections Connecting players Speaker connections Set CARTRIDGE selection switch by the type of your cartridge to be used MM (j) or MC (h). • The PHONO input terminals are equipped with a short pin-plug. Remove this plug to connect a turntable. •... -
Page 11: Connecting The Power Cord
ENGLISH Connecting the power cord Basic operation Wait until all connections have been completed before connecting the power cord. Before use Symbols used to indicate buttons in this manual To household Button located on both the main unit and power outlet VOLUME Turn the all the way down. -
Page 12: Starting Playback
ENGLISH Starting playback Starting recording Symbols used to indicate buttons in this manual INPUT SELECTOR Button located on both the main unit and to select the source. <REC OUT SELECTOR> to the program source BUTTON the remote control The input indicator for the selected source lights. you wish to record. -
Page 13: Advanced Connections
ENGLISH Advanced connections Advanced operations Connecting P.DIRECT jacks Connecting pre out jacks Setting Eco mode If you use a preamplifier, connect it as shown below, and then you If you use a power amplifier or subwoofer, connect it as shown With the Eco mode ON, this unit will automatically enter the standby can use this unit as a power amplifier. -
Page 14: Explanation Terms
• Switch off the power and please contact the – as an overload or excess voltage occurs for any flashes red at intervals of approximately DENON service adviser. reason. 0.5 seconds. In this unit, the power indicator blinks and the unit The power indicator lights but no sound is •... -
Page 15: Specifi Cations
ENGLISH Specifications Index n Power amplifier section 2-channel driving (CD → SP OUT) Rated Output Power: Adjusting the tone ················································ 8 70 W + 70 W (8 Ω, 20 Hz – 20 kHz, T.H.D. 0.07 %) Adjusting the volume ··········································· 8 140 W + 140 W (4 Ω, DIN, 1 kHz, T.H.D. - Page 17 D&M Holdings Inc. Printed in Japan 5411 10408 002D...
Need help?
Do you have a question about the PMA-1510AE and is the answer not in the manual?
Questions and answers