
Related Manuals for Denon PMA-150H


Summary of Contents for Denon PMA-150H
- Page 1 Contents Connections Playback Settings Tips Appendix PMA-150H INTEGRATED AMPLIFIER Owner’s Manual Remote control Front panel Rear panel Index unit...
- Page 2 Contents Connections Playback Settings Tips Appendix Connections Accessories Inserting the batteries Connecting speakers Operating range of the remote control unit Connecting the speaker cables Features Connecting the subwoofer High quality sound Connecting speakers High performance Connecting a digital device Part names and functions Connecting an analog device Front panel Connecting a PC or Mac...
- Page 3 Contents Connections Playback Settings Tips Appendix Playback Listening to DAB/FM broadcasts Listening to DAB/FM broadcasts Basic operation Changing the FM reception mode (Tune Mode) Turning the power on Presetting DAB/FM stations Switching the power to standby Automatically presetting FM stations (Auto Preset) Selecting the input source Listening to stations registered in the preset list Adjusting the volume...
-
Page 4: Auto Standby
Contents Connections Playback Settings Tips Appendix Settings AirPlay function Playing songs from your iPhone, iPod touch or iPad Menu map Playing iTunes music with this unit Menu operation Play a song from your iPhone, iPod touch or iPad on multiple synced devices (AirPlay 2) Inputting characters Spotify Connect function... -
Page 5: Heos Account
Contents Connections Playback Settings Tips Appendix Tips Network Network Information Tips Wi-Fi Troubleshooting Bluetooth Power does not turn on / Power is turned off Network Control LED is flashing Friendly Name Operations cannot be performed through the remote control unit Connection No sound comes out Settings... - Page 6 Contents Connections Playback Settings Tips Appendix Appendix The Internet radio cannot be played back Music files on PC or NAS cannot be played back (Music server) Playing back a USB memory devices Various online services cannot be played D/A converter Cannot connect to a wireless LAN network Playing back a Bluetooth device Music files on PC or Mac cannot be played back (USB-DAC)
- Page 7 Playback Settings Tips Appendix Thank you for purchasing this Denon product. To ensure proper operation, please read this owner’s manual carefully before using the product. After reading this manual, be sure to keep it for future reference. Accessories Check that the following parts are supplied with the product.
- Page 8 Contents Connections Playback Settings Tips Appendix Inserting the batteries NOTE 0 To prevent damage or leakage of battery fluid: 0 Do not use a new battery together with an old one. Remove the rear lid in the direction of the arrow and 0 Do not use two different types of batteries.
- Page 9 Plus Additionally, 70 W+70 W (4 Ω/ohms) output that is more powerful than A high bitrate and high sampling has been achieved with Denon’s the size of the housing delivers the “delicate yet powerful sound” of unique data interpolation algorithm. 16 bit audio signals are converted to a high bitrate of 32 bit and 44.1 kHz sampling signals are up-sampled...
- Page 10 Contents Connections Playback Settings Tips Appendix The device is equipped with a AirPlay ® function in addition to High performance network functions such as Internet radio etc. You can enjoy a wide variety of content, including listening to Internet Equipped with a USB-DAC function to support playback of high- Radio, playing audio files stored on your PC.
- Page 11 LAN or Wi-Fi (wireless LAN) network that the iPad, iPhone or Android devices are connected to. Includes a system remote control that can also be used for Denon’s CD Player DCD-100 operations. HEOS provides streaming music from your favorite online music...
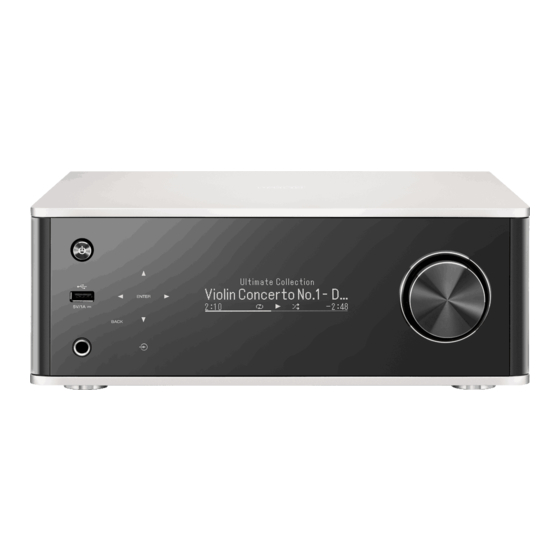
- Page 12 Contents Connections Playback Settings Tips Appendix Part names and functions Front panel For details, see the next page. Remote control Front panel Rear panel Index unit...
- Page 13 Contents Connections Playback Settings Tips Appendix D ENTER key This determines the selection. E Display This displays various pieces of information. F Volume control knob Adjusts the volume. G USB port (T) This is used to connect USB storages (such as USB memory devices). (v p.
-
Page 14: Rear Panel
Contents Connections Playback Settings Tips Appendix Rear panel For details, see the next page. Remote control Front panel Rear panel Index unit... - Page 15 Contents Connections Playback Settings Tips Appendix B AC inlet (AC IN) Used to connect the power cord. (v p. 32) C Speaker terminals (SPEAKERS) Used to connect speakers. (v p. 22) D ANALOG IN connectors Connecting to a device with analog audio output connectors. (v p.
- Page 16 F PRE OUT connector Used to connect a subwoofer with a built-in amplifier. (v p. 23) G IR CONTROL jack Connects to a Denon CD player that is equipped with a IR control jack. (v p. 31) H DAB/FM antenna terminal (ANTENNA) Used to connect DAB/FM antennas.
-
Page 17: Remote Control Unit
Contents Connections Playback Settings Tips Appendix Remote control unit A Remote control signal transmitter This transmits signals from the remote control unit. (v p. 8) B Input source select buttons These select the input source. (v p. 35) C System buttons These perform playback related operations. - Page 18 Contents Connections Playback Settings Tips Appendix G QUEUE button This displays the queue. “Playing back files stored on PC or NAS” (v p. 38) “Playing a USB memory device” (v p. 41) H ENTER button This determines the selection. I Cursor buttons (uio p) These select items.
- Page 19 Contents Connections Playback Settings Tips Appendix M Power operation button (AMP POWER X) This turns the power on/off (standby). (v p. 34) N Remote mode select button (REMOTE MODE AMP) Switches the remote control operating mode to this unit. O REPEAT button (L) Switches the repeat playback.
- Page 20 Connections Playback Settings Tips Appendix o CD player operations A Denon CD player can be operated. A Power button (CD POWER X) B Remote mode select button (REMOTE MODE CD) C System buttons Skip buttons (8, 9) Play/pause button (1/3)
- Page 21 Contents Connections Playback Settings Tips Appendix o Contents o Cables used for connections Provide necessary cables according to the devices you want to Connecting speakers connect. Connecting a digital device Connecting an analog device Speaker cable Connecting a PC or Mac Connecting a USB memory device to the USB port Connecting a DAB/FM antenna Subwoofer cable...
- Page 22 Contents Connections Playback Settings Tips Appendix Connecting speakers Here we connect the speakers in the room to this unit. Turn the speaker terminal counterclockwise to loosen This section explains how to connect them using typical examples. NOTE 0 Disconnect this unit’s power plug from the power outlet before connecting the speakers.
- Page 23 Contents Connections Playback Settings Tips Appendix Connecting the subwoofer Connecting speakers Use a subwoofer cable to connect the subwoofer. Subwoofer Remote control Front panel Rear panel Index unit...
- Page 24 Contents Connections Playback Settings Tips Appendix Connecting a digital device Connect this unit to a device with digital output connectors, such as a TV. TV/Digital device 0 When connecting a TV to this unit, turn off the audio output of the TV’s internal speakers.
- Page 25 Contents Connections Playback Settings Tips Appendix Connecting an analog device You can connect this unit to various devices with analog audio output. Analog device AUDIO AUDIO Remote control Front panel Rear panel Index unit...
- Page 26 0 Before USB connecting this unit to your computer, install the driver software in your computer. (v p. 65) 0 Download the driver software from the PMA-150H page of the Denon website. 0 Use a cable that is 3 m or less to connect to the computer.
- Page 27 USB memory device 0 Denon does not guarantee that all USB memory devices will operate or receive power. When using a portable USB hard disk drive (HDD) which came with an AC adapter, use that device’s supplied AC adapter. NOTE 0 USB memory devices will not work via a USB hub.
- Page 28 Contents Connections Playback Settings Tips Appendix Connecting a DAB/FM antenna After connecting the antenna and receiving a DAB signal, find the position at which the reception is best using the “Tuning Aid” in the setup menu, then fix the antenna with tape at that position. (v p. 107) 0 For best results with the supplied indoor antenna, orient the antenna along a wall such that it is stretched out horizontally and parallel to the floor (but above the floor), and then fasten the two end tabs to the wall.
- Page 29 Contents Connections Playback Settings Tips Appendix Connecting to a home network (LAN) This unit can connect to a network using a wired LAN or wireless LAN. Wired LAN You can connect this unit to your home network (LAN) to enable various types of playback and operations as described below.
- Page 30 Contents Connections Playback Settings Tips Appendix Wireless LAN 0 When using this unit, we recommend you use a router equipped with the following When connecting to the network via wireless LAN, connect the external functions: antennas for Bluetooth/wireless connectivity connection to the rear panel 0 Built-in DHCP server and stand them upright.
- Page 31 Tips Appendix Connecting to the IR control connector Denon CD players connected to this unit can be controlled via the unit using the HEOS app. o Connection This unit Use the included IR control cable to connect the IR CONTROL OUT jack of this unit to the IR CONTROL IN jack of the CD player.
- Page 32 Contents Connections Playback Settings Tips Appendix Connecting the power cord After completing all the connections, insert the power plug into the power outlet. Power cord (supplied) To household power outlet (AC 230V, 50/60Hz) Remote control Front panel Rear panel Index unit...
-
Page 33: Heos Favorites
Contents Connections Playback Settings Tips Appendix o Contents Playback a device Basic operation Playing a USB memory device Turning the power on Listening to music on a Bluetooth device Switching the power to standby Listening to DAB/FM broadcasts Selecting the input source Using as a D/A converter Adjusting the volume Connect and play back from an analog device... -
Page 34: Input Source
Contents Connections Playback Settings Tips Appendix Basic operation Turning the power on AMP POWER Press AMP POWER X to turn on. Input source select buttons 0 You can also press X on the main unit to turn on power from standby mode. 0 You can also press 1/3 to turn on power from standby mode. - Page 35 Contents Connections Playback Settings Tips Appendix Selecting the input source Adjusting the volume Press the input source select button to be played back. Use VOLUME df to adjust the volume. The selected input source appears on the display. The volume level appears on the display. 0 This unit switches between DAB and FM each time TUNER is pressed.
- Page 36 Contents Connections Playback Settings Tips Appendix Listening to Internet Radio Internet Radio refers to radio broadcasts distributed over the Internet. Internet Radio stations from around the world can be received. The Internet Radio station list on this unit the database service provided by TuneIn Radio service.
- Page 37 Contents Connections Playback Settings Tips Appendix Listening to Internet Radio 0 Any characters that cannot be displayed are replaced with “.” (period). Press INTERNET RADIO. NOTE Select the station you want to play. 0 The radio station database service may be suspended or be otherwise unavailable without notice.
- Page 38 Contents Connections Playback Settings Tips Appendix Playing back files stored on PC or NAS This unit can play back music files and playlists (m3u, wpl) from DLNA compatible servers including PCs and NAS devices on your network. The audio format types and specifications supported by this unit for playback are as follows.
- Page 39 Contents Connections Playback Settings Tips Appendix Playing back files stored on PC or NAS Browse the music on your PC/NAS and select something to play. Use this procedure to play music files or playlists stored on DLNA files servers on your local network. Press MUSIC SERVERS to switch the input source to 0 When you select something to play you will be asked how you want to queue up your music.
- Page 40 Contents Connections Playback Settings Tips Appendix Use ui to select the “Play Now” or “Play Now & NOTE Replace Queue”, then press ENTER. 0 When playing back music files with your PC or NAS connected through wireless Playback starts. LAN, audio may be interrupted depending on your wireless LAN environment. In this case, connect using a wired LAN.
- Page 41 Contents Connections Playback Settings Tips Appendix Playing a USB memory device Playing back music files stored on a USB memory device. Only USB memory devices conforming to mass storage class standards can be played on this unit. This unit is compatible with USB memory devices in “FAT32” or “NTFS” format.
- Page 42 Contents Connections Playback Settings Tips Appendix Playing files stored on USB memory Browse the music on your USB memory device and devices select something to play. Insert the USB memory device into the USB port. 0 When you select something to play you will be asked how you want to queue up your music.
- Page 43 QUEUE This displays the queue NOTE 0 Note that Denon will accept no responsibility whatsoever for any problems arising with the data on a USB memory device when using this unit in conjunction with the USB memory device. 0 When a USB memory device is connected to this unit, the unit loads all of the files on the USB memory device.
- Page 44 Contents Connections Playback Settings Tips Appendix Listening to music on a Bluetooth device Music files stored on Bluetooth devices such as smartphones, digital music players, etc. can be enjoyed on this unit by pairing and connecting this unit with the Bluetooth device. Communication is possible up to a range of about 30 m.
- Page 45 Contents Connections Playback Settings Tips Appendix Listening to music on a Bluetooth Select this unit when its name appears in the list of device devices displayed on the screen of the Bluetooth device. In order to enjoy music from a Bluetooth device on this unit, the Bluetooth Connect to the Bluetooth device while “Bluetooth Pairing Mode”...
- Page 46 Contents Connections Playback Settings Tips Appendix Pairing with other Bluetooth devices NOTE 0 To operate the Bluetooth device with the remote control of this unit, the Bluetooth Pair a Bluetooth device with this unit. device needs to support the AVRCP profile. 0 The remote control of this unit is not guaranteed to work with all Bluetooth devices.
- Page 47 Contents Connections Playback Settings Tips Appendix Reconnecting to this unit from a Bluetooth device After pairing is completed, the Bluetooth device can be connected without performing any operations on this unit. This operation also needs to be performed when switching the Bluetooth device for playback.
- Page 48 Contents Connections Playback Settings Tips Appendix Getting the HEOS App You can use many online music streaming services from the HEOS App. Depending upon your geographical location, there are several options to choose from. For more information about which services are available in your area please visit http://www.HEOSbyDenon.com Download the HEOS App for iOS or Android by searching App Store, Google Play store or Amazon Appstore for “HEOS”.
- Page 49 Contents Connections Playback Settings Tips Appendix o Changing your HEOS Account HEOS Account HEOS Accounts can be registered in “HEOS Account” (v p. 108) in the Tap the “Music” tab. menu of this unit or by tapping “Music” tab - “Settings” icon a in the HEOS App.
- Page 50 Rooms Music Now Playing Tap the “Rooms” tab. If there are multiple HEOS devices, select “Denon PMA-150H”. 0 Tap the Pencil icon e at the top right to switch edit mode. You can change the displayed name. Remote control Front panel...
- Page 51 Contents Connections Playback Settings Tips Appendix o Selecting the music track or station from music sources Music Tap the “Music” tab and select a music source. 0 All music services displayed may not be available in your location. This Phone USB Music Music Servers Playlists...
- Page 52 Contents Connections Playback Settings Tips Appendix Browse the music to play. Album Now Playing After selecting a music track or radio station the app will Artist Album automatically change to the “Now Playing” screen. 10 Tracks,60 Mins.,2014 Track 01 0 When you select a music track to play you will be asked how you want to Rooms queue up your music.
- Page 53 Contents Connections Playback Settings Tips Appendix Listening to the same music in multiple Rooms Rooms rooms Drag one room into another to group them Drag one room into another to group them Dining Dining The HEOS system is a true multi-room audio system that automatically Song Name 1 Song Name 1 synchronizes audio playback between multiple HEOS devices so that the...
- Page 54 Contents Connections Playback Settings Tips Appendix o Ungrouping rooms Rooms Rooms Press and hold your finger on room that you want to Drag one room into another to group them Drag one room into another to group them remove from the group. Dining Dining Song Name 1...
- Page 55 Contents Connections Playback Settings Tips Appendix o Grouping all rooms (party mode) Rooms Rooms You can easily group 16 rooms together into Party Mode by using a Drag one room into another to group them Drag one room into another to group them “pinch”...
- Page 56 Contents Connections Playback Settings Tips Appendix o Ungrouping all rooms Rooms Rooms You can easily ungroup all of your rooms and exit Party Mode by using Drag one room into another to group them Drag one room into another to group them a “spread”...
- Page 57 Contents Connections Playback Settings Tips Appendix Listening to DAB/FM broadcasts For details about how to connect the antenna, see “Connecting a DAB/FM antenna” (v p. 28). n About DAB+ The main difference between DAB and DAB+ is the type of audio codec used.
- Page 58 Contents Connections Playback Settings Tips Appendix Changing the FM reception mode Presetting DAB/FM stations (Tune Mode) Up to 50 stations can be registered in the preset list. Change the reception mode to FM. If you cannot tune in automatically with Press OPTION during reception of the station to be AUTO mode (AUTO), then change the mode to manual mode (No registered.
- Page 59 Contents Connections Playback Settings Tips Appendix Automatically presetting FM stations Listening to stations registered in the (Auto Preset) preset list You can automatically register all FM stations that can be received to the Press OPTION during reception of a station. preset list.
- Page 60 Contents Connections Playback Settings Tips Appendix Deleting a station from the preset list Auto scanning DAB broadcast stations Press OPTION during reception of a station. Press OPTION during DAB reception. An option menu is displayed. An option menu is displayed. Use ui to select “Preset List”, then press ENTER.
- Page 61 Contents Connections Playback Settings Tips Appendix Switching the reception information for RDS search the currently tuned in DAB station RDS is a broadcasting service which allows a station to send additional information along with the regular radio program signal. Use this function to automatically tune to FM stations that provide the RDS Press INFO during DAB reception.
- Page 62 Contents Connections Playback Settings Tips Appendix PTY search Press OPTION during FM reception. An option menu is displayed. Use this function to find RDS stations broadcasting your desired program type (PTY). Use ui to select “PTY Search”, then press ENTER. PTY identifies the type of RDS program.
- Page 63 Contents Connections Playback Settings Tips Appendix TP search Radio Text TP identifies programs that carry traffic announcements. RT allows RDS stations to send text messages that appear on the display. This allows you to easily find out the latest traffic conditions in your area before leaving home.
- Page 64 Contents Connections Playback Settings Tips Appendix Using as a D/A converter Digital audio signals input from an external device or computer into this unit can be converted and output as analog signals using this unit’s D/A converter. (D/A converter function) AMP POWER DSD is a registered trademark.
- Page 65 USB 2.0: USB High speed/USB Audio Class Ver. 2.0 Download the dedicated driver from the “Download” section of the PMA-150H page of the Denon website 0 This unit was checked the operation using the system requirements by us, but onto your PC.
- Page 66 Contents Connections Playback Settings Tips Appendix Install the driver. C The wizard menu is displayed. Click “Next”. A Select the language to use for the installation. B Click “OK”. Remote control Front panel Rear panel Index unit...
- Page 67 Contents Connections Playback Settings Tips Appendix D Read the Software Licensing Agreement, and click “I accept the F Click “Install” on the installation start dialog. terms of the License Agreement”. The installation starts. Do not perform any operation on the PC E Click “Next”.
- Page 68 Contents Connections Playback Settings Tips Appendix G Click “Next”. H When the installation is completed, click “Finish”. Remote control Front panel Rear panel Index unit...
- Page 69 For the connection procedure, refer to the “Connecting a PC or C Check that there is a checkmark next to “Default Device” under in Mac” section. (v p. 26) “PMA-150H” of the “Playback” tab. When there is a checkmark for a different device, click “PMA-150H” and “Set Default”.
- Page 70 C Select the sampling rate and bit rate to be applied to the D/A from the USB-DAC function. converter. A Select “PMA-150H” and click “Properties”. It is recommended that “2 channel, 24 bit, 192000 Hz (Studio Quality)” is selected (Windows 7).
- Page 71 0 Operation may fail in some PC hardware and software configurations. 0 Please see the FAQ at www.denon.com if you experience any issues getting audio to play from your computer through this unit. You may also want to check the support pages for your audio player application.
- Page 72 F Check that “Use this device for sound output” is checked in “PMA-150H”. If a different device is checked, select and “Secondary click” on “PMA-150H”, and then select “Use this device for sound output”. Remote control Front panel Rear panel...
- Page 73 Connections Playback Settings Tips Appendix G Select the “PMA-150H” format. o Playback It is normally recommended to set the format to “384000.0 Hz” and “2ch-32 bit Interger”. Install the desired player software on your computer beforehand. Use the rear panel USB-DAC port to connect this unit to a computer.
- Page 74 Contents Connections Playback Settings Tips Appendix Connect and playback from a digital 0 Perform operations such as playback and pause on the computer. At this time, you device (Coaxial/Optical 1/Optical 2) cannot perform operations with buttons on this unit or the remote control. 0 When this unit is functioning as a D/A converter, sound is not output from the computer’s speakers.
- Page 75 Contents Connections Playback Settings Tips Appendix NOTE 0 Do not input non-PCM signals, such as Dolby Digital, DTS and AAC. This causes noise and could damage the speakers. o Specifications of supported audio formats See “D/A converter” (v p. 129). Remote control Front panel Rear panel...
- Page 76 Contents Connections Playback Settings Tips Appendix Connect and play back from an analog device Prepare for playback. Check the connection, then turn on this units. (“Connecting an analog device” (v p. 25)) Press ANALOG to switch the input source to “Analog ANALOG 1”...
- Page 77 Contents Connections Playback Settings Tips Appendix AirPlay function Music files stored on your iPhone, iPod touch, iPad or iTunes can be played on this unit via the network. Router This unit 0 Input source will be switched to “AirPlay” when AirPlay playback is started. 0 You can stop AirPlay playback by choosing other input source.
- Page 78 Contents Connections Playback Settings Tips Appendix Playing songs from your iPhone, iPod Playing iTunes music with this unit touch or iPad Install iTunes 10, or later, on a Mac or Windows PC that If you update your “iPhone/iPod touch/iPad” to iOS 4.2.1 or later, you can is connected to the same network as this unit.
- Page 79 Songs from an iPhone, iPod touch or iPad operating iOS 11.4 or later can be synced with multiple AirPlay 2 supported devices for simultaneous iPhone playback. Denon xxxxxxxx Speakers Play the song on your iPhone, iPod touch or iPad. AirPlay icon is displayed on the iPhone, iPod touch or iPad screen.
- Page 80 Contents Connections Playback Settings Tips Appendix Spotify Connect function Spotify is the world’s most popular streaming service. If you subscribe to Playing Spotify music with this unit Spotify Premium, you can control your new speaker with your phone or tablet. Because Spotify is built-in to your speaker, you can still take calls or Download the “Spotify App”...
-
Page 81: Sleep Timer
Contents Connections Playback Settings Tips Appendix Convenience functions This section explains how to use convenient functions that can be used for each input source. Control of “HEOS Favorites” operations is optimized for the app. For more information on acquiring the app, see “Getting the HEOS App”... - Page 82 Contents Connections Playback Settings Tips Appendix Playing back HEOS Favorites Deleting a HEOS Favorites Press FAVORITES CALL. Press FAVORITES CALL. The “HEOS Favorites” is displayed. The “HEOS Favorites” is displayed. Use ui to select the content you would like to While the HEOS Favorites content list is displayed, use playback, then press ENTER.
- Page 83 Contents Connections Playback Settings Tips Appendix Adjusting the tone n Treble Use ui to adjust the treble. Press TONE. -8 dB – +8 dB (Default: 0 dB) The tone menu is displayed. n Balance Use ui to select the item you want to adjust (“Source Direct”/“Bass”/“Treble”/“Balance”), then press ENTER.
- Page 84 Contents Connections Playback Settings Tips Appendix Switching the display’s brightness Using the sleep timer The display brightness can be adjusted between three levels. You can have the power automatically switched to standby once a set time has elapsed. This is convenient for listening while going to sleep. Press DIMMER.
-
Page 85: Menu Map
Contents Connections Playback Settings Tips Appendix Menu map For menu operations, see the following page. By default, this unit has recommended settings defined. You can customize this unit based on your existing system and your preferences. Setting items Detailed items Description Page Audio... - Page 86 Sets the unit power to standby when the unit is not in use. Usage Data Selects whether or not to send anonymous usage data to Denon. Firmware Set whether or not to check for firmware update, update the firmware, and display update and upgrade notifications.
- Page 87 Contents Connections Playback Settings Tips Appendix Setting items Detailed items Description/Detailed items Page Network Network Information Displays various information about the network. Wi-Fi The Wi-Fi function can be stopped to prevent noise that affects the sound quality. Bluetooth Stopping Bluetooth function reduces a source of noise that affects sound quality, enabling higher sound quality playback.
- Page 88 Contents Connections Playback Settings Tips Appendix Setting items Detailed items Description/Detailed items Page Network Settings Used for manually setting the IP address. DHCP IP Address Subnet Mask Gateway Save Diagnostics Used to check the network connection. Physical Connection Router Access Internet Access z1 Displayed when the “DHCP”...
-
Page 89: Nas
Contents Connections Playback Settings Tips Appendix Setting items Detailed items Description Page Tuning Aid Displays the reception intensity for DAB antenna installation. Station Order Sets the order of broadcasting stations to be displayed. DRC (Dynamic Range Control) Sets dynamic range control. DAB Initialize Resets the DAB modules. - Page 90 Contents Connections Playback Settings Tips Appendix Menu operation Press SETUP. The menu is displayed on the display. Use ui to select the menu to be set or operated, then press ENTER. Use ui to change to desired setting. Press ENTER to enter the setting. To return to the previous item, press BACK.
- Page 91 Contents Connections Playback Settings Tips Appendix Inputting characters On this unit, you can change the name displayed on the following screens Use 0 – 9, +10 until the desired character is displayed. to the names that you prefer. Friendly Name (v p. 101) The types of characters that can be input are as shown in the following table.
- Page 92 Contents Connections Playback Settings Tips Appendix Repeat step 2 to input characters then press ENTER to Using the cursor buttons register it. Display the screen for inputting characters. 0 Press CLEAR to erase the character that is currently selected. To change a character, use o p to align the cursor with the 0 Press and hold CLEAR for 3 seconds or more to erase all characters.
- Page 93 Contents Connections Playback Settings Tips Appendix Audio Make audio-related settings. Volume Limit H/P Amplifier Gain Make a setting for maximum volume. The volume cannot be increased Set the gain of the headphone amplifier. Set this according to the above this setting. impedance of the connected headphones.
- Page 94 Contents Connections Playback Settings Tips Appendix General TV Input o Auto-Play When a TV audio source is input to this unit, the unit automatically Set this when playing audio from a TV on this unit. When the TV is turned switches to the input source set in “Default Input”...
- Page 95 Contents Connections Playback Settings Tips Appendix IR Control Language Assign operations on this unit to the remote control of your TV. This Sets the language for display the menu. enables you to operate this unit with the remote control of your TV. English / Deutsch / Français / Italiano / Nederlands / Español / Svenska / Русский...
- Page 96 Information provided by customers will be used as reference material for o Check for Update product development purposes in the future. Denon will never provide any information we collect to third parties. Check for firmware updates. Provide information on the operating status The firmware can be updated if a firmware update has been released.
- Page 97 Contents Connections Playback Settings Tips Appendix o Auto-Update o Allow Update This unit will automatically update to the newest firmware when in Enable or disable updates and upgrades for this unit. standby mode. Enables this unit to receive updates and (Default): upgrades.
- Page 98 If the error continues, check the network environment. 0 Information regarding the “Update” function and “Add New Feature” will be announced on the Denon website each time related plans are defined. See the Denon website for details about upgrades.
- Page 99 Contents Connections Playback Settings Tips Appendix Information Reset o Notification Alerts Perform this procedure if the display is abnormal or if operations cannot be performed. Restores the contents of each setting to the factory settings. Sets whether or not to display the notification when the power is turned Make settings again.
- Page 100 Contents Connections Playback Settings Tips Appendix Network To use this unit by connecting it to a home network (LAN), you must configure network settings. If you set up your home network (LAN) via DHCP, set “DHCP” to “On”. (Use the default setting.) This allows this unit to use your home network (LAN). When assigning an IP address to each device manually, you need to assign an IP address to this unit using the “IP Address”...
- Page 101 0 When “Network Control” is set to “On”, the unit consumes more standby power. 0 Up to 30 characters can be input. 0 For character input, see “Inputting characters” (v p. 91). 0 The default Friendly Name on first use is “Denon PMA-150H”. Remote control Front panel...
- Page 102 Contents Connections Playback Settings Tips Appendix o Wi-Fi Setup Connection Connect to a wireless LAN (Wi-Fi) router. Choose whether to connect the home network to a wireless LAN or a The router can be connected in the following ways. Select the wired LAN.
- Page 103 2. Check that your iOS device is connected to the wireless LAN (Wi- The time for pressing the button varies depending on the router. Fi) router and select “Denon PMA-150H” from “SET UP NEW 3. Press ENTER within 2 minutes.
- Page 104 Input the name of the wireless network SSID: 2. Connect the wireless LAN of the PC or tablet used to “Denon PMA-150H” (SSID). when the message “Connect your Wi-Fi device to Wi-Fi network Select the encryption method according called “Denon PMA-150H””...
- Page 105 Contents Connections Playback Settings Tips Appendix o Subnet Mask Settings When connecting an xDSL modem or connector adapter directly to Configure the IP address. this unit, input the subnet mask indicated in the documentation If you are using a broadband router (DHCP function), the information supplied by your provider.
- Page 106 Contents Connections Playback Settings Tips Appendix o Internet Access Diagnostics Checks whether this unit has access to the Internet (WAN). Used to check the network connection. o Physical Connection Failed to connect to the Internet. Check Error: the Internet connection environment or Checks the physical LAN port connection.
- Page 107 Contents Connections Playback Settings Tips Appendix Set the DAB-related settings. Only displayed when the input source is set to “DAB” in “DAB” of the settings menu. (v p. 35) Tuning Aid Station Order The reception intensity of the currently tuned in frequency is displayed. The service list is created with the auto scan function.
- Page 108 Contents Connections Playback Settings Tips Appendix HEOS Account Make HEOS Account-related settings. HEOS Account is needed in order to use HEOS Favorites. The menu displayed differs depending on the status of the HEOS Account. You have not signed in You have already signed in o I have a HEOS Account o Signed in As If you already have a HEOS Account, enter the current account name...
- Page 109 Contents Connections Playback Settings Tips Appendix o Contents Troubleshooting Power does not turn on/Power is turned off Tips LED is flashing I want to listen to high sound performance playback Operations cannot be performed through the remote control unit I want to adjust the tone myself No sound comes out I want sound playback that is faithful to the original sound Sound is interrupted or noise occurs...
-
Page 110: Tips
Contents Connections Playback Settings Tips Appendix Tips I want to listen to high sound performance playback The Wi-Fi function can be stopped to prevent noise that affects the sound quality. Set “Disabled” to the “Wi-Fi”. (v p. 100) Stopping Bluetooth function reduces a source of noise that affects sound quality, enabling higher sound quality playback. Set “Disabled” to the “Bluetooth”. - Page 111 Contents Connections Playback Settings Tips Appendix Simple operations in the power off state Press remote control input source select buttons, 1/3 buttons or FAVORITES CALL button to simultaneously perform each operation and switch the unit on. When the “Network Control” function is set to “On”, you can perform playback, or other operations through AirPlay or HEOS App. (v p. 101) I want the volume not to become too loud by mistake Set the volume upper limit for “Volume Limit”...
-
Page 112: Troubleshooting
Contents Connections Playback Settings Tips Appendix Troubleshooting If a problem should arise, first check the following: 1. Are the connections correct? 2. Is the set being operated as described in the owner’s manual? 3. Are the other devices operating properly? 0 If steps 1 to 3 above do not improve the problem, restarting the device may improve the problem. - Page 113 Contents Connections Playback Settings Tips Appendix Power does not turn on / Power is turned off Power is not turned on. Check whether the power plug is correctly inserted into the power outlet. (v p. 32) This unit is in standby mode. Press the X button on the unit or the AMP POWER X button on the remote control. (v p. 34) Power automatically turns off.
- Page 114 Contents Connections Playback Settings Tips Appendix Operations cannot be performed through the remote control unit Operations cannot be performed through the remote control unit. Batteries are worn out. Replace with new batteries. (v p. 8) Operate the remote control unit within a distance of about 7 m from this unit and at an angle of within 30°. (v p. 8) Remove any obstacle between this unit and the remote control unit.
- Page 115 Contents Connections Playback Settings Tips Appendix No sound comes out No sound is produced. Or sound is distorted. Check the connections for all devices. (v p. 21) Insert connection cables all the way in. Check that input connectors and output connectors are not reversely connected. Check cables for damage.
- Page 116 Contents Connections Playback Settings Tips Appendix Sound is interrupted or noise occurs During playback from the Internet radio or USB memory device, sound is occasionally interrupted. When the transfer speed of the USB memory device is slow, sound may occasionally be interrupted. The network communication speed is slow or the radio station is busy.
- Page 117 Contents Connections Playback Settings Tips Appendix Desired sound does not come out The volume does not increase. The maximum volume is set too low. Set the maximum volume using “Volume Limit” on the menu. (v p. 93) Headphone volume is low. Switch “H/P Amplifier Gain”...
- Page 118 Contents Connections Playback Settings Tips Appendix AirPlay cannot be played back The AirPlay icon is not displayed on iTunes / iPhone / iPod touch / iPad. This unit and PC / iPhone / iPod touch / iPad are not connected to the same network (LAN). Connect it to the same LAN as this unit. (v p. 29) The firmware on iTunes / iPhone / iPod touch / iPad is not compatible with AirPlay.
- Page 119 Contents Connections Playback Settings Tips Appendix USB memory devices cannot be played back USB memory device is not recognized. Disconnect and reconnect the USB memory device. (v p. 27) Mass storage class compatible USB memory devices are supported. This unit does not support a connection through a USB hub. Connect the USB memory device directly to the USB port. The USB memory device must be formatted to FAT32 or NTFS.
- Page 120 Contents Connections Playback Settings Tips Appendix File names on the USB memory device are not displayed properly The file names are not displayed properly (“...”, etc.). Characters that cannot be displayed are used. This is not a malfunction. Characters that cannot be displayed have been used. On this unit, characters that cannot be displayed are replaced with a “.
- Page 121 Contents Connections Playback Settings Tips Appendix The Internet radio cannot be played back A list of broadcasting stations is not displayed. The LAN cable is not properly connected, or the network is disconnected. Check the connection status. (v p. 29) Perform the network diagnostic mode.
- Page 122 Contents Connections Playback Settings Tips Appendix Music files on PC or NAS cannot be played back (Music server) Files stored on a computer cannot be played. Files are stored in a non-compatible format. Record in a compatible format. (v p. 131) Files that are copyright protected cannot be played on this unit.
- Page 123 Contents Connections Playback Settings Tips Appendix Various online services cannot be played Various online services cannot be played. The online service may have been discontinued. Cannot connect to a wireless LAN network Cannot connect to the network. The network name (SSID), password and encryption setting have not been set up correctly. Configure the network settings according to the setting details of this unit.
- Page 124 “Unsupported” is displayed when audio signals that are not supported by this unit are input. Check the settings on your computer or player software. (v p. 73) If the your computer is running a macOS, make sure the “PMA-150H” format is set to “384000.0 Hz” or less in “Audio MIDI Setup”. (v p. 73) Remote control...
- Page 125 Contents Connections Playback Settings Tips Appendix Audio from digital devices cannot be played back (Coaxial/Optical) “Signal Unlock” is displayed. When digital audio signals cannot be detected properly, “Signal Unlock” is displayed. (v p. 74) “Unsupported” is displayed. “Unsupported” is displayed when audio signals that are not supported by this unit are input. Check the audio output signal format from your digital device.
- Page 126 Contents Connections Playback Settings Tips Appendix Update/upgrade error messages If an update/upgrade is interrupted or fails, an error message appears. Display Description Connection failed. Please check your network, then try The network connection is unstable. again. Connection to the server failed. Check your network environment and try the update again.
-
Page 127: Network Settings
Contents Connections Playback Settings Tips Appendix Resetting network settings If network contents cannot be played or the unit cannot connect to the network, restarting the unit may improve the problem. We recommend restarting the unit before returning the settings to the default settings. (v p. 112) If the operations are not improved by restarting the unit, follow the steps below. - Page 128 Contents Connections Playback Settings Tips Appendix Playing back a USB memory devices This unit is compatible with MP3 ID3-Tag (Ver. 2) standard. This unit is compatible with WMA META tags. If the image size (pixels) of an album artwork exceeds 500 × 500 (WMA/MP3/Apple Lossless/DSD) or 349 × 349 (MPEG-4 AAC), then music may not be played back properly.
-
Page 129: Usb Memory Device
Contents Connections Playback Settings Tips Appendix D/A converter o Maximum number of playable files and folder The limits on the number of folders and files that can be displayed by this unit are as follows. o Specifications of supported audio formats Media USB memory device USB-DAC... - Page 130 Contents Connections Playback Settings Tips Appendix Playing back a Bluetooth device This unit supports the following Bluetooth profile. A2DP (Advanced Audio Distribution Profile): When a Bluetooth device that supports this standard is connected, monaural and stereo sound data can be streamed at a high quality. AVRCP (Audio/Video Remote Control Profile): When a Bluetooth device that supports this standard is connected, the Bluetooth device can be operated from this unit.
- Page 131 Contents Connections Playback Settings Tips Appendix Playing back files stored on a PC and NAS This unit is compatible with MP3 ID3-Tag (Ver. 2) standard. This unit is compatible with WMA META tags. If the image size (pixels) of an album artwork exceeds 500 × 500 (WMA/MP3/WAV/FLAC) or 349 × 349 (MPEG-4 AAC), then music may not be played back properly.
- Page 132 Contents Connections Playback Settings Tips Appendix Playing back Internet Radio o Playable broadcast station specifications Sampling frequency Bit rate Extension 32/44.1/48 kHz 48 – 192 kbps .wma 32/44.1/48 kHz 32 – 320 kbps .mp3 .aac/ MPEG-4 AAC 32/44.1/48 kHz 48 – 320 kbps .m4a Last function memory This function stores the settings which were made before going into the...
- Page 133 Contents Connections Playback Settings Tips Appendix Explanation of terms o Audio FLAC (Free Lossless Audio Codec) FLAC stands for Free lossless Audio Codec, and is a lossless free audio Apple Lossless Audio Codec file format. Lossless means that the audio is compressed without any loss This is a codec for lossless audio compression method developed by in quality.
- Page 134 Contents Connections Playback Settings Tips Appendix THIS SOFTWARE IS PROVIDED BY THE COPYRIGHT HOLDERS AND MP3 (MPEG Audio Layer-3) CONTRIBUTORS “AS IS” AND ANY EXPRESS OR IMPLIED This is an internationally standardized audio data compression scheme, WARRANTIES, INCLUDING, BUT NOT LIMITED TO, THE IMPLIED using the “MPEG-1”...
- Page 135 Contents Connections Playback Settings Tips Appendix o Network Sampling frequency Sampling involves taking a reading of a sound wave (analog signal) at AirPlay regular intervals and expressing the height of the wave at each reading in AirPlay sends (plays) contents recorded in iTunes or on an iPhone/iPod digitized format (producing a digital signal).
-
Page 136: Pairing
Contents Connections Playback Settings Tips Appendix o Other WPA-PSK/WPA2-PSK (Pre-shared Key) This is a simple authentication system for mutual authentication when a Pairing preset character string matches on the wireless LAN access point and Pairing (registration) is an operation that is required in order to connect a client. - Page 137 Contents Connections Playback Settings Tips Appendix Trademark information The Bluetooth word mark and logos are registered trademarks owned ® by the Bluetooth SIG, Inc. and any use of such marks by D&M Holdings Apple, AirPlay, iPad, iPad Air, iPad Pro and iPhone are trademarks of Inc.
- Page 138 Contents Connections Playback Settings Tips Appendix Specifications o Audio amplifier Output characteristics Rated output: Dual-channel drive 35 W+35 W (8 Ω/ohms, 1 kHz, T.H.D. 0.1 %) 70 W+70 W (4 Ω/ohms, 1 kHz, T.H.D. 0.1 %) Output terminals: Speaker: 4-16 Ω/ohms (impedance) Headphones: Φ6.3 mm jack Total harmonic distortion: 0.002 % (Digital input, rated output -3 dB, 8 Ω/ohms, 1 kHz)
-
Page 139: Wireless Lan
Contents Connections Playback Settings Tips Appendix o Tuner section [FM] Receiving Range: 87.50 MHz – 108.00 MHz Effective sensitivity: 1.2 μV / 75 Ω/ohms FM Channel separation: 42 dB (1 kHz) FM S/N ratio: Monaural : 70 dB Stereo : 70 dB FM THD+N (1 kHz): Monaural : 0.4 % Stereo : 0.4 %... - Page 140 Contents Connections Playback Settings Tips Appendix o Bluetooth section Communications system: Bluetooth Specification Version 4.1 Transmission power: Bluetooth Specification Power Class 1 Maximum communication range: Approx. 30 m in line of sight Used frequency range: 2.4 GHz Modulation scheme: FHSS (Frequency-Hopping Spread Spectrum) Supported profiles: A2DP (Advanced Audio Distribution Profile) 1.2 AVRCP (Audio Video Remote Control Profile) 1.5...
- Page 141 Contents Connections Playback Settings Tips Appendix o General Operating temperature: +5 ℃ - +35 ℃ Power supply: AC 230 V, 50/60 Hz Power consumption: 65 W Power consumption in standby modes : Setting items in the menu Standby modes Power consumption Network Control Auto-Play (v p.
- Page 142 Contents Connections Playback Settings Tips Appendix Dimensions (Unit : mm) Weight : 5.6 kg Remote control Front panel Rear panel Index unit...
-
Page 143: Table Of Contents
Contents Connections Playback Settings Tips Appendix Index Firmware update ..........96 Menu map ............85 Front panel ............. 12 AirPlay ............77 NAS ............38, 131 Auto Standby ..........95 HEOS Account ........49, 108 Network settings .......... 100 HEOS Favorites ..........81 Bluetooth device .......... - Page 144 Contents Connections Playback Settings Tips Appendix Rear panel ............14 USB memory device ........ 27, 41 Remote control unit ........17 Resetting network settings ......127 Wi-Fi settings ..........102 Wired LAN ..........29, 102 Sleep timer ............. 84 Wireless LAN ......... 30, 102 Spotify ............
- Page 145 3520 10700 00AD Copyright © 2019 D&M Holdings Inc. All Rights Reserved.
Need help?
Do you have a question about the PMA-150H and is the answer not in the manual?
Questions and answers