Table of Contents
Advertisement
Quick Links
Introduction:
DA-70544 is an USB2.0/E-SATA to dual SATA HDD docking station that
allows direct data exchanging between SATA II 3.0G and High-speed
USB. It supports Offline Clone, which is able to copy data and system
files from Source HDD to Target HDD completely via finger touch.
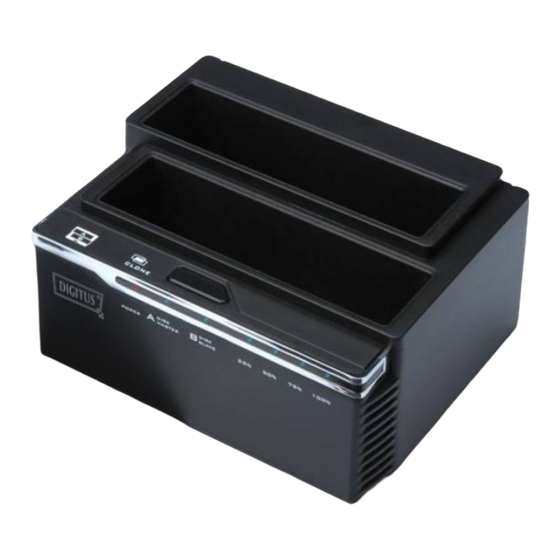
Function Chart:
1、Power switch (ON/OFF)
4、E-SATA interface
6、Bay 'A' indicator
8、Clone processing indicator
DUAL Docking Station
User
DA-70544
2、DC input
5、Power indicator
7、Bay 'B' indicator
- 1 -
Manual
9、Clone button
3、USB interface
Advertisement
Table of Contents

Subscribe to Our Youtube Channel
Related Manuals for Digitus DA-70544


Summary of Contents for Digitus DA-70544
- Page 1 Manual DA-70544 Introduction: DA-70544 is an USB2.0/E-SATA to dual SATA HDD docking station that allows direct data exchanging between SATA II 3.0G and High-speed USB. It supports Offline Clone, which is able to copy data and system files from Source HDD to Target HDD completely via finger touch.
- Page 2 Caution: 1. Once using E-SATA interface, it can only recognize one HDD in PC. If 2 HDDs are inserted in the dock, it can only recognize Bay ‘A’ HDD. If only insert one HDD in the dock, both Bay’A’ and Bay ’B’...
- Page 3 Clone will be invalid. Offline clone a、 Insert source HDD to Bay ‘A’; target HDD to Bay ‘B’, and then turn on the power b、Once the Bays indicators are on, that means DA-70544 is ready for clone. - 3 -...
- Page 4 c、Press and hold the clone button for 3 seconds until the indicator light is on, press the button once more for Clone confirmation. Offline clone is starting to process. d、Clone progress indicator flashes and shows the progress (25%, 50%, 75%, 100%). - 4 -...
- Page 5 e、Once clone is finished, all progress indicators will light up. f、Turn off power and take out the HDD carefully HDD Partition a、Open Disk management and select the unallocated area b、Right click 〝New partition〞for further action - 5 -...
- Page 6 c、“Next” - 6 -...
- Page 7 d、Base on your need and click “Next” e、Please enter the new partition capacity and click “Next” for further action - 7 -...
- Page 8 f、Assign the drive letter and “Next” g、Select “quick format” to format the new partition - 8 -...
- Page 9 h、Click “finish” i、Partition completed, the new partition can be found. - 9 -...
Need help?
Do you have a question about the DA-70544 and is the answer not in the manual?
Questions and answers