Table of Contents
Advertisement
Quick Links
Advertisement
Table of Contents

Related Manuals for Hand Held Products Nautiz X3


Summary of Contents for Hand Held Products Nautiz X3
- Page 1 User‟s Manual Nautiz X3...
- Page 2 Handheld. Handheld has the right to modify the product or the software in order to improve the stability, features and design of the product.
- Page 3 CONTENTS Technical Support Safety Information About the Product Unpacking Product Status Indicators Components and Buttons Working with Your Unit Inserting/Removing SIM Card Battery Information Performing Initial Startup Attaching Hand Strap Installing Screen Protector Using Expansion Port Entering Data/Using Stylus Pen Password Protecting Resetting Memory...
-
Page 4: Technical Support
Please contact your reseller for product support. If you discover any problems with the product, please contact Handheld‟s Technical Support Team on +46 510 54 71 70. Alternatively, you can view the FAQ by visiting our website at http://www.handheldgroup.com for more information. -
Page 5: Safety Instructions
SAFETY INSTRUCTIONS The following information is for the safety of users and to prevent the product from being damaged. Please read the followings carefully and use the product accordingly. Power In the event of abnormal sounds, smells, or smoke, please contact Customer Support after unplugging the product from the power outlet and removing the battery. - Page 6 Only use the provided batteries, power adapter, and cradle. Handheld is not responsible for damages to the unit resulting from other software installed by a user after purchasing the product.
-
Page 7: About The Product
ABOUT THE PRODUCT UNPACKING PRODUCT The images in this user manual may not reflect the color and shape of the actual product. Please check to make sure there are no missing components. Contact our Customer Care Center if you wish to purchase any additional or optional products Main Unit Hand strap Stylus and Stylus Lanyard... -
Page 8: Status Indicators
STATUS INDICATORS Following are some of the status indicators seen on your unit. The backup battery levels are low. Dialling without a SIM Card. More than one instant message Call in progress. received. Calls are being forwarded. More than one e-mail or text Call placed on hold message received. - Page 9 Main battery is charging. Main battery is half full Main battery is low Main battery is fully charged Main battery is charged sufficiently Main battery is very low for use.
-
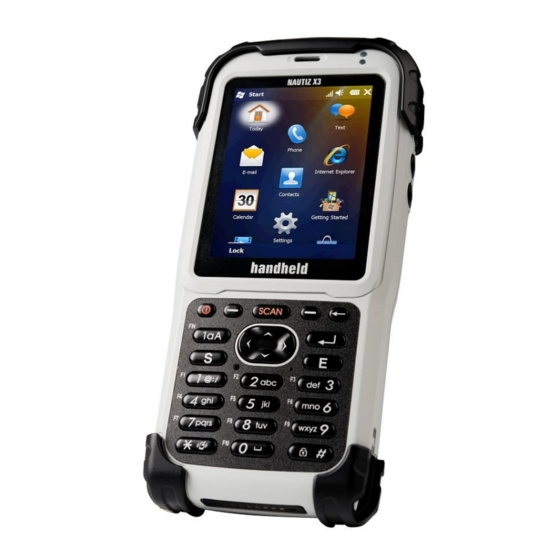
Page 10: Components And Buttons
COMPONENTS AND BUTTONS Front View and Keypad Buttons Top View Component Description Speaker Omits sound when using cellular function Flashes slow blue to indicate cellular network coverage 2 Upper Indication LED´s Flashes quick blue while searching for cellular networks Turned off means battery is not charging Red indicated battery is charging 2 Lower Power LED... - Page 11 Component Description Laser Scanner Used to read 1D barcodes Imager Scanner Used to capture data in 2D barcodes Component Description Stylus Pen Use to tap touch screen to make selections Camera and Flash Takes still pictures and records video clips, flash (above) provides light for pictures Hand Strap Holder The hand strap attaches here...
-
Page 12: Working With Your Unit
WORKING WITH YOUR UNIT INSERTING/REMOVING SIM CARD If you wish to enable cellular functions insert your SIM card while battery is not attached as seen in the diagram below. Insert: You can remove the SIM card anytime you do not wish to use cellular function as seen below. -
Page 13: Battery Information
Charging may take longer if the device is turned on. Charging temperature ranges from 0°C to 40°C (32°F to 104°F) Checking remaining battery power To check the charging status of the NAUTIZ X3: Tap Start > Settings > Systems > Power and open the Power Screen. -
Page 14: Optimizing Battery Life
Optimizing battery life Please follow the battery saving instructions below: 1. Leave the NAUTIZ X3 connected to the charger when it is not in use OR remove the battery. 2. Set the device to power down when it has not been used for a certain period of time. -
Page 15: Performing Initial Startup
Set the backlight to power down when it has not been used for a certain period of time. 1. Start > Settings > System > Backlight Icon > Battery Power tab. 2. On Battery Power: Disable the backlighting if the device has not been used for a. - Page 16 2. Press the power button to turn on your device. The backlight of the keypad will light up and, after a few seconds, the setup screen appears. 3. Follow the on-screen instructions to complete the setup wizard. 4. For models with the phone function only: If a SIM card has been inserted and the mobile phone network operator (or you) has set the PIN, you will be prompted to enter the PIN.
-
Page 17: Using Stylus Pen
ENTERING DATA/USING STYLUS PEN When entering data using the keypad, you can use just one hand or both hands Using Stylus Pen Use can use the stylus to navigate and select objects on the screen. Pull the stylus out of the slot and extend it for ease of use. - Page 18 Do not use other tools except for the stylus provided by Handheld in order to avoid damage on the screen. PASSWORD PROTECTING/LOCKING Password Protecting Password protecting your device will prevent unauthorized use. To password protect go to Start > Setting > Lock > Password tab.
- Page 19 7. Tap Confirm. When a user tries to access NAUTIZ X3 after a certain period of unused time, a password screen will be prompted. This window is also prompted when NAUTIZ X3 is connected with a host computer via the cradle or via the communication cable.
- Page 20 Press power button at the front of the device for a short while. MEMORY Copy the data in the Nautiz X3 and keep it in a separate place. Data stored in the Nautiz X3 may be deleted during repair or upgrade. So make sure to take a back up of important data.
- Page 21 The home screen moves up and down if you scroll the screen up and down while pressing and holding on the screen with your finger. And the information on the selected application will be displayed on the status bar as the names below information status indicating bar moves.
- Page 22 To customize Home Screen, tap Start > Setting > Home icon. You can customize the background of the screen using the Appearance tab and change the screen properties using the Property tab. Classic Home Screen You can change the Home Screen into the classic layouts used for Windows Mobile 6.5. To change the screen to the classic layouts, go to Start >...
- Page 23 Uncheck the checkbox that was pre-checked by Windows and select other options. Then press OK. Note: Task bar is only available in the classic layout. Soft key indicator bar The soft key indicator bar is displayed at the bottom of the screen, and there are two post- key buttons.
- Page 24 The user applications and folders are displayed on the Start Screen. Applications and folders displayed on the Start Screen Home: Closing Start menu and displaying the Home Screen. Phone: Making calls, Answering calls, changing calls, and configuring call conference. Text: Sending and receiving SMS text messages. E-mail: Sending and receiving emails.
- Page 25 Getting Started: Launching Start applications. Alarms: Setting local time of each country and alarms. Picture & videos: Viewing and managing pictures, animation, gif, and video files. Windows Media: Playing audio and video files. Marketplace: Purchasing or downloading applications from the Marketplace. You can reconnect to it after upgrading via the Internet using ActiveSync, if it is your first time use.
- Page 26 Game: Launching games. Notes: Creating handwriting memos or pictures or voice recoding files. Tasks: Managing tasks. File Explorer: Configuring and managing files in the device. Active Sync: Synchronizing information between NAUTIZ X3 and a host computer or Exchange Server.
- Page 27 For further information, please refer to user‟s manual of Microsoft application for Windows Mobile 6.5 . Search Phone: Searching for contacts, data, or other information in NAUTIZ X3. For further information, please refer to user‟s manual of Microsoft applications for Windows Mobile 6.5.
- Page 28 Bluetooth: Opening Bluetooth applications, setting NAUTIZ X3 to visible mode, and searching for other Bluetooth devices within range. Clock & Alarms: Setting the clock of device to the data and time of local residence or if you are on travel, you can set them to the corresponding area. You can set alarm for specific date and time.
- Page 29 Beam: A feature related to IrDA (however, it is not supported on NAUTIZ X3). Connections: In order for the device to connect to the Internet or private local networks by configuring more than of connection types – Dial-up, GPRS, Bluetooth, Modem, etc.
- Page 30 Owner Information: Entering NAUTIZ X3 owner‟s information. Phone: Configuring phone settings. System folder (only 2D Imager barcode Set) About: Viewing the basic system information such as the version of Windows Mobile R, the type of processor used for NAUTIZ X3, etc.
- Page 31 Certificates: Verifying the certificate information installed in NAUTIZ X3. Customer Feedback: Submitting a user‟s comment on Windows Mobile 6 software. Device Profile: Verifying the build information of NAUTIZ X3 and the other module information. Encryption: Encrypting files in a storage card. The encrypted files can be only read on this device.
- Page 32 Memory: Checking memory allocation status and memory card information; aborting currently running programs. Modem Band Setting: Configuring Modem band settings. Regional Settings: Configuring NAUTIZ X3 locale settings according to each region including how to display numbers, currencies, date/time, or time format. Remove Programs: Removing programs installed in NAUTIZ X3.
-
Page 33: Usb Port
3. Turn volume on or off by selecting turn-off or turn-on radio button. You can adjust system volume via Sounds and Alarms window or use the up-and-down button located on the side of NAUTIZ X3. Display of battery level Battery icon on the Navigation Bar indicates battery power level. If the main battery is lower than the pre-specified level, the corresponding icon displays the level;... -
Page 34: Connection To A Pc
The NAUTIZ X3 is equipped with Bluetooth technology that can exchange information (files, appointments, tasks, etc.) with other Bluetooth-enabled devices such as phones, printers, access points or mobile computers. To use the NAUTIZ X3 as a modem, establish a dial-up modem connection between the device and a computer. - Page 35 Microsoft stack supports smart synchronisation. For details, refer to MICROSOFT MSDN. Bluetooth Composition - In principle, the NAUTIZ X3 is configured to use the Microsoft Bluetooth stack. The services available via Microsoft Bluetooth stack is listed in Table 6-1. Table 6-1. Bluetooth services...
- Page 36 If there is no active pairing, the Bluetooth wireless connection will be disconnected. A pairing between the NAUTIZ X3 and another Bluetooth device will time out if there is no data exchange between the two devices. The NAUTIZ X3 will be temporarily...
- Page 37 3. Ensure that the devices are within 10m (30ft) of each other. 4. Choose Start > Settings > Bluetooth > Add New Device 5. Tap Add New Device. The NAUTIZ X3 will search for new Bluetooth devices within range. 6. Choose a device from the list.
- Page 38 For more details, refer to the user manual for the headset. Only WAN audio will be transmitted to a headset. System audio will be transmitted using the NAUTIZ X3 speaker. You can answer and make calls using a hands-free profile.
- Page 39 Bluetooth devices, please refer to the user manual for the headset. Note: While an active pairing is being established, the NAUTIZ X3 will not go into pause mode even when the power button is pressed. A notification message will appear instead.
- Page 40 12. Tap New Outgoing Port. The Add a Device screen will be displayed. 13. Select the serial device and tap Next. 14. Select a COM port from the drop-down menu. 15. Tap Finish Note: This process alone will not create a partnership. To make a partnership again, the application must run Microsoft Bluetooth Stack by opening the selected COM port.
- Page 41 For more details, refer to the user manual for the headset. Note: If smart synchronisation is pre-configured or a pre-defined PIN is requested, the password prompt will not be displayed. 5. Tapping Connection will pair NAUTIZ X3 with the stereo headset.
- Page 42 Note: If smart synchronisation is pre-configured or a pre-defined PIN is requested, the password prompt will not be displayed. 3. Tap Connection. The NAUTIZ X3 will connect to the stereo headset. WI-FI(802.11) If your unit‟s cellular function is enabled, you can connect to wireless networks to access the Internet.
-
Page 43: Wireless Wan
WIRELESS WAN Settings may vary depending on country. Please contact your service provider or retailer for further information. 1. Tap Start -> Settings -> Connections -> Connections -> “Tasks”. 2. Tap “Add a new modem connection”. 3. Enter the Connection name and select modem. 4. - Page 44 8. If you need to define settings, tap the “Advanced” button 9. Tap Finish Manual Network Settings for WAN Manual settings may interfere with regular communication. The default setting is Automatic. 1. Wireless manager -> tap the Menu button -> Phone Settings -> Network or Phone Program ->...
- Page 45 CAMERA Taking pictures 1. Tap Start > Pictures and Videos icon. 2. Choose camera from the navigation bar. 3. Check the image in the view finder and, if necessary, adjust settings. 4. Press the Enter key to take a picture. Video Recording 1.
-
Page 46: Barcode Scanner
NAUTIZ X3 forward and backwards until you find the optimal range of operation. The larger the barcode, the greater the distance required between the barcode and the NAUTIZ X3. If the distance between the barcodes is shorter, the closer the distance required between the barcode and the NAUTIZ X3. - Page 47 Scanning barcodes Check that the scanning application is running on the NAUTIZ X3. The laser beam exits the end of the NAUTIZ X3 while the scan button is pressed. The red scan beam should cover the entire barcode. The laser beam indicates that scanning is in progress.
- Page 48 Image scanning 1. Check that an associated program, such as Notes, is running on the NAUTIZ X3. 2. Press the scan button to turn on the aiming pattern to help level the scanner with the target.
- Page 49 If the vehicle's window contains heating threads, this could affect the GPS performance of the device. To improve GPS signals, mount the NAUTIZ X3 in a clear line to the sky, without any obstacles. To access satellite information, the NAUTIZ X3 and GPS...
-
Page 50: Phone Features
The NAUTIZ X3 can be used for making calls, saving contacts, managing call records, sending text messages, storing received messages, etc. In addition, users can browse the web via a dial-up network to send data in real time with a variety of office applications. - Page 51 CALLING There are three audio modes to choose from when making a telephone call. Handset mode: Uses the speaker at the front of the NAUTIZ X3. Handset mode is the default mode. Speaker mode: Enables the speaker mode.
- Page 52 Using wired headsets Headsets can be used for audio applications. Connect a headset (earphones) to the earphone plug located on the side of the NAUTIZ X3. Adjust the volume before connecting the headset. When a headset is connected, the speaker is disabled.
- Page 53 3. Choose between Call Work, Call Home and Call Mobile. Make calls using the Call History Tap Start > Phone or Tap the “S” Talk key on the NAUTIZ X3 keypad. Tap the desired item from the Call History.
- Page 54 Start a voice call by tapping the phone icon next to the number. To make or terminate a call, tap End or tap the red end call on the NAUTIZ X3 keypad. Making emergency calls You can make an emergency call even if no SIM card is installed. For more details about installing a SIM card, please refer to SIM Card Installation on page 3.
- Page 55 Mute the microphone during a call Muting the microphone during a call will allow you to continue hearing the other person, but they will be unable to hear you. 1. Tap Start > Phone or Tap the “S” Talk key on the NAUTIZ X3 keypad.
- Page 56 To create a memo during a call, tap the Menu button and select Create Memo. How to check memos created during a call 1. Tap Start > Phone, the green talk key or the Send "S" key on the NAUTIZ X3 keypad.
- Page 57 1. Locate any contacts and numbers you wish to add to Speed Dial from the Call History. 2. Tap Start > Phone, the green talk key or the Send "S" key on the NAUTIZ X3 keypad. 3. Tap Speed Dial > Menu > New.
- Page 58 Managing the Call History You can reset talk time and delete call history. Modifying the Call History View 1. Tap Start > Phone, the green talk key or the Send "S" key on the NAUTIZ X3 keypad. 2. Tap Call History.
- Page 59 Reset the Recent Call Counter 1. Tap Start > Phone, the green talk key or the Send "S" key on the NAUTIZ X3 keypad. 2. Tap Call History. 3. Tap Menu. 4. Choose Call Timers. 5. Tap Reset. Delete all Call History 1.
- Page 60 4. Choose Delete All Calls. 5. Tap Yes. View Call Details 1. Tap Start > Phone, the green talk key or the Send "S" key on the NAUTIZ X3 keypad. 2. Tap Call History. 3. Select an item to view call details.
-
Page 61: Text Messaging
1. Tap Start > Phone, the green talk key or the Send "S" key on the NAUTIZ X3 keypad. 2. Tap Call History. 3. Press and hold the desired item. 4. Choose an item from the menu. Switching Between Calls How to switch between two calls: 1. - Page 62 You can make a call, save, read or delete messages from the text message screen. If you subscribe to Caller ID services, you can identify the caller by comparing the number to the information saved in Contacts. You can read saved text messages when the phone functionality is turned off. 1.
- Page 63 A: Please use com port 4 Q: Does the Nautiz X3 support USB Host or Client? A: Nautiz X3 supports USB host and client on a software level. By changing the settings in the application, the user can choose either one of them.
- Page 64 Protects the screen from damage caused by abrasion and foreign bodies. o Extends the lifespan of the touch screen. The NAUTIZ X3 screen is made from glass. Do not drop the NAUTIZ X3 or apply excessive force to the screen.
- Page 65 If the battery leaks, be careful not to allow the fluid to come into contact with skin or eyes. If battery fluid comes into contact with skin or eyes, rinse using plenty of water and seek immediate medical advice. If you suspect damage to the device or the battery, contact Handheld. Cleaning Cleaning the exterior Use only detergents or cleaners dedicated for computers.
- Page 66 Contamination levels may vary depending on the users' operational environment, it is recommended that the device be cleaned regularly.
Need help?
Do you have a question about the Nautiz X3 and is the answer not in the manual?
Questions and answers