Table of Contents
Advertisement
Quick Links
Advertisement
Table of Contents

Related Manuals for AirLive WL-1200CAM


Summary of Contents for AirLive WL-1200CAM
- Page 1 WL-1200CAM Wireless -G Dual Stream IP Camera User’s Manual...
-
Page 2: Declaration Of Conformity
OvisLink Corp. 5F., NO.6, Lane 130, Min-Chuan Rd., Hsin-Tien City, Taipei County, Taiwan Declare that the product Wireless-G Dual Stream Camera AirLive WL-1200CAM is in conformity with In accordance with 89/336 EEC-EMC Directive and 1999/5 EC-R & TTE Directive Clause Description Electromagnetic compatibility and Radio spectrum Matters (ERM);... - Page 3 1999/5/CE. muiden ehtojen mukainen Ar šo OvisLink Corp. deklarē, ka AirLive WL- Hér með lýsir OvisLink Corp yfir því að AirLive WL- Latviski [Latvian] 1200CAM atbilst Direktīvas 1999/5/EK Íslenska [Icelandic] 1200CAM er í...
-
Page 4: Federal Communication Commission Interference Statement
4. Consult the dealer or an experienced radio technician for help. FCC Caution This equipment must be installed and operated in accordance with provided instructions and a minimum 20 cm spacing must be provided between computer AirLive WL-1200CAM User’s Manual... - Page 5 Netherlands, Portugal, Spain, Sweden, and the United Kingdom. The ETSI version of this device is also authorized for use in EFTA member states: Iceland, Liechtenstein, Norway, and Switzerland. EU Countries Not intended for use None. AirLive WL-1200CAM User’s Manual...
-
Page 6: Table Of Contents
3.3.2 Wireless Settings ................56 3.3.3 E-Mail Settings .................. 58 3.3.4 PPPoE Settings ................. 60 3.3.5 FTP Settings ..................61 3.3.6 Date / Time Settings ................62 3.3.7 Resolution ..................63 3.3.8 Advanced Settings ................64 3.3.9 Users ....................65 AirLive WL-1200CAM User’s Manual... - Page 7 3.5.2 Recording (Scheduled) ..............75 3.4.3 Status ....................78 3.4.4 General ..................... 79 3.4.5 About ....................80 3.6 Play Recorded Video ................... 81 Chapter IV: Appendix ....................83 4.1 Specification ....................83 4.2 Troubleshooting ................... 84 AirLive WL-1200CAM User’s Manual...
-
Page 8: Chapter I: Familiar With Your Internet Ip Camera
(WEP & WPA / WPA2 / WPANone), which will provide ultimate data security level. All video transmitted over the air is encrypted; therefore no one will be able to get the video captured by the IP camera, expect yourself. You can discover more useful functions in next section! AirLive WL-1200CAM User’s Manual... -
Page 9: Product Highlights
Configurable motion detection sensitivity Upgradeable firmware - enjoy new functions without buying a new camera! Supports up to 4 users, and you can set different password to different user. Usage and event logging. AirLive WL-1200CAM User’s Manual... -
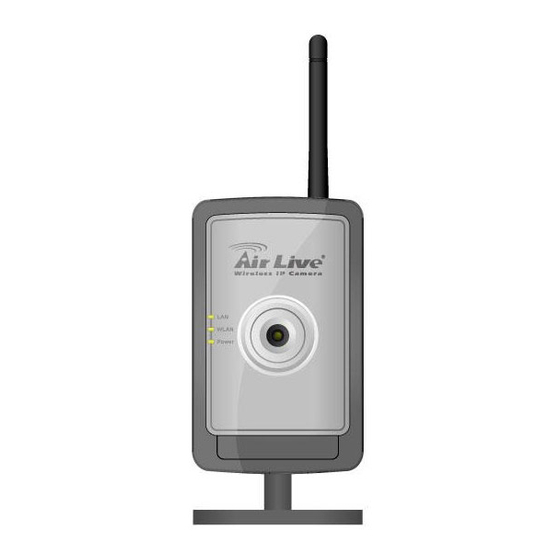
Page 10: Familiar With Key Components
LAN LED: Indicates LAN activity WLAN LED: Indicates Wireless LAN activity Power LED: Indicates power status Camera: Video camera with lens Focus Ring: Adjusts focus Descriptions for LAN / WLAN / Power LED will be giver later. AirLive WL-1200CAM User’s Manual... -
Page 11: Bottom View
Reset Button: Press and hold for 5 seconds to reset the camera settings to factory default value. Power Jack: Connect to power adapter for power supply. LAN Jack: Connect to your local area network by network cable. Speaker Out: Connect to external speaker AirLive WL-1200CAM User’s Manual... -
Page 12: Back View
Connector MAC Address Label Tripod Connector: Connects to any standard tripod / camera wall holder. MAC Address Label: Shows the MAC address of this IP camera. Useful when you can’t locate the camera on the network. AirLive WL-1200CAM User’s Manual... -
Page 13: Descriptions For Led Indicators
Connect your tripod / camera holder, and point the camera to the place you wish to monitor. Connect the external speaker’s audio cable to ‘Speaker’ jack located at the bottom of this IP camera. If you don’t need audio support, you can skip this step. AirLive WL-1200CAM User’s Manual... -
Page 14: Locate The Ip Address Of This Ip Camera
If the left three fields of the IP address of your computer is not 192.168.2, you’ll have to change the IP address of your computer first: Click ‘Start’ -> ‘Control Panel’ Double-click ‘Network Connections’ icon. AirLive WL-1200CAM User’s Manual... - Page 15 Right-click ‘Local Area Connection’, and click ‘Properties’. Select ‘Internet Protocol (TCP/IP)’, then click ‘Properties’. AirLive WL-1200CAM User’s Manual...
- Page 16 Ask network administrator to check the DHCP release table, if the camera was set to obtain the IP address by DHCP, a new record will be added to DHCP release table on DHCP server when the IP camera is connected to the local area network. AirLive WL-1200CAM User’s Manual...
-
Page 17: Log Onto Web Management Interface
IP address of the IP camera in address bar of Internet Explorer. You should be prompted to input the user name and password: Default user name is ‘admin’ (in lower case) and password is ‘airlive’. Click ‘OK’ to continue after user name and password has entered. - Page 18 Microsoft DirectX® installed. Please download Microsoft DirectX® from Microsoft’s website (http://www.microsoft.com), and try again. In some cases, your computer is able to display the image from IP camera correctly, but you’ll still see these messages. If this happens, just ignore them. AirLive WL-1200CAM User’s Manual...
-
Page 19: Chapter Ii: Using Web Management Interface
The first menu after you logged onto web management interface is ‘Camera’, and this is the only menu you can see the real-time image from camera. You can always back to this menu by clicking ‘Camera’ on the top of web management interface. AirLive WL-1200CAM User’s Manual... - Page 20 IP camera before you can use this function - see chapter 2.4 for detailed instruction). Snapshot Take a snapshot picture and save the picture to your computer’s hard drive. Record Start video recording and save recorded video clip to your computer’s hard drive. AirLive WL-1200CAM User’s Manual...
-
Page 21: Motion Detection
IP camera before it really works. Please refer to chapter 2.6 to see detailed instructions for how to enable this function. Please click ‘Motion Detection’ in pop-up menu, and a new setup menu will appear: AirLive WL-1200CAM User’s Manual... - Page 22 IP camera faces to, so you can decide how to When you finish with setting up motion detection region, click ‘OK’ to start motion detection, or click ‘Cancel’ to discard all settings you just made, and motion detection function will not be activated. AirLive WL-1200CAM User’s Manual...
-
Page 23: Mute Audio
Click ‘Mute Audio’ to mute audio. A check will appear in front of ‘Mute audio’ to indicate that sound received by IP camera’s microphone will not be transferred to your computer. Click ‘Mute audio’ again to hear the sound received by IP camera’s microphone again. AirLive WL-1200CAM User’s Manual... -
Page 24: About
This function will provide you with the version number of current IP camera plugin, which is useful when you need online support. To see version information, right-click on the image. A pop-up menu will appear: Select ‘About’ and the version information will appear: AirLive WL-1200CAM User’s Manual... -
Page 25: Lan Settings
IP address, use PPPoE, Dynamic DNS, and activate UPnP function. You can access this menu by clicking ‘LAN’ on the top of web management interface. 2.2.1 IP Address You can define IP address and select the port number you wish to use here. AirLive WL-1200CAM User’s Manual... - Page 26 For example, if the HTTP port number you specified here is 90 and the IP address of IP camera is 10.20.20.30, then you have to input ‘http://10.20.20.30:90’ in the address bar of Internet explorer. Click ‘Apply’ to save settings and make the new settings take effect. AirLive WL-1200CAM User’s Manual...
- Page 27 Input the MTU (Maximum Transmission Unit) given by your ISP here. Ask your ISP if you don’t know what value you should input here, or use default value. Click ‘Apply’ to save settings and make the new settings take effect. AirLive WL-1200CAM User’s Manual...
-
Page 28: Dynamic Dns
Input dynamic DNS user name here, must be the same as the one you applied on dyndns.org. Password Input dynamic DNS password here, must be the same as the one you applied on dyndns.org. Click ‘Apply’ to save settings and make the new settings take effect. AirLive WL-1200CAM User’s Manual... -
Page 29: Upnp
Select ‘Enable’ to activate UPnP function of this IP camera, select Enable UPnP ‘Disable’ to disable it. Click ‘Apply’ to save settings and make the new settings take effect. After UPnP function is activated, a popup message will appear: AirLive WL-1200CAM User’s Manual... -
Page 30: Loginfree
The descriptions of every setting in this menu will be given below: Item Description LoginFree Specify the file name of the picture here. If you want to disable this function, leave it blank. Click ‘Apply’ to save settings and make the new settings take effect. AirLive WL-1200CAM User’s Manual... - Page 31 AirLive WL-1200CAM User’s Manual...
- Page 32 2.3 WLAN Parameters (For wireless model only) If you wish to use wireless network instead of wired network connection, you have to set wireless LAN parameters here. You can access this menu by clicking ‘WLAN’ on the top of web management interface. AirLive WL-1200CAM User’s Manual...
- Page 33 Select the maximum wireless data transfer rate here, from 1Mbps to 54Mbps. Maximum transfer rate for 802.11b wireless network is 11Mbps, and maximum transfer rate for 802.11g wireless network is 54Mbps. It’s recommended to select ‘Auto’, so the data transfer rate will vary AirLive WL-1200CAM User’s Manual...
- Page 34 WEP key here. WEP Key 3 Input the 3 set of WEP key here. WEP Key 4 Input the 4 set of WEP key here. Click ‘Apply’ to save settings and make the new settings take effect. AirLive WL-1200CAM User’s Manual...
-
Page 35: Dual Mode
The descriptions of every setting in this menu will be given below: Item Description Default Video Specify default video encoding format of this IP camera here. Format Available options are MPEG4 and MJPEG. AirLive WL-1200CAM User’s Manual... -
Page 36: Mpeg4
CAUTION: Choosing a low frame rate will save bandwidth, but may not be able to capture every motion if the object that IP camera points to is moving fast. Click ‘Apply’ to save settings and make the new settings take effect. AirLive WL-1200CAM User’s Manual... -
Page 37: Mjpeg
CAUTION: Choosing a low frame rate will save bandwidth, but may not be able to capture every motion if the object that IP camera points to is moving fast. Click ‘Apply’ to save settings and make the new settings take effect. AirLive WL-1200CAM User’s Manual... -
Page 38: Audio
CAUTION: Using a high number here with an amplified external speaker may cause hearing problem to the people standing in front of the speaker, or may cause damage to the speaker itself. Click ‘Apply’ to save settings and make the new settings take effect. AirLive WL-1200CAM User’s Manual... -
Page 39: Email & Ftp
You can access this menu by clicking ‘Motion Detection’ on the top of web management interface. The instructions of Email and FTP settings will be given below. 2.5.1 Email Settings These settings are used to send the captured picture via Email: AirLive WL-1200CAM User’s Manual... - Page 40 Click ‘Apply’ to save settings and make the new settings take effect. After that, you can click ‘Send a test email’ to send a testing Email to the address you set here, so you can make sure the setting you specified here is correct and working. AirLive WL-1200CAM User’s Manual...
-
Page 41: Ftp Settings
Some FTP servers require passive mode, if you don’t know, please ask FTP server’s administrator; most of FTP servers will work fine with both modes, but if you found that non-passive mode is not working, you can try to use passive mode. AirLive WL-1200CAM User’s Manual... -
Page 42: Motion Detection
Next Event Detected Specify the time interval between two motion detections in seconds. Interval If a motion is detected after last detection time, and before next detection time, nothing will be send by Email or via FTP. AirLive WL-1200CAM User’s Manual... -
Page 43: System
You can also upgrade the firmware of this IP camera, to make new functions available on this IP camera. You may also clear all settings or reboot the IP camera here. You can access this menu by clicking ‘System’ on the top of web management interface. AirLive WL-1200CAM User’s Manual... -
Page 44: Camera Information
‘admin’ as user name. Confirm Password Please input the same password again, to make sure there’s no typo. Click ‘Apply’ to save settings and make the new settings take effect. AirLive WL-1200CAM User’s Manual... -
Page 45: Date / Time Setting
Please input the IP address or host name of NTP server here. You can use default value ‘pool.ntp.org’, or ask your ISP for the IP address or host name, if they have one. Click ‘Apply’ to save settings and make the new settings take effect. AirLive WL-1200CAM User’s Manual... -
Page 46: Utilities
Switch the LED light of this IP camera off, so ‘LAN’ and ‘WLAN’ LED LED Setting on the IP camera will stop working, in case you don’t want other people know the camera is transferring data. You can click this button again to switch LED lights on again. AirLive WL-1200CAM User’s Manual... -
Page 47: Status
2.8 Status This menu provides all information about this IP camera, like firmware version, system uptime, date / time, and network information. You can access this menu by clicking ‘Status’ on the top of web management interface. AirLive WL-1200CAM User’s Manual... -
Page 48: Users
Specify the user name here. Please use alphanumerical characters (0 to 9, A to Z, and a to z). Not using symbols and space. Password Specify the password for this user here. Confirm Password Specify the password for this user here again. AirLive WL-1200CAM User’s Manual... - Page 49 Click ‘Apply’ to save settings and make the new settings take effect. AirLive WL-1200CAM User’s Manual...
- Page 50 All activities of this IP camera will be logged, and you and enter ‘Log’ menu to view these logs. You can access this menu by clicking ‘Log’ on the top of web management interface. Click ‘Refresh’ to get latest update. AirLive WL-1200CAM User’s Manual...
-
Page 51: Chapter Iii: Windows-Based Utility
Follow the following instructions to install utility: Click ‘Next’ to start setup procedure: Click ‘Next’ to install the utility to default location (folder). To change folder, click ‘Change’ and pick another folder you wish to use. AirLive WL-1200CAM User’s Manual... - Page 52 Click ‘Install’ to install utility to the folder selected in previous step: Setup procedure may require several minutes, please be patient. AirLive WL-1200CAM User’s Manual...
- Page 53 (or similar) message: Please click ‘Unblock’ (or similar option) to let IP camera Utility pass the firewall, or the IP camera utility may not be able to function properly. AirLive WL-1200CAM User’s Manual...
-
Page 54: Locate Camera On Local Network And Network Setting
Admin utility will launch automatically after installation is complete. If not, please launch ‘IP Camera Admin’ from ‘IP Camera’ group in ‘All Programs’ by yourself. If the IP camera is correctly installed and connected to your network, you should see something similar like this: AirLive WL-1200CAM User’s Manual... - Page 55 If you want to change these settings, please click ‘Detail Setting’ or ‘Setting Wizard’. If you only need to change the basic network setting, click ‘Setting Wizard’. You’ll be prompted to input user name and password: AirLive WL-1200CAM User’s Manual...
- Page 56 The default user name is ‘admin’ (you can not change it), and the default password is ‘airlive’, and then click ‘OK’ to continue. The descriptions of every setting in this menu will be given below: Item Description The name of this IP camera. If you have more than one IP camera, it’s Internet Camera Name suggested to use the place’s name where camera is located, so you...
-
Page 57: Network Settings
Please click ‘Detail Setting’ in admin software for detailed IP camera setting, and you’ll be prompted to input user name and password: The default user name is ‘admin’ (you can not change it), and the default password is ‘airlive’, and then click ‘OK’ to continue. - Page 58 Please specify the port number for video transmission, default value is ‘4321’. Web Port Please specify the port number for web management interface, default value is ’80’. After all settings are completed, click ‘OK’ to save settings, or click ‘Cancel’ to abort and discard changes. AirLive WL-1200CAM User’s Manual...
-
Page 59: Wireless Settings
/ encryption, you need to edit the profile and input required information before you can connect to the wireless device. Create a new profile. You’ll be prompted to input these information: AirLive WL-1200CAM User’s Manual... - Page 60 WPA. Key Length: Select the key length of WEP encryption. Must be the same with the setting of the wireless device you wish to connect. Key Format: Key Length: Select the key format of WEP encryption. AirLive WL-1200CAM User’s Manual...
-
Page 61: E-Mail Settings
The ‘E-Mail Settings’ tab lets you to configure the E-mail alert settings of the IP camera. An E-mail will be sent to the address you specified here when the IP camera detects motion, so you can be alerted by E-mail anywhere & anytime. AirLive WL-1200CAM User’s Manual... - Page 62 Password Please input the password of SMTP server here, if your SMTP server requires the use of authentication. After all settings are completed, click ‘OK’ to save settings, or click ‘Cancel’ to abort and discard changes. AirLive WL-1200CAM User’s Manual...
-
Page 63: Pppoe Settings
Input the MTU (Maximum Transmission Unit) given by your ISP here. Ask your ISP if you don’t know what value you should input here, or use default value. After all settings are completed, click ‘OK’ to save settings, or click ‘Cancel’ to abort and discard changes. AirLive WL-1200CAM User’s Manual... -
Page 64: Ftp Settings
Some FTP servers require passive mode, if you don’t know, please ask FTP server’s administrator; most of FTP servers will work fine with both modes, but if you found that non-passive mode is not working, you can try to use passive mode. AirLive WL-1200CAM User’s Manual... -
Page 65: Date / Time Settings
‘pool.ntp.org’, or ask your ISP for the IP address or host name, if they have one. After all settings are completed, click ‘OK’ to save settings, or click ‘Cancel’ to abort and discard AirLive WL-1200CAM User’s Manual... -
Page 66: Resolution
Select resolution from drop down menu, available options are 160 x 120, 320 x 240 (QVGA), and 640 x 480 (VGA) After all settings are completed, click ‘OK’ to save settings, or click ‘Cancel’ to abort and discard changes. AirLive WL-1200CAM User’s Manual... -
Page 67: Advanced Settings
Password Input dynamic DNS password here, must be the same as the one you applied on dyndns.org. After all settings are completed, click ‘OK’ to save settings, or click ‘Cancel’ to abort and discard changes. AirLive WL-1200CAM User’s Manual... -
Page 68: Users
Password Specify the password for this user here. Confirm Password Specify the password for this user here again. After all settings are completed, click ‘OK’ to save settings, or click ‘Cancel’ to abort and discard changes. AirLive WL-1200CAM User’s Manual... -
Page 69: Tools
You can click this button again to switch LED lights on again. After all settings are completed, click ‘OK’ to save settings, or click ‘Cancel’ to abort and discard changes. AirLive WL-1200CAM User’s Manual... -
Page 70: About
3.3.11 About This menu shows the information about the admin software itself. Click ‘Cancel’ or ‘OK’ to exit. AirLive WL-1200CAM User’s Manual... -
Page 71: Camera Viewer
DirectX® compatible video card, or DirectX® is not installed. Please go to http://www.microsoft.com/directx to download latest version of DirectX® , if this does not help, please consult your computer dealer or manufacturer for assistance. AirLive WL-1200CAM User’s Manual... - Page 72 Current date and time will be displayed at upper-left corner for your reference. Dashboard: Dashboard lets you control the camera; you can change camera view, capture image, and record video. When you’re playing video, you can control the video playing by dashboard also. AirLive WL-1200CAM User’s Manual...
-
Page 73: Connecting To Ip Camera
IP camera and display the image for you. Please follow the following instructions to input camera information: Click one of camera number you wish to use: Click 1, 2, 3, or 4. The following setup window will appear: AirLive WL-1200CAM User’s Manual... - Page 74 When a camera is connected, its image will be displayed in the corresponding area in the video viewer window. Repeat steps 1 to 2 to setup more camera, up to 4 cameras can be controlled by a single camera viewer utility. AirLive WL-1200CAM User’s Manual...
-
Page 75: Select The Camera To View And Control
Enlarge the size of camera view window (resolution 620 x 480) Rotate View Flip the captured image upside down (turn 180 degrees), click this button again to return. This function is very useful when camera is installed in a upside-down position. AirLive WL-1200CAM User’s Manual... - Page 76 Click ‘Stop’ button to stop recording. Play Return to normal state when camera is stopped or paused. After all settings are completed, click ‘OK’ to save settings, or click ‘Cancel’ to abort and discard changes. AirLive WL-1200CAM User’s Manual...
-
Page 77: Advanced Camera Setting
If you wish to change these settings, please disconnect from the camera first by clicking ‘Stop’ button in dashboard, until the color bar above the number of camera become pink. AirLive WL-1200CAM User’s Manual... -
Page 78: Recording (Scheduled)
If this check box is unchecked and the disk is full, viewer utility will stop recording, and upcoming recording schedule will not be executed. Create a new one-time recording schedule. After you click this button, you’ll be prompted to specify the recording schedule: AirLive WL-1200CAM User’s Manual... - Page 79 HH:MM:SS (24-hour format). You can also use up and down button to adjust selected time field. Period: Please specify how long this recording schedule should be in HH:MM:SS format. To: Displays when this recording schedule will end (‘From’ time plus ‘Period’) AirLive WL-1200CAM User’s Manual...
- Page 80 You can select an existing schedule and click ‘Edit’ to change its start Edit / end time. Delete You can delete an existing schedule. Please select a schedule, then click ‘Delete’. You’ll be prompted to confirm the delete. AirLive WL-1200CAM User’s Manual...
-
Page 81: Status
Shows current data rate of connected camera (kilobytes per second). Number of Frames Shows total received frames since the camera is connected. Number of Users Shows how many users are connected to this camera. Click ‘OK’ or ‘Cancel’ to exit. AirLive WL-1200CAM User’s Manual... -
Page 82: General
Large video files will take more time to open, so you can use this function to set the max video file size to a smaller value. The maximum file size can not be greater than 2048 megabytes, due to the restriction of operating system. AirLive WL-1200CAM User’s Manual... -
Page 83: About
3.4.5 About This menu provides the version number of viewer utility. Click ‘OK’ or ‘Cancel’ to exit. AirLive WL-1200CAM User’s Manual... -
Page 84: Play Recorded Video
Open File A new video playback window will appear, you can use mouse to resize the window. Video Playback Window Dashboard When a video file is opened, you can use these controls to control video playback: AirLive WL-1200CAM User’s Manual... - Page 85 The progress of video playback will also displayed by the progress indicator on the dashboard: Progress Indicator The slide pointer of progress indicator will move right as video plays. You can also use mouse to drag the slide pointer, to control the progress of video playback. AirLive WL-1200CAM User’s Manual...
-
Page 86: Chapter Iv: Appendix
View multiple cameras simultaneously - Up to 4 cameras at a time Manual/Schedule Record, Video Playback/Stop/Forward/Pause Supports four additional user accounts for viewing camera Auto sending Snap Shot by E-mail or FTP Support DDNS and UPnP functions Supports Windows 2000/XP/Vista Firmware Upgradeable EMI & Safety FCC, CE AirLive WL-1200CAM User’s Manual... -
Page 87: Troubleshooting
Try to adjust ‘MTU’ setting if you’re using PPPoE to connect to Internet. Ask your ISP or network administrator for detailed instruction. IP camera is not a. Is the network cable or wireless connection disconnected? responding Please check it. AirLive WL-1200CAM User’s Manual... - Page 88 Please check log, if FTP upload or Email sending is failed, it will be logged, and this may give you some clue on how to solve the problem. e. Change the threshold to a more sensitive setting. AirLive WL-1200CAM User’s Manual...
Need help?
Do you have a question about the WL-1200CAM and is the answer not in the manual?
Questions and answers