Table of Contents
Advertisement
Advertisement
Table of Contents

Related Manuals for Kodak RVG


Summary of Contents for Kodak RVG
- Page 1 CS4000-00_en KODAK RVG Digital Radiography Systems User’s Guide...
- Page 2 Current Dental Terminology copyright © 2002, 2004 American Dental Association U.S. Federal law restricts the Kodak RVG sensor to sale by or on the order of a dentist or physician. Manual Name: KODAK RVG Digital Radiography Systems User’s Guide...
-
Page 3: About This Guide
Describes preliminary use of the sensor. Acquiring Images Describes the procedures for acquiring images. Disinfecting and Describes the procedures for Maintaining the Sensor disinfecting and maintaining the sensor. Troubleshooting Images Describes techniques for producing better images. KODAK RVG Digital Radiography Systems User’s Guide (CS4000_en) - Page 4 Foreword Foreword For optimum image display and processing quality, use the sensor with the Kodak dental imaging software. The Kodak dental imaging software is specifically designed to make the most of the capabilities of the sensor. The sensor is a class I device in accordance with annex VII of directive 93/42/EEC concerning medical devices.
- Page 5 • Ensure all equipment associated with the system bears a CE marking. • Check that the electrical network complies with the current standards of the country of installation. KODAK RVG Digital Radiography Systems User’s Guide (CS4000_en) 1–1...
- Page 6 Contact your local Kodak representative or refer to www.kodak.com/go/recycle for additional information on the collection and recovery programs available for this product.
- Page 7 IEC/EN 60 601-1 and IEC/ EN 60 601-1-1. Install and use computer or video peripheral equipment while closely following the steps in this manual to ensure compliance with these standards. KODAK RVG Digital Radiography Systems User’s Guide (CS4000_en) 1–3...
- Page 8 Non-Medical Devices 1–4 Compliance and Safety...
-
Page 9: Getting Started
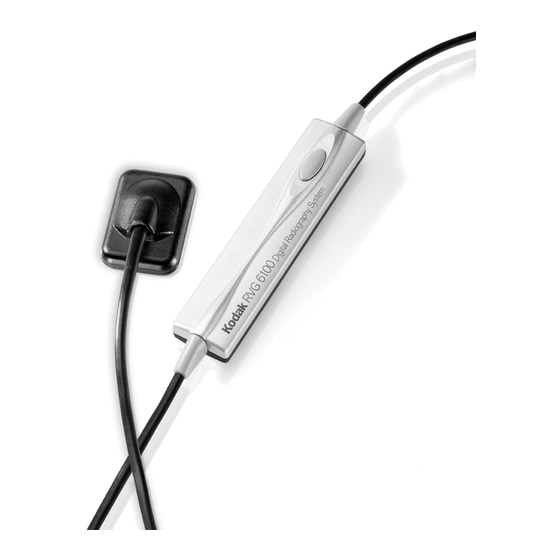
Note The sensor consists of two inseparable parts: Because these sensors are used in the same • Sensor manner, this manual references use of the • Remote control size 1 sensor. KODAK RVG Digital Radiography Systems User’s Guide (CS4000_en) 2–1... -
Page 10: Remote Control
Sensor The sensor is radio-sensitive. The active surface is the flat surface marked with the Kodak logo. The marking #0, #1 or #2 indicates the size of the sensor, respectively size 0, 1, or 2. The back of the sensor, non-reactive to x-rays, is rounded and contains the cable attachment. - Page 11 The remote control is connected to the computer with its USB 2 connector. You can connect the remote control with the power on, when the computer is switched on. You do not need to start the Kodak dental Caution! imaging software before you connect the sensor.
- Page 12 Use a digital timer to compensate for current variations in conventional generators. You can connect the Kodak generators directly to the electronics of the sensor to synchronize image acquisition with the trigger action. This link provides...
- Page 13 Provide visual access for the cause diagnostic patient, to encourage communication. This enables errors due to the you to access the RVG system and maintain the inability of the working ergonomics at the chair. equipment to display the image properly.
- Page 14 Adjusting Exposure Time Using the Dose Indicator Use the dose indicator to help you correctly determine the exposure time for your generator. For each image taken with a sensor, the dose indicator is displayed at the bottom of the window. Use the dose Control Panel indicator to observe the quality of the image exposure.
- Page 15 Adult with #1 or #2 practice. Upper incisor/canine 0.18 Upper premolar 0.24 Upper molar 0.40 Lower incisor/ canine 0.12 Lower premolar 0.18 Lower molar 0.24 KODAK RVG Digital Radiography Systems User’s Guide (CS4000_en) 2–7...
- Page 16 Adjusting Exposure Time Table 2–1 Sensor Exposure Times (Continued) Child with #0 Upper incisor/canine 0.11 Upper premolar 0.15 Upper molar 0.24 Lower incisor/ canine 0.075 Lower premolar 0.11 Lower molar 0.15 Operating tips and recommended exposure times are Note given for an average case, representing an adult The programmed time patient weighing approximately 80 kg.
- Page 17 You can print images either on a printer attached to each computer or to a printer shared on the network. KODAK RVG Digital Radiography Systems User’s Guide (CS4000_en) 2–9...
-
Page 18: Preparing The Software
Maintaining Hygiene” specifically designed for each size of sensor: size 0, on page 4–2. size 1 or size 2. You can obtain these from your Kodak dental systems supplier. Preparing the Software To prepare the software for an image acquisition,... - Page 19 Acquiring a Good Image Using a Synchronization Link If a Kodak generator is linked to the computer using a synchronization link, you can acquire a new image without using the F2 button, clicking on the RVG Acquisition icon, or pressing the sensor remote control button.
- Page 20 Acquiring a Good Image Positioning the Sensor Place the sensor in the mouth in the same way Note regardless of the type of positioner used. For more details on the type of positioners, see Figure 2–1 shows a positioning example. “Using the Different Positioning Systems”...
- Page 21 Center the sensor on the tooth to be x-rayed by sliding it distally. Do not hesitate to use the roundness of the palatal arch and place the sensor at the center of the cavity. KODAK RVG Digital Radiography Systems User’s Guide (CS4000_en) 2–13...
- Page 22 Acquiring a Good Image Using the Different Positioning Systems Apply the same rules for positioning the sensor in the mouth that you use in classic radiology. You may require time to adapt due to the rigidity of the sensor. You can use different systems for positioning the sensor in the mouth.
- Page 23 For a narrow mouth, move the sensor back parallel to the real axis of the teeth while pushing back the tongue slightly. Use the blunt edges of the sensor to depress the floor of the mouth to better frame the apical area. KODAK RVG Digital Radiography Systems User’s Guide (CS4000_en) 2–15...
- Page 24 Kodak range. Enhancing Zones of Interest The black and white of the film is replaced in digital by a vast quantity of gray levels.
- Page 25 Using the Filters and Tools Use the following filters and tools to enhance the digital image: • filter Sharpness • tool Highlight • filter Relief • tool Measurement KODAK RVG Digital Radiography Systems User’s Guide (CS4000_en) 2–17...
- Page 26 Enhancing the Digital Image Using the Sharpness Filter Use the filter to emphasize a radiological Sharpness feature that could go unnoticed in the pure image and spot the subtleties of the image. The filter emphasizes Sharpness Filter lateral ducts or small fissures, exaggerates details that are already clearly visible on the image, such as amalgams or any other high-density material.
- Page 27 Do not take focal point to object, calibrate the tool to compensate measurements on a for the conic enlargement of the projection. Refer to printed image. the Kodak dental imaging software online Help. KODAK RVG Digital Radiography Systems User’s Guide (CS4000_en) 2–19...
- Page 28 Enhancing the Digital Image Using Full Resolution By default, images are displayed at a reduced size to allow you to view several images at a time. To increase the visible details in the image window, do the following: • To display the image at 100% or 1:1, double-click the image, or right-click the image and select Full Screen Actual Size.
- Page 29 Therefore the true clinical support remains the digital file. KODAK RVG Digital Radiography Systems User’s Guide (CS4000_en) 2–21...
- Page 30 Enhancing the Digital Image Working with the Image Windows Images are displayed in windows that you can drag and drop. Additionally, use the buttons in the taskbar to manipulate the windows. Table 2–3 describes the image window buttons. Table 2–3 Image Window Buttons Image Button...
- Page 31 Using Templates to Acquire Images on page 3–3 Exposure Chart” on page 2–7. Launching an Image Acquisition To launch an RVG image acquisition, click RVG Acquisition on the toolbar. Using the Standard Procedure to Acquire Images To acquire a digital intraoral radiographic image,...
- Page 32 Each click rotates the sensor image 90°. display format, the orientation of the Make sure still displays in RVG Acquisition image is pre-selected green. If not, click the button again or use the for you. sensor remote control button, align the beam indicating device, and capture the image.
- Page 33 Posterior images Size 2 Size 1 Bitewing images Size 2 RVG FMS #5 Size 1 Bitewing images or PA images Size 1 Four bitewing images Bitewing Size 2 Four bitewing images format KODAK RVG Digital Radiography Systems User’s Guide (CS4000_en) 3–3...
- Page 34 Using Templates to Acquire Images Using an FMS to Acquire Images To use an FMS to acquire images, follow these steps: Connect the sensors to the digital imaging dock. Open the patient’s record and launch the Imaging window. Select . The Format >...
- Page 35 Images” on page 3–1. displayed and viewed in a vertical orientation. The image is displayed in the designated location. Continue to acquire images until you complete the template. When finished, click Save KODAK RVG Digital Radiography Systems User’s Guide (CS4000_en) 3–5...
- Page 36 Using Templates to Acquire Images 3–6 Acquiring Images...
- Page 37 4–3 • Storing the Sensor After Use on page 4–3 • Maintaining the Sensor on page 4–3 • Preventing Electrostatic Discharge on page 4–4 • Protecting Computer Data on page 4–4 KODAK RVG Digital Radiography Systems User’s Guide (CS4000_en) 4–1...
- Page 38 Disinfecting the Sensor and Maintaining Hygiene Disinfecting the Sensor and Maintaining Hygiene Carefully follow the procedure detailed earlier in this manual on how to prepare the sensor to ensure Note maximum hygienic safety for the patient. Our sensors are supplied non-sterile. To disinfect the sensor and maintain proper hygiene, follow these guidelines: •...
- Page 39 Do not pull on the cable, even when removing the disposable protective sheath. • Do not walk on or roll objects over the cable. • Do not request the patient to bite on the sensor or the cable. KODAK RVG Digital Radiography Systems User’s Guide (CS4000_en) 4–3...
- Page 40 Preventing Electrostatic Discharge • Do not disconnect the sensor during the 90-second delay, in non-synchronized mode, or during acquisition. • Do not force, bend, or pull the cable at the sensor side. • Do not immerse the sensor remote control. Preventing Electrostatic Discharge To prevent electrostatic discharge, do the following:...
- Page 41 When troubleshooting problems that you may encounter with images, try to solve the problem by using the following instructions. If the problem persists, or if it is not outlined below, contact Kodak dental imaging support. Table A–1 outlines troubleshooting methods for resolving most problems that you may encounter.
- Page 42 Table A–1 Troubleshooting Tips (Continued) The image is • The exposure time is too short; increase pale and it. The selected acquisition mode does grainy. not correspond to the x-ray dose used. • The generator voltage is too low (<60 kV rms); have the generator checked.
Need help?
Do you have a question about the RVG and is the answer not in the manual?
Questions and answers
My RVG doesn't react and indicates an error #31. How do I resolve the matter?