
Subscribe to Our Youtube Channel
Related Manuals for NewMar SPM-200


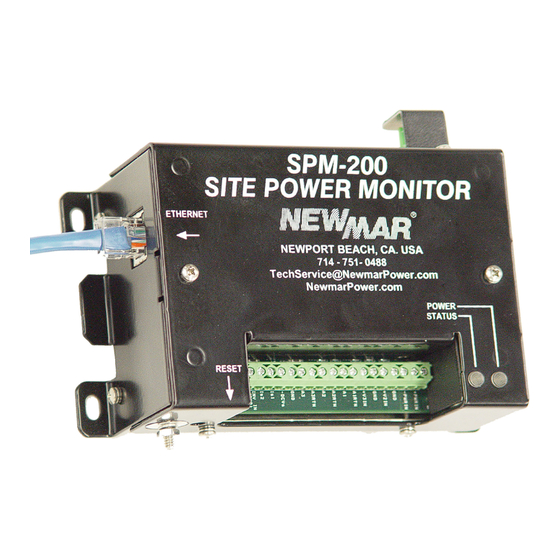
Summary of Contents for NewMar SPM-200
- Page 1 Site Power Monitor Installation/Operation Manual Model: SPM-200 M-SPM-200 As of June 2012 P.O. Box 1306 Phone: 714-751-0488 Newport Beach Fax: 714-957-1621 California 92663 E-Mail: techservice@newmarpower.com...
-
Page 2: Table Of Contents
Figure 7 Web Page: Network Section of the Config Webpage........13 SPM-200 Web Page Overview................. 14 Figure 8 Web Page: SPM-200 Homepage (Configured Unit)........14 Setting Low & High Alarm Trips..............15 Figure 9 Web Page: Alarm Page.................. 15 Figure 10 Web Page: Logging Page................ - Page 3 Section/Figure Topic Page Figure 12 Web Page- Top of Config Page............... 18 5.2.1 Reset ALL to Default Values................18 5.2.2 Refresh DNS Cache..................18 5.2.3 Zero Current Channel (Shunt)................. 18 5.2.4 Web Server....................... 19 Figure 13 Web Page: Setting up the Web Server and Configuring DNS......19 5.2.5 DNS Servers (HTTP &...
-
Page 4: Quick Reference Guide
1.0 Quick Reference Guide P.O. Box 1306 Phone: 714-751-0488 Newport Beach Fax: 714-957-1621 California 92663 E-Mail: techservice@newmarpower.com... -
Page 5: Overview
CAUTION: If you intend to power -48 VDC AND monitor -48 VDC, input power must come from an isolated DC converter. If you need one, we will provide it free of charge. Contact NEWMAR: 800-854-3906 or E-Mail: Techservice@newmarpower.com and request model: 48-12-1i Kit • Accuracy ± 5%... -
Page 6: Temperature Sensor
2.2.3 Temperature Sensor This sensor is located on the top right hand side corner of the SPM-200 when vertically mounted and senses ambient temperature. A protective guard prevents damage to the exposed sensor. Sensor Range: -20° C to +60° C/-20° F to +140° F Accuracy: +/- .5%... -
Page 7: Wiring
Option C: Rack Mounting The unit can be rack mounted with Newmar optional 19” or 23” rack mounting kit, 2 RU (3.5 inches) tall, model RM-SPM, P/N: 020-5091-0. 3.2 Wiring Connections for both operating power and sensor inputs are made to the terminal block on the front panel. -
Page 8: Ac Voltage Monitoring
CAUTION: Never connect the line side (Hot) of an AC source to INV IN (GND) or any RTN terminal on the SPM. 3.2.6 Ethernet Connection Remote monitoring requires Ethernet connection via RJ 45 jack. Plug into the port on left side of unit. A solid green LED on the port indicates a link is established. A flashing green LED on the jack indicates activity (com). The SPM-200 requires a 10BaseT connection. P.O. Box 1306 Phone: 714-751-0488 Newport Beach Fax: 714-957-1621 California 92663 E-Mail: techservice@newmarpower.com... - Page 9 If you intend to power from -48 VDC AND monitor -48 VDC, input power must come from an isolated DC con- verter. If you need one, we will provide it free of charge. Contact NEWMAR: 800-854-3906 or E-mail: techservice@newmarpower.com and request model: 48-12-1i *** Positive ground inputs only (-48VDC) P.O.
-
Page 10: Figure 2 Install Wiring Guide
FIGURE 2: Install Wiring Guide P.O. Box 1306 Phone: 714-751-0488 Newport Beach Fax: 714-957-1621 California 92663 E-Mail: techservice@newmarpower.com... -
Page 11: Set-Up Monitoring & Data Logging
4.1.1 Initial Setup This section will show how to do an initial setup of a new SPM-200. The easiest way to do this is to connect a laptop or some other PC directly to the unit to set the basic parameters. -
Page 12: Nic Setup
4.1.2 NIC Setup The following instructions describe the process in Windows XP. Earlier versions of Windows and Windows 7 follow a similar procedure. If you are using some other operating system please consult your users’ manual for instructions on how to set up the network interface card. 1. -
Page 13: Figure 4 Spm-200 Homepage (Un-Configured Unit)
This section covers setting the clock and configuring your SPM to connect over a network. NOTE: If you don’t have a network to connect to, the SPM-200 can be used as a simple data logger with a Web interface. The only item that you must set is the clock, as described below. -
Page 14: Setting Account Names & Passwords
Now, scroll down the Config page until you find the Name and Password Configuration options block. Here, you can set up to three levels of password protection for the SPM-200, allowing you to restrict which user(s) in your organization are able to view or change the unit’s settings. Although these settings are optional, Newmar Power highly recommends that you at least set up the Administrator account to prevent unauthorized changes to the network and administrative settings. - Page 15 View-Only account without both a Control and Administrator account. Administrator: this account has complete access to the SPM-200; all pages are viewable, and any setting can be changed – including the ability to change any other account’s passwords. Note that this account is the only account which can access the Config page, and that you must configure this account before you can configure the Control or View-Only accounts.
-
Page 16: Setting The Internet Address
At this point you have two options: 1) Continue using the PC and the crossover cable to finish configuring the SPM-200, and later connecting it to the network it will really use. If you want to choose this option, skip over the section “Setting the Internet Address”... -
Page 17: Spm-200 Web
5.0 SPM-200 Web Page Overview The Sensors web page is the home page for the SPM-200. It is the page that will be displayed when you first connect to an SPM. The Sensors Page shows the current value of all the inputs to the SPM. A Sensors Page from... -
Page 18: Setting Low & High Alarm Trips
Note that the default names on the previous illustration have been replaced by names that are more meaningful in this installation. Some other configuration variables have been changed, such as the temperature units. Temperature can be displayed in Fahrenheit or Celsius, whichever you choose. The clock has been set and some of the information in the box at the bottom has been customized as well. - Page 19 This allows an escalation procedure to be set up. If you make changes to this (and any other web page on the SPM-200) don’t forget to click “Save Changes” when you’re finished. If you don’t, your changes will be lost.
- Page 20 At the bottom of the page is shown the maximum length of the log, in this case 40.16 days. That means if the SPM-200 has enough room in its memory to store data over that time. The memory is set up as a circular buffer - if the SPM-200 has run for more than that time, new data will replace the old on a first in – first...
-
Page 21: Configuration Page
SPM-200 itself might cause the display to read a bit high. The most important thing to do on this page is to set the name of this SPM-200, and more meaningful names for all of the inputs. -
Page 22: Web Server
FIGURE 13: Setting up the Web Server and Configuring DNS The “Web Server” section controls the SPM-200’s built in Web Server. You can select the HTTP protocol, the secure HTTPS protocol, or both. The port numbers shown are the defaults for HTTP and HTTPS. You can change these numbers, but it’s usually best to leave them at the default values. -
Page 23: Configuring Email Settings
Syslog is a utility that runs on a UNIX machine to capture error messages from systems like the SPM-200. Newmar Support may ask you to configure this utility to help debug a problem with the SPM-200 software. It does not perform any function in the normal operation of the SPM-200. -
Page 24: Configuring Snmp Settings
“SNMP Management System”, which is running somewhere on the network. Management Systems can poll Agents, or an Agent can send information to the Management System using something called a “Trap”. The SPM-200 sends traps to either or both of the Trap addresses selected here for any alarm which has the “Trap” boxes checked. -
Page 25: Camera (Ip) Configuration
SPM-200 does not monitor or do anything with the images from the cameras except display the thumbnails on the Sensors page. You must enter the IP address of each camera, and select the model from the drop down menu. -
Page 26: Firmware Download & Upload
5.2.9.2 Firmware Download & Upload FIGURE 19: Upload System Firmware From time to time Newmar may issue new firmware for the SPM-200. This will usually come as a “zip” file. Download the zip file from www.newmartelecom.com/site_power_monitor/site_power_monitor.html to your computer and “unzip” it. Then navigate to this section of the Config page, and click the “Browse” button. -
Page 27: P.o. Box
FIGURE 21: Syslog Configuration These check boxes control what information is gathered by Syslog. You do not have to check any of these unless Newmar Support is trying to debug a problem with your software. P.O. Box 1306 Phone: 714-751-0488... -
Page 28: Specifications
Power Source Voltage: 11 - 60 negative / positive ground*, 250 mA max *CAUTION: If you intend to power -48 VDC AND monitor -48 VDC, input power must come from an isolated DC converter. If you need one, we will provide it free of charge. Contact NEWMAR: 800-854-3906 or E-mail: techservice@newmarpower.com and request model 48-12-1i Kit... -
Page 29: Warranty
We are happy to consult with you to resolve any problems or questions you may have. If , during consultation, it appears the SPM-200 must be returned to the factory for repair, we will issue a Return Materials Authorization (RMA) number at that time. -
Page 30: Appendix A: Operation Without A Static Ip Address Using Dyndns
8.0 Appendix A: Operation Without a Static IP Address Using DynDNS If you want to access your SPM-200 over the public Internet, your browser needs to know the unit’s unique IP address. But it can be difficult to obtain a permanent “static” IP address in many situations. - Page 31 Setting Up DynDNS: There are three things that have to be done to solve the problem. The first is to use the DynDNS service to make the IP address of the router available to users on the public Internet. The second is to program the router to forward requests for web pages to the SPM, and the third is to configure the SPM.
- Page 32 FIGURE 24: Linksys Wireless G Broadband Router, Applications/Gaming Note: some ISPs block access to port 80. If yours is one of them, you’ll need to use some other port. Valid port numbers are in the range 0 to 65535, but to be totally compliant with the rules of the Internet you should pick a number between 49152 and 65535.
-
Page 33: Appendix B: Troubleshooting
9.0 Appendix B: Troubleshooting 1) Nothing happens when I power up the SPM - Neither the Power Indicator nor the Status Indicator light up. • Check to make sure that DC power is connected. Pin 19 is ground and Pin 20 is +6 to +60 VDC. 2) The Power and Status Indicators light up, but I do not see any lights on the Ethernet Connector • Check to make sure that the SPM is connected either to an Ethernet switch or directly to a laptop computer. - Page 34 Exchange server. 9) How do I get the SNMP MIB for the unit? • The MIB for the unit can be found in two places. In the header of the SPM-200 webpage under Alternate Formats, is a link to the MIB. A copy of the MIB is also included in the firmware zip file of version 2.53 (is this the latest version) and higher.
- Page 35 3. Click on the Logs tab and the Logging Frequency and Delete Log History checkbox should no longer be grayed out. 14) How do you reset the SPM-200? • The IP Reset Button, located under the RJ45 connector, has two functions: 1) If you hold it down while you power up the unit, all of the user-configurable parameters are reset to the factory defaults.
-
Page 36: Appendix C: The Console Program
10 Appendix C: The Console Program This manual describes how to communicate with one SPM-200 using a web browser. If you only have one or a few SPM-200s it is not hard to look at them one at a time. However, if you have more SPMs, perhaps 5 or 10 or even more, monitoring them becomes a problem.
Need help?
Do you have a question about the SPM-200 and is the answer not in the manual?
Questions and answers