Table of Contents
Advertisement
Quick Links
Advertisement
Table of Contents

Related Manuals for NEC LED-VP1


Summary of Contents for NEC LED-VP1
- Page 1 User’s Manual Video Processor LED-VP1...
-
Page 2: Table Of Contents
Index Declaration of conformity .......................... English-1 Important Information ..........................English-2 Safety Precautions, Maintenance & Recommended Use ............... English-3 Contents ..............................English-4 Parts Name and Functions ........................English-5 Front panel .............................. English-5 Rear panel ............................... English-6 Connections ............................... English-7 Connecting an External Device ....................... English-7 Connecting the Power .......................... -
Page 3: Declaration Of Conformity
Declaration of conformity For USA FCC Information 1. Use the attached specified cables with the LED-VP1 (D000LE) video processor so as not to interfere with radio and television reception. (1) Please use the supplied power cord or equivalent to ensure FCC compliance. -
Page 4: Important Information
Voltage 120* * When operating the video processor LED-VP1 (D000LE) with its AC 125-240V power supply, use a power supply cord that matches the power supply voltage of the AC power outlet being used. NOTE: This product can only be serviced in the country where it was purchased. -
Page 5: Safety Precautions, Maintenance & Recommended Use
• It’s recommended to wipe holes a minimum of once a month. Connecting to a TV* • Cable distribution system should be grounded (earthed) in accordance with ANSI/NFPA 70, the National Electrical Code (NEC), in particular Section 820.93, Grounding of Outer Conductive Shield of a Coaxial Cable. -
Page 6: Contents
Contents The parts supplied with this unit are as follows. In the rare case that one of these parts is missing or damaged, contact the retailer. • Power cord (1.8 m USA) • Power cord (1.8 m EU) • Signal cable (2 m) •... -
Page 7: English
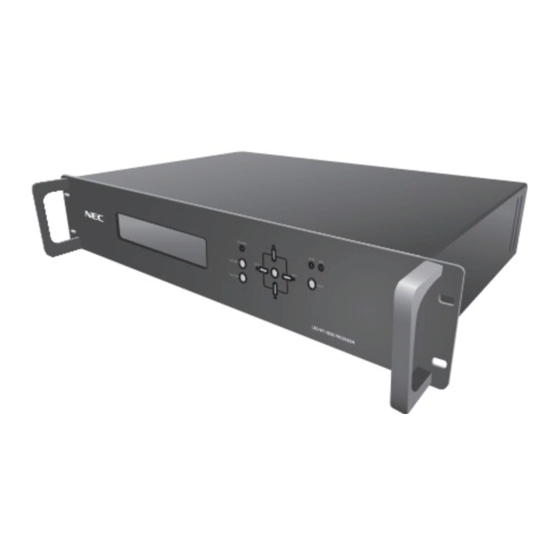
Parts Name and Functions Front panel STANDBY ISSUE SELECT INPUT INPUT SOFT PWR MENU PATTERN Display panel Right( )/INPUT button Displays the status, such as the input source and input resolution. When adjusting the video image, raises the setting. When the menu is not being operated, switches the input. SOFT PWR button (power) MENU button Switches the power on and off. -
Page 8: Rear Panel
Rear panel Power connector (IEC-3) Video input (RCA) Connects the power cord. Connects to a composite video output device. Main power switch (AC) HD3 input (mini D-Sub 15-pin) Switches the main power on and off. Connects to an analog RGB or component video output device. HD1 input (RCA) HDMI input (HDMI) Connects to an analog RGB or component video output device. -
Page 9: Connections
Connections Connecting an External Device • To protect the device, switch off the power before connecting it. • When connecting devices, follow the instructions in their user manuals. Connecting the Power NOTE : • Connect the power cord to the unit before connecting it to the power outlet. 1. -
Page 10: Connection And Setting
Connection and setting Before connecting • Before connecting, switch off the power of the unit, the device to be connected to the unit, and any other peripheral devices. • Refer to the user manuals of all the devices. DVD player (component output) Computer (analog output) -
Page 11: Basic Operation
Basic Operation 1. Power 1.1 Turning on the power (1) Turn on the main power (AC) switch. (2) The RUN lamp lights up (blue). After a short time, the RUN lamp turns off and the STANDBY lamp (STANDBY) lights up (orange) (indicates the standby status). - Page 12 (1) Switching the input with the INPUT button INPUT INPUT If the input source and input resolution are not displayed, switch the input with the button or button. To select analog RGB input, perform the operation in item (2). Composite S-Video Component RCA Component BNC...
-
Page 13: Troubleshooting
Troubleshooting Check the troubleshooting guide below. Symptom Causes and countermeasures The power does not turn on. The SOFT PWR button must be held down to turn on the power. Keep pressing the SOFT PWR button until the STANDBY lamp turns off. The component signal is not displayed. -
Page 14: Appendix
Appendix Specifications Product name LED-VP1 Remarks Can be connected to a DVI-D device with a Digital Video HDMI (2 connectors) conversion cable. HD1: RCA x 5 (*2) Analog HD2: BNC x 5 (*1) Input RGB/Component video HD3: Mini D-Sub 15-pin... -
Page 15: Communication Command Specifications
Communication command specifications Baud rate 19200 bps Data bits 8 bit Parity None Stop bit 1 bit Flow control None Commands (1) Power control Power on 6Fh 6Eh 0Dh Power off 6Fh 66h 66h 0Dh (2) Switching the input Composite video 73h 73h 72h 63h 20h 30h 0Dh S-Video 73h 73h 72h 63h 20h 31h 0Dh... -
Page 16: Dimensional Drawing
Dimensional Drawing 431.1 42.5 Unit: mm English-14... -
Page 17: Manufacturer's Recycling And Energy Information
Dedicated recycling sites ensure that environmentally harmful components are properly handled and securely disposed. To ensure the best recycling of our products, NEC DISPLAY SOLUTIONS offers a variety of recycling procedures and gives advice on how to handle the product in an environmentally sensitive way, once it has reached the end of its life.
Need help?
Do you have a question about the LED-VP1 and is the answer not in the manual?
Questions and answers