Table of Contents
Advertisement
Please keep this Owner's Manual for future reference. If you sell or give this product away, please include this
Owner's Manual, and ask the new owner to read the instructions completely before operating.
Please read this Owner's Manual completely before assembling or operating this product.
Assembly of this product should be carried out by an adult.
Parts are wrapped in paper or protective covering to prevent damage during shipment. Remove all parts and
packing materials from the box prior to assembly. Save all packing materials until assembly is complete to
make sure no parts are accidentally thrown away. After assembly is complete, properly discard all waste.
Refer to the Parts List and Diagram on page two of this manual to make sure all parts are accounted for.
Do not return this product to the store! If any parts are missing or damaged, please contact one of our
Customer Service Representatives by phone at 1-800-242-6110, or by e-mail at Info@instep.net.
WARNING Always wear an approved safety helmet when riding!
WARNING Never leave your child unattended on this product!
WARNING This trailer bike is designed to attach to an adult bicycle with 26", 27", or 700C wheels!
WARNING This trailer bike does not have a brake. Make sure the adult bike brakes function properly!
WARNING Recommended for ages 4 through 9! Maximum weight capacity of rider is 75 pounds!
WARNING Make sure the child riding the trailer bike understands how to operate it correctly!
WARNING Always use the safety flag when riding with this product!
WARNING A bicycle with the trailer bike attached requires a wide turning radius! Use caution when turning!
WARNING Do not ride over curbs! Avoid bumps and potholes! Do not turn sharply!
WARNING Before riding, check that all parts are assembled correctly per the manufacturer's instructions!
WARNING Tire should be inflated to the pressure reading shown on the tire sidewall! Check before each use!
WARNING Use a foot pump or hand pump to inflate tires! Pressurized air hoses can cause overinflation!
WARNING Do not ride at night!
WARNING Do not ride barefoot!
WARNING Do not ride in wet weather or when road surface is slippery!
WARNING Periodically re-check all fasteners to make sure they are tight!
Adjustable wrench
6mm Allen wrench
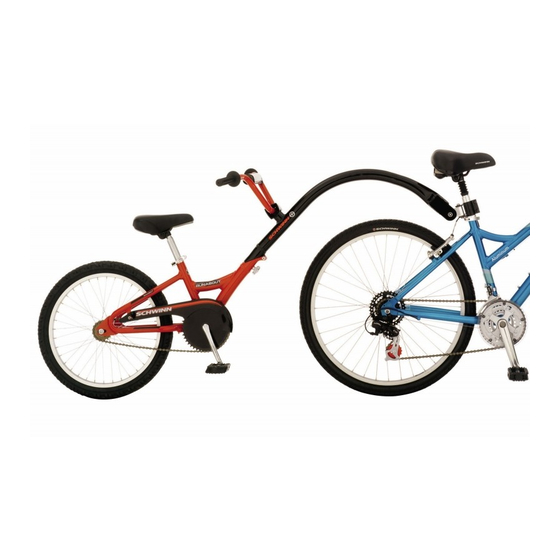
Runabout
Model 13-SC250/SC350 Trailer
Owner's Manual
PRIOR TO ASSEMBLY:
IMPORTANT SAFETY INFORMATION:
TOOLS REQUIRED FOR ASSEMBLY:
5mm Allen wrench
1
Advertisement
Table of Contents

Related Manuals for Schwinn Runabout 13-SC250


Summary of Contents for Schwinn Runabout 13-SC250
- Page 1 Runabout Model 13-SC250/SC350 Trailer Owner’s Manual Please keep this Owner’s Manual for future reference. If you sell or give this product away, please include this Owner’s Manual, and ask the new owner to read the instructions completely before operating. PRIOR TO ASSEMBLY: Please read this Owner’s Manual completely before assembling or operating this product.
- Page 2 (found on carton or manual) and assembly instructions ready when calling. If neither is available, please tell us the name of the product in question. For questions concerning the safe use of this product, please contact Schwinn at 1-800-242-6110 info@instep.net...
- Page 3 ASSEMBLY AND OPERATING INSTRUCTIONS Open carton, remove contents, and compare contents with parts list Note: To prevent scratching of the frame, it is recommended that you lay the parts out on top of a flattened cardboard box, or other soft surface. Remove all contents from the carton.
- Page 4 STEP 2 Extend the folding trailer arm Extend the trailer arm until the two frame ends are flush together. If necessary, move the quick release bolt and knob out of the way. Position the square head of the bolt into the squared spot on the frame and screw on the quick release knob to the other side.
- Page 5 STEP 4 Attach the handlebar foam then fold the trailer arm Check to see if the handlebar pad is properly attached. If it is not, follow steps 4A and 4B. Remove the cover from the foam pad and slide the foam pad over the handlebar crossbar so the opening is on the bottom.
- Page 6 STEP 6 Install the seat post assembly and adjust the seat Loosen the seat post quick release skewer. Slide the tube of the seat post assembly into the frame seat tube to a depth of at least 2-1/2 inches. WARNING! Minimum insertion line must be completely inserted into frame and must not be visible! Adjust the seat to the desired height.
- Page 7 STEP 8 Attach Runabout to adult bike and secure seat post clamp Place the Runabout behind the adult bike with the seat post clamp against the adult bike seat post. The seat post should rest in the valley of the seat post clamp. Place the seat post clamp plate over the seat post and tighten all four bolts by hand.
- Page 8 STEP 11 Remove the Runabout from the adult bike 11A. Flip the quick-release lever up, and unscrew the nut from the other side. 11B. Remove the nut and slide the quick-release bolt completely out. 11C. Slide the coupler assembly out from the seat post clamp. Replace quick-release pin. STEP 12 Reattach the Runabout to the adult bike 12A.
- Page 9 ACCESSORIES FOR YOUR RUNABOUT TRAILER BIKE Additional Coupler Kits allow you to switch your PATHFINDER from one bike to another. The PATHFINDER Coupler Kit includes the seat post clamp, four bolts, and the Q/R pin bolt. PF001 - - - - - Cut Here - - - - - - - - - - - - - - - - - - - - - - - - - - - - - - - - - - - - - - - - - - - - - - - - - - - Cut Here - - - - - Bike Trailer Accessory Order Form Model # Item...
Need help?
Do you have a question about the Runabout 13-SC250 and is the answer not in the manual?
Questions and answers