Table of Contents
Advertisement
Advertisement
Table of Contents

Related Manuals for Schwinn Classic Cruiser


Summary of Contents for Schwinn Classic Cruiser
- Page 1 A S S E M B LY / O W N E R ’ S M A N U A L...
-
Page 2: Table Of Contents
United States. These marks may be registered in other nations or otherwise protected by common law. Schwinn, the Schwinn Quality logo, and Classic Cruiser are trademarks owned by or licensed to Nautilus, Inc. Google Play™, and iTunes are trademarks of their respective ®... -
Page 3: Important Safety Instructions
Important Safety Instructions This icon means a potentially hazardous situation which, if not avoided, could result in death or serious injury. Obey the following warnings: Read and understand all warnings on this machine. Carefully read and understand the Assembly instructions. •... - Page 4 • This machine is for home use only. • Do not wear loose clothing or jewelry. This machine contains moving parts. Do not put fingers or other objects into moving parts of the exercise equipment. • Set up and operate this machine on a solid, level, horizontal surface. • Make the Pedals stable before you step on them. Use caution when you step on and off the machine.
-
Page 5: Safety Warning Labels / Serial Number
Safety Warning Labels and Serial Number WARNING! • Injury or death is possible if caution is not used while using this machine. • Keep children and pets away. • Read and follow all warnings on this machine. • Refer to the Owner’s Manual for additional warnings and safety information. -
Page 6: Specifications
Specifications / Tools Maximum User Weight: 300 lbs. (136 kg) Machine Weight: 73 lbs. (33.1 kg) 48” (122 cm) Power Requirements: Operational Voltage: 9VDC Operating Current: 1.5A Regulatory Approvals: AC Power Adapter: UL listed, CSA certified (or equivalent), Rated 120V 60Hz Input, 9VDC, 1500mA Output. Class 2. -
Page 7: Parts
larger diame- Parts / Hardware ter clamp Item Description Item Description Handlebar Post Seat Adjustment Clamp Handlebar Assembly Seat Post Media Rack Seat Handlebar Adjustment Console Clamp Frame Assembly Pedal, Left Front Stabilizer Rear Stabilizer Leveler Power Supply Pedal, Right Button Head Hex Screw, Socket Head Cap Screw, M8 x 20... -
Page 8: Assembly
Assembly Note: Because of the cables that run from the Handlebars to inside the Frame Assembly, be sure to carefully unpack and place the Handlebars in front of the Frame Assembly. Be sure not to crimp the cables during unpacking or assembly. 1. - Page 9 2. Attach the Stabilizers to the Frame Assembly...
- Page 10 3. Attach the Seat to the Seat Post NOTICE: Tighten the bolts on each side of the Seat bracket to hold the Seat in posi- tion. 4. Place the Seat and Handlebar Adjustment Clamps on the Frame Assembly NOTICE: Orient the clamps so the inner ridge rests on the top of the posts from the Frame Assembly.
- Page 11 5. Route the Console Cable through the Handlebar Post. Attach the Handlebar and Seat Posts to the Frame Assembly NOTICE: Do not crimp the cable. Make sure the adjustment levers fully engage the Posts. Be sure the Posts are below the maximum height marks.
- Page 12 6. Attach the Console to the Frame Assembly NOTICE: Do not crimp the cable. Hardware is pre-installed and not on the Hardware Card (*).
- Page 13 7. Attach the Handlebars to the Frame Assembly Note: Be sure not to crimp any cables when attaching the Handlebars.
- Page 14 8. Attach Pedals to Frame Assembly Note: The Left Pedal is reverse-threaded. Be sure to attach Pedals on the proper side of he Bike. Orientation is based from a seated position on the bike. The Left Pedal has an “L”, the Right Pedal an “R”.
- Page 15 9. Attach Media Rack to Frame Assembly Note: Adjust the Media Rack to the desired orientation, and fully tighten the hard- ware that secures it to the Handlebars.
- Page 16 10. On the Handlebars, inspect the orientation of the Timer, Resistance Shifter, and App Game Control Levers. Adjust for Proper Positioning 11. Fully Tighten All Hardware from Previous Steps 12. Connect AC Power Adapter to Frame Assembly...
-
Page 17: Leveling The Bike
13. Final Inspection Inspect your machine to ensure that all hardware is tight and components are properly assembled. Be sure to record the serial number in the field provided at the front of this manual. Refer to the Safety Warning Labels and Serial Number section of this manual. Do not use or put the machine into service until the machine has been fully assembled and inspected for correct performance in accordance with the Owner’s Manual. -
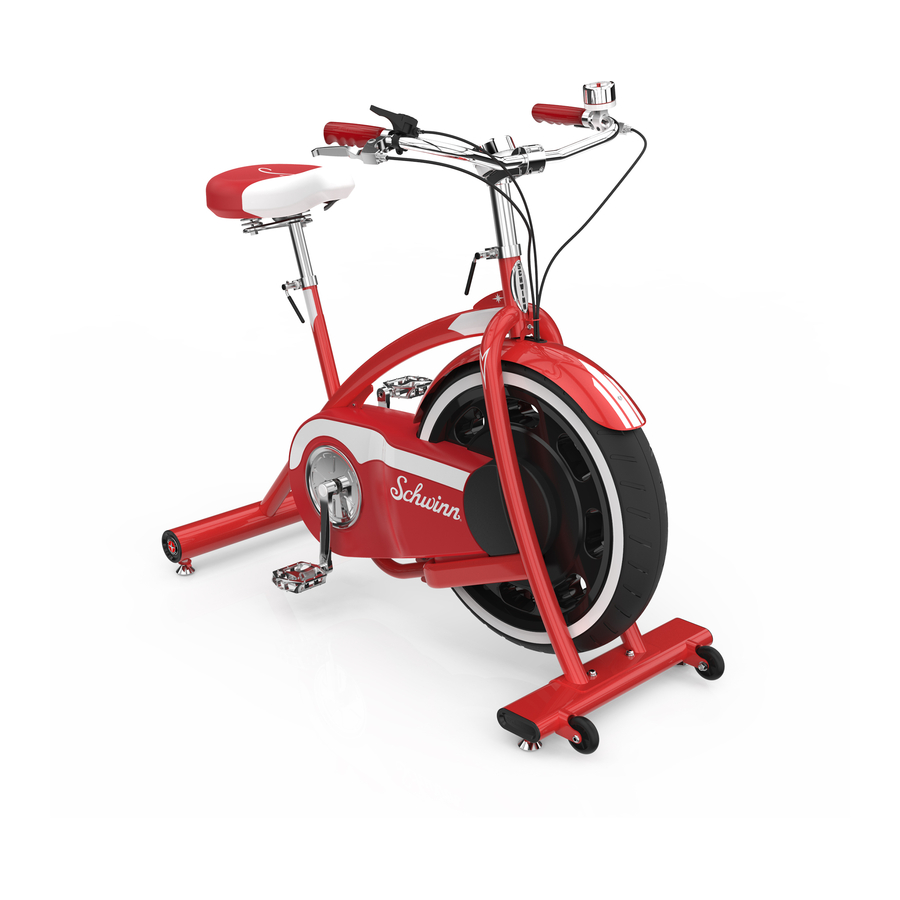
Page 18: Features
Features Console Stabilizer, Front Handgrip Transport Wheels Timer Leveler Handlebars Power Inlet Media Rack Drive Belt Guard Resistance Shifter Pedal App Game Control Lever Rear Stabilizer Handlebar Adjustment Lever Seat Adjustment Lever Flywheel (enclosed) Seat Use the values calculated or measured by the machine’s computer for reference purposes only. - Page 19 ® ness App This fitness machine is equipped with Bluetooth connectivity and can wirelessly sync ® with the “Schwinn Classic Cruiser™” Fitness App on supported devices. The App syncs with your fitness machine to track total calories burned, time, distance, and more. The Bluetooth App Connected display shows when the Console is paired with the App. ® Before you begin your workout, open the App on your Bluetooth enabled device.
- Page 20 App Game Control Levers The App Game Control Levers add a level of interaction when used with features on the Schwinn Classic Cruiser™ App.
-
Page 21: Operations
Operations What to Wear Wear rubber-soled athletic shoes or appropriate cycling shoes. You will need the appropri- ate clothes for exercise that allow you to move freely. How Often Should You Exercise Consult a physician before you start an exercise program. Stop exercising if you feel pain or tightness in your chest, become short of breath, or feel faint. -
Page 22: Workout Mode
Resistance Shifter The Resistance Shifter controls the level of resistance that is applied to the flywheel. The selected resistance level is pointed to by the lower “star burst” of the Schwinn Quality ® logo. There are seven levels of resistance (1-7) on the exercise bike. Adjust the Resistance Shifter to increase or decrease the resistance at any time during your workout. -
Page 23: Workout Results
Workout Results The Console does not show your workout results. To be able to review a workout, a Bluetooth enabled device with the Schwinn Classic Cruiser™ App must be running for the ® duration of the workout. Be sure to select your User profile (1 or 2) on the App before the work out. The App will track the user, date/time of the workout, duration, average speed, highest... -
Page 24: Maintenance
Maintenance Read all maintenance instructions fully before you start any repair work. In some conditions, an assistant is necessary to do the necessary tasks. Equipment must be regularly examined for damage and repairs. The owner is responsible to make sure that regular maintenance is done. Worn, damaged or loose components must be repaired or replaced immediately. - Page 25 Maintenance Parts Seat Front Stabilizer Seat Post Leveler Console Flywheel Console Mast Tensioner App Game Control Lever Brake Assembly/Servo Motor Handlebar Grip Drive Belt Brake Shifter Drive Pulley Handlebars Data Cable Media Rack Handlebar Adjustment Clamp Timer Seat Adjustment Clamp Crank Arm, Left Crank Arm, Right Pedal, Left...
-
Page 26: Troubleshooting
Troubleshooting Condition/Problem Things to Check Solution No display/partial Check electrical (wall) Make sure unit is plugged into a display/unit will not outlet functioning wall outlet. turn on Check connection at unit Connection should be secure and undamaged. Replace adapter or connection at unit if either are dam- aged. - Page 27 Condition/Problem Things to Check Solution Console shuts off Check electrical (wall) Make sure unit is plugged into a (enters sleep mode) outlet functioning wall outlet. while in use Check connection at unit Connection should be secure and undamaged. Replace adapter or connection at unit if either are dam- aged.
- Page 28 Condition/Problem Things to Check Solution Console will not Fitness machine Unplug unit from electrical outlet for sync with Blue- 5 minutes. Reconnect to outlet. tooth enabled ® device Bluetooth enabled device Consult your device to be sure that ® the Bluetooth wireless feature has ®...
-
Page 30: Warranty
Warranty Who Is Covered This warranty is valid only to the original purchaser and is not transferable or applicable to any other person(s). What Is Covered Nautilus, Inc. warrants that this product is free from defects in materials and workmanship, when used for the purpose intended, under normal conditions, and provided it receives proper care and maintenance as described in the Product’s Assembly and Owner’s manual. - Page 31 • Damage due to normal usage and wear and tear. • This warranty does not extend to any territories or countries outside the United States and Canada. How to Obtain Service For Products purchased directly from Nautilus, Inc. contact the Nautilus office listed on the Contacts page of the products Owner’s manual.
- Page 32 8016158.110117.A...
Need help?
Do you have a question about the Classic Cruiser and is the answer not in the manual?
Questions and answers