Advertisement
Table of Contents
Model No. WEBE20780
USER'S
Serial No.
Write the serial number in the space
MANUAL
above for reference.
Serial Number Decal (under seat)
QUESTIONS?
As a manufacturer, we are com-
mitted to providing complete
customer satisfaction. If you have
questions, or find that there are
missing or damaged parts, we
will guarantee you complete sat-
isfaction through direct assis-
tance from our factory.
TO AVOID UNNECESSARY
DELAYS, PLEASE CALL DIRECT
TO OUR TOLL-FREE CUSTOMER
HOT LINE. The trained techni-
cians on our customer hot line
will provide immediate assis-
tance, free of charge to you.
CUSTOMER HOT LINE:
1-800-999-3756
Mon.–Fri., 6 a.m.–6 p.m. MST
CAUTION
Read all precautions and instruc-
tions in this manual before using
this equipment. Save this manual
for future reference.
PATENT PENDING
Advertisement
Table of Contents

Related Manuals for Weider Pro 218


Summary of Contents for Weider Pro 218
- Page 1 Model No. WEBE20780 USER’S Serial No. Write the serial number in the space MANUAL above for reference. Serial Number Decal (under seat) QUESTIONS? As a manufacturer, we are com- mitted to providing complete customer satisfaction. If you have questions, or find that there are missing or damaged parts, we will guarantee you complete sat- isfaction through direct assis-...
-
Page 2: Table Of Contents
Table of Contents Warning Decal Placement ..............2 Important Precautions . -
Page 3: Important Precautions
Important Precautions WARNING: To reduce the risk of serious injury, read the following important precautions before using the weight bench. 1. Read all instructions in this manual before 13. Always fold the backrest out of the way when using the weight bench. Use the weight performing squat exercises (see page 15). -
Page 4: Before You Begin
Thank you for selecting the versatile WEIDER ® Monday through Friday, 6 a.m. until 6 p.m. Mountain 218 Weight Bench. The PRO 218 is designed to help Time (excluding holidays). To help us assist you, you develop every major muscle group of the body. -
Page 5: Part Identification Chart
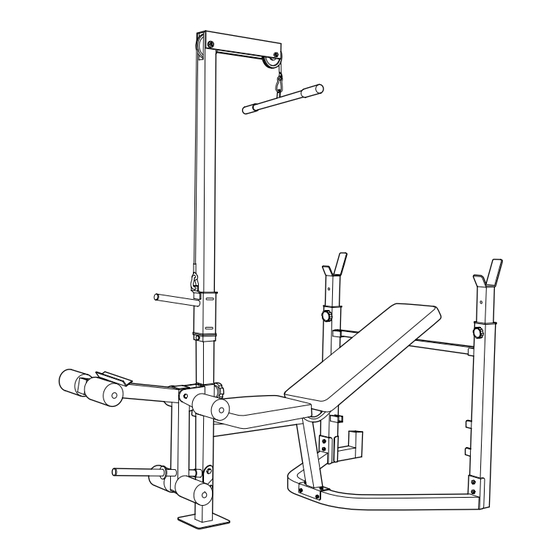
Part Identification Chart—Model No. WEBE20780 R1299A M6 x 16mm Screw (45)–6 M8 Nylon Locknut (40)–11 M10 Nylon Locknut (49)–4 M6 x 40mm Bolt (44)–4 M8 x 16mm Bolt (19)–3 M10 Washer (51)–6 M8 x 55mm Carriage Bolt (47)–2 M8 Washer (55)–6 M8 x 60mm Bolt (42)–3 M8 x 70mm Bolt (38)–1 M6 Washer (54)–4... -
Page 6: Assembly
Assembly Before beginning assembly, carefully read the • For help identifying the small parts, use the PART following information and instructions: IDENTIFICATION CHART on page 5. • As you assemble the weight bench, make sure all Make Things Easier for Yourself! parts are oriented as shown in the drawings. - Page 7 3. Identify the Left Upright by (8) locating the welded Welded Nut nut. The Left Upright must be oriented as shown in the drawing. Press a 2 1/2” Square Inner Cap (33) into the lower end of the Left Upright. Press a 2” Square Inner Cap (29) into the lower end of the Storage Post (27).
- Page 8 7. Insert a 1” Square Inner Cap (32) into the open end of each Backrest Tube (13, 61). Insert a 10mm Plastic Bushing (62) into each end of the welded tubes on the Backrest Tubes (13, 61) as shown in the inset drawing. Welded Identify the Left (13) and Right (61) Backrest Tube.
- Page 9 10. Attach the Seat (22) to the Left Seat Bracket (64) and the Right Seat Bracket (65) with four M6 x 16mm Screws (45). Insert the Seat Pin (63) through the holes in the cen- ter of the Seat Brackets and the holes in the Bench Frame (5).
- Page 10 14. Attach the Curl Pad (24) to the Curl Post (10) with two M6 x 16mm Screws (45). Slide the Curl Post (10) into the Storage Post (27). 15. Press a 2 1/4” Square Bushing (58) into the top and bottom of the Weight Carriage (2).
- Page 11 17. Feed the Cable (36) through the indicated slot in the Lat Tower (1). Rest the Cable in the groove of a Pulley (35). Attach the Pulley to the Lat Tower with an M10 x 75mm Bolt (50), two M10 Washers (51), two 15mm Spacers (52) and an M10 Nylon Locknut (49).
-
Page 12: Adjusting The Weight Bench
19. Slide a Handgrip (15) onto each end of the Lat Bar (14). 20. Make sure all parts are properly tightened before you use the weight bench. The use of all remaining parts will be explained in Adjusting the Weight Bench starting below. Adjusting the Weight Bench This section explains how to adjust the weight bench. -
Page 13: Set At The Same Height
ATTACHING WEIGHTS TO THE WEIGHT CARRIAGE To use the Lat Tower (1), slide the desired amount of weight (not included) onto the weight tube (F) on the Weight Carriage (2). Secure the weights with the Spring Clip (53). WARNING: Do not place more than 130 pounds on the weight carriage. - Page 14 ATTACHING THE CURL POST OR LAT TOWER For some exercises, the Curl Post (10) must be attached to the weight bench. Insert the Curl Post (10) into the indicated hole in the Front Leg (4). Align the holes in the Front Leg and the Curl Post.
- Page 15 FOLDING THE BACKREST To perform squat exercises, you will need to fold the Backrest (23) to the upright position. To fold the Backrest (23), lift and pull it forward as far as it will go. It will be held in place by its own weight. WARNING: Always fold the backrest out of the way when performing squat exercises.
- Page 16 ATTACHING THE LAT BAR TO THE LAT TOWER To use the Lat Tower (1), attach the Lat Bar (14) to the Cable (36) with a Cable Clip (16). LOCKING THE LEG LEVER Some exercises, such as sit-ups, can be performed more comfortably with the Leg Lever (3) locked.
-
Page 17: Exercise Guidelines
Exercise Guidelines THE FOUR BASIC TYPES OF WORKOUTS PERSONALIZING YOUR EXERCISE PROGRAM Specifying the exact length of time for each workout, Muscle Building as well as the number of repetitions or sets for each The only way to increase the size and strength of exercise, is a highly individual matter. -
Page 18: Muscle Chart
You should rest for a short period of time after each without strain. Stretching at the end of each workout set. The ideal resting periods are: is very effective for increasing flexibility. • Rest three minutes after each set for a muscle build- ing workout STAYING MOTIVATED •... - Page 19 EXERCISE WEIGHT SETS REPS MONDAY Date: AEROBIC EXERCISE TUESDAY Date: EXERCISE WEIGHT SETS REPS WEDNESDAY Date: THURSDAY AEROBIC EXERCISE Date: EXERCISE WEIGHT SETS REPS FRIDAY Date: Make photocopies of this page for scheduling and recording your workouts.
-
Page 20: Ordering Replacement Parts
This warranty gives you specific legal rights. You may also have other rights which vary from state to state. ICON HEALTH & FITNESS, INC., 1500 S. 1000 W., LOGAN, UT 84321-9813 WEIDER is a registered trademark of ICON Health & Fitness, Inc. Part No. 148521 R1299A... - Page 21 REMOVE THIS PART LIST/EXPLODED DRAWING FROM THE MANUAL SAVE THIS PART LIST/EXPLODED DRAWING FOR FUTURE REFERENCE...
- Page 22 Part List—Model No. WEBE20780 R1299A Key No. Qty. Description Key No. Qty. Description Lat Tower Cable Weight Carriage Carriage Stop Leg Lever M8 x 70mm Bolt Front Leg 1 3/4” Thin Square Inner Cap Bench Frame M8 Nylon Locknut Left Base M10 x 70mm Bolt Right Base M8 x 60mm Bolt...
- Page 23 Exploded Drawing—Model No. WEBE20780 R1299A...
Need help?
Do you have a question about the Pro 218 and is the answer not in the manual?
Questions and answers