Table of Contents
Advertisement
Model No. WEBE29301
Serial No.
Write the serial number in the
space above for reference.
Serial
Number
Decal
QUESTIONS?
As a manufacturer, we are com-
mitted to providing complete
customer satisfaction. If you have
questions, or if there are missing
parts, we will guarantee complete
satisfaction through direct assis-
tance from our factory.
TO AVOID UNNECESSARY
DELAYS, PLEASE CALL DIRECT
TO OUR TOLL-FREE CUSTOMER
HOT LINE. The trained techni-
cians on our customer hot line
will provide immediate assis-
tance, free of charge to you.
CUSTOMER HOT LINE:
1-800-999-3756
Mon.–Fri., 6 a.m.–6 p.m. MST
CAUTION
Read all precautions and instruc-
tions in this manual before
using this equipment. Save this
manual for future reference.
USER'S MANUAL
Visit our website at
www.weiderfitness.com
new products, prizes,
fitness tips, and much more!
Advertisement
Table of Contents

Related Manuals for Weider Club 550


Summary of Contents for Weider Club 550
- Page 1 Model No. WEBE29301 USER’S MANUAL Serial No. Write the serial number in the space above for reference. Serial Number Decal QUESTIONS? As a manufacturer, we are com- mitted to providing complete customer satisfaction. If you have questions, or if there are missing parts, we will guarantee complete satisfaction through direct assis- tance from our factory.
-
Page 2: Table Of Contents
• Replace label if and operating instructions prior to use. damaged, illegible, or • Do not allow children on or around machine. removed. • Replace label if damaged, illegible, or removed. WEIDER is a registered trademark of ICON Health & Fitness, Inc. -
Page 3: Important Precautions
Important Precautions WARNING: To reduce the risk of serious injury, read the following important precautions before using the weight rack. 1. Read all instructions in this manual before 10. The weight rack is designed to support a using the weight rack. Use the weight rack maximum of 300 pounds, including the bar- only as described in this manual. -
Page 4: Before You Begin
Before You Begin Thank you for selecting the versatile CLUB WEIDER Department toll-free at 1-800-999-3756, Monday ® 550 weight bench. The 550 weight bench is designed through Friday, 6 a.m. until 6 p.m. Mountain Time to help you develop every major muscle group of the (excluding holidays). -
Page 5: Part Identification Chart
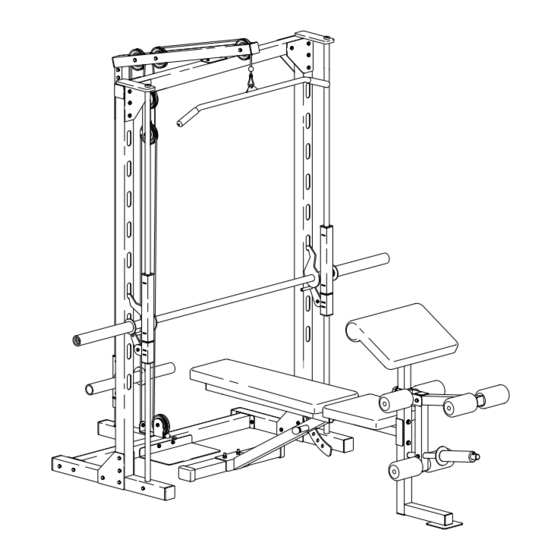
Part Identification Chart—Model No. WEBE29301 R1200A Refer to the drawings below to identify small parts used in assembly. The number in parentheses below each drawing is the key number of the part, from the Part List in the center of this manual. The number following the key number is the quantity needed for assembly. -
Page 6: Assembly
Assembly Before beginning assembly, carefully read the Some small parts may be pre-assembled. following information and instructions: • As you assemble the weight bench, make sure all parts are oriented as shown in the drawings. Make Things Easier for Yourself! This manual is designed to ensure that the Assembly requires the following tools (not weight bench can be assembled successfully... - Page 7 3. Attach an Upright (1) to each Base (7) using two Joint Plates (12), four M10 x 80mm Bolts (41), and four M10 Nylon Locknuts (11). Make sure the Uprights are oriented exactly as shown. Do not tighten the Nylon Locknuts yet. 4.
- Page 8 6. Press a 38mm Bushing (29) into each end of the Right Weight Glider (31). Slide the Right Weight Glider onto the indicated end of the Barbell (35) and attach it to the Barbell using an M8 x 20mm Screw (50). Do not tighten the Screw yet. Make sure the Right Weight Glider is oriented exactly as shown.
- Page 9 10. Press a 60mm Square Inner Cap (55) into each end of the Top Crossbar (9). Attach the Top Crossbar to the Uprights (1) using four Joint Plates (12), eight M10 x 80mm Bolts (41), and eight M10 Nylon Locknuts (11). Do not tighten the Nylon Locknuts yet.
- Page 10 13. Press a 50mm Square Inner Cap (10) into each end of the Pulley Bar (59). Slide the bracket on the Pulley Bar into the top of the Rear Upright (2). Attach the Pulley Bar to the Rear Upright using two M10 x 65mm Bolts (56), four M10 Small Washers (6), and two M10 Nylon Locknuts (11).
- Page 11 17. Slide the indicated end of the High Cable (13) onto the M10 x 20mm Bolt (26) in the Weight Carriage (22). Tighten an M10 Nylon Locknut (11) onto the Bolt. 18. Route the High Cable (13) around a Pulley (5) as shown.
- Page 12 21. Attach the indicated end of the Low Cable (8) to the bracket on the Rear Base (3) using an M10 x 20mm Bolt (26) and an M10 Nylon Locknut (11). Bracket 22. Press two 50mm Square Inner Caps (10) into the bottom and the indicated end of the Front Leg (73).
- Page 13 24. Press four 25mm x 50mm Inner Caps (79) into the ends of the Backrest Frame (78). Attach the Backrest Bracket (53) to the Backrest Frame using two M10 x 25mm Bolts (43) and two M10 Nylon Locknuts (11). 25. Attach the Backrest (69) to the Backrest Frame (78) with four M6 x 65mm Screws (62) and four M6 Washers (81).
- Page 14 28. Press three 45mm Square Inner Caps (71) into the Leg Lever (72). Press a 25mm Round Inner Cap (84) into the indicated end of the Weight Tube (75). Attach the Weight Tube (75) to the Leg Lever (72) with an M8 x 55mm Bolt (70), two M8 Flat Washers (67), a 10mm Spacer (74), and an M8 Nylon Locknut (54).
-
Page 15: Adjusting The Weight Bench
Adjusting the Weight Bench This section explains how the weight bench can be adjusted. Inspect and tighten all parts each time you use the weight bench. Replace any worn parts immediately. The weight bench can be cleaned with a damp cloth and a mild, non-abrasive detergent. - Page 16 ATTACHING WEIGHTS TO THE BARBELL OR THE WEIGHT CARRIAGE Weights To use the Barbell (35), slide the desired amount of weight (not included) onto each end of the Barbell. Secure the weights with Weight Clips (51). Weights can be attached to the weight tube on the Weight Carriage (22) in the same manner.
- Page 17 ATTACHING THE WEIGHT ADAPTER To use your weight bench with an Olympic weight set, you must attach the Olympic Weight Adapter (42). To do this, press a Weight Adapter Bushing (46) into each end of the Weight Adapter. Slide the Weight Adapter onto the Weight Tube (75) and secure it with the Weight Adapter Pin (52).
-
Page 18: Exercise Guidelines
Exercise Guidelines THE FOUR BASIC TYPES OF WORKOUTS PERSONALIZING YOUR EXERCISE PROGRAM Muscle Building Specifying the exact length of time for each workout, The only way to increase the size and strength of and the number of repetitions and sets for each exer- your muscles is to push them to a high percentage of cise, is a highly individual matter. -
Page 19: Muscle Chart
Make sure to rest for a short period of time after each each stretch gradually and go only as far as you can set. The ideal resting periods are: without strain. Stretching at the end of each workout • Rest three minutes after each set for a muscle build- is very effective for increasing flexibility. -
Page 20: Ordering Replacement Parts
• The MODEL NUMBER of the product (WEBE29301) • The NAME of the product (CLUB WEIDER 550 weight bench) • The SERIAL NUMBER of the product (see the front cover of this manual) •... - Page 21 REMOVE THIS PART LIST/EXPLODED DRAWING FROM THE MANUAL SAVE THIS PART LIST/EXPLODED DRAWING AND THE USER’S MANUAL FOR FUTURE REFERENCE...
- Page 22 Part List—Model No. WEBE29301 R1200A Key No. Qty. Description Key No. Qty. Description Upright Weight Adapter Bushing Rear Upright 50mm Bushing Rear Base 25mm Bushing Foot Plate 45mm Square Bushing Pulley M8 x 20mm Screw M10 Small Washer Weight Clip Base Weight Adapter Pin Low Cable...
- Page 23 Exploded Drawing—Model No. WEBE29301 R1200A...
Need help?
Do you have a question about the Club 550 and is the answer not in the manual?
Questions and answers