Danfoss 102 Installation & User's Instructions
Electro-mechanical mini-programmer forcontrolling hot water and heating
Hide thumbs
Also See for 102:
- Operating instructions manual (94 pages) ,
- Reference manual (60 pages) ,
- Installation and wiring instructions (2 pages)

Subscribe to Our Youtube Channel
Related Manuals for Danfoss 102


Summary of Contents for Danfoss 102
- Page 1 electro-mechanical mini- programmer for controlling hot water and heating Installation & User Instructions including Factory Replacement Units (FRU)
-
Page 2: Table Of Contents
Index Installation Product specifi cation Installation Wiring User Your programmer Setting the time of day Setting the programme Selecting operating mode Temporary overrides Contact details... -
Page 3: Product Specifi Cation
Installation Instructions Please Note: This product should only be installed by a qualifi ed electrician or competent heating installer, and should be in accordance with the current edition of the IEEE wiring regulations. Product specifi cation Specifi cation Power supply 230Vac ±... -
Page 4: Installation
Installation Pre-Selector wheel Selector switch Plug-in replacement module Wallplate/Terminal block (not with FRU units) NB. For FRU units - go straight to to point 4 on page 5 wallplate/ 1. Loosen the fi xing screw in terminal the base of the unit to release block the grey plastic Wiring Cover. - Page 5 3. Fix the Wallplate/Terminal Block to the wall with countersunk No.8 woodscrews or to a steel box to BS 4662. 1970 or a surface mounting steel or moulded box having centres of 23/8” (60.3mm). 4. Referring to the Wiring Diagrams on page 6, connect the unit as shown.
-
Page 6: Wiring
1) Typical domestic gas or oil fired system HW circiut and room stat and 2 port spring with gravity hot water and pumped heating return zone valve in heating circuit. (if a room stat is not required, wire pump L directly to terminal 2 on the 102). -
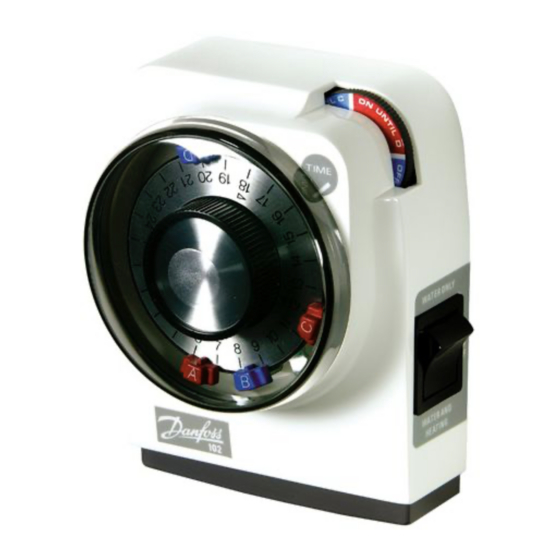
Page 7: Your Programmer
However 1 ON and 1 OFF period can be obtained by using the Pre-Selector Wheel (see page 11). You can choose whether the 102 controls your hot water & heating together, just the hot water or neither system (OFF) using the manual rocker switch. -
Page 8: Setting The Time Of Day
Setting the time of day The dial on the front of the 102 displays the hours of the day using the 24hour clock. TIME mark Remove dial cover (turn slightly to the left and pull off) Turn the dial clockwise... - Page 9 Example: If you want your system ON between 8am and 10am and again between 4pm and 11pm, set the tappets as shown. (A to 8, B to 10, C to 16, D to 23). A = 1st ON B = 1st OFF C = 2nd ON D = 2nd OFF Remember:...
-
Page 10: Selecting Operating Mode
Selecting operating mode The Rocker Switch on the side of the unit is used to select how your 102 controls your hot water & heating system. You can manually select either: hot water only hot water & heating together neither (system OFF) -
Page 11: Temporary Overrides
Overriding the programe using the Pre-Selector wheel The pre-selector wheel can be used to override the set programme on occasions when you need to change from your normal heating routine. By turning the wheel anti-clockwise you can turn the unit ON when it is OFF and vice versa. - Page 12 Call our technical department 0845 121 7505 (8.45-5.15 Mon-Thurs, 8.45-4.45 Fri) For a large print version of these instructions please contact the Marketing Services Department on 0845 121 7400. Danfoss Randall Ltd Ampthill Road Bedford MK42 9ER Tel: 01234 364621 Fax: 01234 219705...
Need help?
Do you have a question about the 102 and is the answer not in the manual?
Questions and answers