Samsung SmartCam SNH-1010N User Manual
Smartcam
Hide thumbs
Also See for SmartCam SNH-1010N:
- User manual (36 pages) ,
- Quick start manual (21 pages) ,
- Troubleshooting manual (3 pages)
Table of Contents
Advertisement
Advertisement
Chapters
Table of Contents

Related Manuals for Samsung SmartCam SNH-1010N


Summary of Contents for Samsung SmartCam SNH-1010N
- Page 1 Samsung SmartCam User Manual SNH-1010N...
-
Page 2: User Manual
(ex: Samsung Techwin makes the best to verify the integrity and correctness of the contents in electric stove or oven) and other warming devices (ex: audio amplifier, TV, etc.). -
Page 3: Table Of Contents
Basic Information …………………………………………… 6 • To avoid entangled cable lines, avoid using cable extension for adaptor’s power cord. • The product’s servicing is allowed only to authorized Samsung Techwin’s service personnel. INSTAllATION & NETWORk CONNECTION • When using the product for children’s care, be careful to keep the product out of children’s reach. -
Page 4: Getting Started
Key Features • Easy to install - With the help of WPS (Wi-Fi Protected Setup), wireless sharing and easy connection are enabled. - Simply visit the home page (www.samsungsmartcam.com) and download and install the program without a separate installer program. •... - Page 5 Product and Accessories System Components Camera Power Adaptor Quick Start Guide License Information Warranty Card Bracket Double-sided Tape Network Cable Check for above components when opening the product package.
-
Page 6: Basic Information
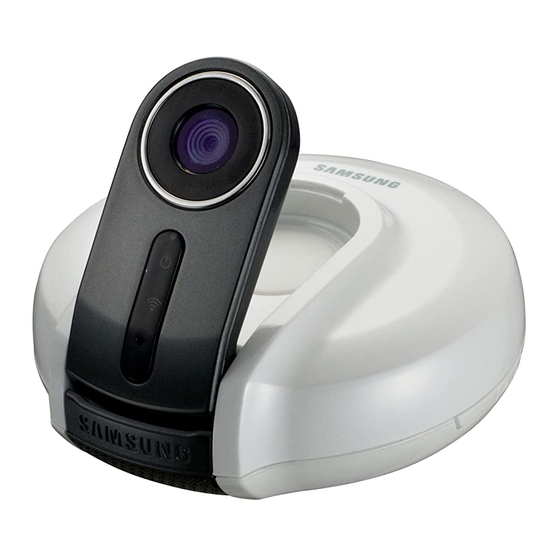
Basic Information Product At a Glance Front View High quality camera lens Built-in IR lEDs for night vision Power status lED Red: Power On, Boot-up in process White: Camera ready Yellow: Privacy mode enabled Wi-Fi status lED Magenta: Updating firmware Flashing White: Searching for wireless network Steady White: Wireless network connected Built-in Mic... -
Page 7: Rear View
Power Supply Side View Plug-in the camera power adapter to the wall outlet and connect the camera as shown. WPS Button Used to connect to the Wireless Access Point Privacy button Press once to stop transmitting Make sure to use the provided power adaptor. Otherwise, the product may not video/audio operate properly. -
Page 8: Installation
Installation Precautions 1. Install the camera in a place where it can receive the video signal with no & n interference. nStallation etwork 2. Keep it away from humidity such as around the humidifier. onneCtion 3. Keep it away from the direct sunlight, strong light or dust; install it in a place of clear view. -
Page 9: Stand Mounting
Wall mounting Stand mounting Use a double-sided tape to secure the bracket to Place the camera in a desired position a desired position. on the surface. You can use the screws to tighten the camera. (not included) The double-sided tape cannot be reused after being used once. - Page 10 Adjust the camera’s shooting angle as appropriate (left and right) and Plug in the power cable and arrange the cables through the bracket tighten the screws on the bottom of the bracket. holes. You can also use a coin or flat-head screwdriver to tighten them. When done, remove the protective film from the lens.
-
Page 11: Network Connection And Settings
Network Connection and Settings Precautions If using a cable router • The wireless network access may fail, depending on the communications environment. If you do not have a Wireless Access Point, you must connect the camera using LAN • For details about the network settings and password, contact your network cable directly to your home router. -
Page 12: If Using A Wireless Access Point Not Equipping Wps
If using a Wireless Access Point not equipping WPS To connect to a wireless network with WPS What is WPS? If you want to connect the camera using a non-WPS Wireless Access Point, change WPS enables to make connection between the camera and the Wireless Access the network setting to Wire and try the wireless network. -
Page 13: Monitoring
Settings Account Setup and Registering the Camera Once you register the product with the site, you can monitor the camera video on the PC or laptop computer. Web browser requirements onitorinG Windows - Windows 7, XP supported - Internet Explorer 7 or 8 - Safari (The 64-bit Internet Explorer 8 is not - Firefox... - Page 14 Enter www.samsungsmartcam.com on the web browser’s address field. Java-uninstalled PC Verify the Java version • In the SmartCam Web service access page, make search for JAVA Runtime Environment (hereinafter “JRE”) and check if your PC has installed the recommended version of JRE 1.6.10 or later. If not, install the latest version of JRE as recommended by the Company.
- Page 15 And, you will be prompted to agree to run the application published by • Search for the current version of JRE on the PC Samsung Techwin Co., Ltd. Check the JRE version of the current PC • Check the current JRE version and download the latest version if necessary...
- Page 16 Agree to install JRE Start installing Java • Agree to install the latest version of JRE Move to the Verify Java page • If you agree to upgrade the current Java version for a PC installing JRE version 1.6.10 or earlier or a PC not installing JRE, you will move to the Java Verify page.
- Page 17 After reading the terms of use, check on “Agree”, and click <Next>. • Move to the SmartCam Web page (www.samsungsmartcam.com), and you will be prompted to agree to run the application published by Samsung Techwin Co., Ltd. Start the SmartCam Web service Provide the requested information, and click <Sign Up>.
- Page 18 Enter the <Serial no.> and click the check. When done, click <Registration>. <Bottom Label of the Product> Create a <Private key>. If you want to change the private key, move to <Admin> <Private Key> and make a change. The private key can be changed only in admin mode.
-
Page 19: Live Video
When done, click <OK>. live Video Select <Video> <Live> to display the live feed from the selected camera. From the <Camera List>, select the camera to monitor and click < >. cam-room1 xxxxxxxxx cam-room2 xxxxxxxxx The < > icon indicates the camera is inactive so you cannot monitor it right now. -
Page 20: Alarm Settings
Alarm Settings Camera has ability to send event notifications when motion or audio is detected. • < > : Takes a picture of current live image you are viewing. See the notification bar below the live view. • < > : When enabled, you can hear what’s happening around the camera. Depending on the policy of the Internet service provider, the sound output may not be supported. - Page 21 <YouTube> Notification 3. Click Apply. When enabled, you can record up to 30 seconds of video to your private YouTube account. 1. Select Enable. 2. Enter your YouTube user ID and password. 3. Select public or private folder to save. By default, it’s set to private folder. 4.
- Page 22 <Google Talk> Notification <E-mail> Notification 1. In the friend’s list, it shows the IDs that camera is registered to and Google Talk friends that receives real-time notification from the camera. <Receiver email address> 2. When enabled, you can receive real-time event notification through Google Talk messenger and Smartphone push service.
-
Page 23: Live Video Setting
Live Video Setting Description Setup Adjust the volume of the built-in microphone and speaker of the camera as appropriate. Audio Note that the Two-way audio transfer function is available only with the smart phone application. You can configure the camera-related settings. •... -
Page 24: Network Setup
Network Setup <Wired Network> <Wireless Network> Description If you select “Dynamic IP Address”, the IP address will be Dynamic IP Address Description obtained automatically. You can select to activate or deactivate the wireless network Wireless On/ You must manually provide the information of: IP address, Wireless Off connection. -
Page 25: Time Setting
Time Setting Administrator <Private Key> Description Description Change the private You can change the private Key. Enter the current private Key, and type a new private Key. Time Zone Select your region. Check this option if you live in a country or region where Summer Time DST(Daylight Saving Time) is applied. - Page 26 <Update Firmware> <My Account> cam-room1 xxxxxxxxx cam-room2 xxxxxxxxx Description Please update your current software version if it is lower than the final version. Update Firmware If the final version is the same as or lower than the current version, the “Update Firmware” button will not be active. No update will proceed.
-
Page 27: Appendix
Specifications Specifications Item SNH-1010N Sensor Appendix Imaging Device VGA 1/6 inch CMOS Lens Focal Length (Zoom Ratio) 2.17mm 64.5°/ 41.0°/ 50.0° Angular Field of View (D/V/H) Focus Control Fixed Lens Type 3 Plastic lens Pan / Tilt / Rotate Pan Range -35°~35°... - Page 28 Item Item SNH-1010N SNH-1010N Network Environmental Operating Temperature / Ethernet RJ-45 (10/100BASE-T) 0°C ~ +40°C (+32°F ~ +104°F)/ 20% ~ 80% RH Humidity Wireless Wi-Fi 802.11 b/g/n Electrical WPS (Wi-Fi Protected Setup) Support WPS Button Input Voltage / Current 5V DC / 2.2A Video Compression Format H.264, MJPEG...
- Page 29 Product Appearance...
-
Page 30: Troubleshooting
Troubleshooting If you encounter a problem with your system, see the table below to solve the problem as quickly and easily as possible. Please follow the instruction below: Problem Action Problem Action Move to “Log-in page -> Find ID/PW”, and enter the registered Move to Setup ... - Page 31 Problem Action The Company supports the privacy policy or mode for protecting The message of your privacy. The Privacy mode can be set using the button on Privacy mode the side of the product. (See page 7 of the manual) appears and In Privacy mode, neither camera video will be displayed nor is it no video is...
- Page 32 Samsung Techwin cares for the environment at all product manufacturing stages, and is taking measures to provide customers with more environmentally friendly products. The Eco mark represents Samsung Techwin’s devotion to creating environmentally friendly products, and indicates that the product satisfies the EU RoHS Directive.
- Page 33 SAMSUNG TECHWIN AMERICA Inc. • SAMSUNG TECHWIN EUROPE LTD. 100 Challenger Rd. Suite 700 Ridgefield Park, NJ 07660 Samsung House, 1000 Hillswood Drive, Hillswood Business Park Toll Free : +1-877-213-1222 Direct : +1-201-325-6920 Chertsey, Surrey, UNITED KINGDOM KT16 OPS Fax : +1-201-373-0124...
Need help?
Do you have a question about the SmartCam SNH-1010N and is the answer not in the manual?
Questions and answers