Table of Contents
Advertisement
Advertisement
Table of Contents

Related Manuals for Philips medication dispenser


Summary of Contents for Philips medication dispenser
- Page 1 Philips Medication Dispenser User Manual...
-
Page 2: Table Of Contents
Philips Medication Dispenser . . . . . . . . . . . . . . . . . . . - Page 3 Dispensing Medication . . . . . . . . . . . . . . . . . . . . . . . . . . . . . . . . . . . . . . 15 Medication and Reminder Messages .
- Page 4 Resetting the Philips Medication Dispenser . . . . . . . . . . . . . . . . . .
- Page 5 Important Information • Accuracy in loading the Philips Medication Dispenser is critical. Double-check each cup prior to loading, and follow the loading instructions announced and displayed on the dispenser . • Do not load lifesaving medication into the dispenser (e.g., nitroglycerine), because you may not be able to access it quickly in an emergency situation .
-
Page 6: Introduction
. Whether the caregiver is family, a friend or a healthcare provider, the Philips Medication Dispenser makes it possible for them to prepare and set up medication a week or more in advance . - Page 7 31 . We’ve designed this User’s Manual to make it easy to understand the Philips Medication Dispenser . But if you have any questions, please don’t hesitate to call . The Support Center is available 24/7 to provide assistance . They’ll help make sure that the dispenser is programmed and functioning correctly .
-
Page 8: What's In The Box
What’s in the Box • Philips Medication Dispenser • Medication loading tray • Medication cups and lids • Door lock keys (2) • Telephone cable • AC power adapter • Caregiver Quick Reference Guide (to be left with the dispenser for easy reference) • Quick Guide to Caregiver Alerts (small card for caregivers to take home with them) • Special Telephone Service Considerations pamphlet Introduction... - Page 9 For assistance, call the Support Center at 1-888-632-3261 .
-
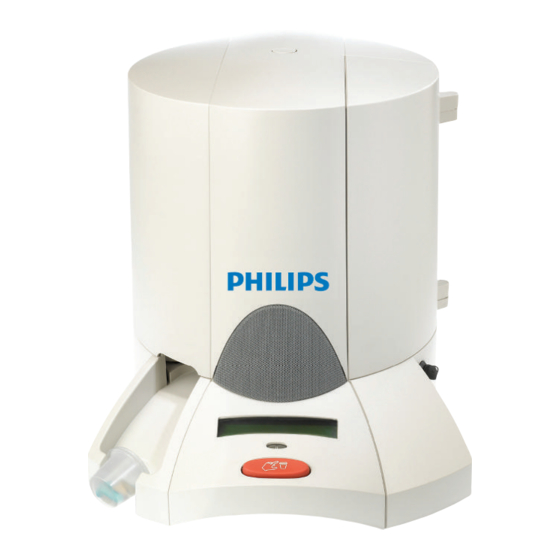
Page 10: Philips Medication Dispenser
Philips Medication Dispenser Keypad Help Press “Help” to access information about the dispenser or to unload medication cups . Load Press “Run” to resume Press “Load” to load normal operation after medication . Also, press you have used other “Load” to review or keypad features . -
Page 11: At A Glance
At a Glance Speaker Medication Dispensing Door Key Area Display Indicator Light Button For assistance, call the Support Center at 1-888-632-3261 . - Page 12 Cylinder Keypad Rechargeable Missed Battery Dose Bin Warning: Always keep the door closed and locked, and store the key in a safe place . Introduction...
-
Page 13: Frequently Asked Questions
Can two people in the same home use the dispenser? No . Because medications are so important, each person in the home should have his or her own Philips Medication Dispenser to avoid errors with medications . What if medications change? Please refer to page 19 for instructions on changing medications . -
Page 14: Preparing And Loading Medication
Preparing and Loading Medication Determine How Many Days of Medication to Load Before you get started: • Gather all medications and have the medication and reminder schedule in front of you . • Talk to the patient’s doctor or pharmacist about getting all medication refills on the same 30-day cycle . • If possible, get prescriptions refilled at the same pharmacy. 1. Most caregivers choose to load 7-10 days’ worth of medication. The amount of medication you choose to load may depend upon: • Frequency of caregiver visits – If you visit the patient weekly, it may make sense to load one week’s worth of medication at a time . • Date of the patient’s next doctor appointment – Since prescriptions frequently change, load medication for only a couple days beyond the appointment . -
Page 15: Prepare Medication
2. The Philips Medication Dispenser holds up to a 40-day supply of medication. The number of days that can be loaded depends upon the number of doses taken per day. For example, if the patient requires 3 doses per day, you can load up to 20 days’ worth of medicine into the dispenser. Medication doses per day Maximum # of days that can be loaded 3. Once you have determined how many days to load, make sure that you have enough medication to cover the time period. This will depend upon the number of pills that are taken each day. For example, if the patient takes 2 pills a day and you want to load 7 days’ worth of medication, then you will need 14 pills. # of pills per day x # of days to load = number of pills required Prepare Medication Important: Load only capsules or pills into the medication cups . • Do not use liquid medication . • Only use cups and lids ordered through Philips. • Make sure the cups and lids are not stuck together. • Do not overload cups. Make sure the lids can be attached securely after loading. - Page 16 2. Place empty cups into the loading tray at the corresponding dosage times for each day of the week. If there are fewer than 6 doses a day, there will be holes left open. 3. If this is the first time the dispenser is being loaded, remove the cups that correspond with doses already taken that day. These will not be loaded into the dispenser. 4. Load medication into the cups. When you are done, each cup should contain the correct combination of medication to be taken at a particular time. 5. Snap lids onto the medication cups. Preparing and Loading Medication...
-
Page 17: Loading Medication
Helpful Hint: Use a permanent marker to write the day and time for each dose on the lid of the cup . This is helpful if cups are unloaded to make medication changes or if you dispense doses early . The medication cups can now be loaded into the dispenser . - Page 18 4. Load medication cups for the day/date displayed on the dispenser. Make sure to load the cups upside down in the order that they are to be taken. In other words, the 1st dose of the day is loaded first, the 2nd dose is loaded second, etc. dose dose dose Medication is loaded on a day-by-day basis . After one day’s worth of medication is loaded, the cylinders will rotate before the next day’s medication is loaded . 5. When you have loaded all the cups for that day, press the “OK” key to continue. The display will show: “Continue”...
-
Page 19: Frequently Asked Questions
After the medication has been loaded, the dispenser will begin normal operation . The display will show: If you do not see a similar display in between dose times, you may have to press the “Run” key . Frequently Asked Questions What if I accidentally select “Continue” when I meant to quit loading the medication? Simply press the “Run”... -
Page 20: Dispensing Medication
Dispensing Medication Medication and Reminder Messages The Philips Medication Dispenser is capable of delivering up to 6 doses per day . It is important to note that a dose can be either a cup of medication or a reminder message . Please refer to the example below . -
Page 21: Normal Operation
Normal Operation During normal operation, the Philips Medication Dispenser will provide information about the next scheduled dose . The next dose can be either a cup of medicine or a reminder message . The display will show: Amount of time until the next dose Current date and time NOTE: If you do not see a similar display in between dose times, press the “Run”... -
Page 22: Missed Doses
(if one has been provided) . For more information about caregiver alerts, please refer to page 47 . If there is no response after 90 minutes, the Philips Medication Dispenser will consider the dose missed . The medication cup will be dispensed to the missed dose storage bin, the voice messages will stop and “System OK”... -
Page 23: Frequently Asked Questions
. The Philips Medication Dispenser will automatically resume its normal operation . If you want to dispense another early dose, repeat the process above . -
Page 24: Changing Medication And Delivery Schedule
Changing Medication and Delivery Schedule Guidelines Occasionally, you may have to change the delivery schedule or the medication that has been loaded into the dispenser . Follow the guidelines below to determine the best way to make changes . If you are unsure about how to change medications, please call our Support Team and we will walk you through the process . -
Page 25: Frequently Asked Questions
What do I do if only the schedule (dose times) has changed? Call the Support Center to update the schedule . They will take care of downloading the new schedule into the Philips Medication Dispenser . What feature should I use if the schedule is the same but the medications have changed? Use the “Review”... -
Page 26: Monitoring And Response
Monitoring and Response Caregiver Alerts Caregiver alerts are an optional feature of the Philips Medication Dispenser . If caregiver contact information has been provided, the dispenser will alert a caregiver when any of the following occurs: • There is a missed dose. • The dispenser is almost out of medication. See “Almost Empty Alerts” on page 22. -
Page 27: Almost Empty Alerts
Please refer to page 47 for a list of caregiver alerts and the recommended action . Daily Check-In Once a day, the Philips Medication Dispenser will automatically call the Support Center to download information about the system status . The following information is downloaded each day: • Number of missed doses... -
Page 28: Frequently Asked Questions
Will the dispenser tie up the telephone line? The Philips Medication Dispenser does rely on the phone line for a few minutes, in the middle of the night, when it performs its daily check-in call . It will also use the phone line when it is attempting to alert a caregiver . - Page 29 For assistance, call the Support Center at 1-888-632-3261 .
-
Page 30: Additional Features
Additional Features Status If there has been a missed dose, pressing the “Status” key will provide information about the missed dose(s) . Otherwise, pressing the “Status” key will provide information about the amount of medication remaining in the dispenser and the battery status . Missed Dose Press the “Status”... - Page 31 80%, please contact the Support Center for assistance . Press the “Status” key . The display will show: This status display will remain on the screen for 5 seconds . After 5 seconds, the Philips Medication Dispenser will automatically resume normal operation .
-
Page 32: Adjusting Settings
Adjusting Settings The following settings can be adjusted to suit individual needs: • Time • Volume • Brightness of the display (LCD) Time If the dispenser is connected to a phone line, call the Support Center to adjust the date and time of the dispenser . If the dispenser is NOT connected to a phone line, refer to the instructions on page 39 to set the date and time . -
Page 33: Demonstration Program
Demonstration Program The demonstration program allows you to demonstrate the functions and features of the Philips Medication Dispenser. You will be instructed to load three medication cups. Do not fill the cups with medication. The cups will then be dispensed, one every 4-8 minutes . 1. To start the demonstration program, press the “Help” key. The display will show: “Unload” will be blinking . 2. Press the up or down arrow key to select “Special.” The display will show: “Yes” will be blinking. 3. Press the “OK” key. The display will show: 4. Press the “Load” key. You will hear and see the cylinders being rotated, and the display will show: 5. It can take up to two minutes for the dispenser to correctly position the cylinders. Once complete, “Cups must be loaded upside down” and “Please load... - Page 34 The Philips Medication Dispenser display will provide information about the next scheduled dose, as below: 9. After 4-8 minutes, the dispenser will prepare to dispense the first of the three doses. “Time for your medication... press button to dispense” will be announced. The red light will start flashing and the display will show: 10. Press the red button on the front of the dispenser to dispense the medication cup. If the button is not pressed within 3-4 minutes, a loud beep will accompany the voice message. This is the same beep that is heard during normal operation if the patient does not dispense the medication within 45 minutes. The Philips Medication Dispenser will dispense the remaining doses in intervals of 4-8 minutes . Additional Features...
-
Page 35: Frequently Asked Questions
39 to adjust the time and/or volume . What happens to the time during Daylight Saving Time? If the Philips Medication Dispenser is connected to a phone line, the Support Center will automatically adjust the time when the clocks change . If the dispenser is NOT connected to a phone line, please refer to the instructions on page 39 to adjust the time . -
Page 36: Installation
Installation Subscriber Activation The Philips Medication Dispenser Subscriber Activation Form and Services Agreement must be sent to the Support Center before the dispenser is installed . This form provides important information about: • Caregivers – people who will be notified in case of missed doses or any problems • Medication delivery schedule • Messages – two types of which are announced and displayed by the Philips Medication Dispenser: 1 . -
Page 37: Setup
Setup 1. Select a location. The Philips Medication Dispenser should be located: • Near a phone jack and an electrical wall outlet that is not controlled by a wall switch • In an area of the home where you spend much of your time • On a hard, flat surface • Away from sources of noise (television, radio, air conditioner, etc.) 2. Unload the box. • Remove the dispenser and supplies from the box. Save the box and packing materials for future use as needed . - Page 38 • Voice-over-IP (VoIP) telephone service • DSL or other Internet telephone service • Lifeline Medical Alert Service • Answering machines 4. Connect your phone. • If you did not disconnect a phone from the wall jack, you may skip this step. • If you unplugged a phone from the wall jack during the previous step, then plug the phone cord from your phone into the open jack on the back of the dispenser . 5. Plug in the power supply. • Plug the power supply into an electrical outlet that is NOT controlled by a switch. • Plug the power cord into the back of the Philips Medication Dispenser. Installation...
- Page 39 Support Specialist through the entire installation . • Call the Support Center at 1-888-632-3261. Tell the Support Specialist that you are ready to activate the service. You will need to provide the patient’s name and the serial number of the Philips Medication Dispenser . The serial number is listed on the bottom of the label inside the door . Serial number...
-
Page 40: Scheduling
The next step is scheduling . The information provided on the Subscriber Activation Form (medication times and messages) will be downloaded into the Philips Medication Dispenser . This is done automatically over the telephone line connection . If you have called from a cell phone, you may remain on the line with the Support Specialist . -
Page 41: Frequently Asked Questions
Support Center for assistance . Congratulations! The setup and scheduling is complete . Medications should now be prepared and loaded into the Philips Medication Dispenser . Please refer to page 9 for further instructions . Frequently Asked Questions Will the dispenser work with voicemail? Yes. -
Page 42: Special Installations
Special Installations Voice-over-IP (VoIP) and DSL Phone Service The Philips Medication Dispenser is compatible with a wide variety of phone services, including VoIP services . However your medication dispenser will work better with some telephone services than others . It is important that you understand how the dispenser will work with your current service, or any other service you may later switch to . -
Page 43: Answering Machines
Communicator Philips Medication Dispenser Phone To wall jack Answering Machines To connect the Philips Medication Dispenser with an answering machine: • Complete the installation and scheduling process with the dispenser connected directly to the wall phone jack . This will ensure optimal connectivity . • Connect the phone line as follows: Philips Medication Dispenser Answering machine Phone... -
Page 44: Set Date And Time (No Phone Line)
Set Date and Time (no phone line) These instructions apply only if the dispenser is NOT connected to a phone line . Otherwise, the Support Center will automatically adjust the date and time of the dispenser . Press the “Setup” key . The display will show: Press the right or left arrow key until “Time”... -
Page 45: Manual Scheduling (No Phone Line)
Manual Scheduling (no phone line) 1. Turn the key clockwise to open the door and expose the keypad. 2. Press the “Schedule” key. The display will show: “Support Center” will be blinking . 3. Press the up arrow key. The display will show: “Manual Entry” will be blinking . 4. Press the “OK” key. The display will show: “6” will be blinking . 5. Use the up or down arrow key to adjust the number of doses for the day displayed. Remember, a dose can be either a cup of medicine or a reminder message. Once the correct number of doses is displayed, press the “OK” key to proceed. The display will show: 6. Press the “OK” key. The display will show: “Accept Msg” will be blinking . 7. Use the up or down arrow key to scroll through all the possible dose messages. - Page 46 8. Repeat the above two steps to select the messages for the remaining doses of the day. Once all messages have been selected, the display will show: “No” will be blinking . 9. This screen allows you to define whether the dose is a reminder message or a cup of medicine. You also define the time for this dose. Use the right or left arrow key to move around and the up or down arrow key to change the selections. Once all the information has been entered, press the “OK” key. 10. Repeat the above step to make selections for the remaining doses of the day. Once you have defined one day, the display will show: “Yes” will be blinking. 11. If the same schedule is to be followed for an entire week, press the “OK” key to select “Yes.” Otherwise, use the right or left arrow key to select “No” and then press “OK.” You will then have to repeat the above process for the other days of the week. 12. The display will then show: “Off ” will be blinking . 13. Press the “OK” key to continue. For further information about the PRN operation, please contact the Support Center. The display will show: The next step is preparing and loading medication . Please refer to page 9 . Special Installations...
- Page 47 For assistance, call the Support Center at 1-888-632-3261 .
-
Page 48: Maintenance
Support Center at 1-888-632-3261 . Cleaning Keep the Philips Medication Dispenser free of dust by occasionally wiping it with a soft cotton cloth. If additional cleaning is required, you should first turn off the power and disconnect the cords from the wall . This will prevent false button presses and possible damage to the dispenser . - Page 49 For assistance, call the Support Center at 1-888-632-3261 .
-
Page 50: Reference
Reference Safety Information 1. The Philips Medication Dispenser must be placed in an indoor living area. 2. Make sure that you do not plug the dispenser into an electrical outlet that is controlled by a wall switch, because someone could accidentally switch off the power. 3. To reduce the risk of electrical shock or fire, do not place the dispenser in or near water or other liquids. 4. Place the Philips Medication Dispenser on a hard, flat surface. 5. Do not load lifesaving medication into the Philips Medication Dispenser (e.g., nitroglycerine), because you may not be able to access it quickly in an emergency situation. 6. Do not spray cleaners directly onto your dispenser because moisture could get inside and cause damage. Reference... -
Page 51: Resetting The Philips Medication Dispenser
Resetting the Philips Medication Dispenser The Philips Medication Dispenser may have to be reset in order to clear an error or other problem . To reset the dispenser: 1. Slide the power switch on the back of the dispenser to the “Off” position. 2. Wait 10 seconds. 3. Slide the power switch to the “On” position. 4. The dispenser will conduct a self-test. The display will show: After a few seconds, the red LED will light up and “System OK, ready for setup” will be announced and displayed . -
Page 52: Caregiver Alerts
Caregiver Alerts Alert Possible Causes Response Required Unit has not There is a voicemail Make sure the patient’s home voicemail has checked in message causing an been cleared of messages . over the last interrupted dial tone . 24 hours . There is a phone off the Caregiver must go to the patient’s home to hook, the phone lines are... -
Page 53: Troubleshooting
Troubleshooting Display Possible Cause What To Do “System OK” is blinking . There has been a Remove the missed dose and missed dose . then press the “Status” key to get information about the missed dose . Press the “Run” key to resume normal operation . -
Page 54: Regulatory Compliance
1 . The “Line” to which you will connect your dispenser (that is, your phone number); and 2 . The Philips Medication Dispenser’s FCC Ringer Equivalence Number (REN) . That number is on the bottom of your dispenser . The REN is used to determine how many devices may be connected to a telephone line . - Page 55 Interference Information: FCC Rules Part 15 Your Philips Medication Dispenser complies with Part 15 of the FCC Rules. Operation is subject to the following two conditions: (1) this dispenser may not cause harmful interference; and (2) this dispenser must accept any interference received, including interference that may cause undesired operation .
- Page 56 . See installation instructions for details . If your home has specially wired alarm equipment connected to the telephone line, ensure that the installation of the Philips Medication Dispenser does not disable your alarm equipment . If you have questions about what will disable alarm equipment, consult your telephone company or a qualified installer.
-
Page 57: Requirements For Canada
Upon request of your local telephone company, you are required to provide them with the following information: 1 . The “Line” to which you will connect your Philips Medication Dispenser (that is, your phone number), and 2 . The Philips Medication Dispenser’s FCC Ringer Equivalence Number (REN) . That number is on the bottom of your dispenser . - Page 58 Interference Information: [RSS-210 of Industry Canada] Your Philips Medication Dispenser complies with RSS-210 of Industry Canada. Operation is subject to the following two conditions: (1) this dispenser may not cause harmful interference; and (2) this dispenser must accept any interference received, including interference that may cause undesired operation .
- Page 59 If your home has specially wired alarm equipment connected to the telephone line, ensure that the installation of the Philips Medication Dispenser does not disable your alarm equipment . If you have questions about what will disable alarm equipment, consult your telephone company or a qualified installer.
- Page 60 Regulatory Compliance...
- Page 61 Notes: For assistance, call the Support Center at 1-888-632-3261 .
- Page 62 Notes:...
- Page 63 Philips Lifeline Philips Lifeline Canada 111 Lawrence Street 95 Barber Greene Road, Suite 105 Framingham, MA 01702-8156 Toronto, Ontario M3C 3E9 Tel: 1-800-451-0525 Tel: 1.800.387.8120 www.lifelinesystems.com www.lifeline.ca P/N 0940552, Rev.01 © 2008. All rights reserved.
Need help?
Do you have a question about the medication dispenser and is the answer not in the manual?
Questions and answers