Table of Contents
Advertisement
INTELLIGENT WEATHER STATION
This product offers:
FEATURES
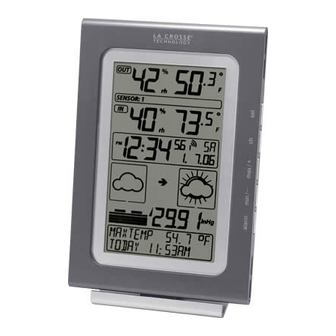
INTELLIGENT WEATHER STATION
LCD
Display
Weather
information
text
WS-9020U 915MHZ
Instruction Manual
INSTANT TRANSMISSION is the state-
of-the-art new wireless transmission
technology, exclusively designed and
developed by LA CROSSE
TECHNOLOGY. INSTANT
TRANSMISSION offers you an
immediate update (every 4 seconds!) of
all your outdoor data measured from
the transmitters: Chart the weather as it
happens!
Function Keys
1
Removable Stand
Hanging hole
Battery
compartment
Advertisement
Table of Contents

Related Manuals for La Crosse Technology WS-9020U


Summary of Contents for La Crosse Technology WS-9020U
- Page 1 WS-9020U 915MHZ INTELLIGENT WEATHER STATION Instruction Manual INSTANT TRANSMISSION is the state- This product offers: of-the-art new wireless transmission technology, exclusively designed and developed by LA CROSSE TECHNOLOGY. INSTANT TRANSMISSION offers you an immediate update (every 4 seconds!) of all your outdoor data measured from...
- Page 2 • Immediate update (every 4 seconds!) of all your outdoor data measured from the transmitters (note: 4 second may vary while updating) • WWVB Radio-controlled time with manual setting option • WWVB reception ON/OFF (user selectable) • 12/24 hour time display •...
-
Page 3: Quick Set-Up
QUICK SET-UP GUIDE Hint: Use good quality Alkaline Batteries and avoid rechargeable batteries. Have the intelligent weather station and remote temperature/humidity sensor 3 to 5 feet apart. Batteries should be out of both the intelligent weather station and remote temperature/humidity sensor units for 10 minutes. Place the batteries into the remote temperature/humidity sensor first and then into the intelligent weather station. -
Page 4: Battery Installation
87 feet. Factoring in the 10 foot room, this leaves a maximum of 77 feet of remaining signal range. This allowance is typically enough for a frame wall with non- metallic siding; however certain materials can reduce range even further. Metal siding, stucco, and some types of glass can reduce signal range by as much as ¾... -
Page 5: Remote Temperature/Humidity Sensor
The intelligent weather station uses 3 x AA (alkaline recommended) batteries. When the batteries need to be replaced the low battery symbol will appear on the LCD (or replace the batteries annually). To install and replace the batteries, please follow the steps below: Remove the cover. -
Page 6: Function Keys
ABOUT WWVB (Radio Controlled Time) The NIST (National Institute of Standards and Technology—Time and Frequency Division) WWVB radio station is located in Ft. Collins, Colorado, and transmits the exact time and date signal continuously throughout the United States at 60 kHz. The signal can be received up to 2,000 miles away through the internal antenna in the intelligent weather station. - Page 7 SET key • Press and hold the key to enter manual setting modes: LCD contrast, 12/24 hour time display, time zone, daylight saving time ON/OFF, manual time setting, calendar, WWVB ON/OFF, ºF/ºC temperature unit, pressure unit, relative pressure setting and language display •...
-
Page 8: Lcd Screen
• Reset max/min record ALARM key • Enter the weather alarm time setting mode • Set next weather alarm in weather alarm setting mode LCD SCREEN The LCD screen is split into 6 sections displaying the information for outdoor data, indoor data, time and date, weather forecast, air pressure and air pressure history, weather information display. -
Page 9: Manual Settings
*When the signal from the remote temperature/humidity sensor is successfully received by the intelligent weather station, this signal reception will be switched on. (If not successful, the icon will not be shown on LCD) So the user can easily see whether the last reception is successful (icon on) or not (icon off). -
Page 10: Lcd Contrast Setting
• Relative pressure value setting • Language display setting LCD CONTRAST SETTING Last digit flashing The LCD contrast can be set within 8 levels, from LCD 1 to LCD8 (default setting is LCD 5): Press and hold the SET key for about 4 seconds until the digit start flashing. -
Page 11: Manual Time Setting
Use the MAX/+ or MIN/- key to set the time zone. The MAX/+ key increases the value and the MIN/- key decreases the value in consecutive 1 hour intervals. Press and release the SET key to confirm selection and to enter the Daylight saving time On/Off setting. -
Page 12: Calendar Setting
The unit will still try to receive the WWVB signal between 0:00 and 6:00 am every day despite it being manually set, if the WWVB reception function has been set ON. When it does receive the signal, it will change the manually set time into the received time. During reception attempts the WWVB tower icon will flash. -
Page 13: F/°C Temperature Unit Setting
Flashing In area where reception of the WWVB time is not possible, the WWVB time reception function can be turned OFF. The clock will then work as a normal Quartz clock. (Default setting is ON). The digit “ON” will start flashing on the LCD. Use the MAX/+ or MIN/- key to turn OFF the time reception function. - Page 14 Press and release the SET key to confirm selection and to enter the Relative Pressure Value setting. Note: The default reference pressure value of the barometer is 29.91 inHg (1013 hPa). For an exact measurement it is necessary to first adjust the barometer to your local relative air pressure (related to elevation above sea level).
-
Page 15: To Exit The Manual Setting Mode
The language for the calendar and “Intelligent” weather information display can be set to view in German (D), French (F), Italian (I), Spanish (S) & English (E) Default setting is English. To set another language: Use the MAX/+ or MIN/- key to set the desired language. Press and release the SET key to confirm selection and exit the Manual settings. -
Page 16: Adding Sensors
Outdoor humidity display in RH% MIN/MAX icon Outdoor reception signal Transmitter identification number (only if there is more than one transmitter) INDOOR RELATIVE HUMIDITY AND INDOOR TEMPERATURE: The indoor temperature and humidity data are automatically updated and displayed in the second section of the LCD. Indoor temperature Indoor relative in °F or ºC... -
Page 17: To Set-Up Of Multiple Sensors
The WS-9020U is able to receive signals from 3 remote temperature/humidity sensors (TX28U-IT). These extra transmitters can be purchased through the same dealer as this unit TO SET-UP OF MULTIPLE SENSORS Remove all the batteries from the receiver and sensor(s) and wait 60 seconds. - Page 18 IMPORTANT: Transmission problems will arise if the setting for multiple sensors is not followed as described above. Should transmission problems occur, it is necessary to remove the batteries from all units and start again the set-up from step 1. TO VIEW MIN/MAX INDOOR AND OUTDOOR RECORDS: To toggle between the current, minimum and maximum data and the times they were recorded, press the MIN/- key for viewing the minimum values, and press the MAX/+ key for viewing the maximum values...
-
Page 19: Outdoor Channel Re-Learn Mode
While the outdoor MIN/MAX humidity and temperature date is being displayed, press the CH key. The display will toggle between the different channels MIN/MAX data. Note: For example, when the MIN outdoor temperature data is displayed and the MAX/+ key is pressed, MAX data outdoor temperature will be displayed. - Page 20 Default alarm values: Temperature 32ºF alarm High 86ºF LOW OUTDOOR TEMPERATURE ALARM SETTING Note: The outdoor temperature alarm can only be set for channel 1 transmitter. To set the LOW outdoor temperature alarm (default OFF): Press and hold the ALARM key for about 3 seconds to enter the alarm setting mode.
-
Page 21: Weather Alarms
The On/ Off icon is flashing. Press the MAX/+ or MIN/- key to activate the alarm ON/OFF. Press the SET key to enter the alarm value setting (alarm value flashing) Use the MAX/+ or MIN/- key to set the alarm value. Press the SET key to confirm and enter the HIGH outdoor temperature alarm setting. -
Page 22: Weather Forecast And Weather Tendency
can set the thresholds for the outdoor temperature to +104°F (+40ºC) (high) and +14ºF (-10°C) (low), while only enabling the high alarm and disabling the low alarm (i.e. temperatures < +14ºF (-10°C) won’t trigger alarm, but temperatures > +104ºF (+40°C) will). Alarm setting Minimum Maximum... - Page 23 Cloudy with Cloudy Rainy Sunny sunny intervals For every sudden or significant change in the air pressure, the weather icons will update accordingly to represent the change in weather. If the icons do not change, then it means either the air pressure has not changed or the change has been too slow for the intelligent weather station to register.
-
Page 24: Air Pressure
Note: After initial set up of the intelligent weather station with the setting of the relative value, readings for weather forecasts should be disregarded for the next 12-24 hours. This will allow sufficient time for the intelligent weather station to collect air pressure data at a constant altitude and therefore result in a more accurate forecast. -
Page 25: Bar Graph Display
The reference relative air pressure can be set between 28.35 to 30.72 inHg (960 to 1040hPa). See “Relative pressure value setting” in manual setting. BAR GRAPH DISPLAY You may select to display the history of the air pressure in the form of a graph consisting of vertical bars on the intelligent weather station LCD. -
Page 26: Low Battery Indicator
At every full hour the current air pressure is used as a basis for the display of a new graph bar. The existing graph is then moved one bar to the left. Note: For accurate barometric pressure trend, the intelligent weather station should operate at the same altitude. - Page 27 German English French Italian Spanish DETAILED INFORMATION SHOWN IN THE WEATHER DISPLAY: Language selected English German French Italian Spanish Timeframe for Forecast Vorhersageda Period Durata prev. Periodo prev. weather period prevision 6 ore 6 horas forecast 6 hours 6 Stunden 6 heures 12 hours 12 Stunden...
- Page 28 Index 70% Index 70% Index 70% Indice 70% Indice 70% Index 75% Index 75% Index 75% Indice 75% Indice 75% Index 80% Index 80% Index 80% Indice 80% Indice 80% Index 85% Index 85% Index 85% Indice 85% Indice 85% Maximum MaxTemp MaxTemp...
- Page 29 The transmission range of the remote temperature/humidity sensor may be affected by the ambient temperature. At cold temperatures the transmitting distance may be decreased. Please bear this in mind when placing the transmitter. The remote temperature sensor should be placed in a dry, shaded area. The remote temperature sensor has a range of 330 feet.
- Page 30 Using other electrical products such as headphones or speakers operating on the same signal frequency (915MHz) may prevent correct signal transmission and reception. Neighbors using electrical devices operating on the 915MHz signal frequency can also cause interference. “Visibility” of the intelligent weather station and remote temperature/humidity sensor (e.g.
- Page 31 Fix a screw (not supplied) into the desired wall, leaving the head extended out the by about 0.2” (5mm). Fold the stand of the intelligent weather station by pushing inward and hang it onto the screw. Remember to ensure that it locks into place before releasing.
-
Page 32: Care And Maintenance
CARE AND MAINTENANCE • Extreme temperatures, vibration and shock should be avoided as these may cause damage to the units and give inaccurate forecasts and readings. • When cleaning the display and casings, use a soft damp cloth only. Do not use solvents or scouring agents as they may mark the LCD and casings. -
Page 33: Warranty Information
La Crosse Technology, Ltd or La Crosse Technology, Ltd’s authorized service center. La Crosse Technology, Ltd will repair or replace this product, at our option and at no charge as stipulated herein, with new or reconditioned parts or products if found to be defective during the limited warranty period specified above. - Page 34 USA address only. Your La Crosse Technology, Ltd warranty covers all defects in material and workmanship with the following specified exceptions: (1) damage caused by accident, unreasonable use or neglect (including the lack of reasonable and necessary maintenance);...
- Page 35 La Crosse Technology, Ltd 190 Main Street La Crescent, MN 55947 Phone: 507.895.7095 Fax: 507.895.2820 e-mail: support@lacrossetechnology.com (warranty work) sales@lacrossetechnology.com (information on other products) web: www.lacrossetechnology.com Questions? Instructions? Please visit: www.lacrossetechnology.com/9020 All rights reserved. This handbook must not be reproduced in any form,...
- Page 36 This device complies with Part 15 of the FCC Rules. Operation is subject to the following two conditions: (1) this device may not cause harmful interference, and (2) this device must accept any interference received, including interference that may cause undesired operation. Statement according to FCC part 15.21: Modifications not expressly approved by this company could void the user's authority to operate the equipment.
Need help?
Do you have a question about the WS-9020U and is the answer not in the manual?
Questions and answers