
Related Manuals for La Crosse Technology WS-9037U-IT


Summary of Contents for La Crosse Technology WS-9037U-IT
- Page 1 WEATHER STATION Contents Language ____________________________________________________ English French Spanish WS-9037U-IT Page...
- Page 2 TABLE OF CONTENTS Topic Inventory of Contents/ Additional Equipment About WWVB Quick Set Up Guide Detailed Set Up Guide Battery Installation Start Up Sequence Explanation of LCD Information Function Key Layout Program Mode Overview of Programming Sequence LCD Contrast Setting Time Zone Setting DST ON/OFF Setting Radio-controlled Time ON/OFF Setting...
-
Page 3: Weather Station
WEATHER STATION This product offers: INVENTORY OF CONTENTS Wireless Weather Station Wireless Thermo-hygro Sensor (TX29UD-TH) and mounting bracket. Instruction Manual FEATURES: The Weather Station Function keys LCD display Instruction Manual INSTANT TRANSMISSION is the state-of- the-art new wireless transmission technology, exclusively designed and developed by LA CROSSE TECHNOLOGY. - Page 4 • WWVB Radio controlled time with manual setting option • Time reception ON/OFF (user selectable) • 12/24 hour time display • Daylight saving time (On/OFF) • Time zone option ±12 hours • Weekday and day calendar display (year and month only in setting mode) •...
- Page 5 SETTING UP WHEN ONE TRANSMITTER IS USED First, insert the batteries in the transmitter (see “How to install and replace batteries in the Thermo-hygro outdoor transmitter” above). Within 2 minutes of powering up the transmitter, insert the batteries in the Weather Station (see “How to install and replace batteries in the Weather Station”...
- Page 6 and reset from step 1. Insert the batteries in the second transmitter as soon as the outdoor temperature and humidity readings from the first transmitter are displayed on the Weather Station. Note : User shall insert the batteries into the second transmitter within 45 seconds after the Weather Station displays the information of the first transmitter.
-
Page 7: To Install And Replace Batteries In The Weather Station
TO INSTALL AND REPLACE BATTERIES IN THE WEATHER STATION TO INSTALL AND REPLACE BATTERIES IN THE THERMO- HYGRO TRANSMITTER The Thermo-hygro transmitter uses 2 x AA, IEC, LR6, 1.5V batteries. To install and replace the batteries, please follow the steps below: Note: In the event of changing batteries in any of the units, all units need to be reset by following the setting up procedures. -
Page 8: Atomic Time - Wwvb Radio Controlled Time
• Malfunction on the units. • Batteries replacement. For resetting, remove all batteries from the units. Wait at least for 1 minute before powering up the Weather station again. Proceed from step 1 in “Setting Up”. ATOMIC TIME - WWVB RADIO CONTROLLED TIME The NIST (National Institute of Standards and Technology—Time and Frequency Division) WWVB radio station is located in Ft. - Page 9 SET key • Press and hold the key to enter manual setting modes: LCD contrast, time zone, DST ON/OFF, time reception ON/OFF, 12/24 hour display, manual time setting, calendar, temperature °C/°F, pressure hPa/inHg, relative pressure value, and weather icon sensitivity setting •...
- Page 10 OUT/+ key • Press shortly to toggle between MAX/MIN and current outdoor temperature/humidity data • Increase, change, toggle all values in manual set mode • Press to set the alarm minute (inside alarm setting mode) • Stop the alarm during alarm ringing •...
-
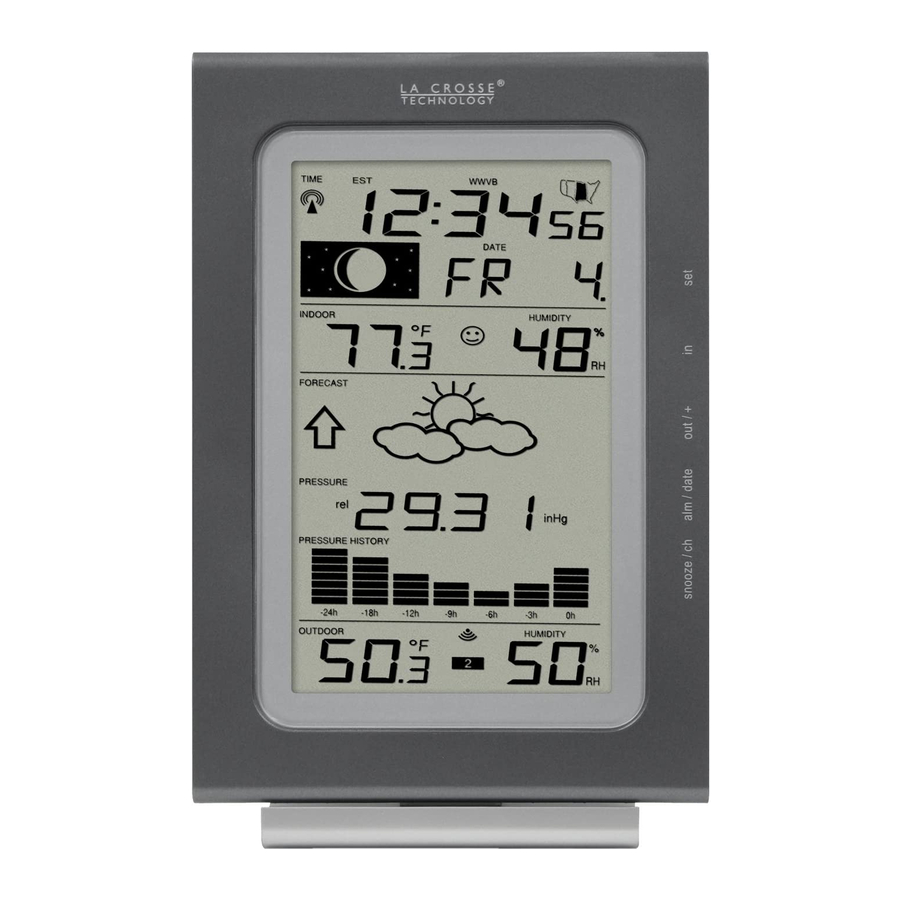
Page 11: Lcd Screen
LCD SCREEN The LCD screen is split into 4 sections displaying the information for time/calendar/alarm/moon phase, indoor data, weather forecast and outdoor data. Time reception icon (for WWVB time) Moon phase icon Low battery indicator Indoor temperature in ºC/ ºF Weather tendency indicator Relative air pressure... -
Page 12: Lcd Contrast Setting
• °C/°F temperature setting • hPa / inHg pressure setting • Relative air pressure setting • Weather forecasting icon sensitivity setting LCD CONTRAST SETTING: The LCD contrast can be set within 8 levels, from LCD 0 to LCD7 (Default setting is LCD 4): Press and hold the SET key until the digit starts flashing. - Page 13 TIME RECEPTION ON/OFF SETTING: In area where reception of the WWVB time is not possible, the WWVB time reception function can be turn OFF. The clock will then work as a normal Quartz clock. (Default setting is ON). The digit “ON” will start flashing on the LCD. Use the OUT/+ key to turn OFF the time reception function.
-
Page 14: Calendar Setting
Press again the SET key to set the minutes. The minute digits start flashing. Use the OUT/+ key to set the minutes. Confirm with the SET key and enter the Calendar setting. Note: The unit will still try to receive the signal between 0:00 and 6:00 am every day despite it being manually set, if the WWVB reception function has been set ON. - Page 15 Confirm with the SET key and enter the Air pressure unit setting. hPa / inHg PRESSURE UNIT SETTING: The pressure display can be selected to show relative air pressure in hPa or inHg (default is “inHg”). Use the OUT/+ key to toggle between “hPa” or “inHg” unit. Confirm with the SET key and enter the Relative air pressure value setting.
-
Page 16: To Exit The Manual Setting Mode
The current sensitivity value will start flashing. Use the OUT/+ key to set the weather sensitivity level. There are 3 levels of setting: 2, 3 and 4. The value corresponds to the change of air pressure in hPa before the weather icon will switch to another state. -
Page 17: Moon Phases Symbol
MOON PHASES SYMBOL The Moon icon of the Weather station will also display all 12 Moon phases throughout the year according to the set calendar. Small Waxing Moon Crescent Small Large Waning Waning Crescent Crescent INDOOR RELATIVE HUMIDITY AND INDOOR TEMPERATURE: The indoor temperature and humidity data, the indoor comfort indicator are automatically updated and displayed on the second section of the LCD. -
Page 18: Weather Forecast And Weather Tendency
Once the MIN or MAX data is displayed, press and hold the SET key for 3 seconds to reset the respective MIN or MAX record to current temperature and humidity data, and current time, date display. Note: The MIN or MAX data needs to be reset individually. WEATHER FORECAST AND WEATHER TENDENCY: WEATHER FORECASTING ICONS: Weather icons in the third section of LCD can be displayed in any of the... -
Page 19: Weather Tendency Indicator
hours. By doing this, the Weather Station will not mistake the new location as being a possible change in air-pressure when really it is due to the slight change of altitude. WEATHER TENDENCY INDICATOR Working together with the weather icons is the weather tendency indicators (located on the left and right sides of the weather icons). -
Page 20: Toggling And Resetting The Outdoor Data
ground to the second floor of the house. Should the unit be moved to a new location, discard readings for the next 12-24 hours. OUTDOOR TEMPERATURE/HUMIDITY DATA The fourth LCD section shows the outdoor temperature and humidity, the reception indicator, the transmitter identification number and the MIN/MAX outdoor data. -
Page 21: Low Battery Indicator
BACK-LIGHT The back-light is automatically switched ON when any keys are pressed. The back-light will be switched on for approximately 8 seconds before automatically switching OFF. LOW BATTERY INDICATOR Low battery indicator is displayed on the LCD when the batteries require changing. -
Page 22: Positioning The Weather Station
POSITIONING THE WEATHER STATION: The weather station has been designed to be hang on a wall or free standing. For free standing: Simply attached the stand to the bottom of the unit and place onto a flat surface. To wall mount Choose a sheltered place. -
Page 23: Care And Maintenance
temperature and humidity readings are receivable. In event that the signal is not received, relocate the sensor(s) or move them slightly as this may help the signal reception. CARE AND MAINTENANCE: Extreme temperatures, vibration and shock should be avoided as •... -
Page 24: Liability Disclaimer
Interior data checking intervals Indoor Temperature Humidity Air pressure checking interval Outdoor temperature and humidity data checking interval: Every 4 seconds (or every 15 minutes if data are lost and display “--.-“) Transmission range Power consumption: (alkaline batteries recommended) Weather station Thermo-hygro transmitter Battery life Dimensions (L x W x H):... -
Page 25: Warranty
La Crosse Technology, Ltd or La Crosse Technology, Ltd’s authorized service center. La Crosse Technology, Ltd will repair or replace this product, at our option and at no charge as stipulated herein, with new or reconditioned parts or products if found to be defective during the limited warranty period specified above. - Page 26 LA CROSSE TECHNOLOGY, LTD WILL NOT ASSUME LIABILITY FOR INCIDENTAL, CONSEQUENTIAL, PUNITIVE, OR OTHER SIMILAR DAMAGES ASSOCIATED WITH THE OPERATION OR MALFUNCTION OF THIS PRODUCT. THIS PRODUCT IS NOT TO BE USED FOR MEDICAL PURPOSES OR FOR PUBLIC INFORMATION.
- Page 27 WS-9080U-IT 915 MHz WIRELESS TEMPERATURE STATION Instruction manual...
- Page 28 Contents Language ___________________________________________________________________ English French Spanish Page...
-
Page 29: Table Of Contents
TABLE OF CONTENTS Topic Inventory of Contents Features Setting Up Battery Installation Function Keys LCD Screen and Settings Atomic Time -WWVB Radio Controlled Time Manual Settings Display of Indoor Temperature Reading Display of Outdoor Temperature Reading Display of Indoor Minimum and Maximum records Display of Outdoor Minimum and Maximum records Daily Indoor Minimum and Maximum Temperature display Daily Outdoor Minimum and Maximum Temperature display... -
Page 30: Inventory Of Contents
This product offers: INVENTORY OF CONTENTS Wireless Temperature Station Wireless Temperature Sensor (TX29U) and mounting bracket. Instruction Manual and Warranty Card. INSTANT TRANSMISSION is the state-of-the-art new wireless transmission technology, exclusively designed and developed by LA CROSSE TECHNOLOGY. INSTANT TRANSMISSION offers you an immediate update (every 4 seconds!) of all your outdoor data measured from the sensors: follow your climatic variations in real-time! -
Page 31: Features
FEATURES: The Temperature Station Display Hanging hole Battery compartment cover Function Keys Foldout Stand... - Page 32 • Atomic Time function (WWVB Radio controlled time) or manual time setting options • Atomic Time reception On/Off • Daylight Saving Time ON/OFF • 12/24 hour display • Hour and minute display • Calendar display Time zone option ±12 hours •...
-
Page 33: Setting Up
The Outdoor Temperature Sensor • • • SETTING UP: When one Sensor is used First, insert the batteries into the temperature sensor. (see “Install and replace batteries in the temperature sensor“). Immediately after and within 30 seconds, insert the batteries into Temperature Station (see “Install and replace batteries in the Temperature Station”). - Page 34 time as 12:00 and the indoor temperature will be displayed. If these are not displayed after 60 seconds, remove the batteries and wait for at least 10 seconds before reinserting them. After inserting the batteries into the sensor, the Temperature Station will start receiving data from the sensor.
- Page 35 light up briefly. Following time as 12:00 and the indoor temperature will be displayed. If they are not shown in LCD after 60 seconds, remove the batteries and wait for at least 60 seconds before reinserting them. The outdoor temperature from the first sensor (channel 1) should then be displayed on the Temperature Station.
- Page 36 Note: • Transmission problems will arise if the setting for additional sensors is not followed as described above. Should transmission problems occur, it is necessary to remove the batteries from all units and follow the set-up from step 1. • If the signal reception is not successful on the first frequency (915MHz) for 45 seconds, the frequency is changed to 920MHz and the learning is tried for another 45 seconds.
-
Page 37: Battery Installation
reception is successful, there will no reception attempt until the following day. When this is successful, the received time will override the manually set time. The date is also updated with the received time. (Please refer also to notes on “Atomic auto-set time - WWVB Radio controlled Time”... - Page 38 INSTALL AND REPLACE BATTERIES IN THE TEMPERATURE SENSOR The temperature sensor uses 2 x AA, IEC LR6, 1.5V battery. To install and replace the batteries, please follow the steps below: Note: In the event of changing batteries in any of the units, all units need to be reset by following the setting up procedures.
-
Page 39: Function Keys
Please participate in the preservation of the environment. Return used batteries to an authorized depot. FUNCTION KEYS: Temperature Station: The Temperature Station has four easy to use function keys. + key MIN/ MAX key SET key CH/- key... - Page 40 SET key (Manual Setting): • Press and hold to enter the setting mode for the following settings: LCD contrast, Time zone, Daylight saving time ON/OFF, Atomic Time Reception (RCC) ON/OFF, 12/24 hr format, Manual time, Year, Month, Day and °C/°F settings. MIN/ MAX key •...
-
Page 41: Lcd Screen And Settings
LCD SCREEN AND SETTINGS: Time display Indoor Temperature Daily indoor min temp Channel No. (Outdoor Sensor ID) Outdoor signal reception icon* Daily outdoor min temp Time reception icon "Weekday + Day" or Day + Month" or "Second" display Receiver low battery icon Daily indoor max temp... -
Page 42: Section 1 - Time And Calendar
*When the outdoor signal is successfully received by the temperature station, this icon will be switched on. (If not successful, the icon will not be shown in LCD) So user can easily see whether the last reception was successful (icon on) or not (icon off). On the other hand, the short blinking of the icon shows that a reception is currently taking place. -
Page 43: Section 3 - Outdoor Temperature
Section 3 - OUTDOOR TEMPERATURE • Display current outdoor temp • Display daily maximum and minimum outdoor temperature ATOMIC TIME - WWVB RADIO CONTROLLED TIME The NIST (National Institute of Standards and Technology—Time and Frequency Division) WWVB radio station is located in Ft. Collins, Colorado, and transmits the exact time signal continuously throughout the United States at 60 kHz. -
Page 44: Manual Settings
Wireless Temperature Station may not be exactly on the second due to the variance in the quartz. However, the clock will adjust the quartz timing over the course of several days to be very accurate; under 0.10 seconds per day. MANUAL SETTINGS: The following manual settings can be done in the setting mode: •... - Page 45 LCD CONTRAST SETTING The LCD contrast can be set to 8 different levels (0 to 7) to suit the user’s needs (default LCD contrast setting is LCD 4). To set the desired contrast level: The above display will be seen. Press the + key or CH/- key to select the level of contrast desired.
- Page 46 The time zone default of the Temperature Station is -5 hr. To change to another time zone: Using the + key or CH/- key, set the time zone. The range runs between -12 to +12 hour. Press the SET key to confirm and enter the “Daylight Saving time ON/OFF setting” or exit the setting mode by pressing the MIN/MAX key.
-
Page 47: Time Reception On/Off Setting
TIME RECEPTION ON/OFF SETTING flashing In area where reception of the WWVB time is not possible, the time reception function can be turned OFF. The clock will then work as a normal Quartz clock. (Default setting is ON). The digit “ON” and the time reception icon will start flashing on the LCD. Use the + key or CH/- key to turn OFF the time reception function. -
Page 48: 12/24 Hour Time Display Setting
12/24 HOUR TIME DISPLAY SETTING After setting time reception ON/OFF, press the SET key, “12 h” or “24 h” flashes in the LCD. (default 12 h) Press the + key or CH/- to select the “12 h” or “24 h” display mode. Press the SET again to confirm and to enter the “Manual Time setting”... -
Page 49: Manual Time Setting
MANUAL TIME SETTING In case the Temperature Station is not able to detect the Atomic time (WWVB) signal (disturbances, transmitting distance, etc.), the time can be manually set. The clock will then work as a normal Quartz clock. Hours (flashing) To set the clock: The hour digits start flashing in the time display section. -
Page 50: Calendar Setting
CALENDAR SETTING weekday The date default of the temperature station is 1. 1. of the year 2006 after initial set-up. Once the radio-controlled time signals are received, the date is automatically updated. However, if the signals are not received, the date can also be set manually. To do this: The year is flashing. -
Page 51: F/°C Temperature Unit Setting
Press the SET key to enter the month setting mode. The month digit will be flashing. Press the + key or CH/- key to set the month and then press the SET key to go to the day setting. The day digit will be flashing. Press the + key or CH/- key to set the day. Confirm with SET key and enter the “°F/°C TEMPERATURE UNIT SETTING”... -
Page 52: Display Of Indoor Temperature Reading
Once the desired temperature unit has been chosen, confirm with the SET key to exit the setting mode. DISPLAY OF INDOOR TEMPERATURE READING: The indoor temperature is measured and displayed on the second section of the LCD. Indoor Icon Indoor Temperature in °F... -
Page 53: Display Of Outdoor Temperature Reading
DISPLAY OF OUTDOOR TEMPERATURE READING: The bottom LCD section shows the outdoor temperature. Outdoor icon DISPLAY OF INDOOR MINIMUM AND MAXIMUM RECORDS: In normal display mode, press the MIN/MAX key once, the minimum indoor temperature will be shown in LCD. Also the time and date of recording this temperature will be displayed. - Page 54 Indoor icon Minimum indoor temp recorded Then press the MIN/MAX button one more time, the maximum indoor temperature will be shown in LCD. Also the time and date of recording this temperature will be displayed. Press three more time the MIN/ MAX button to go back to the normal display. Time and date of record...
-
Page 55: Display Of Outdoor Minimum And Maximum Records
DISPLAY OF OUTDOOR MINIMUM AND MAXIMUM RECORDS: In normal display mode, Press the MIN/MAX button three times, the outdoor minimum temperature and the time and date of recording this temperature will be displayed. Press the MIN/MAX button once more, the outdoor maximum temperature and the time and date of recording this temperature will be displayed. - Page 56 RESETTING THE INDOOR AND OUTDOOR MINIMUM /MAXIMUM RECORDS In normal display mode, press the MIN/MAX button once to advance to the indoor MIN temp display. Press and hold the MIN/MAX key for about 3 seconds, this will reset the currently shown indoor and outdoor minimum and maximum data to the current time, date and temperature.
- Page 57 Note: The daily minimum temperature record is reset automatically at 8:00 pm and the daily maximum temperature is reset automatically at 8:00 am every day. DAILY OUTDOOR MIN AND MAX TEMPERATURE DISPLAY This temperature station also displays the daily minimum and maximum outdoor temperature for each outdoor channel in normal display.
-
Page 58: 915 Mhz Reception
maximum temperature is reset automatically at 8:00 am every day. 915 MHz RECEPTION The Temperature Station should receive the temperature data within 5 minutes after set-up. If the temperature data is not received 5 minutes after setting up (not successfully continuously, the outdoor display shows “- - -”... -
Page 59: Mounting
above) otherwise transmission problems may occur. The transmission range is about 330 feet (100 m) from the sensor to the Temperature Station (in open space). However, this depends on the surrounding environment and interference levels. If no reception is possible despite the observation of these factors, all system units have to be reset (see Setting up). -
Page 60: Positioning The Temperature Sensor
Free standing POSITIONING THE TEMPERATURE SENSOR: The sensor is supplied with a holder that may be attached to a wall with the two screws supplied. The sensor can also be position on a flat surface by securing the stand to the bottom to the sensor. With the stand, the Temperature Station can be placed onto any flat surface. -
Page 61: Care And Maintenance
To wall mount: 1. Secure the bracket onto a desired wall using the screws and plastic anchors. 2. Clip the sensor onto the bracket. Note: Before permanently fixing the sensor wall base, place all units in the desired locations to check that the outdoor temperature reading is receivable. -
Page 62: Specifications
• Immediately remove all low powered batteries to avoid leakage and damage. Replace only with new batteries of the recommended type. • Do not make any repair attempts to the unit. Return them to their original point of purchase for repair by a qualified engineer. Opening and tampering with the unit may invalidate their guarantee. -
Page 63: Warranty
Warranty service can only be performed by a La Crosse Technology, Ltd authorized service center. The original dated bill of sale must be presented upon request as proof of purchase to La Crosse Technology, Ltd or La Crosse Technology, Ltd’s authorized service center. - Page 64 La Crosse Technology, Ltd will repair or replace this product, at our option and at no charge as stipulated herein, with new or reconditioned parts or products if found to be defective during the limited warranty period specified above. All replaced parts and products become the property of La Crosse Technology, Ltd and must be returned to La Crosse Technology, Ltd.
- Page 65 LA CROSSE TECHNOLOGY, LTD WILL NOT ASSUME LIABILITY FOR INCIDENTAL, CONSEQUENTIAL, PUNITIVE, OR OTHER SIMILAR DAMAGES ASSOCIATED WITH THE OPERATION OR MALFUNCTION OF THIS PRODUCT. THIS PRODUCT IS NOT TO BE USED FOR MEDICAL PURPOSES OR FOR PUBLIC INFORMATION.
- Page 66 For warranty work, technical support, or information contact: La Crosse Technology, Ltd 2809 Losey Blvd. S. La Crosse, WI 54601 Phone: 608.782.1610 Fax: 608.796.1020 e-mail: support@lacrossetechnology.com (warranty work) sales@lacrossetechnology.com (information on other products) web: www.lacrossetechnology.com Question? Instructions? Please visit: www.lacrossetechnology.com/9080...
- Page 67 All rights reserved. This handbook must not be reproduced in any form, even in excerpts, or duplicated or processed using electronic, mechanical or chemical procedures without written permission of the publisher. This handbook may contain mistakes and printing errors. The information in this handbook is regularly checked and corrections made in the next issue.
- Page 68 TABLA DE CONTENIDO Tema Contenido Funciones y características Puesta en funcionamiento Instalación de las pilas Teclas de Funcionamiento Pantalla LCD y Configuraciones La Hora Radio-controlada WWVB Configuraciones manuales Visualización de la lectura de la temperatura en interiores Visualización de la temperatura en exteriores Visualización de los máximos y mínimos registros en interiores Visualización de los máximos y mínimos registros en exteriores Visualización de laMin Y Max temperatura en Interiores Registrada...
-
Page 69: Contenido
Especificaciones técnicas Información sobre la garantía Este producto le ofrece: CONTENIDO Estación de la temperatura Inalámbrica Sensor de Temperatura Inalámbrico (TX29U-IT) y soporte de montaje. Manual de Instrucciones y Tarjeta de la Garantía. TRANSMISION INSTANTANEA es lo último en tecnología de transmisión inalámbrica, este producto es diseñado y desarrollado exclusivamente por la ‘LA CROSSE TECHNOLOGY’. -
Page 70: Funciones Y Características
FUNCIONES Y CARACTERISTICAS: La Estación de la temperatura Pantalla • La hora radio-controlada WWVB con opción de ajuste manual • Encendido/apagado de la función de recepción de la hora ON/OFF Orificio para colgar Cubierta del compartimiento de las pilas Teclas de Funcionamiento Stand desprendible... - Page 71 • Visualización de la hora en el formato de las 12/24 horas • Visualización de la hora y los minutos • Opción para seleccionar la zona horaria entre ±12 horas • Transmisión inalámbrica mediante frecuencia de 915 MHz • Recibe la señal de recepción en intervalos de 4 segundos •...
-
Page 72: Puesta En Funcionamiento
Sensor de Temperatura en exteriores • • • • PUESTA EN FUNCIONAMIENTO: Cuando se utiliza solamente un Sensor Primero, inserte las pilas en el Sensor (lea las instrucciones sobre “Como instalar y cambiar las pilas en el Sensor de Temperatura” anotadas más adelante). Inmediatamente después y dentro de un periodo de 30 segundos, coloque las pilas en la estación (lea las instrucciones sobre “Como instalar y Cambiar las pilas en la Estación”). - Page 73 pantalla LCD se iluminarán brevemente. Luego se visualizarán los datos de la temperatura en interiores y la hora en las 12:00. Si estos datos no son visualizados después de 60 segundos, retire las pilas y espere por lo menos un minuto antes de reinsertarlas nuevamente.
- Page 74 Ponga las pilas en el primer sensor. En un periodo de 30 segundos después de haber puesto las pilas en el primer transmisor, ponga las pilas en la Estación de Temperatura. Una vez que las pilas estén en su sitio, todas las secciones de la pantalla se iluminarán brevemente. Acto seguido muestra los datos de la temperatura interior y la hora en las 12:00.
- Page 75 Tan pronto como se vean en la pantalla de la estación los datos de la temperatura exterior del segundo sensor y símbolo del "canal 2", ponga las pilas en el tercer sensor. Luego, dos minutos después se deben ver en la pantalla los datos en exteriores del tercer transmisor y el símbolo del canal debe devolverse al número "1", una vez que se reciban correctamente los datos del tercer sensor.
- Page 76 Si la señal de recepción no se puede recibir bajo la primera frecuencia de (915MHz) durante 45 segundos, la señal de frecuencia cambia a 920MHz y vuelve a intentar la recepción durante otros 45 segundos. Si aún así no es posible, se intentará nuevamente la recepción durante otros 45 segundos bajo la frecuencia de 910MHz.
-
Page 77: Instalación De Las Pilas
es recibida correctamente, no se hará ningún otro intento de recepción hasta el día siguiente a la misma hora. Cuando la señal de recepción es recibida correctamente, se borrará la hora puesta manual y cambiará a la hora de la radio-señal. La fecha también es actualizada junto con la hora recibida. - Page 78 INSTALACION Y CAMBIO DE LAS PILAS EN EL SENSOR DE TEMPERATURA La Sensor de Temperatura utiliza 2 baterías AA, IEC LR6, de 1.5V. Para instalar y cambiar las pilas, por favor siga los siguientes pasos: Quite la tapa. Inserte las baterías observando la polaridad correcta. Vuelva a colocar la tapa de la batería en la unidad y asegúrela re- atornillando nuevamente.
-
Page 79: Cambio De Las Pilas
CAMBIO DE LAS PILAS: Se recomienda cambiar las pilas en todas las unidades con regularidad para asegurar una optima exactitud de todas estas unidades (refiérase a las Especificaciones Técnicas anotadas más adelante). Por favor participe en la conservación del medio ambiente. Deseche las pilas agotadas en un punto de reciclaje autorizado para este fin. - Page 80 Tecla SET (Configuración): Sirve para entrar en los siguientes programas de configuración manual: contraste de la pantalla LCD, zona horaria, configuración de la hora de verano encendido/ apagado, para encender/apagar la función de recepción de la hora radio-controlada, para escoger el formato de la hora en 12/24 horas, también para poner la hora manualmente, poner el año, mes, fecha, la unidad de temperatura en grados en °F/°C.
- Page 81 Tecla CH/- • Para hacer un ajuste "negativo" (disminuir) los datos en varias configuraciones • Para intercambiar entre las lecturas de los diferentes canales/sensores en exteriores...
-
Page 82: Pantalla Lcd Y Configuraciones
PANTALLA LCD Y CONFIGURACIONES: Icono interior Min temperatura interior registrada diariamente Icono Exterior No de Identificación del Transmisor (canal No.) Señal de Recepción en Exteriores Min temperatura exterior registrada diariamente Icono de recepción (para la hora WWVB) Muestra "Día de la semana + Día"... - Page 83 *Cuando la señal sea recibida correctamente, el icono se encenderá. (Si la señal no se recibe correctamente el icono no aparecerá en la pantalla.) De manera que el usuario pueda ver fácilmente los datos de la última recepción exitosa de la señal (icono encendido) ningún icono (icono apagado).de otra parte, el icono pequeño que titila en la pantalla señala que ya se recibió...
-
Page 84: Sección 3 - Temperatura Exterior
• Muestra el registro diario de la mínima y máxima temperatura registrada en interiores Sección 3 - TEMPERATURA EXTERIOR • Muestra la lectura de la temperatura actual en exteriores • Muestra el registro diario de la mínima y máxima temperatura registrada en exteriores •... -
Page 85: Configuraciones Manuales
han creado una norma o estándar internacional, midiendo un segundo como 9,192,631,770 vibraciones de un átomo de Césium-133 al vacío. Para obtener mayor información sobre la señal WWVB y el reloj atómico, por favor visite nuestro sitio en la red del NIST, en la siguiente dirección: http://www.boulder.nist.gov/timefreq.htm. -
Page 86: Contraste De La Pantalla Lcd
• Ajuste Manual de la hora • Configuración del Calendario • Ajuste del formato de la temperatura en °F/ °C Pulse la tecla SET para pasar al modo de configuración manual: CONTRASTE DE LA PANTALLA LCD El nivel de contraste de la pantalla LCD puede ser ajustado en 8 niveles diferentes, para ajustarse a las necesidades del usuario (viene preajustado en el nivel LCD 4). - Page 87 CONFIGURACION DE LA ZONA HORARIA: Titilando La zona horaria preajustada en la estación es "–5 h". Para cambiar a otra zona horaria: Utilizando la tecla + o 'CH/-' ponga la zona horaria. El rango va -12, -11, -10… 0, 1, 2, 3, 4…12 h, en intervalos consecutivos de una (1) hora.
- Page 88 Utilice la tecla + o CH/- para apagar esta función. Confirme su ajuste con la tecla SET y entre en el modo/programa de Configuración de la Función de Recepción de la Hora ON/OFF o para salir del programa de configuración pulsando la tecla MIN/MAX. CONFIGURACION DE LA SENAL DE RECEPCION DE LA HORA ON/OFF Titilando (Icono de recepción...
- Page 89 Confirme con la tecla SET y entre en el modo de ajuste del “Formato de Visualización de la Hora 12/24 Horas” o salga del programa de configuración pulsando la tecla MIN/MAX. Nota: Si la función de recepción de la hora es apagada manualmente OFF, el reloj no intentará...
-
Page 90: Ajuste Manual De La Hora
“Configuración Manual de la Hora” o salga del programa de configuración pulsando la tecla MIN/MAX . Nota: Cuando se selecciona el formato de las 24h, el formato del calendario será: día y mes. Cuando se selecciona el formato de las 12h, el formato del calendario será mes y día. - Page 91 Confirme con la tecla SET y entrar en el modo de “Configuración del Calendario” o salga del programa de configuración pulsando la tecla MIN/MAX. CONFIGURACION DEL CALENDARIO "Día. Mes." (para el formato de las 24h) "Mes. Día." (para el formato de las 12h) Año...
- Page 92 La fecha preajustada en la estación es: 1. 1. del año 2006. Una vez que la señal de la hora radio-controlada sea recibida, la fecha también es actualizada automáticamente. Sin embargo, si la radio-señal no es recibida, la fecha también puede ser ajustada manualmente.
- Page 93 CONFIGURACION DE LA UNIDAD DE TEMPERATURA EN GRADOS °F/°C La unidad de temperatura está preajustada en °F (grados Fahrenheit o Centígrados). Para seleccionar °C (grados Centígrados): El símbolo “°C/ °F” empieza a titilar, use la tecla + ou CH/- para cambiar entre “°C” y “°F”.
-
Page 94: Visualización De La Temperatura En Exteriores
Icono interior VISUALIZACION DE LA TEMPERATURA EN EXTERIORES: Icono exterior Número de identificación del transmisor La última sección de la pantalla muestra la temperatura en exteriores, y mostrará el número del canal debajo de esta lectura si se ha usado más de un Sensor. Temperatura Interior en °F... - Page 95 VISUALIZACION DE LOS MINIMOS Y MAXIMOS REGISTROS EN INTERIORES: En el modo de visualización normal, Pulse una vez la tecla MIN/MAX, para ver los mínimos registros de la temperatura interior. También mostrará la hora y fecha del registro de esta temperatura. Icono de interior mínimos registros de la temperatura...
- Page 96 Pulse la tecla MIN/ MAX tres veces más para devolverse al modo de visualización normal. VISUALIZACION DE LOS MINIMOS Y MAXIMOS REGISTROS EN EXTERIORES: En el modo de visualización normal, Pulse tres veces la tecla MIN/MAX, la pantalla mostrará la mínima temperatura registrada en exteriores y también mostrará la hora y fecha del registro de esta temperatura.
- Page 97 Icono de exterior Canal No. Pulse la tecla MIN/ MAX una vez más para devolverse al modo de visualización normal. REAJUSTE DE LAS MAXIMAS/MINIMAS LECTURAS REGISTRADAS EN EXTERIORES Hora de registro de la Max. Temperatura Max. temperatura...
-
Page 98: Visualización De Lamin Y Max Temperatura En Interiores Registrada
Nota: En el modo de visualización normal, puse la tecla MIN/ MAX, para pasar al programa de los MIN/ MAX datos registrados en interiores. Pulse la tecla SET durante aprox. 2 segundos, así se reajustarán los mínimos y máximos registros en interiores con respecto a los datos de la temperatura y hora actuales. -
Page 99: Visualización De Lamin Y Max Temperatura En Exteriores Registrada
VISUALIZACION DE LA MIN Y MAX TEMPERATURA EN EXTERIORES REGISTRADA DIARIAMENTE La estación mostrará los máximos y mínimos registros diarios de la temperatura en exteriores provenientes de cada uno de los canales, en la parte inferior de la pantalla, en el modo de la pantalla normal. - Page 100 RECEPCION DE LA SEÑAL DE 915 MHz La estación de la temperatura debe recibir los datos de la temperatura exterior dentro de 5 minutos después de la puesta en funcionamiento. Si los datos de la temperatura no son recibidos 5 minutos después de la puesta en marcha (si continuamente no puede recibir la señal de recepción la sección de datos en exteriores muestra el símbolo “- - -”...
-
Page 101: Montaje O Instalación
llegase a pasar accidentalmente reinstale todas las unidades (vea las notas sobre “Poniendo en Funcionamiento” anotadas anteriormente). De lo contrario podrán presentarse problemas de transmisión. La extensión o alcance de transmisión del Sensor a distancia hasta la Estación es de alrededor de 330 pies (100 metros) (en espacios abiertos). - Page 102 libre puedan ser recibidos desde la ubicación deseada. Fije un tornillo (no suministrado) en la pared deseada, dejando la cabeza extendida por fuera aprox. 5mm. Retire el stand/soporte de la estación halándolo de la base y cuélguela en el tornillo. Recuerde que debe asegurarse que la unidad quede bien instalada en su sitio antes de soltarla.
- Page 103 INSTALACION DEL SENSOR DE TEMPERATURA El Sensor de Temperatura viene suministrado con un soporte que puede ser instalado en una pared con la ayuda de los dos tornillos incluidos. El Sensor también puede ser colocado en cualquier superficie plana colocándole el soporte de montaje en la base, tal como lo muestra la figura.
-
Page 104: Cuidado Y Mantenimiento
ubique todos los Sensores o muévalos ligeramente ya que esto puede ayudar para recibir la señal de recepción. CUIDADO Y MANTENIMIENTO: • Evite exponer las unidades a temperaturas extremas y vibraciones o choques eléctricos, ya que estos factores pueden causar daño a las unidades y ocasionar pronósticos y lecturas inexactas. -
Page 105: Especificaciones Tecnicas
ESPECIFICACIONES TECNICAS: Rango de medición de la Temperatura: Interior 32°F a +139.8°F con una resolución de 0.2°F (0ºC a +59.9ºC con una resolución de 0.1ºC, Se visualizará “OF.L” si esta por fuera de este intervalo) Exterior -39.8°F a+157.8°F con una resolución de 0.2°F (-39.9ºC a+69.9ºC con una resolución de 0.1ºC, Se visualizará... - Page 106 Technology, Ltd’. El recibo original de la compra del producto deberá ser incluido si este le es solicitado como prueba de la compra del producto por ‘La Crosse Technology, Ltd’ o por el centro de servicio autorizado de ‘La Crosse Technology’.
- Page 107 El propietario deberá pagar los costos de flete para enviar su producto de La Crosse Technology, Ltd hasta un centro de servicio autorizado de La Crosse Technology, Ltd. La Crosse Technology, Ltd pagará...
- Page 108 La Crosse Technology, (6) unidades utilizadas para un uso diferente al doméstico en casa (7) las aplicaciones y usos para los cuales no está destinado este producto o (8) la incapacidad del producto de recibir la señal debido a cualquier fuente de interferencia.
- Page 109 La Crosse Technology, Ltd 2809 Losey Blvd. S. La Crosse, WI 54601 Phone: 608.782.1610 Fax: 608.796.1020 e-mail: support@lacrossetechnology.com (Para trabajos de la garantía) sales@lacrossetechnology.com (Información sobre otros productos) web: www.lacrossetechnology.com ¿Preguntas? ¿Instrucciones? Por favor visite nuestra página web: www.lacrossetechnology.com/9080 Todos los derechos reservados. Este manual no puede ser reproducido de ninguna manera, ni siquiera en citas textuales, duplicarlo o procesarlo utilizando métodos...
- Page 110 Este manual puede contener errores en su contenido y errores de mecanografía. La información de este manual se verifica regularmente y las correcciones necesarias se harán en la próxima edición. No aceptamos ninguna responsabilidad por los errores técnicos o de mecanografía o por sus consecuencias. Todas las marcas y patentes están reconocidas y registradas.
- Page 111 Statement according to FCC part 15.21: Modifications not expressly approved by this company could void the user's authority to operate the equipment. Statement according to FCC part 15.105: NOTE: This equipment has been tested and found to comply with the limits for a Class B digital device, pursuant to Part 15 of the FCC Rules.
- Page 112 TABLE DES MATIERES Sujet Inventaire du contenu Caractéristiques Montage Installation des piles Commandes Ecran LCD et réglages Heure radio-pilotée (signal horaire WWVB) Réglages manuels Affichage des relevés de température intérieures Affichage des relevés de température extérieures Affichages des maximum et minimum intérieurs enregistrés Affichages des maximum et minimum extérieurs enregistrés Affichage des MIN/ MAX quotidiens de la température intérieures Affichage des MIN/ MAX quotidiens de la température extérieures...
-
Page 113: Inventaire Du Contenu
Ce produit présente: INVENTAIRE Station de température sans fil Capteur de température sans fil (TX29U-IT) et support. Mode d’emploi et fiche de garanti La TRANSMISSION INSTANTANEE est le summum en matière de technologie sans fil, conçue et développée exclusivement par LA CROSSE TECHNOLOGY. -
Page 114: Caractéristiques
CARACTERISTIQUES: CARACTERISTIQUES: Station de température Station de température Affichage • • Heure radio-pilotée (signal horaire WWVB) avec option de réglage manuel Heure radio-pilotée (signal horaire WWVB) avec option de réglage manuel • • Réception de l’heure actiovée/annulée Réception de l’heure actiovée/annulée •... - Page 115 • Option de fuseau horaire ±12 heures • Transmission sans fil à 915 MHz • Réception des signaux toutes les 4 secondes • Affichage de la température en degrés Fahrenheit (°F) ou Celsius (°C) au choix • Affichage de la température intérieures et extérieures avec MIN/MAX enregistrés •...
-
Page 116: Montage
• • • • MONTAGE: Avec un seul Capteur Commencer par installer les piles dans capteur de température (voir “Installation et remplacement des piles dans Capteur de température ”). Dans les 30 secondes qui suivent la mise sous tension de Capteur, installer les piles dans le station de température (voir “Installation et remplacement des piles dans le station de température”). - Page 117 Quand les piles sont en place dans Capteur, le station commence à recevoir les données de Capteur. La température extérieures et l’icône de réception du signal devraient s’afficher sur le station de température. Si ceci ne se produit pas dans les 3 minutes qui suivent, retirer les piles des deux appareils et recommencer à...
- Page 118 poste de température Si elles ne s’affichent pas dans les 2 minutes qui suivent, retirer les piles de tous les appareils et recommencer à partir de l’étape 1. Installer les piles du deuxième capteur dès que les relevés de température extérieures du premier capteur s’affichent sur le poste de température.
- Page 119 la fréquence passe à 920MHz et un nouvel essai d’apprentissage est effectué pendant 45 secondes. En cas d’insuccès, un nouvel essai de réception est effectué pendant 45 secondes sur 910MHz. Ces essais sont aussi effectués pour re-synchronization. IMPORTANT: Des problèmes de transmission apparaissent si les capteurs supplémentaires ne sont pas montés conformément aux indications ci-dessus.
-
Page 120: Installation Des Piles
“Réglage manuel de l’heure”). INSTALLATION DES PILES INSTALLER ET REMPLACER LES PILES DANS LE STATION DE TEMPERATURE Le station de température fonctionne avec 2 piles AAA, IEC LR3, 1.5V. Pour les installer ou les remplacer, suivre les étapes ci-dessous: Retirer le couvercle à l’arrière du station de température. Installer les piles en respectant les polarités (voir les indications). - Page 121 Capteur de température fonctionne avec 2 piles AA, IEC LR6, 1.5V . Pour l’installer ou la remplacer, suivre les étapes ci-dessous: Note: Quand on remplace les piles de l’un des appareils, il est nécessaire de réenclencher tous les appareils conformément aux procédures de montage. En effet, un code de sécurité est attribué de façon aléatoire par Capteur au moment de la mise en fonction et ce code doit être reçu et stocké...
-
Page 122: Remplacement Des Piles
REMPLACEMENT DES PILES: Il est recommandé de remplacer régulièrement les piles de tous les appareils pour en assurer un maximum de précision (Cycle de vie des piles - voir les Spécifications ci-dessous). Participez à la protection de l’environnement et déposez toutes piles usagées dans une décharge autorisée. - Page 123 • Pour entrer le mode de réglage des fonctions suivantes: contraste du LCD, fuseau horaire, heure d'tete activee/ annulee, réception de l’heure activée/ annulée, affichage 12/24 heures, réglage manuel de l’heure, année, mois, date et °F/°C réglages. Commande MIN/ MAX •...
-
Page 124: Ecran Lcd Et Réglages
ECRAN ET REGLAGES LCD : Icône intérieure Temp. min. quot. Icône extérieure Identification de capteur (N° de canal) Signal de réception extérieure* Temp. min. quo. du canal Icône de réception du signal horaire (pour WWVB) Affiche "Jour + Quantième” ou “Jour + Mois”... - Page 125 signal extérieur reste affichée à l’écran (l’icône ne sera pas affichée si la réception échoue). L’utilisateur peut ainsi s’assurer de la bonne réception du signal (icône affichée) ou de l’échec de réception (icône absente). Un signal de réception qui clignote indique une réception en cours des données extérieures.
-
Page 126: Heure Radio-Pilotée (Signal Horaire Wwvb)
• Affiche l’icône de réception du signal extérieur Heure radio-pilotée (signal horaire WWVB) La station de radio WWVB du NIST (Institut National des Normes et de la Technologie— Division Heure et Fréquence) est situé à Ft. Collins, Colorado, et transmet sans interruption un signal horaire exact à... -
Page 127: Réglages Manuels
le quartz pour afficher l’heure avec une précision : 0,10 seconde près par jour. REGLAGES MANUELS: Les réglages manuels suivants peuvent être effectués dans le mode de réglage: • Réglage du contraste du LCD • Réglage du fuseau horaire • Réglage de l’heure d’été... - Page 128 par défaut est LCD 4). Pour règler le niveau de contraste désiré: Quand l’affichage ci-dessus apparaît, appuyer sur ‘+’ ou 'CH/-' pour sélectionner le niveau de contraste désiré. Appuyer sur SET pour confirmer et entrer le “Réglage du fuseau horaire” ou sortir du mode de réglage en appuyant sur MIN/MAX.
- Page 129 Le signe “DST ON” se met à clignoter sur le LCD. Utiliser ‘+’ ou 'CH/-' pour activer ou annuler la fonction d’heure d’été. Confirmer avec SET et entrer le “réglage de la réception de l’heure” ou sortir du mode de réglage en appuyant sur MIN/MAX. REGLAGE DE LA RECEPTION DE L’HEURE (Icône de réception de l’heure) clignotant...
- Page 130 Le signe “ON” et l’icône de réception de l’heure se mettent à clignoter sur le LCD. Utiliser ‘+’ ou 'CH/-' pour désactiver la fonction de réception de l’heure. Confirmer avec SET et entrer le “réglage de l’affichage 12/24-heures” ou sortir du mode de réglage en appuyant sur MIN/MAX.
- Page 131 Note: Quand le mode 24h est sélectionné, le calendrier s’affiche en format date-mois. Avec l’affichage 12h, le calendrier s’affiche en format mois-date. REGLAGE MANUEL DE L’HEURE Si le station de température ne réussit pas à capter le signal WWVB (interférences, distance de transmission, etc), il est possible de régler l’heure manuellement.
- Page 132 Bien que l’appareil ait été réglé manuellement, il continue à essayer de recevoir le signal toutes les heures justes. Quand il reçoit le signal, l’heure captée supplante l’heure réglée manuellement. REGLAGE DU CALENDRIER Année "Date-Mois" (pour affichage 24h) "Mois-Date." (pour affichage 12h)
- Page 133 Quand l’appareil reçoit les signaux radio-commandés, la date est actualisée automatiquement. Cependant, en cas de non réception des signaux, il est possible de règler la date manuellement. Pour ce faire ; Utiliser la commande ‘+’ ou 'CH/-' pour règler l’année, de 2006 à 2029 (réglage par défaut: 2006).
-
Page 134: Affichage Des Relevés De Température Intérieures
les °C (degrés Celsius): “°C/ °F” clignotera. Utiliser la commande ‘+’ ou 'CH/-' pour alterner entre “°F” et “°C”. Après avoir sélectionné l’unité de température désirée, confirmer avec SET et sortir du mode de Réglages manuels. AFFICHAGE DES RELEVES DE TEMPERATURE INTERIEURES: La température intérieures sont relevées etr affichées sur la 2nd section du LCD. -
Page 135: Affichage Des Relevés De Température Extérieures
AFFICHAGE DES RELEVES DE TEMPERATURE EXTERIEURES: Icône extérieure N° d’identification de capteur quand plus d’un capteur est utilisé La 3rd section du LCD affiche la température extérieure et un numéro de canal dessus la température indique si plus d’un capteur est utilisé. AFFICHAGE DES DONNEES INTERIEURES MINIMUM AND MAXIMUM : Dans le mode d’affichage normal, appuyer une fois sur MIN/MAX pour afficher la température intérieure minimum sur le LCD. -
Page 136: Affichages Des Maximum Et Minimum Extérieurs Enregistrés
Icône intérieure Température intérieure minimum Appuyer sur MIN/MAX encore une fois pour afficher la température intérieure maximum sur le LCD. L’heure et la date d’enregistrement de la température s’afficheront aussi.. Appuyer trois fois de plus sur MIN/ MAX pour retourner à l’affichage normal. AFFICHAGE DES DONNEES EXTERIEURES MINIMUM AND MAXIMUM : Dans le mode d’affichage normal, appuyer trois fois sur MIN/MAX pour afficher la température extérieure minimum sur le LCD. - Page 137 Icône extérieure N° d’identification de capteur Appuyer une fois de plus sur MIN/ MAX pour retourner à l’affichage normal. REENCLENCHEMENT DES DONNEES INTERIEURES ET EXTERIEURES MINIMUM /MAXIMUM ENREGISTREES Dans le mode d’affichage normal, appuyer sur MIN/ MAX pour passer à l’affichage des données MIN/MAX enregistrées.
-
Page 138: Affichage Des Min/ Max Quotidiens De La Température Intérieures
les données de température intérieur et extérieure max. et min. enregistrées aux niveaux actuels. Note: Les données intérieures minimum et maximum enregistrées, ainsi que les données minimum et maximum de tous les canaux extérieurs seront réenclenchés simultanément. AFFICHAGE DES MIN MAX QUOTIDIENS DE LA TEMPERATURE INTERIEURE Temp. -
Page 139: Affichage Des Min/ Max Quotidiens De La Température Extérieures
AFFICHAGE DES MIN MAX QUOTIDIENS DE LA TEMPERATURE EXTERIEURE Ce station de température affiche la température extérieure maximum et minimum enregistrée chaque jour pour chaque canal extérieur, dans le bas du LCD avec l’affichage normal. N° de canal Temp. min. quot. -
Page 140: Réception 915 Mhz
VERIFICATION DE LA RÉCEPTION 915MHz Le station de température devrait recevoir la température dans les 15 minutes qui suivent le montage. En cas de non réception des données de température (et d’humidité dans les 15 minutes qui suivent le montage (l’affichage indique “- - -”), vérifier les points suivants: Le station de température ou capteur devrait être situé... -
Page 141: Mise En Place
pieds (100m), en espace dégagé. Cependant, ceci dépend de l’environnement et des niveaux d’interférence. Si la réception reste impossible alors que tous ces facteurs ont été respectés, réenclencher tous les appareils (voir « Montage » ci-dessus). MISE EN PLACE MISE EN PLACE DU Station de température: Le Station de température est conçu pour s’accrocher à... - Page 142 MISE EN PLACE DE L’ CAPTEUR DE TEMPERATURE: Capteur est fourni avec un support qui peut se fixer au mur à l’aide des deux vis fournies. On peut aussi le poser sur une surface plate et fixant le support à la base de capteur. Grâce à...
-
Page 143: Entretiens
1. Fixer le support au mur désiré à l’aide des vis et chevilles fournies. 2. Encastrer le capteur de température dans le socle. Note: Avant de fixer capteur au mur de façon définitive, placer tous les appareils aux endroits désirés et s’assurer de la bonne réception de la température extérieure. -
Page 144: Specifications
pour le faire réparer par un technicien qualifié. Ouvrir et réparer soi-même l’appareil risque d’annuler la garantie. • Ne pas soumettre les appareils à des changements de température soudains et extrêmes. Ceci entraînerait un changement rapide des prévisions et des relevés, ce qui en diminuerait la précision. -
Page 145: Garantie
Station de température Capteur de température La Crosse Technology Ltd assure un an de garantie limitée sur cet appareil contre tout défaut de matériel et fabrication. Cette garantie limitée qui entre en vigueur à partir de la date d’achat de l’appareil n’est valide que pour les produits achetés et utilisés en Amérique du Nord, et uniquemement pour... - Page 146 Toutes les pièces ou appareils remplacés deviennent la propriété de La Crosse Technology, Ltd et doivent lui être retournés. Les pièces et appareils remplacés sont soumis à la garantie d’origine restante ou une période de garantie de quatre- vingt-dix (90) jours, la période la plus longue étant en vigueur.
- Page 147 à l’installation. LA CROSSE TECHNOLOGY, LTD DECLINE TOUTE RESPONSABILITE POUR TOUS DOMMAGES FORTUITS, INDIRECTS, SECONDAIRES OU SIMILAIRES ASSOCIES A L’UTILISATION OU AU MAUVAIS FONCTIONNEMENT DE CE PRODUIT. CE PRODUIT NE DOIT PAS ETRE UTILISE DANS UN BUT MEDICAL OU POUR L’INFORMATION DU...
- Page 148 Pour tout travail de garantie, support technique ou information, contacter: La Crosse Technology, Ltd 2809 Losey Blvd. S. La Crosse, WI 54601 Phone: 608.782.1610 Fax: 608.796.1020 courriel: support@lacrossetechnology.com (travaux sous garantie) sales@lacrossetechnology.com (information sur les autres produits) Toile: www.lacrossetechnology.com Questions? Instructions? Visitez:...
- Page 149 Tous droits réservés. Ce livret ne peut pas être reproduit sous aucune forme, y compris extraits, ni dupliqués ou traités par procédé électronique, mécanique ou chimique sans l’autorisation écrite de l’éditeur. Ce livret peut contenir des erreurs ou fautes d’impression. Les informations qu’il contient sont vérifiées régulièrement et corrigées nécessairement dans l’édition suivante.
Need help?
Do you have a question about the WS-9037U-IT and is the answer not in the manual?
Questions and answers