Table of Contents
Advertisement
Quick Links
Advertisement
Table of Contents

Related Manuals for La Crosse Technology WS-9029U


Summary of Contents for La Crosse Technology WS-9029U
- Page 1 WS-9029U 915 MHz WIRELESS WEATHER STATION INSTRUCTION MANUAL...
-
Page 2: Table Of Contents
CONTENTS 03 introduction 03 features 04 quick set up guide 05 detailed set up guide 06 function keys 06 operations 08 mounting 09 troubleshooting 10 maintenance and care 10 specifications 10 warranty information... -
Page 3: Features
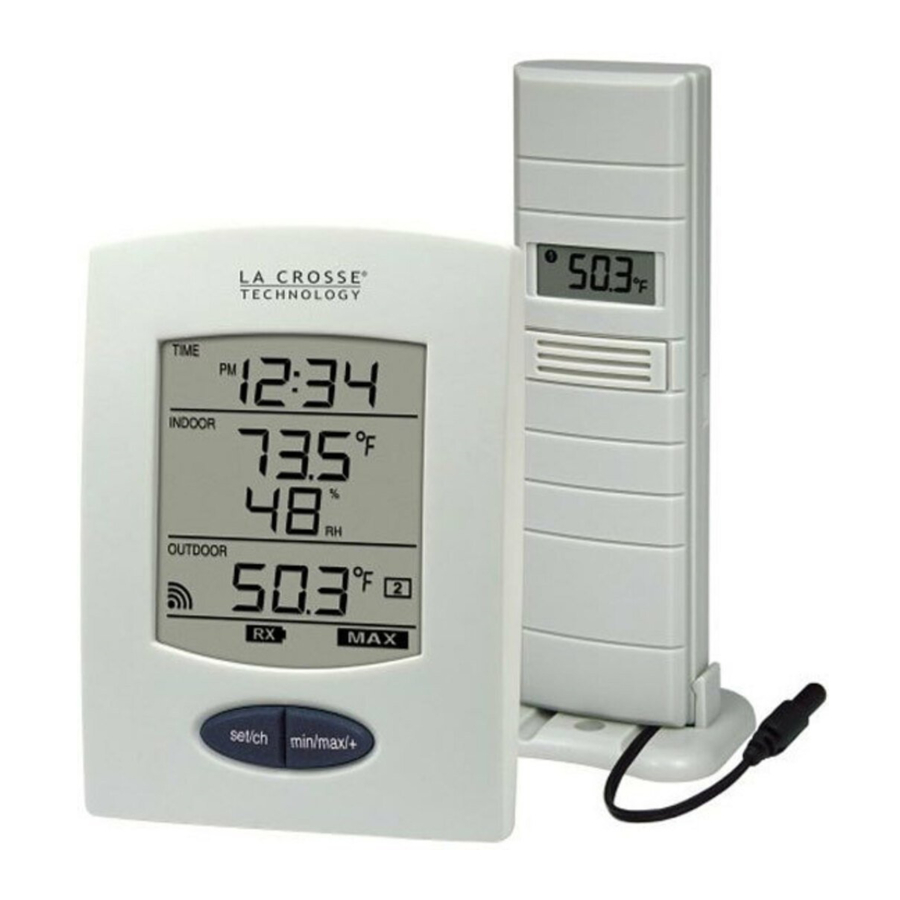
This product offers: 12 or 24 Hour Time Display Connection w/ Sensor Icon Low Battery Indicator Set/ Channel Button FIGURE 1 FEATURES • Wireless Weather Station (Figure 1). • Remote Temperature Sensor with optional Channel 2 Probe (TX25U, Figure 2). •... -
Page 4: Quick Setup
• Wall Hanging or Free Standing. Optional Probe w/ 10 Foot Wire ADDITIONAL EQUIPMENT (not included) 1. Two fresh AA 1.5V alkaline batteries for the wireless weather station. 2. Two fresh AAA 1.5V alkaline batteries for the remote temperature sensor. 3. -
Page 5: Detailed Setup Guide
DETAILED SETUP GUIDE I. BATTERY INSTALLATION (When one Temperature sensor is being used) 1. First, insert the batteries to the Temperature sensor (see “A. Temperature sensor” below). 2. Within 2 minutes of powering up the sensor, insert the batteries to the Weather Station (see “B. -
Page 6: Function Keys
3) is currently displaying its data in the OUTDOOR LCD. (This feature is explained in further detail in the section—Adding Remote Temperature Sensors). VIEWING MINIMUM AND MAXIMUM TEMPERATURE RECORDS The WS-9029U keeps a record of the MINIMUM and MAXIMUM indoor and outdoor temperatures. - Page 7 The remote temperature sensor data will always be displayed on the channel 1 and the temperature probe on the channel 2. If the probe on remote temperature sensor is unplugged, the "probe channel" on WS-9029U LCD will show "---", the remote temperature sensor displayed value will still be shown.
-
Page 8: Mounting
NOTE: You must insert the batteries into the second sensor within 30 seconds of reception of the first sensor. 7. The outdoor temperature from the second sensor and the "channel 3" icon should then be displayed on the Weather station. If this does not happen after 2 minute, the batteries will need to be removed from all the units and reset from step 1. -
Page 9: Troubleshooting
• on the wall with the use of a wall hanging screw (not included). TROUBLESHOOTING NOTE: For problems not solved, please contact La Crosse Technology. Problem: Hour is incorrect (minute and date are correct) Solution: Be sure correct time zone and daylight saving time settings are selected. -
Page 10: Maintenance And Care
Warranty service can only be performed by a La Crosse Technology, Ltd authorized service center. The original dated bill of sale must be presented upon request as proof of purchase to La Crosse Technology, Ltd or La Crosse Technology, Ltd’s authorized service center. - Page 11 (4) damage resulting from failure to follow instructions contained in your owner’s manual; (5) damage resulting from the performance of repairs or alterations by someone other than an authorized La Crosse Technology, Ltd authorized service center; (6) units used for other than home use (7) applications and uses that this product was not intended or (8) the products inability to receive a signal due to any source of interference..
Need help?
Do you have a question about the WS-9029U and is the answer not in the manual?
Questions and answers