Table of Contents
Advertisement
Quick Links
©2009 CARSON OPTICAL
HAUPPAUGE NY 11788
www.carsonoptical.com
MADE IN CHINA
7
Carson Optical
35 Gilpin Avenue
Hauppauge, NY 11788-4723
Phone: 631-963-5000
Fax: 631-427-6749
©2007 CARSON OPTICAL
For information, call toll-free: 1-800-967-8427
HAUPPAUGE NY 11788
www.carson-optical.com
info@carsonoptical.com / sales@carsonoptical.com / www.carsonoptical.com
MADE IN CHINA
©2009 CARSON OPTICAL
HAUPPAUGE NY 11788
www.carsonoptical.com
MADE IN TAIWAN
50668 00573
1
©2011 CARSON OPTICAL
HAUPPAUGE NY 11788
www.carsonoptical.com
MADE IN CHINA
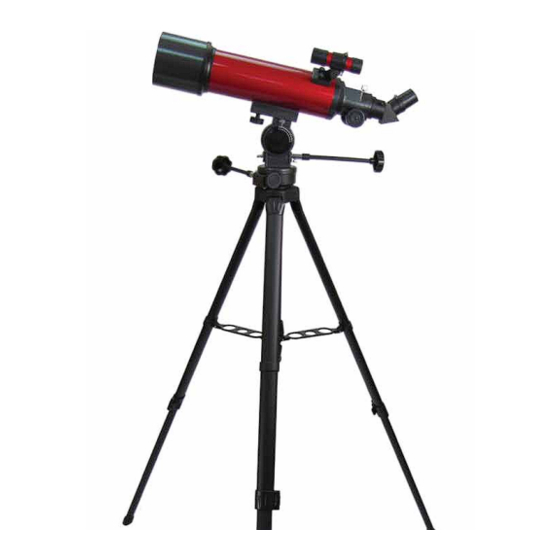
RP-200 TELESCOPE
Instruction Manual
Advertisement
Table of Contents

Subscribe to Our Youtube Channel
Related Manuals for Carson RP-200


Summary of Contents for Carson RP-200
- Page 1 RP-200 TELESCOPE Instruction Manual ©2009 CARSON OPTICAL HAUPPAUGE NY 11788 www.carsonoptical.com MADE IN CHINA 50668 00573 Carson Optical 35 Gilpin Avenue Hauppauge, NY 11788-4723 Phone: 631-963-5000 Fax: 631-427-6749 ©2007 CARSON OPTICAL ©2011 CARSON OPTICAL For information, call toll-free: 1-800-967-8427 HAUPPAUGE NY 11788 HAUPPAUGE NY 11788 www.carsonoptical.com...
- Page 2 Congratulations on your purchase of a Carson RP-200 Red Planet Series telescope. This telescope features an easy-to-use design and high perfor- Table of Contents: mance optics that are perfect for amateur astronomers looking to explore the wonders of outer space. Please read this manual carefully to ensure that you assemble and use your telescope correctly. When used properly, your Red Planet telescope should provide years of exciting observations of the uni- Box Contents verse. Please note that this Refractor telescope was designed for both terres- Figures 1-6 / Figure Key trial and astronomical viewing.
- Page 3 Fig.1 Fig.3 Fig.2 Fig.4...
- Page 4 Fig.5 Key to Figures 1-6: Objective Lens Lens Shade Optical Tube Assembly 8x21mm Erecting Finder Scope Eyepiece Focus Knobs Optical Tube Saddle Plate Altitude Adjustment Flexible Cable Horizontal Adjustment Flexible Cable 10. Horizon Mount 11. Horizon Mount Base 12. Tripod Legs 13. Eyepiece Holder Thumb Screw 14. Optical Tube Assembly Tripod Connector 15. Saddle Plate Lock 16. Altitude Dial 17. Focuser Draw Tube 18. 45° Corner Lens 19. Mount Locking Screw Fig.6 20. Altitude Lock Knob 21.
- Page 5 Assembly of your Red Planet Telescope: Attaching the Finder Scope: There are two finder scope bracket mounting bolts (Fig. 4-24) located at the end of the optical tube near the eyepiece assembly. Remove the nuts and set Setting Up Your Tripod: aside. Place the finder scope bracket (Fig. 4-25) onto the mounting bolts, The aluminum tripod comes preassembled and ready-to-use. Remove the replace the nuts and tighten down securely to the optical tube. Make sure the tripod from the box and pull apart the legs. Gently push down the tripod bracket is facing forward as shown in Fig. 4. Slide the finder scope (Fig. 1-4) braces (Fig. 6-28) until they are in the lowest position. Turn the tightening into the bracket facing forward. ring (Fig. 6-27) (located at the center of the Tripod Brace) clockwise to lock the tripod in the open position. You can then extend the legs to the desired Attaching the Eyepieces: height by pulling open the tab on each leg lock (Fig. 6-32), sliding the leg Insert the 45° corner lens (Fig. 2-18) into the focuser draw tube (Fig. 2-17) down the desired amount and then pushing the leg lock back against the leg and secure into place by tightening the corner lens thumbscrew (Fig. 5-26). into the locked position (Fig. 6-31). Repeat the process with each leg trying Insert the Kellner 20mm eyepiece (Fig. 2-5) into the corner lens (Fig. 2-18) to keep the tripod as level as possible with the ground. You will notice there and tighten down using the eyepiece holder thumb screw (Fig. 2-13). are holes in the tripod leg braces (Fig. 6-29). These are designed to hold eyepieces when not in use. You have now completed the assembly of your Red Planet telescope. We will now need to make the necessary adjustments in order to use your Attaching the Horizon Mount: telescope properly.
-
Page 6: Calculating Power
Calculating Power: • O nce the object is centered in the field of view, turn the focus knobs (Fig. 1-6) until the image is clear and sharp. If the focus knobs are locked, loosen the focuser draw tube lock (Fig. 5-23) before turning The magnification of a telescope depends on both the focal length of your the knobs. telescope as well as the eyepiece you use. There is a simple formula you can • Y ou will notice that the object you are viewing will slowly move use to determine the magnification you are using at any given time. Simply across the field of view (caused by the rotation of the Earth). You divide the focal length of the telescope by the focal length of the eyepiece. will need to turn the slow motion cables (Fig. 1-8,9) to keep the ob- For example, if you are using the 20mm eyepiece with your TP-200 telescope ject centered. -
Page 7: Specifications
Care and Maintenance of Your Telescope: Warnings: Cleaning: • N ever use this telescope (or its viewfinder) to look directly at or • A lways replace dust covers and lens caps when not in use. This will near the sun. Viewing the sun can cause instant and irreversible minimize the amount of dust and debris that gets into your telescope. eye damage. • C leaning should be performed only if absolutely necessary. If dust • A lways supervise children when using this telescope. has built up on the optics use a soft camel’s hair brush or pressurized • D o not leave telescope unattended at any time. Untrained adults or air to gently remove it. children may not be familiar with the correcting operating procedure. • T o remove dirt, grease or fingerprints, clean with a soft cotton cloth • D o not point the telescope at the sun even when you are not looking rubbing in a circular motion. Use of a coarse cloth or unnecessary through it. This will cause internal damage to the telescope. - Page 8 Warranty Procedure: Provide proof of purchase. A receipt or other dated proof of purchase must be included with merchandise being returned for a warranty claim to be pro- cessed. Call or write for authorization. Before returning any product for a warranty claim, a Return Authorization (RA) number must be obtained. No merchan- dise will be accepted without an RA, and failure to obtain an RA will prevent or delay processing of the warranty claim. To obtain an RA call 631-963- 5000, or write to Carson Warranty Service, 35 Gilpin Ave, Hauppauge NY 11788 with a description of the problem. Include your name, address and telephone number. Package the return carefully. Shippers will not reimburse for damages due to insufficient packaging, even if the merchandise is insured. Print the RA num- ber prominently on the top of the package. Prepay shipping. Insure the package. Send it to Carson Warranty Service, 35 Gilpin Ave., Hauppauge NY 11788. Merchandise must be shipped prepaid. Carson will not accept merchandise C.O.D.
Need help?
Do you have a question about the RP-200 and is the answer not in the manual?
Questions and answers
What Barlow lens is best to increase magnification of the RP 200 Carson telescope?
A 2x Barlow lens is recommended to increase magnification for the Carson RP-200 telescope.
This answer is automatically generated