Table of Contents
Advertisement
©2009 CARSON OPTICAL
HAUPPAUGE NY 11788
www.carsonoptical.com
MADE IN CHINA
7
Carson Optical
35 Gilpin Avenue
Hauppauge, NY 11788-4723
Phone: 631-963-5000
Fax: 631-427-6749
©2007 CARSON OPTICAL
For information, call toll-free: 1-800-967-8427
HAUPPAUGE NY 11788
www.carson-optical.com
info@carsonoptical.com / sales@carsonoptical.com / www.carsonoptical.com
MADE IN CHINA
©2009 CARSON OPTICAL
HAUPPAUGE NY 11788
www.carsonoptical.com
MADE IN TAIWAN
50668 00573
1
©2011 CARSON OPTICAL
HAUPPAUGE NY 11788
www.carsonoptical.com
MADE IN CHINA
RP-300 TELESCOPE
Instruction Manual
Advertisement
Table of Contents

Related Manuals for Carson RP-300


Summary of Contents for Carson RP-300
- Page 1 RP-300 TELESCOPE Instruction Manual ©2009 CARSON OPTICAL HAUPPAUGE NY 11788 www.carsonoptical.com MADE IN CHINA 50668 00573 Carson Optical 35 Gilpin Avenue Hauppauge, NY 11788-4723 Phone: 631-963-5000 Fax: 631-427-6749 ©2007 CARSON OPTICAL ©2011 CARSON OPTICAL For information, call toll-free: 1-800-967-8427 HAUPPAUGE NY 11788 HAUPPAUGE NY 11788 www.carsonoptical.com...
-
Page 2: Table Of Contents
Congratulations on your purchase of a Carson RP-300 Red Planet Series telescope. This telescope features an easy-to-use design and high perfor- Table of Contents: mance optics that are perfect for amateur astronomers looking to explore the wonders of outer space. Please read this manual carefully to ensure that Introduction you assemble and use your telescope correctly. - Page 3 Fig.1 Fig.3 Fig.2...
- Page 4 Fig.4 Fig.6 Fig.5 Fig.7...
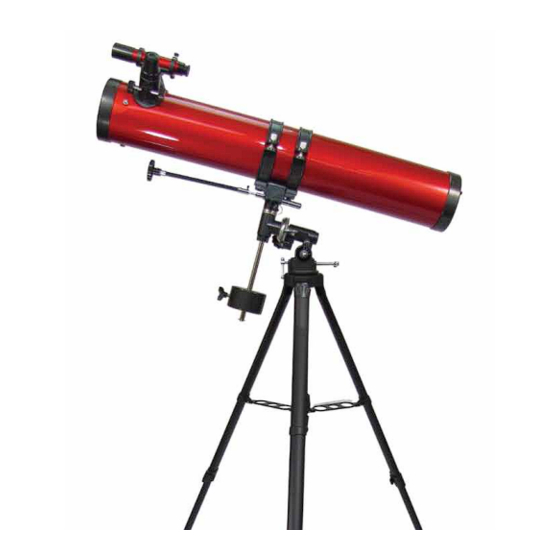
- Page 5 Fig.8 Key to Figures 1-9: 6x30mm Finder Scope Focuser Eyepiece Focus Knobs Optical Tube Assembly Cradle Rings Dec. Flexible Cable R.A. Flexible Cable Optical Tube Saddle Plate 10. Equatorial Mount Counter Weight Bar Counter Weight 13. Counter Weight Locking Screw 14. Tripod Legs 15. Declination Lock 16. Dec. Setting Circle 17. R.A. Setting Circle 18. Latitude Dial 19. Latitude Turn Screws Fig.9 20. Equatorial Mount Base 21.
-
Page 6: Setting Up Your Tripod
Assembly of your Red Planet Telescope: Attaching the Telescope Tube to the Mount: Remove the two cradle rings (Fig. 1-6) from the box. There are two holes in the top of the equatorial mount (called the optical tube saddle plate (Fig. Setting Up Your Tripod: 2-9)). Place the threaded screw at the bottom of each cradle ring (Fig. 6-29) The aluminum tripod comes preassembled and ready-to-use. Remove the through one of these holes and secure it using the included washer and wing tripod from the box and pull apart the legs. Gently push down the tripod nut (Fig. 6-30). Attach and secure the other cradle ring in the same way. -
Page 7: Balancing The Telescope
Balancing the Telescope: Aligning the Finder Scope: The low power and wide field of view provided by the 6x30mm finder scope (Fig. 5-1) provides a quick and easy way to sight an object prior to looking Balancing the Mount in R.A.: through the high-power telescope. The finder scope must first be properly To reduce stress on the mount, the telescope should be balanced on the polar aligned with the telescope in order to work properly. This alignment is best axis (See Fig. 2). Instructions on how to do so are as follows: performed during the daylight. Follow the steps below to align your finder • Loosen the R.A. lock knob (Fig. 3-22) and position the telescope... -
Page 8: Understanding Celestial Movement
Understanding Celestial Movement: The equivalent to longitude lines on the celestial sphere are known as lines of “Right Ascension” or “R.A.” for short. These lines are measured in hours, minutes and seconds starting at the “zero” line of R.A. which passes through In order to get the most enjoyment out of your telescope it is necessary to the constellation Pegasus. There are 24 primary lines of R.A. located at 15° know the basics of how celestial objects move across the sky. Due to the ro- intervals along the celestial equator. Right Ascension coordinates range from tation of the earth, celestial objects appear to move from East to West across 0hr 0min 0sec to (but not including) 24hr 0min 0sec. the sky, much like the Sun. You will notice this movement as an object in your telescope field of view will slowly move across the field and out of Every celestial object has a corresponding R.A. and Dec. coordinate. Given view. Continuous adjustment is needed to keep an object in the field of view. the proper coordinates, you can use the setting circles on your telescope This will be explained in more detail later. mount to locate any celestial object. The coordinates can only be used if the telescope is first aligned with the North (or South) Celestial Pole. Many people choose to “star-hop” when using a telescope, a quick and rela- tively easy way to start. This is a method of using easily identifiable stars and constellations to serve as reference points to find other objects in the sky. Polar Alignment: A more advanced and precise method of locating specific celestial objects is by using setting circles (Fig. 3-16,17) located on your equatorial mount (Fig. -
Page 9: Using The Telescope
Using Setting Circles: Your telescope is now polar aligned for the area you are using it. You will need only to point the telescope North (or South in the Southern Hemisphere) The setting circles (Fig. 3-16,17) on your equatorial mount can be used to when using it from now on. You will only need to repeat the polar alignment locate hard to find celestial objects. Follow the instructions below to use the if you move to a different location and your latitude has changed. setting circles effectively: • Make sure your telescope is assembled properly and polar aligned. -
Page 10: Care And Maintenance Of Your Telescope
Collimation of the Optics: There are many conditions that may affect your ability to focus or observe celestial objects clearly. The internal optics of the telescope have already been “collimated” or • B rightly lit areas (light pollution) will make it difficult to see faint “aligned” at the factory. However, rough handling of the telescope may objects in the sky. It will also make it difficult for your eyes to adjust knock the optics out of collimation, resulting in poor optical performance. to the dark. You should try and find a dark area and allow your eyes Please refer to Fig. 10 to better understand the internal layout of your to adjust to the dark before making observations. Using a red filtered telescope. -
Page 11: Adjusting The Primary Mirror
Fig.12 Fig.13 Specifications: Adjusting the Primary Mirror: If the telescope is properly collimated you should see the diagonal mirror (See Fig. 10) at the exact center of the primary mirror. If the diagonal Optical Design: Newtonian Reflector mirror appears off-center (See Fig. 12) you will need to adjust the primary Aperture: 114mm (4.49”) mirror (See Fig. 10) located on the outside lower-end of the main tube. To Focal Length: 900mm (35.43”) do this you will first need to loosen the primary mirror locking screws (Fig. Focal Ratio: 7.89 9-39). These are the screws that are flush against the surface of the telescope. Finder Scope: 6x30mm Then alternately loosen and tighten the Primary Mirror Tilt Screws until the Eyepiece 1: Kellner 20mm diagonal mirror is centered inside the primary mirror. The primary mirror Magnification 1: screws are easily identified because they stick out from the surface of the Eyepiece 2:... -
Page 12: Customer Service
Customer Service: Warranty Procedure: Provide proof of purchase. A receipt or other dated proof of purchase must be included with merchandise being returned for a warranty claim to be pro- We will be happy to help you with any problems you may experience cessed.
Need help?
Do you have a question about the RP-300 and is the answer not in the manual?
Questions and answers