Table of Contents
Advertisement
©2009 CARSON OPTICAL
HAUPPAUGE NY 11788
www.carsonoptical.com
MADE IN CHINA
7
Carson Optical
35 Gilpin Avenue
Hauppauge, NY 11788-4723
Phone: 631-963-5000
Fax: 631-427-6749
©2007 CARSON OPTICAL
For information, call toll-free: 1-800-967-8427
HAUPPAUGE NY 11788
www.carson-optical.com
info@carsonoptical.com / sales@carsonoptical.com / www.carsonoptical.com
MADE IN CHINA
©2009 CARSON OPTICAL
HAUPPAUGE NY 11788
www.carsonoptical.com
MADE IN TAIWAN
50668 00573
1
©2011 CARSON OPTICAL
HAUPPAUGE NY 11788
www.carsonoptical.com
MADE IN CHINA
RP-400 TELESCOPE
Instruction Manual
Advertisement
Table of Contents

Related Manuals for Carson RP-400


Summary of Contents for Carson RP-400
- Page 1 RP-400 TELESCOPE Instruction Manual ©2009 CARSON OPTICAL HAUPPAUGE NY 11788 www.carsonoptical.com MADE IN CHINA 50668 00573 Carson Optical 35 Gilpin Avenue Hauppauge, NY 11788-4723 Phone: 631-963-5000 Fax: 631-427-6749 ©2007 CARSON OPTICAL ©2011 CARSON OPTICAL For information, call toll-free: 1-800-967-8427 HAUPPAUGE NY 11788 HAUPPAUGE NY 11788 www.carsonoptical.com...
-
Page 2: Table Of Contents
Congratulations on your purchase of a Carson RP-400 Red Planet Series telescope. This telescope features an easy-to-use design and high perfor- Table of Contents: mance optics that are perfect for amateur astronomers looking to explore the wonders of outer space. Please read this manual carefully to ensure that you assemble and use your telescope correctly. When used properly, your Red Planet telescope should provide years of exciting observations of the uni- Box Contents verse. Please note that this Refractor telescope was designed for astronomi- Figures 1-7 / Figure Key cal viewing and is not recommended for terrestrial use. - Page 3 Fig.1 Fig.3 Fig.2 Fig.4...
- Page 4 Fig.5 Fig.7 Fig.6...
-
Page 5: Setting Up Your Tripod
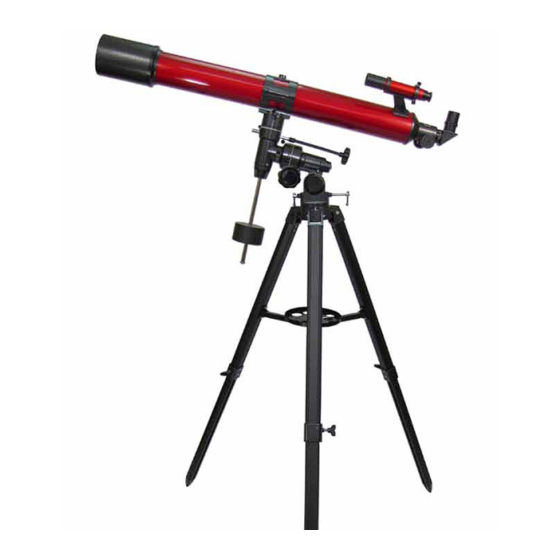
Key to Figures 1-7: Assembly of your Red Planet Telescope: Setting Up Your Tripod: Objective Lens Lens Shade The aluminum tripod comes almost entirely preassembled and ready-to-use. Optical Tube Assembly Remove the tripod from the box and pull apart the legs. Gently push down Cradle Ring the tripod braces (Fig. 7-36) until they are in the lowest position. You can 6x30mm Finder Scope then extend the legs to the desired height by loosening the sliding leg exten- Focus Knobs sion lock knob (Fig. 7-37), sliding the leg down the desired amount and then Equatorial Mount tightening the extension lock knob until secure. Repeat the process with each R.A. Flexible Cable leg trying to keep the tripod as level as possible with the ground. You can Counter Weight Bar then attach the accessory tray (Fig. 7-34) to the tripod by lining up the thread- 10. Equatorial Mount Base ed bottom of the accessory tray with the hole in the middle of the three tripod 11. Tripod Legs braces and twisting until tight. This tray is designed with eyepiece holder Counter Weight slots (Fig. 7-35) to hold spare eyepieces when not in use. 13. -
Page 6: Attaching The Telescope Tube To The Mount
Balancing the Telescope: Attaching the Telescope Tube to the Mount: Remove the cradle ring (Fig. 1-4) from the box. The top of the equatorial mount is called the optical tube saddle plate (Fig. 2-16). Loosen the saddle Balancing the Mount in R.A.: plate lock (Fig. 3-19) and slide the cradle ring into the saddle plate until the To reduce stress on the mount, the telescope should be balanced on the polar stopper on the bottom of the cradle ring assembly rests against the front of axis (See Fig. 2). Instructions on how to do so are as follows: the saddle plate. Make sure that the cradle ring lock knob (Fig. 6-33) is on • L oosen the R.A. lock knob (Fig. 3-22) and position the telescope off the right side of the mount. Tighten the saddle plate lock to secure the cradle to one side of the mount (you may need to remove the R.A. slow mo- ring in place. tion cable (Fig. 1-8) temporarily). The counterweight bar (Fig. 1-9) should be parallel to the ground. Unscrew the cradle ring lock knob (Fig. 6-33) and open the cradle ring. • R elease the telescope gradually and see which side it falls towards. Carefully remove the optical tube assembly (Fig. 1-3) from the box. Gently To avoid accidental damage, do not let go of the telescope complete- rest the optical tube into the cradle ring with the eyepiece (Fig. 2-14) towards the back. The cradle ring should be roughly in the center of the tube. We • L oosen the counterweight lock knob (Fig. 1-13) and position the will balance this later. Close the cradle ring around the telescope and secure weight so that the telescope and counterweight remain stationary... -
Page 7: Aligning The Finder Scope
Understanding Celestial Movement: Aligning the Finder Scope: The low power and wide field of view provided by the 6x30mm finder scope (Fig. 1-5) provides a quick and easy way to sight an object prior to looking In order to get the most enjoyment out of your telescope it is necessary to through the high-power telescope. The finder scope must first be properly know the basics of how celestial objects move across the sky. Due to the ro- aligned with the telescope in order to work properly. This alignment is best tation of the earth, celestial objects appear to move from East to West across performed during the daylight. Follow the steps below to align your finder the sky, much like the Sun. You will notice this movement as an object in scope properly: your telescope field of view will slowly move across the field and out of • P lace the Plossl 20mm eyepiece (Fig. 2-14) into the corner lens (Fig. view. Continuous adjustment is needed to keep an object in the field of view. 2-15) of the telescope. This will be explained in more detail later. • L oosen both the R.A. lock knob (Fig. 3-22) and the Dec. lock knob (Fig. 3-24) so that the telescope swings freely along both axes. Many people choose to “star-hop” when using a telescope, a quick and rela- • P oint the main telescope at a specific land object 200 yards or more tively easy way to start. This is a method of using easily identifiable stars away. Lock down the R.A. and Dec. axes. Turn the slow motion and constellations to serve as reference points to find other objects in the sky. cables (Fig. 2–8,17) until the object is centered in the telescope field. A more advanced and precise method of locating specific celestial objects is • N ow look through the finder scope (Fig. 1-5) and loosen or tighten by using setting circles (Fig. 3-20,21) located on your equatorial mount (Fig. the finder scope bracket screws (Fig. 4-26) until the crosshairs are 1-7) to find the celestial coordinates of that particular object. -
Page 8: Polar Alignment
Using the Telescope: Every celestial object has a corresponding R.A. and Dec. coordinate. Given the proper coordinates, you can use the setting circles on your telescope mount to locate any celestial object. The coordinates can only be used if the Once you have properly assembled, balanced and aligned your telescope you telescope is first aligned with the North (or South) Celestial Pole. are finally ready to start using it. • T o locate an object using the telescope, first loosen the R.A. lock Polar Alignment: (Fig. 3-22) and Dec. lock (Fig. 3-24) allowing the telescope to rotate along both axes. Look through the finder scope (Fig. 1-5) to sight the object you are looking for and center it in the finder scope cross- If the telescope is accurately aligned with the celestial pole, very little dec- hairs. You may need to focus the finder scope by turning the finder lination adjustment will be necessary to track a celestial object. Most of the scope focus knob (Fig. 4-27). Then re-tighten the R.A. and Dec. tracking can be done using the Right Ascension cable (Fig. 1-8). locks. To line up your telescope with the pole: • I t is best to use the lowest power eyepiece (the Plossl 20mm eye- • M ake sure the equatorial mount is locked in the “home” position, piece) at first. This allows for a wider field of view making it easier meaning that the optical tube assembly is parallel to the correspond- to locate objects. Once the object is centered in the field of view you ing portion of the mount below it and that the declination axis is can switch the eyepiece to higher magnifications. -
Page 9: Using Setting Circles
Using Setting Circles: • V iewing through a closed window might also result in a distorted image due The setting circles (Fig. 3-20,21) on your equatorial mount can be used to locate to the varying densities of window glass. hard to find celestial objects. Follow the instructions below to use the setting • A void viewing objects that are low on the horizon. Objects that are higher circles effectively: up in the sky will appear much sharper. • M ake sure your telescope is assembled properly and polar aligned. • S udden changes in temperature may cause condensation to appear on the op- • L ook up the celestial coordinates of an easy to spot object located nearby to tical components of the telescope. It is best to set up your telescope ahead of the object you seek on a star chart or atlas (not included). time and then wait while the telescope adjusts to the new temperature before • C enter this easy to spot object in the field of view of your telescope. using it. • R otate the R.A. setting circle (Fig. 3-21) on your telescope’s mount by hand until the proper coordinate lines up with the R.A. indicator. You will notice Care and Maintenance of Your Telescope: that the R.A. setting circle has two sets of numbers. The top numbers are for... -
Page 10: Specifications
Specifications: This warranty extends to the original purchaser only and is not assignable or transferable. It shall not apply to any product that has been subject to mis- use, abuse, negligence or accident, or to any defects or damage directly or Optical Design: Refractor indirectly caused by the use of unauthorized replacement parts and/or service Aperture: 90mm (3.54”) performed by unauthorized personnel. Focal Length: 1000mm (39.37”) This warranty gives you specific legal rights, and you may also have other Focal Ratio: 11.11 rights which could vary from state to state. Some states do not allow Optical Coatings: Fully Coated limitations on the life of an implied warranty and/or do not allow excluding Finder Scope: 6x30mm or limiting incidental or consequential damages. If so, the above limitations Eyepiece 1: Plossl 20mm or exclusions may not apply to you. Magnification 1: Eyepiece 2: Plossl 10mm Warranty Procedure: Magnification 2: 100x Provide proof of purchase. A receipt or other dated proof of purchase Mount: Equatorial must be included with merchandise being returned for a warranty claim Weight:...
Need help?
Do you have a question about the RP-400 and is the answer not in the manual?
Questions and answers