Table of Contents
Advertisement
Quick Links
Download this manual
See also:
User Manual
Advertisement
Table of Contents

Related Manuals for Kramer VS-808TP


Summary of Contents for Kramer VS-808TP
- Page 1 K R A ME R E LE CT R O N IC S L T D . USER MANUAL MODEL: VS-808TP 8x8 Twisted Pair Matrix Switcher P/N: 2900-300147 Rev 1...
-
Page 3: Table Of Contents
Defining the VS-808TP 8x8 Twisted Pair Matrix Switcher Installing the VS-808TP in a Rack Connecting the VS-808TP Connecting a Serial Data Source to the VS-808TP RS-232 Data Port Connecting a Serial Controller to the VS-808TP Connecting to the VS-808TP via Ethernet... - Page 4 Figure 16: Serial Page Figure 17: Port Name Page Figure 18: Data and Audio Processing Page Figure 19: User Management Page Figure 20: Firmware Page VS-808TP - Contents...
-
Page 5: Introduction
7: Scan Converters and Scalers; GROUP 8: Cables and Connectors; GROUP 9: Room Connectivity; GROUP 10: Accessories and Rack Adapters and GROUP 11: Sierra Video Products. Congratulations on purchasing your Kramer VS-808TP 8x8 Twisted Pair Matrix Switcher which is ideal for long range graphics distribution and multimedia applications. -
Page 6: Getting Started
Using Twisted Pair Cable Kramer engineers have developed special twisted pair cables to best match our digital twisted pair products; the Kramer: BC-DGKat524 (CAT 5 24 AWG), the Kramer: BC-DGKat623 (CAT 6 23 AWG cable), and the Kramer: BC-DGKat7a23 (CAT 7a 23 AWG cable). -
Page 7: Overview
Overview Thank you for purchasing the Kramer VS-808TP 8x8 Twisted Pair Matrix Switcher. This unique matrix switcher which utilizes economical TP (Twisted Pair) cabling often pre-installed in buildings these days, routes and distributes signals both from a local and/or remote source, and at extended ranges. It is designed especially for installations where a high level of control possibilities is required from extended distances. -
Page 8: Defining The Vs-808Tp 8X8 Twisted Pair Matrix Switcher
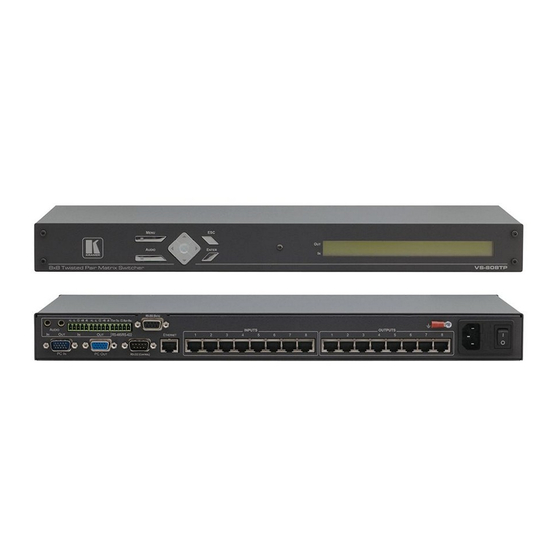
Defining the VS-808TP 8x8 Twisted Pair Matrix Switcher Figure 1 defines the front panel of the VS-808TP. Figure 1: VS-808TP 8x8 Twisted Pair Matrix Switcher Front Panel Feature Function AUDIO Button Press to display/switch audio status. Press again to display/switch video/RS-232 status MENU Button Press to display the menu. -
Page 9: Figure 2: Vs-808Tp 8X8 Twisted Pair Matrix Switcher Rear Panel
Figure 2 defines the rear panel of the VS-808TP. Figure 2: VS-808TP 8x8 Twisted Pair Matrix Switcher Rear Panel Feature Function IN 3.5mm mini jack Connect to the output of the unbalanced stereo audio source (for example, the audio output... -
Page 10: Installing The Vs-808Tp In A Rack
Installing the VS-808TP in a Rack VS-808TP - Installing the VS-808TP in a Rack... -
Page 11: Connecting The Vs-808Tp
Always switch off the power to any device before connecting it to your VS-808TP. After connecting your VS-808TP, connect its power and then switch on the power to the other devices. Figure 3: Connecting the VS-808TP 8x8 Twisted Pair Matrix Switcher To connect the VS-808TP as illustrated in the example in Figure 1. -
Page 12: Connecting A Serial Data Source To The Vs-808Tp Rs-232 Data Port
Connecting a Serial Data Source to the VS-808TP RS-232 Data Port You can connect a serial data source to the VS-808TP via RS-232 to control remote acceptors (for example, monitors). The RS-232 data source is connected to the RS-232 (DATA) port. A null-modem adapter is not required for this connection and a straight-through cable can be used. -
Page 13: Figure 4: Crossed Cable Rs-232 Connection
6.2.1 Connecting an RS-232 Serial Controller to the VS-808TP RS-232 Control Port You can connect to the unit (the RS-232 CONTROL port) via a crossed RS-232 connection, using for example, a PC. A crossed cable or null-modem is required as shown in method A and B respectively. If a shielded cable is used, connect the shield to pin 5. -
Page 14: Connecting To The Vs-808Tp Via Ethernet
Figure 6: Wiring for an RS-485 Serial Data Source Figure 7: Wiring for an RS-422 Serial Data Source Connecting to the VS-808TP via Ethernet You can connect the VS-808TP via Ethernet using either of the following methods: • A crossover cable (see Section 6.3.1) for direct connection to the PC... -
Page 15: Figure 8: Local Area Connection Properties Window
The Local Area Connection Properties window appears. 5. Select the Internet Protocol (TCP/IP) and click the Properties Button. Figure 8: Local Area Connection Properties Window 6. Select Use the following IP Address and enter the details as shown in Figure VS-808TP - Connecting the VS-808TP... -
Page 16: Connecting The Balanced/Unbalanced Stereo Audio Output
7. Click OK. 6.3.2 Connecting to the Ethernet Port via a Network Switch/Hub To connect to the Ethernet port on the VS-808TP via a network switch/hub: • Connect the PC to the Ethernet network switch/hub using a straight through cable... -
Page 17: Wiring The Cat 5 Line In/Line Out Rj-45 Connectors
Orange / White Orange Green / White Blue Blue / White Green Brown / White Brown Pair 1 4 and 5 Pair 2 1 and 2 Pair 3 3 and 6 Pair 4 7 and 8 VS-808TP - Connecting the VS-808TP... -
Page 18: Operating The Vs-808Tp Locally Via The Front Panel Buttons
Operating the VS-808TP Locally via the Front Panel Buttons The VS-808TP is operated using the front panels buttons as follows: • Press the left (◄) or right (►) arrows to move backward or forward to select the output of a switched pair •... -
Page 19: Using The Menu
Section 7.1.3) • Adjust Audio Level (see Section 7.1.4) • Save/Load Profile (see Section 7.1.5) • Security Mode (see Section 7.1.6) • Data and Audio Processing (see Section 7.1.7) VS-808TP - Operating the VS-808TP Locally via the Front Panel Buttons... - Page 20 Sets the serial port parameters to the factory default (see Section 10.1) Settings Save and Reset Save any changes to settings and reset the device the Device Exit Without Exit without saving and changed settings Save VS-808TP - Operating the VS-808TP Locally via the Front Panel Buttons...
- Page 21 Description Options Password Required Turns on and off the requirement for a Yes, No password to access the menu Change password Sets the password for access 0000 to 9999 VS-808TP - Operating the VS-808TP Locally via the Front Panel Buttons...
- Page 22 TP transmitter being used. Parameter Description Options Processing Sets the processing mode for the data and audio Default, Bypass Mode depending on the TP transmitter in use: Default—Default Default=TP133/134 Bypass=TP-125/126 VS-808TP - Operating the VS-808TP Locally via the Front Panel Buttons...
-
Page 23: Operating The Vs-808Tp Remotely Via The Web Pages
Operating the VS-808TP Remotely via the Web Pages You can operate the VS-808TP using a standard Web browser over a LAN. The Web pages are divided into four sections: • Connections—Controls switching, video gain and compensation, and audio volume (see Section 8.2) -
Page 24: Connections Page
The Setup pages consist of four sub-pages: • Web page (see Section 8.3.1) • Serial page (see Section 8.3.2) • Port Name page (see Section 8.3.3) • Data and Audio Processing page (see Section 8.3.4) VS-808TP - Operating the VS-808TP Remotely via the Web Pages... -
Page 25: Figure 15: Web Page
Figure 15: Web Page 8.3.2 Serial Page The Serial page allows you to select the: • Serial port address • Baud rate • Serial port mode Figure 16: Serial Page VS-808TP - Operating the VS-808TP Remotely via the Web Pages... -
Page 26: Figure 17: Port Name Page
The Data and Audio Processing page allows you to select either no processing or for the device to provide data and audio processing. Figure 18: Data and Audio Processing Page VS-808TP - Operating the VS-808TP Remotely via the Web Pages... -
Page 27: User Management
Super User—Full rights (no user management) • Administrator—Full rights and user management Figure 19: User Management Page Firmware The firmware page allows you to upgrade the firmware of the device. Figure 20: Firmware Page VS-808TP - Operating the VS-808TP Remotely via the Web Pages... -
Page 28: Technical Specifications
0-15 where 0=mute , 01=–25dB and 15=6dB MAXIMUM CABLE LENGTH: 300m (984ft) BAUD RATE (RS-232): 9600, 19200, 38400, 115200 POWER CONSUMPTION: 100-240VAC, 50/60Hz, 23VA DIMENSIONS: 19" x 9.4" x 1U (W, D, H) WEIGHT: 3kg (6.6lbs) approx ACCESSORIES: Power cord, rack “ears” VS-808TP - Technical Specifications... -
Page 29: Default Parameters
To reset the IP settings to the factory reset values, power cycle the device while holding in the Factory Reset button located on the rear panel of the unit IP Address 192.168.1.39 Subnet mask 255.255.255.0 Default gateway 0.0.0.0 10.2 Default Logon Credentials Logon Credentials Name kramer Password kramer VS-808TP - Default Parameters... -
Page 30: Kramer Protocol
Kramer Protocol The VS-808TP supports the Kramer Protocol 2000. You can download our user friendly “Software for Calculating Hex Codes for Protocol 2000” from the technical support section at http://www.kramerelectronics.com. 11.1 Kramer Protocol 2000 This RS-232/RS 485/Ethernet communication protocol (Version 0.51) uses four bytes of information as defined below. - Page 31 PC the same four bytes that it was sent (except for the first byte, where the DESTINATION bit is set high). NOTE 2 - SETUP # 0 is the present setting. SETUP # 1 and higher are the settings saved in the switcher's memory, (i.e. those used for Store and Recall). VS-808TP - Kramer Protocol...
- Page 33 " " 2900- 300147 P/N: Rev:...
Need help?
Do you have a question about the VS-808TP and is the answer not in the manual?
Questions and answers