
Related Manuals for Jensen JCR-255


Summary of Contents for Jensen JCR-255
- Page 1 MODEL JCR-255 AM/FM DUAL ALARM AUTO TIME SET CLOCK RADIO INSTRUCTION MANUAL Please read and follow this instruction manual carefully before using the unit and retain it for future reference...
-
Page 2: Dear Jensen ® Customer
DEAR JENSEN ® CUSTOMER Selecting fine audio equipment such as the unit you've just purchased is only the start of your musical enjoyment. Now it's time to consider how you can maximize the fun and excitement your equipment offers. This... - Page 3 TO PREVENT FIRE OR SHOCK HAZARD, DO NOT USE THIS PLUG WITH AN EXTENSION CORD, RECEPTACLE OR OTHER OUTLET UNLESS THE BLADES CAN BE FULLY INSERTED TO PREVENT BLADE EXPOSURE. TO PREVENT FIRE OR SHOCK HAZARD, DO NOT EXPOSE THIS APPLIANCE TO RAIN OR MOISTURE.
- Page 4 13. Refer all servicing to qualified service personnel. Servicing is required when the apparatus has been damaged in any way, such as power- supply cord or plug is damaged, liquid has been spilled or objects have fallen into the apparatus, the apparatus has been exposed to rain or moisture, does not operate normally, or has been dropped.
-
Page 5: Important Notes
Avoid installing the unit in locations described below: Places exposed to direct sunlight or close to heat radiating appliances such as electric heaters. Dusty places. Places subject to constant vibration. Humid or moist places. COMPLIANCE WITH FCC REGULATIONS This device complies with Part 15 of the FCC Rules. Operation is subject to the following two conditions: this device may not cause harmful interference, and this device must accept any interference received, including... -
Page 6: Power Source
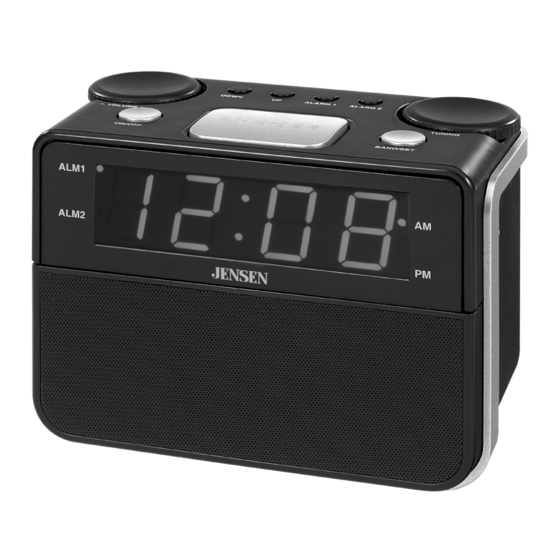
This unit is designed to operate on 120V/60Hz AC house current. Operating this unit from any other power source may cause damage to the unit, and such damage is not covered by your warranty. The radio is also pre-loaded with 2 x “AA” batteries for the battery back-up and for the Auto Time Set clock system. - Page 7 1. POWER ON/OFF BUTTON 2. VOLUME CONTROL 3. CLOCK SETTING UP BUTTON 4. CLOCK SETTING DOWN BUTTON 5. ALARM1 BUTTON 6. ALARM2 BUTTON 7. SNOOZE BUTTON 8. (AM/FM)BAND / CLOCK SET BUTTON 9. TUNNING CONTROL 10. TIME ZONE SELECTOR 11. DAYLIGHT SAVING TIME SWITCH 12.
- Page 8 1. ALARM 1 INDICATOR 2. ALARM 2 INDICATOR 3. MULTI FUNCTION DISPLAY 4. AM CLOCK INDICATOR 5. PM CLOCK INDICATIOR 6. SPEAKER...
-
Page 9: Setting The Time Zone
AUTO TIME SET This unit features an Automatic Time Set system powered by 2 X “AA” batteries (3V DC) (Included), so you do not need to set the clock time when first plugged in. After the unit is plugged in, the LED display will show the current time automatically after you set the time zone and daylight saving time for desired area. -
Page 10: Setting The Clock
SETTING THE CLOCK In case the back-up batteries are accidentally removed. You will need to set the clock manually. If the LED display is blinking In standby mode, press the UP button to increase or press the DOWN button to decrease the minutes setting. Press and hold the UP / DOWN button to fast forward/backward the clock setting. -
Page 11: Alarm Operation
When you have finished listening, press the ON/OFF button once to turn off the unit. TIPS FOR BEST RADIO RECEPTION AM - The AM antenna is built inside the radio. If AM reception is weak, change the position of the unit until the internal antenna picks up the strongest signal. -
Page 12: Wake To Buzzer
To stop the alarm immediately, press the ON/OFF button once. The radio will stop but the alarm remains set and will turn the unit on again at the same time on the following day. To turn off the alarm completely, press the ALARM button repeatedly until ALARM indicator turns off. -
Page 13: Auxiliary Input
BACKLIGHT BRIGHTNESS OPERATION You can change the LED brightness by switching the HI / LO dimmer switch located on the side of the cabinet. This unit features an AUX line-in jack for connecting your iPod, MP3 player or other digital music players. 1. -
Page 14: Specifications
Power Requirement: Battery Backup For Clock: Frequency Range: Please refer to the instructions on the enclosed warranty card for returning your unit for service. When returning the unit, please remove the battery to prevent damage to the unit in transit and/or from possible battery leakage. We are not responsible for battery returned with the product or for the cost of replacement.
Need help?
Do you have a question about the JCR-255 and is the answer not in the manual?
Questions and answers