Table of Contents
Advertisement
Advertisement
Table of Contents
Troubleshooting

Related Manuals for Hand Held Products Quick Check Bar Code Verifiers 800


Summary of Contents for Hand Held Products Quick Check Bar Code Verifiers 800
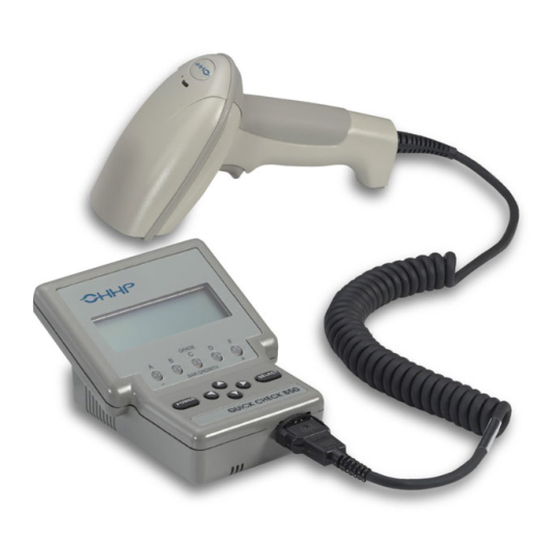
- Page 1 Quick Check® 600/800 Series Bar Code Verifiers ™ User’s Guide...
- Page 2 Hand Held Products. Hand Held Products shall not be liable for technical or editorial errors or omissions contained herein; nor for incidental or consequential damages resulting from the furnishing, performance, or use of this material.
-
Page 3: Table Of Contents
Table of Contents Chapter 1 - Getting Started About This Guide ..............1-1 Unpacking the Quick Check 600/800 Verifier ..... 1-2 Noting the Verifier’s Features........1-3 Specifications................ 1-7 Installing the Batteries ............1-7 Charging the Batteries............ 1-8 Turning the Unit On and Off.......... 1-9 Calibrating the Quick Check 600/800 Verifier .... - Page 4 Changing the Scanning Options ......... 3-10 Beeper Pitch ..............3-11 Extended Accuracy ............3-11 Decode Direction ............3-11 Changing the Output Options ..........3-12 Display Options............3-12 Parameter Result Lines ..........3-12 Print Options ..............3-13 AutoPrint/Store ............3-13 Scan Profile ..............3-14 Resetting the Default Settings ..........
- Page 5 Chapter 5 - Saving and Printing Saving Data................5-1 Checking the Print Buffer During Operation......5-1 Printing Data ................. 5-2 Deleting Stored Data............. 5-3 Interfacing With a Computer.......... 5-4 Reviewing the Printouts ..........5-4 Printing Guidelines ............... 5-6 Using the QCP or QCHSP..........5-6 Troubleshooting the QCP or QCHSP......
- Page 6 Chapter 9 - Error, Application, and Type Messages Chapter 10 - Flow Charts Chapter 11 - SSTR Codes Chapter 12 - Special Codes Chapter 13 - Unrecognized Symbols Unrecognized Symbols............13-1 Chapter 14 - Customer Support Troubleshooting..............14-1 Technical Assistance ............14-1 Online Technical Assistance..........
-
Page 7: Chapter 1 - Getting Started
Getting Started About This Guide ® This manual contains information on the Quick Check 600/800 Series Bar Code Verifiers. It describes all the features and functions of the Quick Check 600/800 Verifier and all the industry applications that can be enabled on the Quick Check 600/800 Verifier. -
Page 8: Unpacking The Quick Check 600/800 Verifier
This manual uses several special symbols to refer to the controls on the instrument. The following table shows the symbols and their descriptions. Symbol Description POWER or SELECT Represents a button on the Quick Check or ↑, ↓, ←, → Verifier unit Shows the LED display on the Quick Check Scan or Low Battery... -
Page 9: Noting The Verifier's Features
“X” Dimension Ruler QCRFPG Calibration Reflectance Bar Code Page If you do not have all these items, contact your sales representative. Noting the Verifier’s Features The Quick Check 600/800 Verifier is a full-featured bar code verifier compatible with all major linear bar code symbologies. It is suitable for desktop use in the office and is easily carried for portable verification in the field. - Page 10 The symbologies tested by the verifier include • EAN/UPC • Code 11 • Code 39 • Code 16K • Interleaved 2 of 5 • Code 49 • Code 128 • MSI • Code 93 • IATA 2 of 5 • Codabar •...
- Page 11 You can customize the settings for specifications, test criteria, scanning options, and output options to your preferences. These options are described in Chapter 3, Changing the Settings . Display The liquid crystal display (LCD) provides four lines of text, each with up to 20 characters per line.
- Page 12 The ports on the back of the unit connect to a recharging unit or to a printer interface cable. The smaller port is for charging the unit. The larger port connects to RS-232 serial communication devices, such as Hand Held Products’ QCPand QCHSPprinters.
-
Page 13: Specifications
Specifications Item Specification 4.30”W x 2.75”H x 5.25”D Dimensions (10.9 cm W x 7.0 cm H x 13.3 cm D) 1.0 lb. (454 g) with wand attached and batteries Weight installed Storage: -20° to 70°C Temperature Operational: 0° to 50°C Humidity 5% to 95% RH non condensing Sealability... -
Page 14: Charging The Batteries
If the message does not reappear, you can continue to use the unit. If you think there is a problem with your batteries, contact Hand Held Products. ♦ To charge the batteries: 1. -
Page 15: Turning The Unit On And Off
Turning the Unit On and Off When you turn on the verifier, it contains the settings stored from the last time you changed them. Chapter 3, Changing the Settings describes these settings and provides instructions for changing them. The verifier shuts itself off after a minute of inactivity to conserve battery power. You can also turn the unit off at any time. - Page 16 Note: 6 mil (0.006 inch) diameter aperture is recommended for EAN/UPC. 2. The display that follows the opening screen depends on two conditions: whether a printer is available, and how the AutoPrint/Store feature is set. If the first line of the display states: •...
- Page 17 If the AutoPrint/Store feature is set to Off, you can: • Continue • Clear • Continue with AutoStore The cursor is at the asterisk next to the term Continue 2.e To continue obtaining scan results with the AutoPrint/Store feature setting , press SELECT.
-
Page 18: Calibrating The Quick Check 600/800 Verifier
3.c To clear (delete) the records stored in the memory, press ↓ and → to place the cursor on the asterisk next to the term and then Clear press SELECT. The stored results and the result from the last scan are deleted from the Quick Check 600/800 Verifier’s memory. -
Page 19: Properly Scanning With The Unit
Three beeps (one long followed by two short beeps) sound if the unit detects reflectance readings significantly different from the previously recorded ones. You may be scanning too slowly, too quickly or unevenly, or using an improper scan angle. A message appears and prompts you to begin again. Continue scanning using the recommended scanning technique until the unit is calibrated. -
Page 20: Cleaning The Wand
Note: Damaged tips for the pen wand should be replaced. Consult your dealer or Hand Held Products’ Customer Service Department for details. Accessories and Options Hand Held Products supplies a variety of accessories and options for the Quick Check 600/800 Verifier. The items indicated by an asterisk are supplied with the verifier. - Page 21 Documentation *QC600/800 User’s Guide & Programming Manual ..QC600-800-UG *QC600/800 Reflectance Page ......QCRFPG Printers QC Standard Speed Dot Matrix Printer .
- Page 22 1 - 16 Quick Check® 600/800 Series User’s Guide...
-
Page 23: Chapter 2 - Quick Start Guide
Quick Start Guide If you are familiar with bar code verifiers, this section will get you up and running in a few minutes. We assume the factory defaults are in effect. 1. Install the batteries Chapter 1 • Slide off battery cover on the bottom of unit. •... - Page 24 • The standard decode display appears. • Use arrow keys to view data Scan SSTR Codes to view data. 7. Print your scan results Chapter 3 • If the Quick Check 600/800 Verifier is connected to a printer and it is turned on, results print automatically (AutoPrint/Store setting default is •...
-
Page 25: Changing The Specifications
Changing the Settings There are four types of options on the Quick Check 600/800 Verifier you can customize: specifications (applications and symbologies), test criteria, scanning options, and output options. Each option has several items that you can turn on, turn off, or change a value. This section describes all the selectable option settings. -
Page 26: Symbologies
Symbologies You can enable (turn on) the symbologies available on your Quick Check 600/ 800 Verifier so they are recognized. When a symbology is enabled, you can modify some of its test parameters. "Symbology Specifications" on page 3-3 lists the parameters you can modify and their factory installed defaults. The parameters are described after the table. -
Page 27: Symbology Specifications
Symbology Specifications Symbology Parameters (defaults are in bold) EAN/UPC Enable: On or off Magnification factor: (080/085/090/100/105/110/115/120/130/140/150/ 160/180/200) Expand U.P.C.-EO: Yes or No Code 39 Enable: On or off Check Character: None or Checked Fixed W/N: None or a value between 1.4 and 3.9 + 0.2 Interleaved Fixed Msg Len*: None or a value between 1 and 49 characters 2 of 5... -
Page 28: Magnification Factor
Magnification Factor The Magnification (Mag) Factor applies to the EAN/UPC symbologies. By setting the size of the bar code symbols that you test, you define appropriate tolerances. You can select a mag factor from the following values: 80%, 90%, 95%, 100%, 105%, 110%, 115%, 120%, 125%,130%, 140%, 150%, 160%, 180% or 200%. -
Page 29: Character Font & Tolerances
The Yes setting for this parameter is the default. Some of the extra characters are represented by special character “strings” as shown in the following Character Translation Table. When you select the No setting, this information does not appear on the display or the printout. Character Translation Table (Code 128, Code 16K, and Code 49) Character... -
Page 30: Wide-To-Narrow Ratio
Wide-to-Narrow Ratio The wide-to-narrow ratio (W/N) applies to symbologies with two element widths, including Codabar, Interleaved 2 of 5, and Code 39. “W/N” is the ratio of wide to narrow elements. Only one symbology can have a W/N ratio at a time. -
Page 31: Industry Applications
6. To change which symbology has a W/N Ratio: Press ↑ or ↓ to set the cursor on the asterisk next to Fixed W/N Ratio • and then press SELECT. A menu appears with Fixed W/N Ratio on top and asks you to choose the symbology name and the ratio amount. -
Page 32: Changing The Test Criteria
♦ To select an application: 1. Display the menu that begins with Print Results (press POWER and SELECT). 2. Set the cursor on the asterisk next to Change Settings and then press SELECT. A menu that begins with Specifications appears. 3. -
Page 33: Decodability
You can obtain the scan grade result in two ways: • Set the verifier to use traditional print quality parameters to make a pass/fail judgment about the symbol and provide detailed measurements. • Set the verifier to use ISO/IEC methods to judge the symbol and report an ISO/IEC scan grade of A, B, C, D or F. -
Page 34: Changing The Scanning Options
Consider the symbol grade as the average resulting from scans you take from all over the symbol. The ISO/IEC standard requires you to obtain ten scans of each symbol. For example, you might sample the symbol at ten different paths in the symbol —... -
Page 35: Beeper Pitch
• Beeper Pitch (raise or lower) • Extended Accuracy • Decoding direction (both ways or forward only) Beeper Pitch You can change the pitch of the verifier’s beeper. Higher pitches seem to sound louder. You can also turn off the tone. The default is 16. The range includes Off and 1 through 31. -
Page 36: Changing The Output Options
3. Set the cursor on the asterisk next to Scanning Options and then press SELECT. A menu that begins with Beeper Pitch appears. 4. To make any necessary changes: • To change the beeper pitch, set the cursor on the asterisk next to Beeper and then press SELECT or →. -
Page 37: Print Options
Additional results you can display and the criteria used include: • Symbol type • Wide-to-narrow ratio (traditional) • Light reflectance (traditional and ISO/IEC) • Dark reflectance (traditional and ISO/IEC) • Symbol contrast (ISO/IEC) • Reflectance minimum/maximum (ISO/IEC) • Edge contrast minimum (ISO/IEC) •... -
Page 38: Scan Profile
• When you have the AutoPrint/Store feature turned on, but no printer is connected to your verifier, or your printer is connected, but is turned off, your scan results are automatically stored in the verifier’s memory. • When you have the AutoPrint/Store feature turned off, after each scan you need to instruct the verifier to print your data (if a printer is connected and turned on) or to store your data (if a printer is not connected or is turned off). -
Page 39: Resetting The Default Settings
5. To change the printout options: • To change the printout options, set the cursor on the asterisk next to Printout Options and then press SELECT. A menu with the printout options selections appears. • To change the printer type, set the cursor on the asterisk next to Printer Type and then press SELECT or →... -
Page 40: Using A Command Code
♦ To unlock the unit: 1. Scan the “Unlock Specs and Tests” Special Code. The unit is now unlocked. You can now change any option setting. Using a Command Code A Command Code is a bar code symbol that allows you to customize the Quick Check 600/800 Verifier for your use. - Page 41 RI & RD, P.C.S., Symbol Contrast, Rmin/Rmax, Modulation, EC(min), Defects, Message Type, Message Length or Check Character Error Override: Yes or No LEDs: P/F Criteria or Bar Growth Output Options Printer Type: (Choose One) QCP, HSP, SSP Printout: Long form or short form AutoPrint/Store: On or Off With profile: Yes or No Generic Code Selections...
-
Page 42: Choosing A Command Code
Verifier settings are unlocked. If you do not have a Quick Check 600/800 Verifier printer or if you want to have a sharper, more durable Command Code, Hand Held Products can prepare a customized code for you. 3 - 18... - Page 43 You can have Hand Held Products create your customized Command Code by mailing or faxing Hand Held Products a copy of the Customized Command Code Selections List with all of the options you want on the Code indicated. Be sure to keep the original list with your Command Code selections for your future reference.
- Page 44 3 - 20 Quick Check® 600/800 Series User’s Guide...
-
Page 45: Chapter 4 - Reviewing Scan Data
Reviewing Scan Data Reviewing Scan Results After you customize the verifier settings for your use, you are ready to scan bar code symbols. The verifier acquires and analyzes data using the ScanProfile Methodology specified in ISO/IEC’s Bar Code Print Quality Guideline (ANS X3, 182). -
Page 46: Iso/Iec Symbol Grade
ISO/IEC Symbol Grade The ISO/IEC Symbol Grade is the average of the scan grades resulting from scans you take from different paths across the symbol. The ISO/IEC Symbol Grade is also referred to as the overall or final symbol grade. You can obtain a symbol grade only if the passing option test criteria is set to an ISO/IEC grade (not to traditional). - Page 47 Determining the ISO/IEC Symbol Grade Quick Check® 600/800 Series User’s Guide 4 - 3...
- Page 48 Determining the ISO/IEC Symbol Grade (continued) 4 - 4 Quick Check® 600/800 Series User’s Guide...
-
Page 49: Reviewing A Scan Example
Reviewing a Scan Example To clarify the difference between a scan grade and a symbol grade, this section presents an example of how you might set up your verifier, scan the symbols and review the results. In this example, we change the verifier settings and see how they affect the results. - Page 50 appears at the beginning of the decoded data to indicate there is more data to the left. Press ← to review the beginning of the message. The text on the other lines of the display depends on the Extended Accuracy option setting.
-
Page 51: Led Display
Note: If you set the Test Criteria Passing parameter to an ISO/IEC grade and you set the #Scans/Symbol parameter to 1, the scan grade is the same as the ISO/IEC symbol grade. • The first line of the symbol grade display provides the symbol or application name, the same as the first line of the scan grade display. -
Page 52: Audio Sounds
For your convenience, the display option feature called “LEDs” allows you to select ISO/IEC test criteria yet have the LEDs display bar growth rather than ISO/ IEC pass/fail grade. Refer to "Changing the Output Options" on page 3-12 additional information. If you set the verifier to use traditional pass/fail test criteria, the color of each LEDs is always the same (first is red, second is yellow, third is green, fourth is yellow, fifth is red). -
Page 53: Reviewing The Dimensional Parameters
Reviewing the Dimensional Parameters The following table lists the dimensional parameters and summarizes their results. Descriptions of the parameters follow the tables. Parameter Trad’l ISO/IEC √ Average Bar Error (Avg Bar Err) √ Wide-to-narrow ratio (Wide/Nar Ratio) √ Decodability* * The method you select (Avg Decode or ISO/IECISO/IEC) determines the scan and sym- bol grades. -
Page 54: Calculating X
W/N Ratio The wide-to-narrow ratio (W/N) applies to symbologies with two element widths including Code 39, Interleaved 2 of 5 and USS-Codabar. W/N is not meaningful for the other symbologies and is not displayed. When measured, the W/N value is compared against generic or user-specified limits appropriate for the symbology. -
Page 55: Reviewing The Reflectance Parameters
3. Press SELECT. The term Symbol Measures 00.00 Inches appears. The cursor appears in the whole number position. If you want to enter the symbol length in metric units (centimeters), enter the numeric value and then press → to move the cursor to Inches. Press ↑. The term changes to Centim. -
Page 56: Errors In Reflectance Parameters
Parameter Result Pass if PCS > 75%,RL > 25% and RD < 30% Fail if not satisfied Pass if Rd/RI < 50% RI/Rd Fail if Rd/RI > 50% A if > 70% SymCont B if > 55% C if > 40% D if >... - Page 57 Note: Certain high reflectance materials may always read “XX” or “— —.” You should repeat the calibration. The ratio of Rd/RI (Rmin/Rmax) must be less than 50% to pass this test. Alternately, you can consider Rd < 50% RI. RI may be rated LO!, but it is never rated HI!, while Rd may be rated HI! but is never rated LO!.
-
Page 58: Reviewing The Format Parameters
5. To resume scanning, start at the quiet zone and scan the symbol. Reviewing the Format Parameters The following tables list the format parameters and their results. Descriptions of the parameters follow the tables. Parameter Trad’l ISO/IEC √ √ Message Length √... -
Page 59: Reviewing Messages
Check Character A check character in a symbol may be mandated by a bar code symbology specification, by you, by both or not at all. The display reflects the requirement and the result, either CkChr Checks if it passes or Check Character Fails if it fails. If you do not set the unit to test for a check character, the message NO Check Character appears. -
Page 60: Using Sstr Codes To Review Data
Using SSTR Codes to Review Data A Single Scan to Result (SSTR) Code is a bar code symbol that tells the verifier to execute certain command functions. If you scan an SSTR Code, the unit displays the scan result parameter represented by that bar code symbol. After you scan a symbol, either the default results appear (listed below) or, if you changed the output display options, the results you specified appear. -
Page 61: Using The Quick Check Verifier As A Reflectometer
If you save your customized default results, the unit automatically enters these changes in the Output Options, Display Options line. To change the upper and lower result lines using the Display Options menu, refer to "Changing the Output Options" on page 3-12. - Page 62 When using the reflectance mode, the reflectance “seen” by the unit is continuously shown on the verifier’s display as both a two-digit reflectance percentage (from 0% to 99%) and on a graphic bar graph (gas gauge). For meaningful and consistent static reflectance values, you must calibrate the unit and hold the wand at the proper scan angle with its “foot”...
-
Page 63: Chapter 5 - Saving And Printing
Saving and Printing Saving Data When you scan a bar code symbol and you do not have a printer connected to the Quick Check 600/800 Verifier, or a printer is connected but not turned on, you can store or save, the scan results in the verifier’s print buffer. You can print the stored results at a later time. -
Page 64: Printing Data
♦ To check the print buffer during operation: 1. Display the menu that begins with Print Results. If scan results are displayed on the verifier, press SELECT. If a menu (for example, a change setting menu) is displayed on the verifier, press POWER repeatedly. -
Page 65: Deleting Stored Data
2. Scan a bar code symbol. - If the AutoPrint/Store feature is set to On, the results print. - If the AutoPrint/Store feature is set to Off, press SELECT twice. After you press SELECT the first time, a menu that begins with Print Results appears and the cursor is on the asterisk next to Print Results. -
Page 66: Interfacing With A Computer
QCDB09F cable. If you have the appropriate computer software, you can display the verifier data on your computer. Contact Hand Held Products for additional information about connecting the verifier to a computer. - Page 67 QCP and QCHSP Printouts ***Quick Check 600*** 660 nm, 06 mil Scanner Interleaved 2/5 123456 - Extended Accuracy! - Avg Bar Err = -.05X Wide/Nar Ratio = 2.5 Decodability = 53% <B> Symbol Total = 055”X” Prnt Contr Sig = 92% Reflect(Light) = 86% Reflect(Dark) = 05% Symbol Contrst = 81%...
-
Page 68: Printing Guidelines
Printing Guidelines The verifier supports two different Hand Held Products serial printers: ® • Quick Check Standard Speed Printer (QCP) ® • Quick Check High Speed Printer (QCHSP) The QCP and QCHSP are both impact printers. When you first receive your printer, you should unpack it carefully. Before attempting to use it, inspect the contents of the package for any shipping damage. - Page 69 Quick Check Printer (QCP) and Quick Check High Speed Printer (QCHSP) A three-position power switch on the printer’s front panel determines its function: Switch Position Function Down Left Center Down Right Paper Feed A red light-emitting diode (LED) to the right of the power switch lights to indicate the On and Paper Feed states.
- Page 70 The printer has a replaceable cartridge ribbon. Replace the paper roll when it is empty. ♦ To turn on and off the QCP or QCHSP: 1. To turn on the printer, press the power switch into the On (center) position. 2.
- Page 71 5. Slide the paper’s straight edge into the slot between the paper compartment and the printer compartment until about one-quarter of an inch is inserted. 6. Press the power switch to the center On position and wait a few seconds. 7.
- Page 72 4. Slide the paper through the gap between the inked ribbon and the frame of the new ribbon cartridge. 5. Set the new cartridge into the printer compartment and press both sides to secure it in place. The cartridge must be properly seated and aligned for the best print quality. If you get ribbon ink on the printer’s plastic case, wipe it off immediately.
-
Page 73: Troubleshooting The Qcp Or Qchsp
Troubleshooting the QCP or QCHSP Printing difficulties may be caused by selecting the incorrect printer interface configuration for the type of printer you are using. • For the QCP, select QCP. • For the QCHSP, select HSP. For instructions on selecting the printer interface setting, see Chapter 3, Changing the Settings . - Page 74 5 - 12 Quick Check® 600/800 Series User’s Guide...
-
Page 75: Chapter 6 - Background Information
Background Information General Bar Code Information Bar code technology allows you to get information into a computer much more accurately than keying. Quick Check 600/800 Verifiers measure the quality of the bar code symbols to ensure the proper information is encoded and can be read. -
Page 76: Symbology Specifications
The industry standards (applications) tested by the verifier include: • AIAG • LOGMARS • BOOKLAND • SCC (SCS/ITF, UCC/ EAN-128) • CCBBA • SISAC • COMPTIA/CTIA • UPC Coupon Code • HIBCC Symbology Specifications The reading and printing specifications for each symbology are defined by various organizations. - Page 77 ABC (formerly CCBC) - America's Blood Centers, 725 15th Street NW, Suite 700, Washington, DC 20005, Tel: (202) 393 5725, Fax: (202) 393 1282, http://www.americasblood.org/ AIAG - Automotive Industry Action Group, 26200 Lahser Rd., Suite 200, Southfield, MI 48033, Tel: (248) 358-3570, http://www.aiag.org/Index.cfm AIM North America - A chapter organization of AIM, Inc., 125 Warrendale- Bayne Road, Warrendale, PA 15086, Tel: (724) 934 5688, Fax: (724) 934 4495,...
-
Page 78: Symbology Characteristics
Symbology Characteristics Your Quick Check 600/800 Verifier can handle bar code symbologies with a variety of characteristics. To help understand symbologies, you should be familiar with the following commonly used terms: • Code refers to the actual data contained in the bar code symbol, such as a part number, serial number, transaction code or other type of data. - Page 79 A check character is a character placed in a predetermined position in a symbol and whose value is based on some mathematical relationship of the other characters in the symbol. It is used by the scanner to validate that the correct data has been decoded.
-
Page 80: How A Bar Code Verifier Works
A bar code reader or scanner extracts the information that is optically encoded in a bar code symbol and converts it into computer-compatible digital data. Hand Held Products provides a variety of handheld wand or pen scanners with the verifier that are designed to minimize scratching the symbol. When you place the wand on a bar code symbol and move it across the symbol, electro-optical techniques read the symbol. -
Page 81: Additional Information
proportional to the amount of light returned. A symbol’s spaces reflect more light than the bars. As the wand is moved across the bar code symbol, the analog voltage varies, creating a graphic scan profile. The scan profile is the basis for verifying the bar code symbol. - Page 82 • ANSI - American National Standards Institute, 25 West 43rd Street, (between 5th and 6th Avenues), 4 floor, New York, NY 10036, Tel: (212) 642 4900, Fax: (212) 398 0023, http://www.ansi.org/ The Bar Code Book-Reading, Printing and Specification of Bar Code •...
-
Page 83: Chapter 7 - Using Datamatch
Using DataMatch Understanding the DataMatch Feature You can load a database into your Quick Check 600/800 Verifier. Then, when you scan a bar code symbol, you can review not only the scan results, but also any information contained in the database about that scanned symbol. The additional information may be, for example, the name of the product. - Page 84 UPC or upc UPC Code EAN or ean European Article Number CBR or cbr Codabar C39 or c39 Code 39 I25 or i25 Interleaved 2 of 5 C93 or c93 Code 93 Code 128 C11 or c11 Code 11 MSI or msi MSI Code DECODE DECODE is the encoded information that appears on the verifier...
- Page 85 3. Open DataMatch (exe). 4. Select a database file. 5. Select the "Compress/Download" button. Quick Check® 600/800 Series User’s Guide 7 - 3...
-
Page 86: Selecting The Datamatch Feature
6. The program walks you through the download steps and lets you know when the process is finished. Selecting the DataMatch Feature You can enable the verifier to verify symbologies, an application or use DataMatch. You enable DataMatch using the same procedure as you would to select a symbology or an application. -
Page 87: Reviewing Datamatch Results
database match description Xchange Msg wScan – includes just database Match description "Reviewing DataMatch Results" on page 7-5 for an explanation of the options. 6. To change the DataMatch option, press ↓ to move the cursor to the asterisk next to the option you want and then press SELECT until the database option you want appears. - Page 88 7 - 6 Quick Check® 600/800 Series User’s Guide...
-
Page 89: Chapter 8 - Using A Quick Check 800 Verifier
Using a Quick Check 800 Verifier The Quick Check Series 800 Bar Code Verifier is a high performance, professional tool for verifying the readability and standards compliance of printed bar codes in non-contact mode. The Quick Check 800 Verifier units use a handheld linear imaging bar code reader for simple, convenient aim and shoot operation. -
Page 90: Reflectance-Based Information
Reflectance-Based Information When connected to a QC3800V, the Main display indicates the Series 800 verifier model, and the bottom line displays: Linear Imager Once a successful scan is performed, the Main display shows, for example: C39:ABCD012345678 Dim --- Fmt Decod’ty 75% <A> WN Ratio 2.3 OK! Note that the second line, where the reflectance information would normally be displayed, shows... - Page 91 * Print Results * Calculate "X" * % Decoded/Scanned * Change Settings * % Decoded/Scanned When the new option is selected, this screen appears: Symbol Grade: ----- ---% Scans Decoded ---% Scans Passed Decoded nnn of nnn An example of this completed screen would be: Symbol Grade: A-3.8 100% Scans Decoded 95% Scans Passed...
- Page 92 * Change Settings * Test Criteria * #Scans/Symbol: nnn Since the Scan Profile output capability does not exist with the QC3800V connected, the Printer Output screen also changes. The program sequence for that display is: * Change Settings * Output Options * Printout Options * Printer Type: HSP * Printout: Long...
-
Page 93: Chapter 9 - Error, Application, And Type Messages
Error, Application, and Type Messages Type Display Message Printout Message GENERAL BAD # System BAD Number System BAD 2nd Chek BAD 2nd Check Chr BAD Addm Chk BAD Addendum Check BAD AlphaNum BAD AlphanumericField BAD Char Seq BAD Char Sequence BAD Symbol Check Chr BAD CheckChr or Check Charctr Fails BAD... - Page 94 Type Display Message Printout Message DATABASE Match Match NOT in DBase NOT in Database ABCD AdvShipmnt Adv Shipmnt Notice Authoriz # Authorization # BAD ID Char. BAD ID Character BAD UnitMeas BAD Unit of Measure Bookland Bookland DestPostCd Dest. Postal code EAN ITF-14 EAN ITF-14 EAN-13...
- Page 95 Type Display Message Printout Message ECV /VCVS ECV /VCVS Emissn Test Emissions Test Employee# Employee Pass ID EngrChgLv1 Engr change Level Gross Amt. Gross Amount HeatProcss Heat/Process # Internal Internal Only! Len /Weight Length/theor.Wgt MastrSerl# Serial # (Master) MixedSerl# Serial # (MixedLd) Net Amount Net Amount NO Separator...
- Page 96 Type Display Message Printout Message BOOKLAND Andorra Andorra Argentna Argentina BAD Publsh # BAD Publisher # Bangldsh Banglasdesh Botswana Botswana Brazil Brazil Bulgaria Bulgaria Caribben Caribbean Chile Chile China China Colombia Colombia CostaRic Costa Rica Croatia Croatia Cuba Cuba Cyprus Cyprus Czechlov Czechoslovakia...
- Page 97 Type Display Message Printout Message India India Indonesa Indonesia Israel Israel Italy Italy Japan Japan Kenya Kenya Korea Korea Lesotho Lesotho Malawi Malawi Malaysia Malaysia Maldives Maldives Malta Malta Mauritis Mauritius Mexico Mexico Morocco Morocco N.Antils Neth.Antilles Namibia Namibia Netherld Netherlands Message on Display Message on Printout...
- Page 98 Type Display Message Printout Message Singpore Singapore Slovinia Slovinia Spain Spain SriLanka Sri Lanka Suriname Suriname Sweden Sweden Taiwan Taiwan Tanzania Tanznaia Thailand Thailand Tunesia Tunesia Turkey Turkey Unesco Unesco Uruguay Uruguay Venzuela Venezuela Yugoslav Yugoslavia Zambia Zambia CCBBA Attribute Attribute Autol Use AutologusUse Only...
- Page 99 Type Display Message Printout Message Hospital# Hospital # Irradiatd Irradiated NegAntCMV Neg for Anti-CMV NotTransf Not For Transfn Obsolete Fmt Obsolete Format PatientID Pat ID (Blood Bg) PatientID Pat ID (Sample) PatientID Pat ID (Wrist) PersonlID Personnel ID# PrimryBag Primary Col Bag ThPhlebty Frm TherPhlebtmy TrnsfrBag...
- Page 100 Type Display Message Printout Message BAD Descrptr BAD Descriptor BAD Flags BAD Flags BAD Indus.ID BAD Industry ID BAD Quantity BAD Quantity BAD UnitMeas BAD Unit of Measure (EAN ITF) (SCS /ITF) Prim/Sec* Primary/Secondary* Prim/Secd Primary/Secondary Primary Primary Primary* Primary* Provider Provider Provider*...
- Page 101 Type Display Message Printout Message Suffix Suffix VariCon Variable Count Volume Volume Width Width UCC/EAN-128 Area Area BAD Appl.ID BAD Appli.ID BAD Data Chk BAD Data Checksum BAD Start CD BAD Start Code Batch # Batch # Bill To Bill To Buy From Buy From Cell.ESN...
- Page 102 Type Display Message Printout Message ProdDate Production Date Quantity Quantity RollProd Roll Product Serial# Serial # Ship To Ship To SHORT Field SHORT Field Symbol LONG! Symbol Too Long UCC Serl UCC Serial SCS SHORT Field SHORT Field Symbol LONG! Symbol Too Long UCC Serl UCC Serial SCS...
-
Page 103: Chapter 10 - Flow Charts
Flow Charts Quick Check® 600/800 Series User’s Guide 10 - 1... - Page 104 10 - 2 Quick Check® 600/800 Series User’s Guide...
- Page 105 Quick Check® 600/800 Series User’s Guide 10 - 3...
- Page 106 10 - 4 Quick Check® 600/800 Series User’s Guide...
- Page 107 Quick Check® 600/800 Series User’s Guide 10 - 5...
- Page 108 10 - 6 Quick Check® 600/800 Series User’s Guide...
-
Page 109: Chapter 11 - Sstr Codes
SSTR Codes Quick Check® 600/800 Series User’s Guide 11 - 1... - Page 110 11 - 2 Quick Check® 600/800 Series User’s Guide...
-
Page 111: Chapter 12 - Special Codes
Special Codes Quick Check® 600/800 Series User’s Guide 12 - 1... - Page 112 12 - 2 Quick Check® 600/800 Series User’s Guide...
-
Page 113: Chapter 13 - Unrecognized Symbols
Unrecognized Symbols Unrecognized Symbols You can use the “Unrecognized symbology” feature to analyze certain characteristics of bar code symbols that would otherwise be “unreadable” by a bar code scanning system. If the unit cannot decode a symbol, verify that the symbology type you are attempting to read has not been turned off (disabled) in the Settings/Codes menu. - Page 114 13 - 2 Quick Check® 600/800 Series User’s Guide...
-
Page 115: Chapter 14 - Customer Support
"Calibrating the Quick Check 600/800 Verifier" on page 1-12. Technical Assistance If you need assistance installing or troubleshooting your imager, please call your Distributor or the nearest Hand Held Products technical support office: North America/Canada Telephone: (800) 782-4263 (8 a.m. to 6 p.m. EST) Fax number: (315) 554-6705 E-mail: natechsupport@handheld.com... -
Page 116: Online Technical Assistance
Hand Held Products provides service for all its products through service centers throughout the world. To obtain warranty or non-warranty service, return the unit to Hand Held Products (postage paid) with a copy of the dated purchase record attached. Contact the appropriate location below to obtain a Return Material Authorization number (RMA #) before returning the product. -
Page 117: Online Product Service And Repair Assistance
(C) static electricity or electro-static discharge, (D) operation under conditions beyond the specified operating parameters, or (E) repair or service of the product by anyone other than Hand Held Products or its authorized representatives. This warranty shall extend from the time of shipment for the duration published by Hand Held Products for the product at the time of purchase ("Warranty... - Page 118 Held Products determines to its satisfaction that the product is defective due to defects in materials or workmanship, Hand Held Products, at its sole option, will either repair or replace the product without charge, except for return shipping to Hand Held Products.
- Page 120 Hand Held Products, Inc. 700 Visions Drive P.O. Box 208 Skaneateles Falls, NY 13153-0208 QC600-800-UG Rev G 3/07...