Table of Contents
Advertisement
Advertisement
Table of Contents

Related Manuals for AEG MCC 663


Summary of Contents for AEG MCC 663
- Page 1 MCC 663 Microwave oven Instruction manual...
-
Page 2: Dear Customer
Dear customer, Thank you for buying an AEG microwave oven and putting your trust in the AEG brand name. Before using your AEG microwave oven for the first time, please read the instruction book thoroughly. This will enable you to take advantage of all the features that the appliance offers. -
Page 3: Table Of Contents
Contents Important information Ecologically responsible disposal of packaging and old appliances ....... . Safety Instructions General . - Page 4 Contents Modes of operation ......Microwave only ........Notes on microwave power levels .
-
Page 5: Important Information
Packaging materials ¤ AEG microwave ovens require effective packaging to protect them during transportation. Only the minimum packaging necessary is used. Packaging materials (e.g. foil or styrofoam) can place children at risk. Danger of suffocation. Keep packaging material away from children. -
Page 6: Safety Instructions General
AEG approved retailer or the AEG Service Force Centre • Should the door seals and/or door seal surfaces, cord or plug be damaged, the appliance should not be operated until it has been repaired by the AEG Service Force Centre. -
Page 7: Microwaves
Microwaves • Whenever heating liquid, please also place a teaspoon in the container to avoid delayed boiling. During delayed boiling, the boiling temperature is attained without the typical steam bubbles rising. When the container is shaken, even gently, the liquid may then suddenly vigorously boil over or spurt - with the risk of scalding the user. -
Page 8: Grill / Convection
Grill / convection functions • The viewing window heats up during grilling and convection cooking (and in combination with microwave cooking), so keep small children away from the appliance. • The cooking area, the grill heating elements, the rack, and the turntable become very hot during all modes. -
Page 9: General Operating Instructions Suitable Ovenware
General operating instructions Suitable ovenware Ovenware material Mode of operation Micro- Convec- Grill Combination wave tion Ovenproof glass and ceramic dishes (without any metal parts, e.g. Pyrex, oven-to-tableware, pie dish) Non ovenproof glass and porcelain (e.g. table crockery Glass ceramic and vitroceramic made of fire/frostproof material (e.g. -
Page 10: What Else To Note
What else to note... • Food comes in all shapes, sizes and textures. The quantities also vary. For these reasons the time and amount of energy needed to defrost, heat or cook will also vary. As a general rule : Double the quantity/weight = nearly * double the time *Please refer to the cooking charts. -
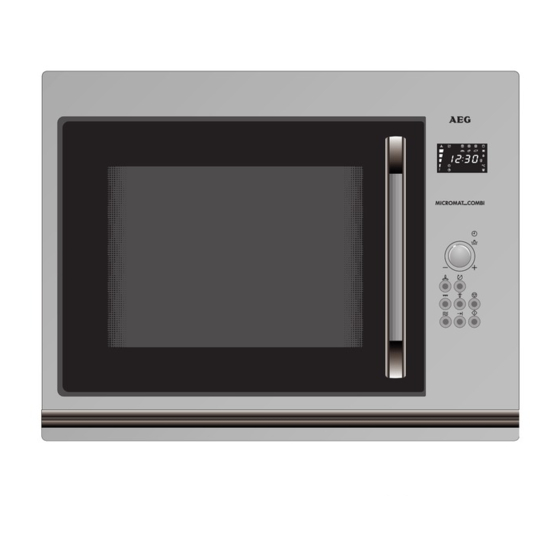
Page 11: Product Description The Appliance
Product Description The appliance A Control panel B Door seal C Door latch and catch D Viewing window E Grill F Turntable G Turntable support H Drive shaft... -
Page 12: Control Panel
The control panel A Display for time of day, function, programme length, power level, temperature, weight, food type, etc. B Selector knob to set the clock, the programme length, the weight when using automatic programmes, the temperature for the convection functions or the end-time to pre- set a programme. -
Page 13: Display
The display 1 2 : 3 0 2 0 0 The display guides you in programming with the following symbols: convection turntable off convection Microwave Grill Grill + microwave + microwave choice of food type for automatic defrosting defrosting symbol weight in grams for automatic programming temperature for clock time... -
Page 14: Accessories
Product Description Accessories The turntable and turntable support should be installed as shown in the diagram. Take care to ensure the turntable support is properly in place. The turntable may turn clockwise or counterclockwise during operation. Do not try to rotate the turntable support manually, as you could damage the drive mechanism. -
Page 15: Before Using The Appliance Cleaning
Before using the appliance Cleaning Wipe over the front of the appliance with a damp cloth. Do not use abrasive cleaning agents (these can damage the surface). For stainless steel fronts use a suitable stainless steel cleaning agent that leaves a protective film against fingerprints. -
Page 16: «At A Glance» Operating Instructions
«At a glance» operating instructions Action Comments 1. Place food in the cooking space. 2. Shut the door. The door will click audibly when it is properly shut. If the door is not shut properly, the appliance will not function. 3. - Page 17 «At a glance» operating instructions Action Comments • Open the door e.g. for stirring. The appliance and interior lighting switch off. •Shut the door and press the START The selected settings remain. The re- button maining time counts down automatically. •Press the CLEAR button once.
-
Page 18: Modes Of Operation
Modes of operation The appliance features the following functions: Microwave In this mode, microwaves generate heat directly in the food. This mode is highly suitable for warming, for example, ready cooked food and drinks, the defrosting of meat or vegetables, and for cooking food like fish and vegetables. -
Page 19: Microwave Only
Modes of operation Microwave Only How to set Example: 1 minute 15 seconds on microwave output level 700 W 1. Press the MICROWAVE button , 900W and the microwave symbol appear in the display together 0 0 : 0 0 with the clock symbol and 00:00. -
Page 20: Notes On Microwave Power Levels
Notes on microwave power levels The following list shows you the power settings and what they can be used for during microwave operation : 900 Watt - heating liquids 700 Watt - to start a cooking sequence, start roasting, stewing, etc. - cooking vegetables - cooking dishes - defrosting and heating of deep frozen ready... -
Page 21: Quick-Start
QUICK-Start How to set The START button provides full microwave power for 1 minute. Each time you push the START button , the programme length is increased by one minute. Example : heating 2 cups of water (2 min) 1. Press the START button twice. The programme time, the microwave symbol and the microwave power level, 0 2 : 0 0 900 W, appear in the display and the programme begins. -
Page 22: Automatic Defrost Programmes
Modes of operation Automatic Defrost Programmes Automatic defrosting programmes are available. After having selected automatic defrosting by pressing the corresponding button , the symbol for Bread/Pastry flashes in the display together with 100g. Press the AUTO DEFROST button again to choose either Meat or Poultry/Fish Enter the weight of the dish, in grams, and press START;... -
Page 23: Grilling
Modes of operation Grilling How to set Example: a 20 minute grill programme 1. Press the GRILL button . The grill symbol appears in the display together with the clock symbol and 0 0 : 0 0 00:00. 2. Set the desired grilling time by using the selector knob, e.g. -
Page 24: Combined Grill And Microwave
Combined Grill and Microwave How to set Example: 20 minutes with 700W microwave power and grill 1. Press the GRILL button . The grill symbol appears in the display together with the clock symbol and 0 0 : 0 0 00:00. -
Page 25: Convection Cooking
Convection cooking How to set Example: a 20 minute convection programme at 200°C 1. Press the CONVECTION button . The corresponding symbol and the pre-set temperature, 150°C, appear in 0 0 : 0 0 the display together with the clock symbol and 00:00. 1 5 0 2. -
Page 26: Combined Convection And Microwave
Combined Convection and Microwave How to set Example: a 20 minute convection programme at 200°C and 150W microwave power 1. Press the CONVECTION button . The corresponding symbol and the pre-set temperature, 150°C, appear in 0 0 : 0 0 the display together with the clock symbol and 00:00. -
Page 27: Preset Programmes
Preset programmes Before programming, check that the clock is set to the correct time. Example : 12:00 To set: Proceed as if setting the desired programme for imme- diate use : 4 5 : 0 0 select your function and programme length (e.g. con- 2 0 0 vection 45 minutes at 200°... -
Page 28: Child Lock
Child lock You may programme “child lock” to prevent unsupervised operation of your oven. To set: Press the PAUSE/CLEAR button for 5 seconds 1 2 : 3 0 with the door open. L O C “L O C ” will appear below the clocktime. To release: Proceed as above : press the PAUSE/CLEAR button 1 2 : 3 1... -
Page 29: Kitchen Timer
Kitchen timer The kitchen timer with bell can also be used as a general purpose reminder. For example, you could use it to set the time it takes to boil the egg that you are cooking on the hob. The timer works without switching on the appliance, as long as no other functions have been selected. -
Page 30: Cooking Charts And Tips Defrosting
Cooking charts and tips Cooking charts and tips Defrosting Dish Weight Power Duration Standing Remarks/Hints in (g) (Watt) (min) time (min) Meat Whole meat 10-15 15-20 Turn once. Cover fatty parts with aluminium foil after 1st half of defrosting time. Steak 5-10 Turn once. -
Page 31: Reheating
Defrosting Description Weight Power Duration Standing Remarks/Hints in (g) (Watt) (min) time (min) Bread Rolls (50g) 4 units Set on a paper towel, turn once. Wholemeal, 1 slice 15-30 s Defrost in a covered loaf mixed, rye (60-80) container. Loaf 15-20 Cover cutting surface. - Page 32 Cooking charts and tips Description Weight Power Duration Standing Remarks/Hints (Watt) (min) time (min) 1 /2 1 portion approx. Heat in covered container, vegetables, 200g stir once. potatoes or rice 1 cup soup approx. Heat clear soup uncovered, 200 ml cover thick soups.
-
Page 33: Cooking
Cooking vegetables Description Weight Liquid Power Duration Standing Remarks/Hints in (g) added (Watt) (min) time (min) Cauliflower 1/8 l 8-10 Dot with butter. Frozen 1/8 l Stalks facing outwards. broccoli Mushrooms none Cut into slices. 1 /2 Frozen peas and carrots Carrots 2-3 tbsp Cut into cubes or slices. -
Page 34: Practical Tips For Use
Cooking Charts and Tips Practical tips for use General • After switching off your appliance, let food stand for a few minutes to allow even heat distribution (standing time). • Remove any aluminium foil or packaging containing metal and/or acces- sories before preparing food (unless specifically stated). -
Page 35: Tips On Microwaving
Tips on microwaving 1. You can’t find cooking details Base programming on a similar type for a specific quantity of food. of food. Lengthen or shorten the cooking time accordingly: Double quantity = almost double time Half quantity = half time 2. -
Page 36: Test Procedures
Cooking Charts and Tips Test procedures (Microwave output power 900 Watt) The quality and operation of microwave ovens are established by recognised test institutes by testing specific dishes. Power Time Standing Comments Nr. 44 566 (min) time Part 2 (min) Defrost and cook 900 Watt Cover. -
Page 37: Grilling
Grilling Table Description Weight Grill Time Notes (gram) (min) Fish mackrel 800-1000 20-25 Brush with oil. Season sardines 6 pieces 20-25 with salt and pepper Meat Sausages 6-8 pieces 20-26 Frozen chopped 4 pieces 23-27 Brush with oil. Season meat 2 Rumpsteak 400 g each 23-27... -
Page 38: Combined Microwave And Grilling
Cooking charts and tips Combined microwave and grilling table Description Weight Dish Microwave Grill Time (in grams) power (min) (watt) Noodle casserole Approx. shallow dish 15-20 500 g pasta Potatoes au gratin Approx. 800 g shallow dish 20-22 potatoes Lasagne Approx. -
Page 39: Baking With The Convection Function
Baking with the convection function Description Mode Temperature Power Time °C (Watt) (min) Cakes in tin Sponge cake 160-170 45-55 Cheese cake 160-170 60-70 residual heat Quiche Lorraine 190-200 40-50 Pastries Fruit flan or tart 200-220 40-50 Cakes baked in a loaf tin 160-180 40-50 Pizza... -
Page 40: Baking Tips
Notes on the baking table The range of baking temperatures and times given are for guidance only, as they are dependent upon the composition of the dough, the quantity and the baking tin size and material. We recommend that you start by using the lower temperature setting. Only select a higher temperature if, for example, you want to brown food more, or if the baking is taking too long. -
Page 41: Cleaning And Care
Cooking charts and tips Cleaning and care The Appliance Exterior Wipe the front of the appliance using a soft cloth and a mild, warm detergent solution. Do not use abrasive cleaning substances, strong detergents or coarse abrasive cleaning materials. Cooking area The interior will remain in good condition for a long time so long as you don't use scouring pads or rough abrasive materials. -
Page 42: What To Do If
- Contact your local AEG Service Force Centre..the interior light is not working ? - Call your local AEG Service Force Centre. The interior light bulb can be exchanged only by trained AEG technicians..the food is taking longer to heat through and cook than before ? -
Page 43: Service And Spare Parts
Service and Spare Parts In the event of your appliance requiring service, or if you wish to purchase spare parts, contact your local AEG Service Force Centre by telephoning: 08705 929 929 Your call will be automatically routed to the Service Centre covering your post code area. -
Page 44: Customer Care
Customer Care For general enquiries concerning your AEG appliance and for further infor- mation regarding AEG appliances please contact us by letter or telephone at the address below or visit our website at www.aeg.co.uk Customer Care Department AEG Domestic Appliances... -
Page 45: Guarantee Conditions
Guarantee Conditions AEG offer the following guarantee to the first purchaser of this appliance. 1. The guarantee is valid for 12 months commencing when the appliance is handed over to the first retail purchaser, which must be verified by purchase invoice or similar documentation. -
Page 46: European Guarantee
European Guarantee If you should move to another country within Europe then your guarantee moves with you to your new home subject to the following qualifications: - The guarantee starts from the date you first purchased your product. - The guarantee is for the same period and to the same extent for labour and parts as exist in the new country of use for this brand or range of products. - Page 48 AEG Hausgeräte GmbH Postfach 1036 D-90327 Nürnberg http: // www.aeg.hausgeraete.de ©Copyright by AEG 2/02 - 99618372...
Need help?
Do you have a question about the MCC 663 and is the answer not in the manual?
Questions and answers