Table of Contents
Advertisement
Advertisement
Table of Contents

Related Manuals for AEG MCC 663


Summary of Contents for AEG MCC 663
- Page 1 MCC 663 Microwave oven Instruction manual...
-
Page 2: Dear Customer
Dear customer, Thank you for buying an AEG microwave oven and putting your trust in the AEG brand name. Before using your AEG microwave oven for the first time, please read the instruction book thoroughly. This will enable you to take advantage of all the features that the appliance offers. -
Page 3: Table Of Contents
Contents Important information Ecologically responsible disposal of packaging and old appliances ....... . Electrical connections . - Page 4 Contents Modes of operation ......Microwave only ........Notes on microwave power levels .
-
Page 5: Important Information
Important information Ecologically responsible disposal of packaging materials and old appliances Packaging materials ¤ AEG microwave ovens require effective packaging to protect them during transportation. Only the minimum packaging necessary is used. Packaging materials (e.g. foil or styrofoam) can place children at risk. Danger of suffocation. - Page 6 A replacement cover / carrier is indicated by the coloured insert at the base of the plug and must be obtained from your local Electrolux Service Centre. IMPORTANT The wires in the mains lead are coloured •...
-
Page 7: Safety Instructions General
• If smoke is observed, keep the oven door closed to extinguish any flames, disconnect the power supply and contact your local AEG Service Force Centre. Never use the microwave oven if it is not functioning properly. • This appliance complies with all relevant safety instructions. In order to maintain the safety of the appliance, repairs should only be carried out by an AEG Service Force Centre. -
Page 8: Microwaves
Always check the temperature before feeding your child to avoid burns. • The hot food in a microwave oven will heat up the ovenware. For this reason always use oven gloves for handling hot dishes. • Never cook your food for too long or at too high a power setting. Some areas of the food can dry out or even ignite. -
Page 9: Grill / Convection
Grill / convection functions • The viewing window heats up during grilling and convection cooking (and in combination with microwave cooking), so keep small children away from the appliance. • The cooking area, the grill heating elements, the wire shelf, the rails and the turntable become very hot during all modes. -
Page 10: General Operating Instructions Suitable Ovenware
General operating instructions Suitable ovenware Ovenware material Ovenproof glass and ceramic dishes (without any metal parts, e.g. Pyrex, oven-to-tableware, glass tray) Non ovenproof glass and porcelain (e.g. table crockery Glass ceramic and vitroceramic made of fire/frostproof material (e.g. Arcoflam) Ovenproof earthenware Plastic, heat-resistant up to 200°C Paper, cardboard... -
Page 11: What Else To Note
What else to note... • Food comes in all shapes, sizes and textures. The quantities also vary. For these reasons the time and amount of energy needed to defrost, heat or cook will also vary. As a general rule : Double the quantity/weight = nearly * double the time *Please refer to the cooking charts. -
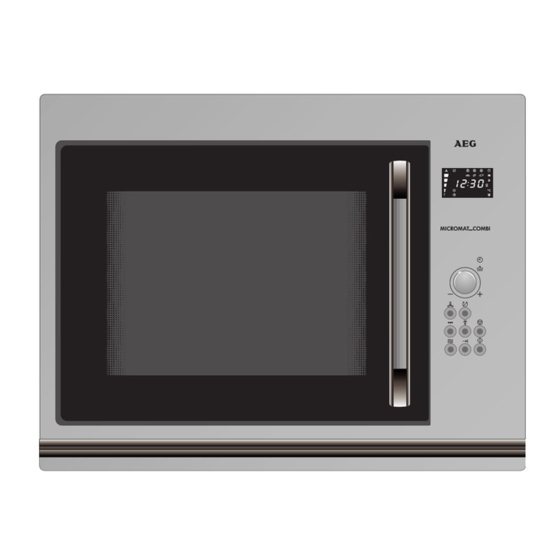
Page 12: Product Description The Appliance
Product Description The appliance A Control panel B Door seal C Door latch and catch D Viewing window E Grill F Turntable support G Drive shaft H Turntable I Shelf support rails... -
Page 13: The Control Panel
The control panel A Display for time of day, function, programme length, power level, temperature, weight, food type, etc. B Selector knob to set the clock, the programme length, the weight when using automatic programmes, the temperature for the convection functions or the end-time to pre- set a programme. -
Page 14: Display
The display The display guides you in programming with the following symbols: convection turntable off choice of food type for automatic defrosting weight in grams for automatic programming clock time end time for presetting programme 1 2 : 3 0 2 0 0 Convection Microwave... -
Page 15: Accessories
Product Description Accessories The turntable and turntable support should be installed as shown in the diagram. Take care to ensure the turntable support is properly in place. The turntable may turn clockwise or counterclockwise during operation. Do not try to rotate the turntable support manually, as you could damage the drive mechanism. -
Page 16: Before Using The Appliance Cleaning
Before using the appliance Cleaning Wipe over the front of the appliance with a damp cloth. Do not use abrasive cleaning agents (these can damage the surface). For stainless steel fronts use a suitable stainless steel cleaning agent that leaves a protective film against fingerprints. -
Page 17: «At A Glance» Operating Instructions
«At a glance» operating instructions Action 1. Place food in the cooking space. 2. Shut the door. 3. Select according to the instructions given on the following pages. 4. If required : switch off the turntable 5. Press the START button End of cooking sequence. - Page 18 «At a glance» operating instructions • Open the door e.g. for stirring. •Shut the door and press the START button •Press the CLEAR button •Press the CLEAR button •Modify the selected cooking time: turn the selector knob clockwise or counterclockwise. •Modify the selected microwave power: press the MICROWAVE button till the desired level appears in the display.
-
Page 19: Modes Of Operation
Modes of operation The appliance features the following functions: Microwave In this mode, microwaves generate heat directly in the food. This mode is highly suitable for warming, for example, ready cooked food and drinks, the defrosting of meat or vegetables, and for cooking food like fish and vegetables. -
Page 20: Microwave Only
Modes of operation Microwave Only How to set Example: 1 minute 15 seconds on microwave output level 700 W 1. Press the MICROWAVE button microwave symbol appear in the display together with the clock symbol microwave power by pressing the MICROWAVE button till the desired microwave power is displayed, e.g. -
Page 21: Notes On Microwave Power Levels
Notes on microwave power levels The following list shows you the power settings and what they can be used for during microwave operation : 900 Watt 700 Watt 600 Watt 400 Watt 150 Watt 80 Watt 0 Watt - heating liquids - to start a cooking sequence, start roasting, stewing, etc. -
Page 22: Quick-Start
QUICK-Start How to set The START button provides full microwave power for 1 minute. Each time you push the START button Example : heating 2 cups of water (2 min) 1. Press the START button twice. The programme time, the microwave symbol and the microwave power level, 900 W, appear in the display and the programme begins. -
Page 23: Automatic Defrost Programmes
Modes of operation Automatic Defrost Programmes Automatic defrosting programmes are available. After having selected automatic defrosting by pressing the corresponding button for Bread/Pastry flashes in the display together with 100g. Press the AUTO DEFROST button again to choose either Meat Enter the weight of the dish, in grams, and press START;... -
Page 24: Grilling
Modes of operation Grilling How to set Example: a 20 minute programme grill level 2 1. Press the GRILL button symbol and the pre-set grill level G G P P 3 3 appear in the display. The clock symbol and 0 0 0 0 : : 0 0 0 0 flash in the display. -
Page 25: Combined Grill And Microwave
Combined Grill and Microwave How to set Example: 20 minutes with 700W microwave power and grill 1. Press the GRILL button symbol and the pre-set grill level G G P P 3 3 appear in the display. The clock symbol and 0 0 0 0 : : 0 0 0 0 flash in the display. -
Page 26: Convection Cooking
Convection cooking How to set Example: a 20 minute convection programme at 200°C 1. Press the CONVECTION button symbol and the pre-set temperature, 150°C, appear in the display together with the clock symbol and 00:00. 2. Set the desired temperature, e.g. 200°C, by pressing the CONVECTION button two times. -
Page 27: Combined Convection And Microwave
Combined Convection and Microwave How to set Example: a 20 minute convection programme at 200°C and 150W microwave power 1. Press the CONVECTION button symbol and the pre-set temperature, 150°C, appear in the display together with the clock symbol and 00:00. 2. -
Page 28: Preset Programmes
Preset programmes Before programming, check that the clock is set to the correct time. Example : 12:00 To set: Proceed as if setting the desired programme for imme- diate use : select your function and programme length (e.g. con- vection 45 minutes at 200° C). Instead of START, press the PRESET PROGRAMME button . -
Page 29: Child Lock
Child lock You may programme “child lock” to prevent unsupervised operation of your oven. To set: Press the PAUSE/CLEAR button with the door open. “L L O O C C ” will appear below the clocktime. To release: Proceed as above : press the PAUSE/CLEAR button for 5 seconds with the door open. -
Page 30: Kitchen Timer
Kitchen timer The kitchen timer with bell can also be used as a general purpose reminder. For example, you could use it to set the time it takes to boil the egg that you are cooking on the hob. The timer works without switching on the appliance, as long as no other functions have been selected. -
Page 31: Cooking Charts And Tips Defrosting
Cooking charts and tips Cooking charts and tips Defrosting Dish Weight in (g) Meat Whole meat Steak Mixed chopped meat Goulash Poultry Chicken 1000 Duck 1500 2000 Fish Whole fish Shrimps/crab Dairy produce Cottage cheese Butter Cheese Cream 200 ml Fruit Strawberries Cherries... -
Page 32: Reheating
Defrosting Description Bread Rolls (50g) Wholemeal, mixed, rye Loaf Pastry Dry cakes eg short crust pastry Fruit flans baked on a baking sheet 450 1 slice cheese cake 1 slice covered apple tart Cream and buttercake Melting of food Chocolate/ toppings Butter Heating of refrigerated food and drink... - Page 33 Cooking charts and tips Description Weight Power Duration Standing Remarks/Hints 1 portion approx. vegetables, 200g potatoes or rice 1 cup soup approx. 200 ml Drinks Milk or baby 200 ml formula Boil 1 cup 180 ml water 1 cup milk 200 ml 1 cup coffee 200 ml...
-
Page 34: Cooking
Cooking vegetables Description Weight Liquid in (g) Cauliflower Frozen broccoli Mushrooms Frozen peas and carrots Carrots Potatoes Kohlrabi Red/green peppers Leeks Frozen Brussel 300 sprouts Sauerkraut Cook all vegetables in a covered container. Cooking fish Description Weight Power in (g) Fish fillets Whole fish The times stated here are for guidance only, and depend on the nature and type of... -
Page 35: Practical Tips For Use
Ready made meals • Ready made meals in metal packages or plastic containers with metal lids should be heated or defrosted in your microwave oven only if they are explicitly marked as being suitable for microwave use. Please follow the operating instructions printed on the packages (e.g. -
Page 36: Tips On Microwaving
Tips on microwaving 1. You can’t find cooking details for a specific quantity of food. 2. The food is too dry. 3. The food is not yet defrosted, heated through or cooked on completion of programme time. 4. The food is overcooked on the outside and undercooked in the middle on completion of cooking time. -
Page 37: Test Procedures
Cooking Charts and Tips Test procedures (Microwave output power 900 Watt) The quality and operation of microwave ovens are established by recognised test institutes by testing specific dishes. Power Nr. 44 566 Part 2 Defrost and cook 900 Watt fish fillets 400 Watt Toast Grill 3... -
Page 38: Grilling
Grilling Table Description Fish mackrel 800-1000 sardines 6 pieces Meat Sausages 6-8 pieces Frozen chopped 4 pieces meat 2 Rumpsteak 400 g each (2-3 cm thick) Snacks Toast Cheese on Toast Toasted snacks Place all dishes on the wire shelf inserted into the 3rd level. Place the wire shelf in the glass tray to catch any drippings. -
Page 39: Combined Microwave And Grilling
Cooking charts and tips Combined microwave and grilling table Description Noodle casserole Potatoes au gratin Lasagne Meatloaf Onion soup au gratin The range of times given are for guidance only, as they are dependent upon the composition and size of the item being cooked, as well as the desired consistency at the end Tips on roasting and grilling The gratin is too dark in colour. -
Page 40: Baking With The Convection Function
Always use the wire shelf or the glass tray inserted in the lowest level. You may use the glass tray supplied with your microwave for the pizzas or pastries. Preheat the microwave oven to the given temperature with the convection function (no microwaves) or follow manufacturer’s cooking instructions... -
Page 41: Baking Tips
Notes on the baking table The range of baking temperatures and times given are for guidance only, as they are dependent upon the composition of the dough, the quantity and the baking tin size and material. We recommend that you start by using the lower temperature setting. Only select a higher temperature if, for example, you want to brown food more, or if the baking is taking too long. -
Page 42: Cleaning And Care
Cooking charts and tips Cleaning and care The Appliance Exterior Wipe the front of the appliance using a soft cloth and a mild, warm detergent solution. Do not use abrasive cleaning substances, strong detergents or coarse abrasive cleaning materials. Do not clean the appliance with a steam cleaner. Cooking area Failure to clean the appliance regularly may damage its surfaces, reduce durability and lead to hazardous operation. -
Page 43: What To Do If
What to do if..the microwave appliance is not working properly ? Check that - the fuses in the fuse box are working, - there has not been a power cut. If the fuses continue to blow, please contact a qualified electrician. - the child lock is not programmed ... -
Page 44: Service And Spare Parts
Service and Spare Parts In the event of your appliance requiring service, or if you wish to purchase spare parts, contact your local UK AEG Service Force Centre by telephoning: 08705 929 929 Your call will be automatically routed to the Service Centre covering your post code area. -
Page 45: Customer Care
UK Customer Care For general enquiries concerning your AEG appliance and for further infor- mation regarding AEG appliances please contact us by letter or telephone at the address below or visit our website at www.aeg.co.uk * calls to this number may be recorded for training purposes. Customer Care Department AEG Domestic Appliances 55-77 High Street... -
Page 46: Guarantee Conditions
Guarantee Conditions Standard guarantee conditions We, AEG, undertake that if within 12 months of the date of the purchase this AEG appliance or any part there of is proved to be defective by reason onlyof faulty workmanship or materials, we will, at our discretion repair or replace the same FREE OF CHARGE for labour, materials or carriage on condition that: The appliance has been correctly installed and used only on the electricity or gas supply stated on the rating plate. -
Page 47: European Guarantee
European Guarantee If you should move to another country within Europe then your guarantee moves with you to your new home subject to the following qualifications: - The guarantee starts from the date you first purchased your product. - The guarantee is for the same period and to the same extent for labour and parts as exists in the new country of use for this brand or range of products. - Page 48 AEG Hausgeräte GmbH Postfach 1036 D-90327 Nürnberg http: // www.aeg.hausgeraete.de © Copyright by AEG 04/03 - 99618375...
Need help?
Do you have a question about the MCC 663 and is the answer not in the manual?
Questions and answers