Table of Contents
Advertisement
Advertisement
Table of Contents

Related Manuals for BH FITNESS LK790


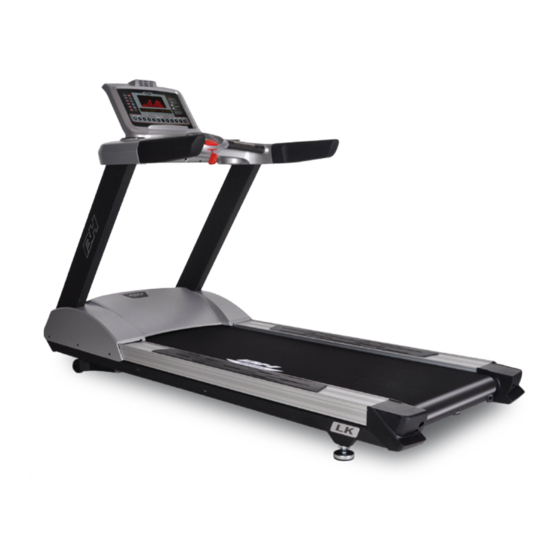
Summary of Contents for BH FITNESS LK790
- Page 1 OWNER’S MANUAL Important: Read all instructions carefully before using this product. Retain this owner’s manual for future reference. BH North America | 20155 Ellipse, Foothill Ranch, California 92610 | p.949.206.0330 | f.949.206.0013 | www.BHFitnessUSA .com...
-
Page 2: Table Of Contents
TABLE OF CONTENTS Title Page Introduction Warnings and Labels Safety Information Exercise Instruction Training Guidelines Suggested Stretches Assembly Instructions Maintenance Console Overview Console Operations Exploded View Drawing Parts List Warranty... -
Page 3: Introduction
CONGRATULATIONS Congratulations on your purchase of BH Fitness equipment. We hope you appreciate the style, quality, and value that exercisers around the world have come to expect from BH Fitness. If you have any questions, concerns or product issues, please call our Customer Service Team at 1-866-325-2339 or email us at CustomerSupport@BHNorthAmerica.com. -
Page 4: Warnings And Labels
WARNINGS AND LABELS Grounded Outlet Ground Pin This product must be grounded. If it malfunctions or breaks down, grounding will provide a path of least resistance for electric current to reduce the risk of electric shock. This cord must be plugged into an appropriate outlet that is properly installed and grounded in accordance with all local codes and ordinances. -
Page 5: Safety Information
Always wear athletic shoes when using the treadmill and tie the laces securely. 6. This treadmill must only be used for the purposes described in this manual. DO NOT use accessories that are not recommended by BH Fitness. 7. Do not place sharp objects near the treadmill. -
Page 6: Exercise Instruction
EXERCISE INSTRUCTION Use of the treadmill offers various benefits; it can improve fitness, muscle tone and when used in conjunction with a calorie controlled diet, it could help you lose weight. 1. Consult your doctor before starting any exercise program. It is advisable to undergo a complete physical examination. -
Page 7: Training Guidelines
TRAINING GUIDELINES Exercise is one of the most important factors in the overall health of an individual. Listed among its benefits are: • Increased capacity for physical work (strength endurance) • Increased cardiovascular (heart and arteries/veins) and respiratory efficiency • Decreased risk of coronary heart disease •... - Page 8 OXYGEN UPTAKE The effort that you can exert over a prolonged period of time is limited by your ability to deliver oxygen to the working muscles. Regular vigorous exercise produces a training effect that can increase your aerobic capacity by as much as 20 to 30%. An increased VO2 Max indicates an increased ability of the heart to pump blood, of the lungs to ventilate oxygen, and of the muscles to take up oxygen.
- Page 9 HEART RATE As you exercise, your heart beat increases. This is often used as a measure of the required intensity of an exercise. You need to exercise hard enough to condition your circulatory system, and increase your pulse rate, but not enough to strain your heart. Your initial level of fitness is important when developing an exercise program for you.
- Page 10 MUSCLE SORENESS For the first week or so, muscle soreness may be the only indication you have that you are on an exercise program. This, of course, does depend on your overall fitness level. A confirmation that you are on the correct program is a very slight soreness in most major muscle groups. This is quite normal and will disappear in a matter of days.
-
Page 11: Suggested Stretches
SUGGESTED STRETCHES Head Rolls Rotate your head to the right for one count while feeling the stretch up the left side of your neck. Next, rotate your head back for one count, stretching your chin to the ceiling. Rotate your head to the left for one count, and finally, drop your head to your chest for one count. - Page 12 SUGGESTED STRETCHES Inner Thigh Stretch Sit with the soles of your feet together with your knees pointing outward. Pull your feet as close into your groin as possible. Gently push your knees towards the floor. Hold for 15 counts. Toe Touches Slowly bend forward from your waist, letting your back and shoulders relax as you stretch toward your toes.
-
Page 13: Assembly Instructions
ASSEMBLY INSTRUCTIONS... - Page 14 ITEM Description Computer Console Frame Left Upright Right Upright Hand Rail Fixture Mp3 Sound Cable ITEM Description Nylock Nut M8xP1.25 Truss Hex Screw (Ø17.5) Truss Hex Screw (Ø13) Allen Bolt M8xP1.25x20 Washer Ø8xØ19x3.0t Spring Washer M8 L-shaped Hex Wrench 6mmx80mmx80mm L-shaped Hex Wrench 5mmx30mmx120mm Socket + Screwdriver...
- Page 15 STEP 1 Remove the Motor Cover to expose the support brackets on the Frame. STEP 2 Note: This drawing is for reference only, Insert the right Upright (D) into the for brake assembly see Parts List and Exploded View Drawing. support bracket on the Frame (B).
- Page 16 STEP 3 Place the Hand Rail Fixture (E) on top of the left and right Uprights. Using Guide Thread the Guide Thread, pull the Control Cable through the opening of the bottom and out the top center of the Control Cable Hand Rail Fixture.
- Page 17 STEP 5 Place the Console (A) above the Hand Rail Fixture and mate all connectors as shown in the figure below, then tighten with bolts (c and l). Be careful not to damage the wires.
- Page 18 Water Bottle Holders STEP 6 Place Water Bottle Holders into the Hand Rail Fixture and twist to lock. STEP 7 Ensure the treadmill is properly leveled by adjusting the leveling feet at the rear of the treadmill. Make sure the treadmill is installed on a level surface.
- Page 19 WATER BOTTLE HOLDER ASSEMBLY Water Bottle Holders The water bottle holder assembly is designed to hold water bottles and small items, such as a MP3 player or a cell phone. The water bottle holders may be removed for cleaning. Hand wash only using a mild soap solution.
-
Page 20: Emergency Stop
EMERGENCY STOP This treadmill is equipped with an emergency stop. The emergency stop button is shown in the drawing below. There are two ways to trigger the emergency stop: 1) Press the emergency stop button to stop the treadmill. 2) Pull the nylon cord and the emergency switch will pop out from the treadmill, stopping the treadmill. -
Page 21: Maintenance
MAINTENANCE LUBRICATION Use the Allen Wrench to loosen the bolt inside the End Cap, giving the belt ample slack. Lift the belt up and apply a thin, even strip of silicone lubricant to the center of the deck. Then re-tension the belt, and adjust the running belt according to the steps on next page. 4 mile/hr below 1 year Average 4~8 mile/hr... -
Page 22: Treadmill Cleaning
ADJUSTING THE BELT If the treadmill is not leveled properly or the belt is not properly tensioned, the belt may shift sideways. The belt was thoroughly checked and adjusted at the factory. However, due to weight differences and individual styles of running, the belt may be prone to shift sideways. If the belt does shift to the left or right, stop the treadmill and adjust the belt as detailed below. -
Page 23: Console Overview
CONSOLE OVERVIEW FIGURE 1 FIGURE 2 8888888888888888 FIGURE 3... -
Page 24: Console Operations
CONSOLE OPERATIONS LAYOUT OF THE CONSOLE (Figure 1) The console is made up of two distinct areas: The top area is for displaying information (see Figure 2 - A,B,C) and the lower area has the function keypads (see Figure 3 - E,F,G). The top LED matrix (A) displays the various pre-programmed exercise profiles as well as the current exertion levels during a workout. - Page 25 Number buttons. Program buttons consist of: Manual, Program 2, Program 3, Program 4, Program 5, Program 6, Program 7, Program 8, Custom (C), Advance Fitness Test (AFT), Intermediate Fitness Test (IFT) & Heart Rate Program (HRP). Fan buttons consist of: OFF/ON and HIGH/LOW Function buttons are used to select a particular exercise, enter data, control exercise exertion levels or finish the exercise (cool down;...
- Page 26 Stop Button - Press this button if you wish to finish the program or end your workout. A summary of all the exercise data will be displayed and will then return to the start screen. Incline Up Button - When pressed during exercise it will increase the level of incline by 1%.
- Page 27 off, press and hold the RESET button located on the console and turn the main power switch (b) to the on position (see Figure A). Figure A 1) CHANGING THE LANGUAGE “LANGUAGE" will appear flashing on the alphanumeric display window. Press the ENTER button and the current language will start flashing.
- Page 28 the next setting. 5) STEADY PULSE RATE TIME “SPR TIME" will appear flashing. Press the ENTER button and a number between 20 and 60 seconds will start flashing. Select the value using the UP/DOWN buttons and then press ENTER to confirm. The word “SPR Time” will start flashing again. Use the UP/DOWN button to continue to the next setting.
-
Page 29: Console Operation
CONSOLE OPERATION STARTING THE FAN This treadmill also features a fan with two speeds (see E in Figure 3), LOW and HIGH. To turn the fan on press the ON/OFF button on the keypad (Figure 3) and the fan will start. - Page 30 With the monitor switched on, the top LED matrix, will show the default profile and the letter “M” for manual. time To enter the setup menu, press and hold both the STOP and ENTER buttons for approximately 4 seconds. The first item displayed is the software version for the treadmill. Press the ENTER button to continue.
- Page 31 confirm. Input your WEIGHT (between 66 and 438 pounds) by using the number buttons. Press ENTER to confirm. Input EXERCISE TIME (between 10 and 60 minutes) using the number buttons. Press ENTER to confirm. This will be shown on the alphanumeric display window and exercise will begin at a speed of 1.2 mph after a 3 second countdown.
- Page 32 P9 CUSTOM PROGRAM With the console switched on, the top LED matrix (see A in Figure 2), will show the default “M” for manual. Use the UP/DOWN arrow buttons to navigate through various profiles. Once program 9 (CUSTOM) has been selected press the ENTER button. Input your AGE by using the number buttons (see G in Figure 3).
- Page 33 P10 – P11 ADVANCED FITNESS & INTERMEDIATE FITNESS TESTS The aim of each test is to assess the user’s fitness level. The difference between the ADVANCED FITNESS TEST (AFT) and INTERMEDIATE FITNESS TEST (IFT) is the programmed level of intensity. With the console switched on, the top LED matrix (see A in Figure 2), will show the default “M”...
- Page 34 The treadmill has an automatic fault correction system. If the problem persists please contact BH North America for service. BH FITNESS RESERVES THE RIGHT TO MODIFY THE SPECIFICATIONS OF ITS PRODUCTS WITHOUT PRIOR NOTICE.
- Page 35 MANUAL CUSTOM ADVANCED FITNESS TEST INTERMEDIATE FITNESS TEST HEART RATE PROGRAM...
-
Page 36: Exploded View Drawing
EXPLODED VIEW DRAWING... -
Page 38: Parts List
PARTS LIST DESCRIPTION QTY/SET DESCRIPTION QTY/SET Computer Assembly Compression Spring Frame Assembly Safety Switch Base Nylon Nut M8xP1.25 Safety Switch Sliding Base Extension Wire(White) 14AWGx90x2t Upright Assembly(Left) Stuff Holder Assembly Upright Assembly(Right) Hand Pulse Plastic Set(Upper) Truss Hex Screw Hand Pulse Plastic Set(Lower) Truss Hex Screw M8xP1.25x20 Round Head Philips Self Tapping Screw ø3x25 Iron Core Ring... - Page 39 PARTS LIST CONTINUED QTY/SE DESCRIPTION QTY/SET DESCRIPTION Belt 3.6mmx163mm Black Power Switch Truss Philips Screw M5xP0.8x12 Power Cord Hand Grip Tube Assembly(Left) Power Cord Switch Cover Hand Grip Basic Seat Plastic (Left) Hand Grip Tube Assembly (Right) Hand Grip Basic Seat Plastic Truss Philips Screw M4xP0.7x10 (Right) Hand Grip Basic Seat Plastic(Right) Hand Grip Basic Seat Plastic(Right)
-
Page 40: Warranty
For more detailed warranty information or to register your product warranty easily online, visit our website at: www.BHFitnessUSA.com FOR WARRANTY REPAIRS, PLEASE DO NOT TAKE YOUR MACHINE BACK TO THE RETAIL STORE. CONTACT BH FITNESS FIRST. BH North America Corporation 20155 Ellipse Foothill Ranch, CA 92610 Phone: 949.206.0330;...
Need help?
Do you have a question about the LK790 and is the answer not in the manual?
Questions and answers
I want wiring diagram sk7950