Avery Dennison AP4.4 User Manual
Hide thumbs
Also See for AP4.4:
- User manual (23 pages) ,
- User & service manual (11 pages) ,
- User manual (16 pages)
Table of Contents
Advertisement
05/09 Rev. 5.02-01
Installing the Printer ...................................... 2
Unpacking the printer ................................ 2
Carrying the Printer ................................... 2
Check the Delivery .................................... 3
Removing the Transportation Lock ........... 6
Product Description ....................................... 7
Operating Parts AP 4.4 / AP 5.4 basic ....... 7
Internal Rewinder ...................................... 9
Internal Rewinder .................................... 11
Arrangement of the Connections ........... 12
Warning Signs at the Printer ................... 14
Control Panel (Display) ........................... 15
Operating State ....................................... 16
USER MANUAL
AP4.4 - AP5.4
Basic Operating Procedures .......................18
Connecting the Printer .............................18
Setting the Interface .................................19
Activate/Deactivate Dispenser .................20
Configure Dispenser ...............................21
Operation in Offline Mode ........................21
Operation in Online Mode ........................22
Creating a Print job ..................................23
Transferring a Print Job ...........................23
Using CF Cards (AP 5.4) .........................24
Setting the Realtime Clock (AP 5.4) .........26
(AP 5.4) ....................................................26
Advertisement
Table of Contents

Related Manuals for Avery Dennison AP4.4


Summary of Contents for Avery Dennison AP4.4
-
Page 1: Table Of Contents
05/09 Rev. 5.02-01 USER MANUAL AP4.4 – AP5.4 Setup & Operation Installing the Printer ........2 Basic Operating Procedures .......18 Unpacking the printer ........ 2 Connecting the Printer ......18 Carrying the Printer ........2 Setting the Interface .........19 Check the Delivery ........3 Activate/Deactivate Internal Rewinder ..19... -
Page 2: Setup & Operation
05/09 Rev. 5.02-01 USER MANUAL Setup & Operation AP4.4 – AP5.4 Installing the Printer Unpacking the printer 1. Remove all loose objects from the packaging. 2. Carefully lift the printer together with the polystyrene cushions out of the box. Have a second person keep hold of the box while you remove the printer. -
Page 3: Check The Delivery
05/09 Rev. 5.02-01 USER MANUAL Setup & Operation AP4.4 – AP5.4 Check the Delivery You are bound to want to start using your new AP 4.4/5.4 as soon as possible. However, we would ask you to take a few minutes to check the following: Please ensure that the printer has not been damaged in transit. - Page 4 05/09 Rev. 5.02-01 USER MANUAL Setup & Operation AP4.4 – AP5.4 • Size 10 torx screwdriver [3G] Tool which is used to replace the print roller and to mount a dispensing edge. AP 5.4 with Cutter Cutter [4] Only if you ordered the “AP 5.4 peripheral with cutter”.
- Page 5 05/09 Rev. 5.02-01 USER MANUAL Setup & Operation AP4.4 – AP5.4 AP 5.4 Dispenser • Printer with mounted dispensing edge • Housing front part, bottom side with screw [6A]. • Cutter flange cover with screws [6B]. • Deflector [6C]. Enables the AP 5.4 Dispenser to be operated with internal (label material) rewinder.
-
Page 6: Removing The Transportation Lock
05/09 Rev. 5.02-01 USER MANUAL Setup & Operation AP4.4 – AP5.4 Removing the Transportation Lock 1. Open the printer lid. 2. Remove the cable tie holding the printhead in place [7A]. For this, use side- cutting pliers or strong scissors. -
Page 7: Product Description
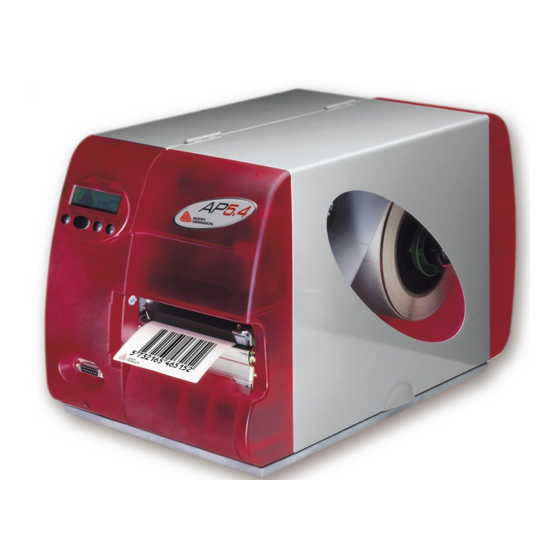
05/09 Rev. 5.02-01 USER MANUAL Setup & Operation AP4.4 – AP5.4 Product Description Operating Parts AP 4.4 / AP 5.4 basic [8] Exterior view of the AP 5.4. A Control panel: LCD graphics display, 4 buttons; displays printer operating status, enables parameter menu settings. - Page 8 05/09 Rev. 5.02-01 USER MANUAL Setup & Operation AP4.4 – AP5.4 [9] AP 5.4 operating parts. A Foil unwinding roll mandrel: Holds the new foil roll. B Foil take-up roll mandrel: Holds the backing paper onto which used foils are wound.
-
Page 9: Operating Parts Ap 5.4 Dispenser / Internal Rewinder
05/09 Rev. 5.02-01 USER MANUAL Setup & Operation AP4.4 – AP5.4 Operating parts AP 5.4 Dispenser / Internal Rewinder AP 5.4 Dispenser [10] Additional operating parts of the „AP 5.4 Dispenser“. A Dispensing edge: Peels the labels off the backing paper. - Page 10 05/09 Rev. 5.02-01 USER MANUAL Setup & Operation AP4.4 – AP5.4 AP 5.4 Internal Rewinder [11] Additional operating parts of the „AP 5.4 Internal Rewinder“. A Deflector: Deflects the printed label web without dispensing any labels. B Deflector: Deflects the label web.
-
Page 11: Modes Of Operation Ap 5.4 Dispenser / Internal Rewinder
05/09 Rev. 5.02-01 USER MANUAL Setup & Operation AP4.4 – AP5.4 Modes of Operation AP 5.4 Dispenser / Internal Rewinder With the AP 5.4 featuring an internal rewinding module, a label can either be dispensed (using the dispensing edge) or rewound into the printer housing (using the deflector) after it is printed. -
Page 12: Arrangement Of The Connections
05/09 Rev. 5.02-01 USER MANUAL Setup & Operation AP4.4 – AP5.4 Arrangement of the Connections CAUTION! - Additional equipment of poor quality can damage the printer Connect only devices that fulfill SELV circuit requirements to EN 60950. Connect only original accessories. - Page 13 05/09 Rev. 5.02-01 USER MANUAL Setup & Operation AP4.4 – AP5.4 D Keyboard connection: In offline mode, the keyboard can be used for data input and print job selection. E Centronics connection: For parallel transfer of print data. F USB connection: For serial transfer of print data.
-
Page 14: Warning Signs At The Printer
05/09 Rev. 5.02-01 USER MANUAL Setup & Operation AP4.4 – AP5.4 Warning Signs at the Printer WARNING Pinch point. Keep hands clear of rollers. A5346 [13] Warning signs at the AP 4.4/5.4. The warning sign pictured in [13] above warns of the risk of getting hands, fin- gers, loose clothing, jewellery, etc. -
Page 15: Control Panel (Display)
05/09 Rev. 5.02-01 USER MANUAL Setup & Operation AP4.4 – AP5.4 Control Panel (Display) [14] Control panel for the AP 5.4. A Display With 32 digits and two lines, the display shows the operating conditions (modi) for parameters, values, status and errors. You can select the lan- guage you want to use for the display. -
Page 16: Operating State
05/09 Rev. 5.02-01 USER MANUAL Setup & Operation AP4.4 – AP5.4 – Additionally, directs to deeper levels within the menu structure and se- lects menu items – Enlarges values F Prog Button – Calls up the parameters menu when offline –... - Page 17 05/09 Rev. 5.02-01 USER MANUAL Setup & Operation AP4.4 – AP5.4 To stop printing, press the online button. Message Mode The printer uses the message mode to signal an error or a particular operating status. Message mode indicates that the printer is waiting to quit or for a fault to be corrected.
-
Page 18: Basic Operating Procedures
05/09 Rev. 5.02-01 USER MANUAL Setup & Operation AP4.4 – AP5.4 Basic Operating Procedures Connecting the Printer WARNING! Printer is driven by mains voltage! Touching of live parts can cause life- threatening body currents and burns! Make sure, that the machine is switched off, before connecting the po- wer cable. -
Page 19: Setting The Interface
05/09 Rev. 5.02-01 USER MANUAL Setup & Operation AP4.4 – AP5.4 5. By pressing the online button you can switch to the online mode: ONLINE 0 JOBS SYSTEM PARAMETER > Turn-on mode When the parameter is set to Online, the... -
Page 20: Activate/Deactivate Dispenser
05/09 Rev. 5.02-01 USER MANUAL Setup & Operation AP4.4 – AP5.4 Possible Errors Shortly after activating the internal rewinder, the following error message may be displayed: Status 5004 Rewinder mat. tear Possible causes: • No printing material has been inserted, or the material’s end was not fixed to the rewinder. -
Page 21: Configure Dispenser
05/09 Rev. 5.02-01 USER MANUAL Setup & Operation AP4.4 – AP5.4 Configure Dispenser Application A The label is dispensed so that a small portion still sticks to the backing paper above the dispensing edge. After the dispensed label has been removed by hand, the next label is immediately printed and dispensed. -
Page 22: Operation In Online Mode
05/09 Rev. 5.02-01 USER MANUAL Setup & Operation AP4.4 – AP5.4 • Feed material until the next punch is reached or as long as the button is held down: OFFLINE x JOBS OFFLINE x JOBS Feed feeding… • Setting the label length automatically:... -
Page 23: Creating A Print Job
05/09 Rev. 5.02-01 USER MANUAL Setup & Operation AP4.4 – AP5.4 • Standalone operation: Selecting a print job stored on a CF card (e.g., Test- dat.FOR): Choose a file ONLINE x JOBS Online Prog Testdat.FOR Creating a Print job Essentially, there are two ways of creating a print job: Either by using the AP 4.4/5.4 printer driver for Windows or by creating a text file with print com-... -
Page 24: Using Cf Cards (Ap 5.4)
05/09 Rev. 5.02-01 USER MANUAL Setup & Operation AP4.4 – AP5.4 Rename the print job file on the CF card autostrt.for so that the printer can rec- ognize it. Once this is finished, the printer will complete the print job as soon as it is set online. - Page 25 05/09 Rev. 5.02-01 USER MANUAL Setup & Operation AP4.4 – AP5.4 Slim guide notch Wide guide notch [15] Example of a 32MB CF-card. Inserting a CF card 1. Switch off the printer. Wait for 5 seconds. 2. Insert the CompactFlash card completely into the card insert. The wide guide notch should face upwards [16].
-
Page 26: Setting The Realtime Clock (Ap 5.4)
05/09 Rev. 5.02-01 USER MANUAL Setup & Operation AP4.4 – AP5.4 Setting the Realtime Clock (AP 5.4) The AP 5.4 realtime clock can be used to calculate and to print the expiration date of any perishable goods. Read here how to set the realtime clock: SYSTEM PARAMETERS >...
Need help?
Do you have a question about the AP4.4 and is the answer not in the manual?
Questions and answers