
Related Manuals for Sonnet Qio Professional Universal Media Reader & Writer


Summary of Contents for Sonnet Qio Professional Universal Media Reader & Writer
- Page 1 Windows User’s Guide ® for Qio Professional Universal Media Reader & Writer ™ Windows...
-
Page 3: Table Of Contents
2 Qio Enclosure Description......................2 3 Hardware Installation and Connection Steps................3 A – Express Bus Extender PCIe Installation Steps B – Connect Qio to a Desktop Computer B – Connect Qio to a Laptop Computer 4 BIOS Setup and Software Installation Steps................5 A – BIOS Settings Change for Desktop Users A – BIOS Settings Change for Laptop Users B – Software Download C – SxS Drivers Installation D – P2 Drivers Installation E – SATA Drivers Installation 5 Memory Card and Adapter Card Use................... 8 Inserting and Removing Cards All Card Types Inserting/Removing SxS Media and ExpressCard/34 Adapters Inserting/Removing P2 Media Inserting/Removing CF (CompactFlash) Cards Using the Sonnet PCIe Bus Extender ExpressCard/34 Adapter SxS and P2 Memory Card Write Protect Switches 6 Formatting Drives Connected to the Qio..................9 Drive Formatting Overview 7 Tips and Known Issues......................10 Tips Known Issues 8 Specifications, Precautions, FCC Compliance, and Support Information........11 Specifications Safety Precautions FCC Compliance Contacting Customer Service... -
Page 5: Introduction And Package Contents
ExpressCard/34 adapter 2 – Q io universal professional media reader/writer (enclosure) 3 – Carrying case 4 – 1 -meter external PCIe x1 interface cable 5 – S onnet Multimedia Memory Card Reader & Writer ExpressCard/34 6 – U niversal 12V power supply with 10-foot cable Package Contents—QIO-PCIE 1 – Sonnet Express Bus Extender PCIe adapter card 2 – Q io universal professional media reader/writer (enclosure) 3 – Carrying case 4 – 1 -meter external PCIe x1 interface cable 5 – S onnet Multimedia Memory Card Reader & Writer ExpressCard/34 6 – U niversal 12V power supply with 10-foot cable... -
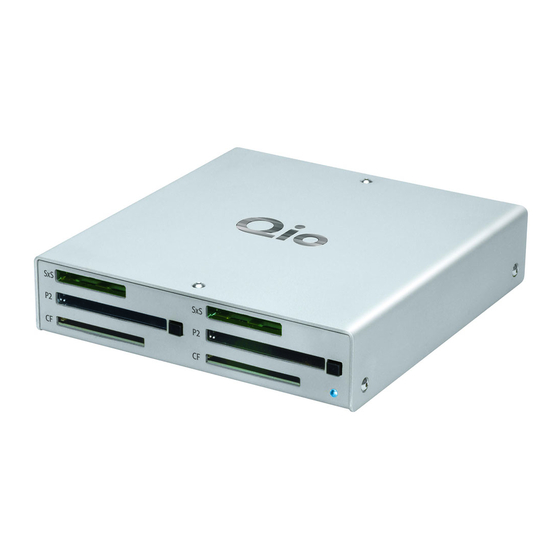
Page 6: Qio Enclosure Description
Chapter 2 – Qio Enclosure Description 1 – Power Indicator LED 3 – P2 Media Slots This indicator lights when Qio is powered, the Sonnet adapter These slots accept P2 memory cards card is installed properly in its slot, the PCIe cable between the two is plugged in properly, and the computer powered on 4 – Eject Buttons for P2 Media Slots Press these buttons to eject cards from the P2 slots 2 – SxS Media Slots These slots accept both SxS memory cards and ExpressCard/34 5 – CF (CompactFlash) Card Slots adapter cards. Use the included Sonnet multimedia memory These slots accept Type I CF memory cards. Qio is not card adapter in these slots to work with Memory Stick, SDXC, compatible with Type II (Microdrive, etc.;... -
Page 7: Hardware Installation And Connection Steps
A – Express Bus Extender PCIe Installation Steps your body, do not walk around the room until after you If you purchased the QIO-PCIE, install the PCIe adapter card into finish installing the Qio and close the computer. your computer first. Otherwise, skip to the next page. 5. Remove the Sonnet card from its packaging, and then install 1. Shut down your computer, and then touch an expansion it into the slot; make sure the card is firmly seated and card access cover on the back of the computer to discharge secured. any potentially damaging static electricity. -
Page 8: B - Connect Qio To A Laptop Computer
Chapter 3 – Hardware Installation and Connection Steps B – Connect Qio to a Laptop Computer Connect the PCIe Bus Extender ExpressCard/34 adapter and the Qio enclosure in the proper order, before you turn on your computer: 1. Connect the external PCIe x1 interface cable to the PCIe Bus Extender ExpressCard/34 adapter. 2. Insert the PCIe Bus Extender ExpressCard/34 adapter into your computer’s ExpressCard slot. 3. Connect the other end of the interface cable to the Qio enclosure. 4. Connect either the AC adapter or the optional XLR power cable (connected to a battery or other power source). -
Page 9: Bios Setup And Software Installation Steps
ROM in the computer’s BIOS. It may be necessary to disable at least ROM in the computer’s BIOS, and possibly move the Sonnet card to one additional option ROM to support all of the Qio’s features. If a different slot. -
Page 10: C - Sxs Drivers Installation
1. Open the Qio Installers folder, and then open the P2Winx64 7. Restart the computer. folder if you are using a 64-bit version of Windows; otherwise, open the P2Winx32 folder. 8. Click Start > Control Panel. In the Control Panel window, click Device Manager. If you haven’t disabled User Account 2. Double-click Setup.exe to launch the installer. Control (UAC), a UAC window will appear; click Continue. 3. When the Open File – Security Warning window appears, click 9. When the Device Manager window appears, click the arrow Run. next to Storage Controllers to expand the list. If “Sonnet Tempo SATA QIO PCI Express Adapter” appears in the list, 4. When the Panasonic P2 Drivers InstallShield Wizard window your installation is complete and the Qio is ready to use. appears, click Next. Otherwise, go to the next step. 5. When the License Agreement window appears, read the 10. Click the arrow next to IDE ATA/ATAPI controllers to agreement, select “I accept the terms in the license expand the list. If there is only one “Standard Dual Channel agreement”, and then click Next. PCI IDE Controller” listed, double-click it and then skip to step 14. Otherwise, go to the next step. - Page 11 18. When the Install from Disk window appears, click Browse. 19. When the Locate File window appears, navigate to the Tempo SATA Installer folder. If you are using a 64-bit version of Windows, double-click the amd64 folder; otherwise, double- click the i386 folder. Select “mvsata”, and then click open. 20. Back in the Install from Disk window, click OK. 21. Back in the Select device driver you want to install for this hardware window, the model will have changed to read “Sonnet Tempo SATA QIO PCI Express Adapter”. Click Next; a Windows Security window may appear. Click Install; the drivers are installed. 22. When the Windows has successfully updated your driver software window appears, click Close. 23. Restart the computer; the Qio is ready for use. S upport Note: After its drivers have been updated, Device Manager identifies Qio’s SATA controller as a...
-
Page 12: Memory Card And Adapter Card Use
Only change the write protect switch position when the card is not inserted Inserting/Removing P2 Media into the Qio • T o insert a card, push it into the slot until it stops; the eject button next to the slot will pop out • B efore physically removing a P2 memory card, be sure to “eject” it first by clicking it in the taskbar and selecting Safely Remove Hardware > Safely remove Panasonic P2 Card; otherwise, data on the memory card may be corrupted • To remove a P2 card, push in the eject button next to the slot Using the Sonnet PCIe Bus Extender ExpressCard/34 Adapter • A lways connect the external PCIe x1 interface cable to the PCIe Bus Extender ExpressCard/34 adapter before inserting it into your computer’s ExpressCard slot • D o not eject the PCIe Bus Extender ExpressCard/34 adapter from your computer unless the computer is shut off... -
Page 13: Formatting Drives Connected To The Qio
Chapter 6 – Formatting Drives Connected to the Qio Drive Formatting Overview If you intend to format drives connected to the Qio using Windows drive formatting tools, you may find much more information by using “format volume” as the search item in Windows Help. The procedure listed below describes the process of formatting and configuring drives under Windows Vista; steps for formatting under Windows 7 are very similar. 1. Turn on your storage system, start Windows, log in, and then click Start > Control Panel. 2. In the Control Panel window, double-click Administrative Tools. If you have not disabled User Account Control (UAC), a UAC window will appear; click Continue. 3. In the Administrative Tools window, double-click Computer Management. Figure 1 4. In the Computer Management window, click Disk Management under Storage to launch the Disk Management application. 5. If an Initialize Disk window appears or if disks are described as not initialized, select a partition style for the attached drive(s), and then click OK; the drive will be initialized (Figure 1). Repeat as necessary with other drives attached to the Qio. 6. Right-click the field next to the name field of one of the attached drives and select the formatting type you wish to use for it. Repeat as necessary with other drives attached to the Qio (Figure 2). 7. Depending on the formatting type you chose, a New Partition Wizard may appear; follow the onscreen instructions to complete formatting of the drive(s). Once formatting is finished, the drives are ready to use. Figure 2... -
Page 14: Tips And Known Issues
Chapter 7 – Tips and Known Issues Tips Known Issues Hot-Plugging SxS, P2, and SD Cards Depending on Which Slot You Installed the Sonnet Internal You may hot-plug and hot-swap SxS, P2, and SD memory cards Express Bus Extender PCIe card, CompactFlash (CF) Cards May Appear as Disabled (by way of the included Sonnet Multimedia Memory Card Reader & Writer ExpressCard/34) in and out of the Qio enclosure. There is a very limited resource in PCI I/O space in PCs, and However, you must follow proper procedures for ejecting volumes depending on the slot you installed the card, there may not be or else you may lose data on the card or cause your computer to enough I/O space for the CF drivers to start. This can often be behave unexpectedly. Do not insert cards into the Qio enclosure fixed by moving the Internal Express Bus Extender PCIe card to a while your computer is sleeping. -
Page 15: Specifications, Precautions, Fcc Compliance, And Support Information
Service, have the following information available so our customer service staff can better assist you: Weight (Qio Enclosure) 1.1 lbs (0.5 kg) • Product name RoHS Compliant • Date and place of purchase • Hard drive model(s) * S upport for up to 16 drives requires the use of drive chassis • Computer model employing a hardware RAID controller (like Sonnet's Fusion • Operating system version D400QR5 or R400QR5). • Software/firmware versions SAFETY PRECAUTIONS If further assistance is needed, please contact Sonnet Customer Please read this section carefully before proceeding. These Service at: precautions explain the correct and safe use of this device, Online Service Form: http://serviceform.sonnettech.com thereby helping to prevent injury to you or others, and also help Tel: 1-949-472-2772 you to minimize the risk of damaging the device. (Monday–Friday, 7 a.m.–4 p.m. Pacific Time) Fax: 1-949-457-6349 Warnings E-mail: support@sonnettech.com Always follow the basic warnings listed here to avoid the risk of serious injury or death from electrical shock, short-circuiting, fire, For Customers Outside the USA and other hazards. These warnings include, but are not limited to: For support on this product, contact your reseller or local distributor. - Page 16 ©2011 Sonnet Technologies, Inc. All rights reserved. Sonnet, the Sonnet logotype, Creativity Stored Here, Simply Fast, the Simply Fast logotype, Fusion, Qio, and Tempo are trademarks of Sonnet Technologies, Inc. FireWire, Mac, the Mac logo, Mac OS, and MacBook are trademarks of Apple Inc., registered in the United States and other countries. Memory Stick and SxS are trademarks of Sony Corporation.
Need help?
Do you have a question about the Qio Professional Universal Media Reader & Writer and is the answer not in the manual?
Questions and answers